Manual
Page 2
... Picture Mode 46 • Adjusting Picture Settings 47 • Changing the Picture Size 48 • Changing the Picture Options 56 • Setting up the TV with Your PC 68 • Changing the Preset Sound Mode 72 • Adjusting Sound Settings 73 • Selecting the Sound Mode 86 Preference • Connecting to a Wired Network 88 • Setting the Network • Connecting to a Wireless Network • Setting the Time • Locking Programme • Economical Solutions • Other Features • Picture In Picture (PIP) • Support...
... Picture Mode 46 • Adjusting Picture Settings 47 • Changing the Picture Size 48 • Changing the Picture Options 56 • Setting up the TV with Your PC 68 • Changing the Preset Sound Mode 72 • Adjusting Sound Settings 73 • Selecting the Sound Mode 86 Preference • Connecting to a Wired Network 88 • Setting the Network • Connecting to a Wireless Network • Setting the Time • Locking Programme • Economical Solutions • Other Features • Picture In Picture (PIP) • Support...
Manual
Page 51
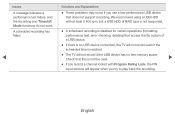
NN NOTE ●● When Double (à, Œ) mode has been set in PIP (Picture-in-Picture), the Picture Size cannot be set. ●● Depending on the input source, the picture size options may vary. ●● The available items may differ depending on the selected mode. ●● When connecting a PC, only 16:9 and 4:3 modes can be adjusted. ●● Settings can be adjusted and stored for each external device connected to an ◀ input on the TV. ▶ English
NN NOTE ●● When Double (à, Œ) mode has been set in PIP (Picture-in-Picture), the Picture Size cannot be set. ●● Depending on the input source, the picture size options may vary. ●● The available items may differ depending on the selected mode. ●● When connecting a PC, only 16:9 and 4:3 modes can be adjusted. ●● Settings can be adjusted and stored for each external device connected to an ◀ input on the TV. ▶ English
Manual
Page 54
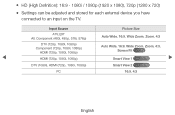
... Input Source Picture Size ATV, EXT AV, Component (480i, 480p, 576i, 576p) Auto Wide, 16:9, Wide Zoom, Zoom, 4:3 DTV (720p, 1080i, 1080p) Component (720p, 1080i, 1080p) HDMI (720p, 1080i, 1080p) Auto Wide, 16:9, Wide Zoom, Zoom, 4:3, Screen Fit for DTV ◀ HDMI (720p, 1080i, 1080p) Smart View 1 for LED TV ▶ DTV (1080i), HDMI (720p, 1080i, 1080p) Smart View 2 for each external device you have connected to...
... Input Source Picture Size ATV, EXT AV, Component (480i, 480p, 576i, 576p) Auto Wide, 16:9, Wide Zoom, Zoom, 4:3 DTV (720p, 1080i, 1080p) Component (720p, 1080i, 1080p) HDMI (720p, 1080i, 1080p) Auto Wide, 16:9, Wide Zoom, Zoom, 4:3, Screen Fit for DTV ◀ HDMI (720p, 1080i, 1080p) Smart View 1 for LED TV ▶ DTV (1080i), HDMI (720p, 1080i, 1080p) Smart View 2 for each external device you have connected to...
Manual
Page 94
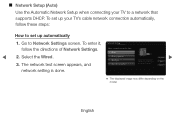
... Foot Connection Connect to Network Settings screen. ■■ Network Setup (Auto) Use the Automatic Network Setup when connecting your TV's cable network connection automatically, follow the directions of Network Settings. Wired ◀ 2. English To set up your TV to set up automatically 1. To enter it, Network Setting follow these steps: How to a network that the LAN cable is done. ●● The displayed image may differ depending on the model. Please make sure that supports...
... Foot Connection Connect to Network Settings screen. ■■ Network Setup (Auto) Use the Automatic Network Setup when connecting your TV's cable network connection automatically, follow the directions of Network Settings. Wired ◀ 2. English To set up your TV to set up automatically 1. To enter it, Network Setting follow these steps: How to a network that the LAN cable is done. ●● The displayed image may differ depending on the model. Please make sure that supports...
Manual
Page 106
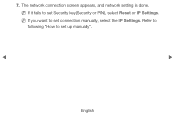
NN If it fails to set up manually". ◀ ▶ English The network connection screen appears, and network setting is done. Refer to following "How to set connection manually, select the IP Settings. 7. NN If you want to set Security key(Security or PIN), select Reset or IP Settings.
NN If it fails to set up manually". ◀ ▶ English The network connection screen appears, and network setting is done. Refer to following "How to set connection manually, select the IP Settings. 7. NN If you want to set Security key(Security or PIN), select Reset or IP Settings.

Manual
Page 114
... Network Settings screen. Previous Next Cancel the TV near the WiFi transmitter giving a gap ◀ no more than 25cm. ●● The displayed image may differ depending on the power of wireless router and TV. To enter it, follow the directions of your Wireless Router supports One Foot Connection. Select the One Foot Connection. 3. Network Setting 1. How to set up using One Foot Connection Turn on the model...
... Network Settings screen. Previous Next Cancel the TV near the WiFi transmitter giving a gap ◀ no more than 25cm. ●● The displayed image may differ depending on the power of wireless router and TV. To enter it, follow the directions of your Wireless Router supports One Foot Connection. Select the One Foot Connection. 3. Network Setting 1. How to set up using One Foot Connection Turn on the model...
Manual
Page 118
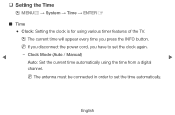
Clock Mode (Auto / Manual) ▶ Auto: Set the current time automatically using various timer features of the TV. OO The current time will appear every time you have to set the clock again. ◀ -- NN If you disconnect the power cord, you press the INFO button. NN The antenna must be connected in order to set the time automatically. English ❑❑ Setting the Time OO MENUm → System → Time → ENTERE ■■ Time ●● Clock: Setting the clock is for using the time from a digital channel.
Clock Mode (Auto / Manual) ▶ Auto: Set the current time automatically using various timer features of the TV. OO The current time will appear every time you have to set the clock again. ◀ -- NN If you disconnect the power cord, you press the INFO button. NN The antenna must be connected in order to set the time automatically. English ❑❑ Setting the Time OO MENUm → System → Time → ENTERE ■■ Time ●● Clock: Setting the clock is for using the time from a digital channel.
Manual
Page 119
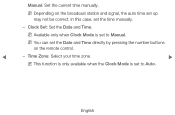
NN Available only when Clock Mode is set to Auto. Time Zone: Select your time zone. ▶ NN This function is only available when the Clock Mode is set to Manual. NN Depending on the remote control. ◀ -- English In this case, set up may not be correct. NN You can set the Date and Time directly by pressing the number buttons on the broadcast station and signal, the auto time set the time manually. -- Clock Set: Set the Date and Time. Manual: Set the current time manually.
NN Available only when Clock Mode is set to Auto. Time Zone: Select your time zone. ▶ NN This function is only available when the Clock Mode is set to Manual. NN Depending on the remote control. ◀ -- English In this case, set up may not be correct. NN You can set the Date and Time directly by pressing the number buttons on the broadcast station and signal, the auto time set the time manually. -- Clock Set: Set the Date and Time. Manual: Set the current time manually.

Manual
Page 122
... Thu Fri Sat Setup: Select Off, Once, Everyday, Time Mon~Fri, Mon~Sat, Sat~Sun or Manual to activate Antenna Channel the timer. If you select Manual, Source ◀ you can be made. English Close 12:00 20 TV DTV ▶ 3 N The c mark indicates the day is selected. ● The displayed image may differ depending on timer settings can set up the day...
... Thu Fri Sat Setup: Select Off, Once, Everyday, Time Mon~Fri, Mon~Sat, Sat~Sun or Manual to activate Antenna Channel the timer. If you select Manual, Source ◀ you can be made. English Close 12:00 20 TV DTV ▶ 3 N The c mark indicates the day is selected. ● The displayed image may differ depending on timer settings can set up the day...

Manual
Page 149
...; be set. ▶ ●● For PIP sound, refer to the Sound Select instructions. ●● If you turn the TV off while watching in PIP mode, the PIP window will disappear. ●● PIP is not supported in the same mode. ❑❑ Picture In Picture (PIP) OO MENUm → System → PIP → ENTERE ■■ PIP t You can watch the TV tuner and one external video source simultaneously.
...; be set. ▶ ●● For PIP sound, refer to the Sound Select instructions. ●● If you turn the TV off while watching in PIP mode, the PIP window will disappear. ●● PIP is not supported in the same mode. ❑❑ Picture In Picture (PIP) OO MENUm → System → PIP → ENTERE ■■ PIP t You can watch the TV tuner and one external video source simultaneously.
Manual
Page 175
Before using 3D function... NN NOTE ●● 3D mode is automatically disabled in following cases: when changing a channel or the input source, or accessing SMART HUB or e-Manual. ●● 3D Mode is set to its memorised configuration value automatically when you changing the input source. ●● Some Picture functions are disabled in 3D mode. ◀ ●● PIP is not supported in 3D mode. ▶ English
Before using 3D function... NN NOTE ●● 3D mode is automatically disabled in following cases: when changing a channel or the input source, or accessing SMART HUB or e-Manual. ●● 3D Mode is set to its memorised configuration value automatically when you changing the input source. ●● Some Picture functions are disabled in 3D mode. ◀ ●● PIP is not supported in 3D mode. ▶ English

Manual
Page 191
NN The Ticker function allows you to access the Internet service while watching ▶ TV. NN Depending on the TV. Channel Bound Service (Off / On): Some channels support applications as an ◀ Internet data service, allowing you to view content from the current input source and ticker data at the same time. NN Only available if supported by the broadcaster English ●● Service Manager Ticker Autorun (Off / On): You can set Ticker Autorun to come on when powering on your country, Ticker application may have a different service or not be supported.
NN The Ticker function allows you to access the Internet service while watching ▶ TV. NN Depending on the TV. Channel Bound Service (Off / On): Some channels support applications as an ◀ Internet data service, allowing you to view content from the current input source and ticker data at the same time. NN Only available if supported by the broadcaster English ●● Service Manager Ticker Autorun (Off / On): You can set Ticker Autorun to come on when powering on your country, Ticker application may have a different service or not be supported.
Manual
Page 223
... is connected to an audio receiver that supports the ARC function. ●● When following the connection above, the Optical jack only outputs 2 channel ◀ audio. English You will only hear sound from the Home Theatre's Front, Left and Right ▶ speakers and the subwoofer. NN NOTE ●● Connect the Optical cable between the DIGITAL AUDIO OUT (OPTICAL) jack on your TV and the Digital Audio Input on the DVD / Satellite Box (i.e.
... is connected to an audio receiver that supports the ARC function. ●● When following the connection above, the Optical jack only outputs 2 channel ◀ audio. English You will only hear sound from the Home Theatre's Front, Left and Right ▶ speakers and the subwoofer. NN NOTE ●● Connect the Optical cable between the DIGITAL AUDIO OUT (OPTICAL) jack on your TV and the Digital Audio Input on the DVD / Satellite Box (i.e.
Manual
Page 295
... mode. ▶ •• Check whether the remote control is Anynet+ compatible. •• Anynet+ doesn't work in certain situations. (Searching channels, operating My Contents or Plug & Play (initial setup), etc.) •• When connecting or removing the HDMI cable, please make sure to search devices again or turn your TV off and on . English The Anynet+ system supports Anynet+ devices only. •• Only one receiver...
... mode. ▶ •• Check whether the remote control is Anynet+ compatible. •• Anynet+ doesn't work in certain situations. (Searching channels, operating My Contents or Plug & Play (initial setup), etc.) •• When connecting or removing the HDMI cable, please make sure to search devices again or turn your TV off and on . English The Anynet+ system supports Anynet+ devices only. •• Only one receiver...

Manual
Page 299
Use HDMI or Component cables to deliver HD (high definition) picture quality. •• Cable / Satellite subscribers: Try HD stations from the channel line up scaled from SD(Standard Definition) contents. •• Adjust the Cable/Set top box video output resolution to 1080i or 720p. •• Make sure you have an analogue cable / set top box, upgrade to a digital set top box. Issues Solutions and Explanations The TV image does not...
Use HDMI or Component cables to deliver HD (high definition) picture quality. •• Cable / Satellite subscribers: Try HD stations from the channel line up scaled from SD(Standard Definition) contents. •• Adjust the Cable/Set top box video output resolution to 1080i or 720p. •• Make sure you have an analogue cable / set top box, upgrade to a digital set top box. Issues Solutions and Explanations The TV image does not...
Manual
Page 305
... the SOURCE button on the TV remote. There is HDMI, it should be connected to an HDMI input on . •• Be sure to the wall outlet and the TV. •• When watching TV from an antenna or cable connection, the TV will turn off automatically. For example, if an ▶ external device's output is no signal. •• Check cable connections (remove and reconnect all cables connected to...
... the SOURCE button on the TV remote. There is HDMI, it should be connected to an HDMI input on . •• Be sure to the wall outlet and the TV. •• When watching TV from an antenna or cable connection, the TV will turn off automatically. For example, if an ▶ external device's output is no signal. •• Check cable connections (remove and reconnect all cables connected to...

Manual
Page 306
... resolutions supported by the TV. This is distorted: macro •• Compression of video contents may cause picture distortion, especially block error, small block, dots, with fast moving pictures such as sports and action movies. ◀ pixelization. •• A low signal can cause picture distortion. Issues Solutions and Explanations RF (Cable / Antenna) Connection The TV is not receiving all available channels to the channel list. Plug & Play (Initial setup...
... resolutions supported by the TV. This is distorted: macro •• Compression of video contents may cause picture distortion, especially block error, small block, dots, with fast moving pictures such as sports and action movies. ◀ pixelization. •• A low signal can cause picture distortion. Issues Solutions and Explanations RF (Cable / Antenna) Connection The TV is not receiving all available channels to the channel list. Plug & Play (Initial setup...
Manual
Page 310
... even if the scheduled time is not the case. ▶ •• If you record a channel locked with Program Rating Lock, the PIN input window will not record if the USB device has no free memory space. Check that access the file system of RAID type is not supported. •• A scheduled recording is disabled for certain operations (formatting, performance test, error checking, deleting) that...
... even if the scheduled time is not the case. ▶ •• If you record a channel locked with Program Rating Lock, the PIN input window will not record if the USB device has no free memory space. Check that access the file system of RAID type is not supported. •• A scheduled recording is disabled for certain operations (formatting, performance test, error checking, deleting) that...

Manual
Page 314
... wall, we recommend using overly rigid or thick cables. Make sure the cables are lost after 30 •• If the TV is in the Plug & Play (Initial setup) procedure. audio or video. •• Loss of •• Check the cable connections and reconnect them. Press the SOURCE button to select TV mode, and go to Home Use mode in the Store Demo mode, it will reset audio and picture...
... wall, we recommend using overly rigid or thick cables. Make sure the cables are lost after 30 •• If the TV is in the Plug & Play (Initial setup) procedure. audio or video. •• Loss of •• Check the cable connections and reconnect them. Press the SOURCE button to select TV mode, and go to Home Use mode in the Store Demo mode, it will reset audio and picture...

Manual
Page 315
The TV operates the OTA (Over The Aerial) function itself to upgrade firmware downloaded whilst your watching TV. English The PIP menu is not available. •• This is part of the product's design and is not a defect. •• PIP functionality is only available when you are using a HDMI, PC or components source. again. Issues Solutions and Explanations You see small particles when...
The TV operates the OTA (Over The Aerial) function itself to upgrade firmware downloaded whilst your watching TV. English The PIP menu is not available. •• This is part of the product's design and is not a defect. •• PIP functionality is only available when you are using a HDMI, PC or components source. again. Issues Solutions and Explanations You see small particles when...


