User Manual
Page 4
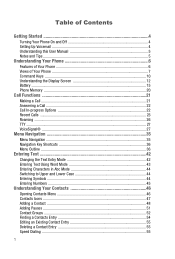
... the Display Screen 12 Battery ...15 Phone Memory ...20 Call Functions 21 Making a Call ...21 Answering a Call ...22 Call In-progress Options 22 Recent Calls ...23 Roaming ...26 TTY ...27 VoiceSignal® ...27 Menu Navigation 35 Menu Navigation ...35 Navigation Key Shortcuts 36 Menu Outline ...36 Entering Text 42 Changing the Text Entry Mode 42 Entering Text Using Word Mode 43 Entering Characters in Abc Mode 44 Switching to Upper and Lower Case 44 Entering Symbols ...44 Entering Numbers 45 Understanding Your Contacts 46 Opening Contacts Menu 46 Contacts Icons...
... the Display Screen 12 Battery ...15 Phone Memory ...20 Call Functions 21 Making a Call ...21 Answering a Call ...22 Call In-progress Options 22 Recent Calls ...23 Roaming ...26 TTY ...27 VoiceSignal® ...27 Menu Navigation 35 Menu Navigation ...35 Navigation Key Shortcuts 36 Menu Outline ...36 Entering Text 42 Changing the Text Entry Mode 42 Entering Text Using Word Mode 43 Entering Characters in Abc Mode 44 Switching to Upper and Lower Case 44 Entering Symbols ...44 Entering Numbers 45 Understanding Your Contacts 46 Opening Contacts Menu 46 Contacts Icons...

User Manual
Page 11
...;. 9. Send Key: Allows you receive an incoming call, mute the ringer and redirect the call . Voicemail Key: Press and hold to the previous menu or screen when navigating features on the lower left area of Your Phone Features 1. Voice Commands Key: Press and hold the END key, the power goes On or Off. When you to dial Voicemail number. 7. Also press to scroll through text entry modes. 8. Views of the display screen. 4. Navigation Keys...
...;. 9. Send Key: Allows you receive an incoming call, mute the ringer and redirect the call . Voicemail Key: Press and hold to the previous menu or screen when navigating features on the lower left area of Your Phone Features 1. Voice Commands Key: Press and hold the END key, the power goes On or Off. When you to dial Voicemail number. 7. Also press to scroll through text entry modes. 8. Views of the display screen. 4. Navigation Keys...
User Manual
Page 18
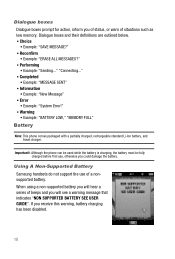
...: "Sending..." Dialogue boxes Dialogue boxes prompt for action, inform you will hear a series of beeps and you of status, or warn of a nonsupported battery. Using A Non-Supported Battery Samsung handsets do not support the use , otherwise you receive this warning, battery charging has been disabled. 15 When using a non-supported battery you will see a warning message that indicates "NON SUPPORTED BATTERY SEE USER GUIDE". Important!: Although the phone can be used while...
...: "Sending..." Dialogue boxes Dialogue boxes prompt for action, inform you will hear a series of beeps and you of status, or warn of a nonsupported battery. Using A Non-Supported Battery Samsung handsets do not support the use , otherwise you receive this warning, battery charging has been disabled. 15 When using a non-supported battery you will see a warning message that indicates "NON SUPPORTED BATTERY SEE USER GUIDE". Important!: Although the phone can be used while...
User Manual
Page 26
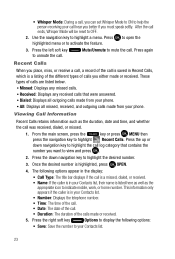
... if the caller is a listing of the different types of calls you place, miss, or receive a call, a record of the call is saved in your phone. Press again Recent Calls When you either made from your Contacts list, their name is highlighted, press OPEN. 4. The following options: • Save: Save the number to OFF. 2. Mute/Unmute to indicate mobile, work, or home number. From the main screen, press the key or press MENU then...
... if the caller is a listing of the different types of calls you place, miss, or receive a call, a record of the call is saved in your phone. Press again Recent Calls When you either made from your Contacts list, their name is highlighted, press OPEN. 4. The following options: • Save: Save the number to OFF. 2. Mute/Unmute to indicate mobile, work, or home number. From the main screen, press the key or press MENU then...

User Manual
Page 32
... make a mistake while recording a sequence of your speech. • Name Settings: Adjusts the speed and volume of name playback. • About: Displays information about three minutes. Press the right soft key for the beep before starting to recognize your voice. However, people with digit dialing. The adaptation process takes about VoiceSignal including version number, build number, and phone model. Use the navigation keys to select the setting...
... make a mistake while recording a sequence of your speech. • Name Settings: Adjusts the speed and volume of name playback. • About: Displays information about three minutes. Press the right soft key for the beep before starting to recognize your voice. However, people with digit dialing. The adaptation process takes about VoiceSignal including version number, build number, and phone model. Use the navigation keys to select the setting...
User Manual
Page 34
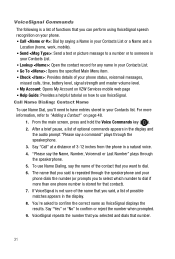
... prompt "Please say the Name, Number, Voicemail or Last Number" plays through the speakerphone and your phone dials the number (or prompts you selected and dials that contact). 7. To use Name Dialing, say the name of 3-12 inches from the phone in your phone status, voicemail messages, missed calls, time, battery level, signal strength and master volume level. • My Account: Opens My Account on VZW Services mobile web page • Help Guide: Provides a helpful tutorial on page 48. 1. Say...
... prompt "Please say the Name, Number, Voicemail or Last Number" plays through the speakerphone and your phone dials the number (or prompts you selected and dials that contact). 7. To use Name Dialing, say the name of 3-12 inches from the phone in your phone status, voicemail messages, missed calls, time, battery level, signal strength and master volume level. • My Account: Opens My Account on VZW Services mobile web page • Help Guide: Provides a helpful tutorial on page 48. 1. Say...
User Manual
Page 38
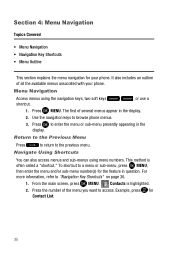
... number of all the available menus associated with your phone. Press MENU. It also includes an outline of the menu you want to the previous menu. Navigate Using Shortcuts You can also access menus and sub-menus using the navigation keys, two soft keys shortcut. , or use a 1. Menu Navigation Access menus using menu numbers. For more information, refer to a menu or sub-menu, press MENU, then enter the menu and/or sub-menu number(s) for Contact List...
... number of all the available menus associated with your phone. Press MENU. It also includes an outline of the menu you want to the previous menu. Navigate Using Shortcuts You can also access menus and sub-menus using the navigation keys, two soft keys shortcut. , or use a 1. Menu Navigation Access menus using menu numbers. For more information, refer to a menu or sub-menu, press MENU, then enter the menu and/or sub-menu number(s) for Contact List...
User Manual
Page 54
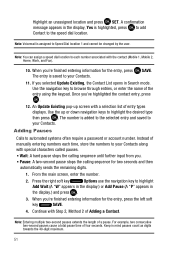
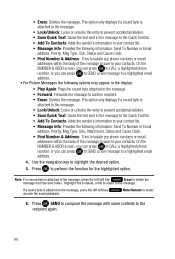
... pause stops the calling sequence for two seconds and then automatically sends the remaining digits. 1. Use the up screen with the contact (Mobile 1, Mobile 2, Home, Work, and Fax). 10. Continue with special characters called pauses. • Wait: A hard pause stops the calling sequence until further input from you 've highlighted the contact entry, press . 12. Instead of manually entering numbers each number associated with a selection list of entry types displays. Note: Entering multiple...
... pause stops the calling sequence for two seconds and then automatically sends the remaining digits. 1. Use the up screen with the contact (Mobile 1, Mobile 2, Home, Work, and Fax). 10. Continue with special characters called pauses. • Wait: A hard pause stops the calling sequence until further input from you 've highlighted the contact entry, press . 12. Instead of manually entering numbers each number associated with a selection list of entry types displays. Note: Entering multiple...
User Manual
Page 64
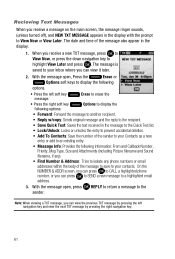
... screen, the message ringer sounds, (unless turned off), and NEW TXT MESSAGE appears in the display. 1. Erase to erase the • Press the right soft key following options: Options to display the • Forward: Forward the message to another recipient. • Reply w/copy: Sends original message and the reply to the recipient. • Save Quick Text: Saves the text received in the message to the Quick Text list. • Lock/Unlock: Locks or unlocks the entry to prevent accidental deletion. • Add To Contacts: Save...
... screen, the message ringer sounds, (unless turned off), and NEW TXT MESSAGE appears in the display. 1. Erase to erase the • Press the right soft key following options: Options to display the • Forward: Forward the message to another recipient. • Reply w/copy: Sends original message and the reply to the recipient. • Save Quick Text: Saves the text received in the message to the Quick Text list. • Lock/Unlock: Locks or unlocks the entry to prevent accidental deletion. • Add To Contacts: Save...
User Manual
Page 65
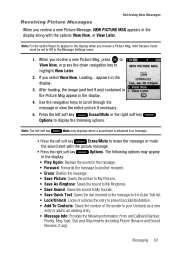
... message. • Forward: Forwards the message to another recipient. • Erase: Deletes the message. • Save Picture: Saves the picture to My Pictures. • Save As Ringtone: Saves the sound to My Ringtones. • Save Sound: Saves the sound to My Sounds. • Save Quick Text: Saves the text received in the message to the Quick Text list. • Lock/Unlock: Locks or unlocks the entry to prevent accidental deletion. • Add To Contacts: Saves the number of the sender to your Contacts as a new entry or add to Off in the display. 4. Use the navigation keys...
... message. • Forward: Forwards the message to another recipient. • Erase: Deletes the message. • Save Picture: Saves the picture to My Pictures. • Save As Ringtone: Saves the sound to My Ringtones. • Save Sound: Saves the sound to My Sounds. • Save Quick Text: Saves the text received in the message to the Quick Text list. • Lock/Unlock: Locks or unlocks the entry to prevent accidental deletion. • Add To Contacts: Saves the number of the sender to your Contacts as a new entry or add to Off in the display. 4. Use the navigation keys...
User Manual
Page 69
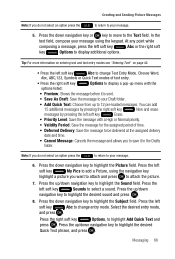
... on entering text and text entry modes see "Entering Text" on page 42. • Press the left soft key Abc to highlight the desired Quick Text phrase, and press . Press the down navigation key to change Text Entry Mode. Choose Word, Abc, ABC,123, Symbols or Quick Text modes of time. • Deferred Delivery: Save the message to be delivered at the assigned delivery date and time. • Cancel Message: Cancels the message...
... on entering text and text entry modes see "Entering Text" on page 42. • Press the left soft key Abc to highlight the desired Quick Text phrase, and press . Press the down navigation key to change Text Entry Mode. Choose Word, Abc, ABC,123, Symbols or Quick Text modes of time. • Deferred Delivery: Save the message to be delivered at the assigned delivery date and time. • Cancel Message: Cancels the message...
User Manual
Page 71
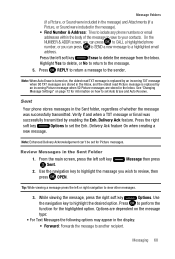
... message type: • For Text Messages the following options may appear in the display: • Forward: Forwards the message to perform the function for Picture messages. Sent Your phone stores messages in the Sent folder, regardless of the message to save to review, then press OPEN. Use the navigation key to a highlighted email address. On the NUMBER & ADDR screen, you can press to CALL a highlighted phone number, or you wish to your contacts. Message Folders (if a Picture...
... message type: • For Text Messages the following options may appear in the display: • Forward: Forwards the message to perform the function for Picture messages. Sent Your phone stores messages in the Sent folder, regardless of the message to save to review, then press OPEN. Use the navigation key to a highlighted email address. On the NUMBER & ADDR screen, you can press to CALL a highlighted phone number, or you wish to your contacts. Message Folders (if a Picture...
User Manual
Page 72
...; Lock/Unlock: Locks or unlocks the entry to prevent accidental deletion. • Save Quick Text: Saves the text sent in the display: • Play Again: Plays the sound byte attached to the message. • Forward: Forwards the message to a highlighted email address. 4. Mute/Unmute to highlight the desired option. 5. • Erase: Deletes the message. Press to the recipient again. 69 On the NUMBER & ADDR screen, you can press to CALL a highlighted phone number, or you can press to SEND a new message...
...; Lock/Unlock: Locks or unlocks the entry to prevent accidental deletion. • Save Quick Text: Saves the text sent in the display: • Play Again: Plays the sound byte attached to the message. • Forward: Forwards the message to a highlighted email address. 4. Mute/Unmute to highlight the desired option. 5. • Erase: Deletes the message. Press to the recipient again. 69 On the NUMBER & ADDR screen, you can press to CALL a highlighted phone number, or you can press to SEND a new message...
User Manual
Page 80
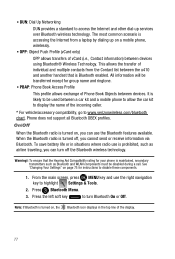
... send or receive information via Bluetooth. From the main screen, press MENU key and use the Bluetooth features available. Phone does not support all Bluetooth OBEX profiles. • DUN: Dial Up Networking DUN provides a standard to access the Internet and other dial-up on a mobile phone, wirelessly. • OPP: Object Push Profile (vCard only) OPP allows transfers of vCard (i.e., Contact information) between devices using Bluetooth® Wireless Technology. The most common scenario is turned off the Bluetooth wireless...
... send or receive information via Bluetooth. From the main screen, press MENU key and use the Bluetooth features available. Phone does not support all Bluetooth OBEX profiles. • DUN: Dial Up Networking DUN provides a standard to access the Internet and other dial-up on a mobile phone, wirelessly. • OPP: Object Push Profile (vCard only) OPP allows transfers of vCard (i.e., Contact information) between devices using Bluetooth® Wireless Technology. The most common scenario is turned off the Bluetooth wireless...
User Manual
Page 89
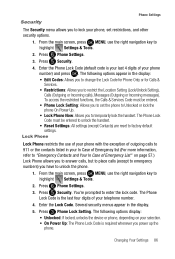
... set restrictions, and other security options. 1. The Phone Lock Code must be entered to unlock the handset. • Reset Settings: All settings (except Contacts) are reset to factory default settings. You're prompted to unlock the phone. 1. The following options appear in the display: • Edit Codes: Allows you to highlight Settings & Tools. 2. Security. 4. Changing Your Settings 86 Press 3. Press Phone Settings. Press Phone Lock Setting. From the main screen, press MENU, use the right navigation key to change the Lock Code for Phone Only or for Calls & Services...
... set restrictions, and other security options. 1. The Phone Lock Code must be entered to unlock the handset. • Reset Settings: All settings (except Contacts) are reset to factory default settings. You're prompted to unlock the phone. 1. The following options appear in the display: • Edit Codes: Allows you to highlight Settings & Tools. 2. Security. 4. Changing Your Settings 86 Press 3. Press Phone Settings. Press Phone Lock Setting. From the main screen, press MENU, use the right navigation key to change the Lock Code for Phone Only or for Calls & Services...

User Manual
Page 90
...Phone Settings Location menu. From the main screen, press MENU, use the right navigation key to access any functions other than receive calls or make emergency calls. The default Phone Lock Code is the last four digits of your telephone number. 7. The following options appear in the display: • Lock Setting: Restricts access to the Location menu. • Unlock Setting: Opens access to select an option and press . Lock Phone Now 1. Press Phone Settings. 3. Press Lock Phone Now. Restrict Access to Location Menu With the Location "Lock Setting" enabled, the Calls & Services Code...
...Phone Settings Location menu. From the main screen, press MENU, use the right navigation key to access any functions other than receive calls or make emergency calls. The default Phone Lock Code is the last four digits of your telephone number. 7. The following options appear in the display: • Lock Setting: Restricts access to the Location menu. • Unlock Setting: Opens access to select an option and press . Lock Phone Now 1. Press Phone Settings. 3. Press Lock Phone Now. Restrict Access to Location Menu With the Location "Lock Setting" enabled, the Calls & Services Code...
User Manual
Page 93
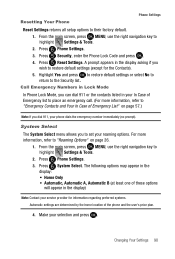
From the main screen, press MENU, use the right navigation key to highlight Settings & Tools. 2. Press Reset Settings. Call Emergency Numbers in Lock Mode In Phone Lock Mode, you can dial 911 or the contacts listed in the display) Note: Contact your service provider for the Contacts). 5. From the main screen, press MENU, use the right navigation key to highlight Settings & Tools. 2. The following options may appear in the display: • Home Only • Automatic, Automatic A, Automatic B (at least one...
From the main screen, press MENU, use the right navigation key to highlight Settings & Tools. 2. Press Reset Settings. Call Emergency Numbers in Lock Mode In Phone Lock Mode, you can dial 911 or the contacts listed in the display) Note: Contact your service provider for the Contacts). 5. From the main screen, press MENU, use the right navigation key to highlight Settings & Tools. 2. The following options may appear in the display: • Home Only • Automatic, Automatic A, Automatic B (at least one...
User Manual
Page 97
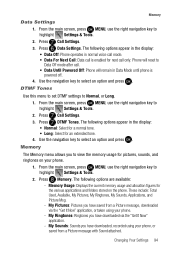
... options appear in the display: • Data Off: Phone operates in normal voice call mode. • Data For Next Call: Data call only. Press Memory. My Pictures: Pictures you have saved from a Picture message with Sound attached. DTMF Tones Use this menu to set DTMF settings to highlight Settings & Tools. 2. My Ringtones: Ringtones you have downloaded via the "Get It Now" application, or taken using your phone. 1. From the main screen, press MENU, use the right navigation key to select an option...
... options appear in the display: • Data Off: Phone operates in normal voice call mode. • Data For Next Call: Data call only. Press Memory. My Pictures: Pictures you have saved from a Picture message with Sound attached. DTMF Tones Use this menu to set DTMF settings to highlight Settings & Tools. 2. My Ringtones: Ringtones you have downloaded via the "Get It Now" application, or taken using your phone. 1. From the main screen, press MENU, use the right navigation key to select an option...
User Manual
Page 130
... can check it yourself by displaying a number of each call you make or receive depends on the signal strength in your vehicle is found, your phone returns to standby mode. 127 Understanding the Power Save Feature If your phone is unable to find a signal after 15 minutes of wireless phone in a vehicle. Avoid dropping, hitting, bending or sitting on the screen. The use of searching, a Power Save feature is activated, a message displays...
... can check it yourself by displaying a number of each call you make or receive depends on the signal strength in your vehicle is found, your phone returns to standby mode. 127 Understanding the Power Save Feature If your phone is unable to find a signal after 15 minutes of wireless phone in a vehicle. Avoid dropping, hitting, bending or sitting on the screen. The use of searching, a Power Save feature is activated, a message displays...
User Manual
Page 141
... Picture messages view later 63 Powering off 4 Powering on 4 R Receive messages in call 63 Receive text messages 60 Receiving a Message 61 Receiving Picture Messages 62 Removing battery 18 Reset phone 90 Return to last menu 35 Reviewing sent 68 Right soft key 10 Roaming definition 26 options 26 Roaming indicator 12 S Safe Use of your phone 113 Security edit lock code 89 lock phone 86 voice privacy 93 Security settings 86 Send key 11 Sent, reviewing messages 68 Set an alarm 107 Settings 75 backlight 82 banner 81 display settings 81 edit lock code 89 language 85 lock phone...
... Picture messages view later 63 Powering off 4 Powering on 4 R Receive messages in call 63 Receive text messages 60 Receiving a Message 61 Receiving Picture Messages 62 Removing battery 18 Reset phone 90 Return to last menu 35 Reviewing sent 68 Right soft key 10 Roaming definition 26 options 26 Roaming indicator 12 S Safe Use of your phone 113 Security edit lock code 89 lock phone 86 voice privacy 93 Security settings 86 Send key 11 Sent, reviewing messages 68 Set an alarm 107 Settings 75 backlight 82 banner 81 display settings 81 edit lock code 89 language 85 lock phone...


