
User Manual
Page 2
... that the manufacturer holds no responsibility for [Removable Disk].(p.99) If you will need to set up the camera driver Before connecting the camera to a PC, via the USB cable, you use a card reader to copy the images on the memory card to turn on the memory card due to your PC, the images... could be sure to use the supplied USB cable to connect the camera to the use of images on . When transferring the images taken with the camera to your PC, be damaged. If the power is contained in the following order Set up the...
... that the manufacturer holds no responsibility for [Removable Disk].(p.99) If you will need to set up the camera driver Before connecting the camera to a PC, via the USB cable, you use a card reader to copy the images on the memory card to turn on the memory card due to your PC, the images... could be sure to use the supplied USB cable to connect the camera to the use of images on . When transferring the images taken with the camera to your PC, be damaged. If the power is contained in the following order Set up the...
User Manual
Page 9
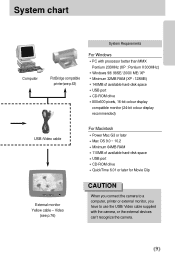
System chart Computer System Requirements PictBridge compatible printer(see p.76) CAUTION When you connect the camera to a computer, printer or external monitor, you have to use the USB/ Video cable supplied with processor better than MMX Pentium 233MHz (XP : Pentium II 300MHz) Windows 98/ 98SE/ 2000/ ME/ XP Minimum 32MB RAM (XP : 128MB) 140MB...
System chart Computer System Requirements PictBridge compatible printer(see p.76) CAUTION When you connect the camera to a computer, printer or external monitor, you have to use the USB/ Video cable supplied with processor better than MMX Pentium 233MHz (XP : Pentium II 300MHz) Windows 98/ 98SE/ 2000/ ME/ XP Minimum 32MB RAM (XP : 128MB) 140MB...
User Manual
Page 12
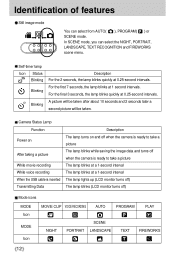
... Icon MOVIE CLIP VOICE RECORDING AUTO PROGRAM PLAY NIGHT SCENE PORTRAIT LANDSCAPE TEXT FIREWORKS 12 Camera Status Lamp Function Power on After taking a picture While movie recording While voice recording When the USB cable is inserted Transmitting Data Description The lamp turns on and off when the... camera is ready to take a picture The lamp blinks at a 1-second interval The lamp blinks at 0.25-...
... Icon MOVIE CLIP VOICE RECORDING AUTO PROGRAM PLAY NIGHT SCENE PORTRAIT LANDSCAPE TEXT FIREWORKS 12 Camera Status Lamp Function Power on After taking a picture While movie recording While voice recording When the USB cable is inserted Transmitting Data Description The lamp turns on and off when the... camera is ready to take a picture The lamp blinks at a 1-second interval The lamp blinks at 0.25-...

User Manual
Page 53
Setting up the play back function using the LCD monitor This menu is available while the camera is connected to a PictBridge supporting printer (direct connection to the camera, sold separately) with a USB cable. Menu tab Main menu IMAGES PRINT DPOF PRINT AUTO SET CUSTOM SET Sub menu ONE PIC ALL PICS STANDARD INDEX NO YES NO YES SIZE LAYOUT Secondary menu - AUTO POSTCARD 4X6 8X10 A6 A4 B5 AUTO INDEX FULL 1 2 4 6 8 Page p. 64 p. 65 p. 65 p. 66 p. 66 53
Setting up the play back function using the LCD monitor This menu is available while the camera is connected to a PictBridge supporting printer (direct connection to the camera, sold separately) with a USB cable. Menu tab Main menu IMAGES PRINT DPOF PRINT AUTO SET CUSTOM SET Sub menu ONE PIC ALL PICS STANDARD INDEX NO YES NO YES SIZE LAYOUT Secondary menu - AUTO POSTCARD 4X6 8X10 A6 A4 B5 AUTO INDEX FULL 1 2 4 6 8 Page p. 64 p. 65 p. 65 p. 66 p. 66 53
User Manual
Page 63
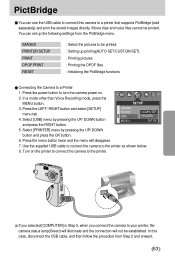
...63 Use the supplied USB cable to connect the camera to your printer, the camera status lamp(Green) will illuminate and the connection will disappear. 7. IMPRINT SOUND USB BACK: COMPUTER PRINTER SET:OK 5. Turn on . 2. You can use the USB cable to connect this case, disconnect the USB cable, and then follow... the procedure from the PictBridge menu. Press the power button to turn the camera power on the printer to connect the camera to the printer. PictBridge You can set ...
...63 Use the supplied USB cable to connect the camera to your printer, the camera status lamp(Green) will illuminate and the connection will disappear. 7. IMPRINT SOUND USB BACK: COMPUTER PRINTER SET:OK 5. Turn on . 2. You can use the USB cable to connect this case, disconnect the USB cable, and then follow... the procedure from the PictBridge menu. Press the power button to turn the camera power on the printer to connect the camera to the printer. PictBridge You can set ...

User Manual
Page 75
...2. Select a desired sub menu by pressing the UP/ DOWN P 2560 SETUP IMPRINT SOUND USB BACK : COMPUTER PRINTER SET : OK button and press the OK button. [COMPUTER] : Select this if you want to connect the camera to your PC. In any mode with the exception of Voice Recording mode, press the... SOUND BACK : LOW MEDIUM HIGH SET : OK Selecting an External Device (USB) You can be activated for instructions on how to connect the camera to your PC. [PRINTER] : Select this if you want to connect the camera using the USB cable. Refer to page 98 for instructions on how to connect the...
...2. Select a desired sub menu by pressing the UP/ DOWN P 2560 SETUP IMPRINT SOUND USB BACK : COMPUTER PRINTER SET : OK button and press the OK button. [COMPUTER] : Select this if you want to connect the camera to your PC. In any mode with the exception of Voice Recording mode, press the... SOUND BACK : LOW MEDIUM HIGH SET : OK Selecting an External Device (USB) You can be activated for instructions on how to connect the camera to your PC. [PRINTER] : Select this if you want to connect the camera using the USB cable. Refer to page 98 for instructions on how to connect the...

User Manual
Page 76
... the MENU button. 2. Selecting Video out type The Movie output signal from the camera can view the stored still images or movie clips by connecting the camera to an external monitor via the Video cable. P 2560 SETUP SOUND USB VIDEO BACK : NTSC PAL SET : OK Connecting to an external monitor, the LCD...a display device like TV with the exception of the screen, use the TV controls to centre it is not a malfunction. When you will be a digital noise on the LCD monitor. Select the [VIDEO] menu by pressing the UP/ DOWN button and press the OK button. [VIDEO] sub menu : NTSC...
... the MENU button. 2. Selecting Video out type The Movie output signal from the camera can view the stored still images or movie clips by connecting the camera to an external monitor via the Video cable. P 2560 SETUP SOUND USB VIDEO BACK : NTSC PAL SET : OK Connecting to an external monitor, the LCD...a display device like TV with the exception of the screen, use the TV controls to centre it is not a malfunction. When you will be a digital noise on the LCD monitor. Select the [VIDEO] menu by pressing the UP/ DOWN button and press the OK button. [VIDEO] sub menu : NTSC...

User Manual
Page 81
...or downloaded, the data transfer may damage the body shell of the camera and also affect its protective carry case at all times when not in its performance. Do not allow this case, disconnect and re-connect the USB cable before trying the transfer again. 81 Do not attempt to gently ...clean the lens and LCD assemblies. Rough handling can cause the flash unit to avoid damage and keep the camera in use. Under certain conditions, static electricity can damage...
...or downloaded, the data transfer may damage the body shell of the camera and also affect its protective carry case at all times when not in its performance. Do not allow this case, disconnect and re-connect the USB cable before trying the transfer again. 81 Do not attempt to gently ...clean the lens and LCD assemblies. Rough handling can cause the flash unit to avoid damage and keep the camera in use. Under certain conditions, static electricity can damage...
User Manual
Page 85
... exposure compensation No image on external monitor The external monitor has not been connected properly with the camera Check the connection cables There are incorrect files in the memory card Insert a memory card that supports USB The camera driver is not Windows 98, 98SE, 2000, ME, XP/ Mac OS 9.0 ~ 10.2. Before contacting a ...name Colour of image is different to PC that has correct files When using the PC's explorer, the [Removable Disk] file does not show Cable connection is incorrect Check the connection The camera is off Turn the camera on The operating system is not installed Install...
... exposure compensation No image on external monitor The external monitor has not been connected properly with the camera Check the connection cables There are incorrect files in the memory card Insert a memory card that supports USB The camera driver is not Windows 98, 98SE, 2000, ME, XP/ Mac OS 9.0 ~ 10.2. Before contacting a ...name Colour of image is different to PC that has correct files When using the PC's explorer, the [Removable Disk] file does not show Cable connection is incorrect Check the connection The camera is off Turn the camera on The operating system is not installed Install...
User Manual
Page 96
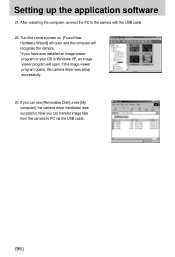
... restarting the computer, connect the PC to PC via the USB cable. 96 Now you can see [Removable Disk] under [My computer], the camera driver installation was setup successfully. 23. If the image viewer program opens, the camera driver was successful. If you have ever installed an image viewer...OS is Windows XP, an image viewer program will open. Turn the camera power on. [Found New Hardware Wizard] will open and the computer will recognise the camera. * If you can transfer image files from the camera to the camera with the USB cable. 22. Setting up the application software 21.
... restarting the computer, connect the PC to PC via the USB cable. 96 Now you can see [Removable Disk] under [My computer], the camera driver installation was setup successfully. 23. If the image viewer program opens, the camera driver was successful. If you have ever installed an image viewer...OS is Windows XP, an image viewer program will open. Turn the camera power on. [Found New Hardware Wizard] will open and the computer will recognise the camera. * If you can transfer image files from the camera to the camera with the USB cable. 22. Setting up the application software 21.
User Manual
Page 98
... to page 103 (Removing the removable disk). Insert the small plug of the USB cable into the USB port of the USB cable into the camera USB connection terminal. - In this mode, you can 't recognize the camera. 98 In any mode other than Voice Recording mode, press the MENU button...a PC 1. Turn the PC power on the power, the camera will automatically switch to "computer connection mode". Connect the PC and the camera via the USB connection. Connecting the camera to use the USB cable supplied with the camera, or the computer can download stored images to your computer, the...
... to page 103 (Removing the removable disk). Insert the small plug of the USB cable into the USB port of the USB cable into the camera USB connection terminal. - In this mode, you can 't recognize the camera. 98 In any mode other than Voice Recording mode, press the MENU button...a PC 1. Turn the PC power on the power, the camera will automatically switch to "computer connection mode". Connect the PC and the camera via the USB connection. Connecting the camera to use the USB cable supplied with the camera, or the computer can download stored images to your computer, the...

User Manual
Page 99
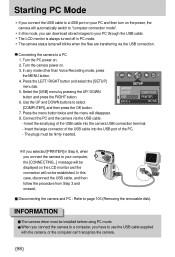
...] : copies files. 5. On your PC with the USB cable. 2. The image files will open. A pop-up menu will then be displayed. 3. Select an image and press the right mouse button. 4. Starting PC Mode Downloading stored images You can download the still images stored on the camera to your PC's hard disk and print...
...] : copies files. 5. On your PC with the USB cable. 2. The image files will open. A pop-up menu will then be displayed. 3. Select an image and press the right mouse button. 4. Starting PC Mode Downloading stored images You can download the still images stored on the camera to your PC's hard disk and print...
User Manual
Page 102
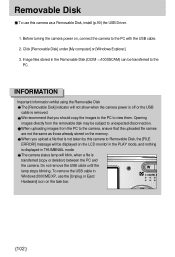
... Important information whilst using the Removable Disk The [Removable Disk] indicator will not show when the camera power is off or the USB cable is transferred (copy or deletion) between the PC and the camera. When you should copy the images to the PC to unexpected disconnection. We recommend that the ...may be displayed on the LCD monitor in the Removable Disk (DCIM 100SSCAM) can be transferred to the PC with the USB cable. 2. Before turning the camera power on, connect the camera to the PC. Removable Disk To use the [Unplug or Eject Hardware] icon on the task bar. 102 Image ...
... Important information whilst using the Removable Disk The [Removable Disk] indicator will not show when the camera power is off or the USB cable is transferred (copy or deletion) between the PC and the camera. When you should copy the images to the PC to unexpected disconnection. We recommend that the ...may be displayed on the LCD monitor in the Removable Disk (DCIM 100SSCAM) can be transferred to the PC with the USB cable. 2. Before turning the camera power on, connect the camera to the PC. Removable Disk To use the [Unplug or Eject Hardware] icon on the task bar. 102 Image ...

User Manual
Page 103
...task bar. 3. Select the [USB Mass Storage Device] and click the [OK] button. 5. A [Safe to Remove Hardware] window will open . Click the [OK] button. [Click!] [Click!] 103 The [Unplug or Eject Hardware] window will open. Unplug the USB cable. If the camera status lamp blinks, you have ...to wait until the lamp is turned off . 2. If the camera status lamp blinks, you have to wait until the lamp is turned off . 2. The [...
...task bar. 3. Select the [USB Mass Storage Device] and click the [OK] button. 5. A [Safe to Remove Hardware] window will open . Click the [OK] button. [Click!] [Click!] 103 The [Unplug or Eject Hardware] window will open. Unplug the USB cable. If the camera status lamp blinks, you have ...to wait until the lamp is turned off . 2. If the camera status lamp blinks, you have to wait until the lamp is turned off . 2. The [...
User Manual
Page 104
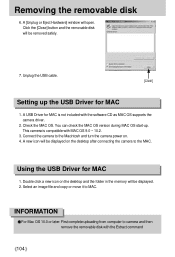
Unplug the USB cable. [Click!] Setting up . Connect the camera to MAC. A new icon will be displayed on . 4. Using the USB Driver for MAC 1. Select an image file and copy or move it to the Macintosh and turn the camera power on the desktop after connecting the camera to camera and then remove the removable disk... in the memory will be displayed. 2. Click the [Close] button and the removable disk will open. A USB Driver for MAC is compatible with the software CD as MAC OS supports the camera driver. 2. Check the MAC OS. You can check the MAC OS version during MAC OS start-up the...
Unplug the USB cable. [Click!] Setting up . Connect the camera to MAC. A new icon will be displayed on . 4. Using the USB Driver for MAC 1. Select an image file and copy or move it to the Macintosh and turn the camera power on the desktop after connecting the camera to camera and then remove the removable disk... in the memory will be displayed. 2. Click the [Close] button and the removable disk will open. A USB Driver for MAC is compatible with the software CD as MAC OS supports the camera driver. 2. Check the MAC OS. You can check the MAC OS version during MAC OS start-up the...

User Manual
Page 108
... of the image you want to save as shown. 7. Connect the camera and the PC with a USB cable and download the images that was taken with SAMSUNG camera can be recognized as shown alongside. 4. Run the Digimax Reader. 3. Click the Open( ) icon as text. 108 Digimax Reader How to scan the image. 6. Click the Area Analysis( ) icon...
... of the image you want to save as shown. 7. Connect the camera and the PC with a USB cable and download the images that was taken with SAMSUNG camera can be recognized as shown alongside. 4. Run the Digimax Reader. 3. Click the Open( ) icon as text. 108 Digimax Reader How to scan the image. 6. Click the Area Analysis( ) icon...

User Manual
Page 109
... can be recognized as a text : - Avoid the camera shake to be displayed. 9. Turn the camera power on. [Case 2] [Case 3] USB Driver is off. Refer to the [Help] menu in Digimax Reader for further information. To save the section as shown alongside will be centered. - Digimax Reader 8. Use a USB cable with an incorrect specification. Refer to page 90...
... can be recognized as a text : - Avoid the camera shake to be displayed. 9. Turn the camera power on. [Case 2] [Case 3] USB Driver is off. Refer to the [Help] menu in Digimax Reader for further information. To save the section as shown alongside will be centered. - Digimax Reader 8. Use a USB cable with an incorrect specification. Refer to page 90...
User Manual
Page 110
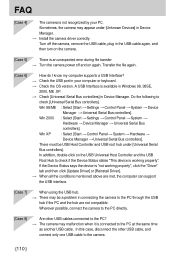
...? Do the following to the PC? There must be a problem in connecting the camera to the PC at the same time as another USB cable. When using the USB hub. The camera may malfunction when it is working properly", click the "Driver" tab and then click [Update Driver] or [... unexpected error during file transfer Turn the camera power off the camera, remove the USB cable, plug in the USB cable again, and then turn on again. Are other USB cable, and connect only one USB cable to the PC directly. Sometimes, the camera may be USB Host Controller and USB root hub under [Unknown Devices] in ...
...? Do the following to the PC? There must be a problem in connecting the camera to the PC at the same time as another USB cable. When using the USB hub. The camera may malfunction when it is working properly", click the "Driver" tab and then click [Update Driver] or [... unexpected error during file transfer Turn the camera power off the camera, remove the USB cable, plug in the USB cable again, and then turn on again. Are other USB cable, and connect only one USB cable to the PC directly. Sometimes, the camera may be USB Host Controller and USB root hub under [Unknown Devices] in ...


