User Manual (ENGLISH)
Page 13
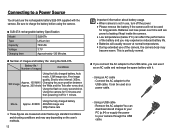
... the zoom position between the Wide and the Tele after every shot. Using the flash on the user's methods. 12 Important information about battery usage. å When camera is perfectly normal. Ê If you connect the AC adapter to your PC (p.94) or supply the ...at normal temperatures. å During extended use of the camera, the camera body may vary depending on every second shot. It can lose power over time and are measured under Samsung's standard conditions and shooting conditions and may become warm. Using the camera for 5 minutes and then powering it as a power...
... the zoom position between the Wide and the Tele after every shot. Using the flash on the user's methods. 12 Important information about battery usage. å When camera is perfectly normal. Ê If you connect the AC adapter to your PC (p.94) or supply the ...at normal temperatures. å During extended use of the camera, the camera body may vary depending on every second shot. It can lose power over time and are measured under Samsung's standard conditions and shooting conditions and may become warm. Using the camera for 5 minutes and then powering it as a power...
User Manual (ENGLISH)
Page 18
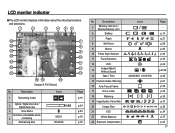
... Battery 7 Flash 8 Self-timer 9 Macro 10 Photo Style Selector 11 Face Detection 12 DIS 13 Image Adjust / Without Sound 14 Date / Time 15 Camera shake Warning 16 Auto Focus Frame 17 Drive mode 18 Metering 19 Image Quality /... Frame Rate 20 Image Size 21 ISO 22 White Balance 23 Exposure compensation Icons 2009/08/01 01:00 PM Page - Description Icons 1 Recording mode 2 Optical / Digital Zoom bar / Digital Zoom rate 3 Voice Memo Number of available shots...
... Battery 7 Flash 8 Self-timer 9 Macro 10 Photo Style Selector 11 Face Detection 12 DIS 13 Image Adjust / Without Sound 14 Date / Time 15 Camera shake Warning 16 Auto Focus Frame 17 Drive mode 18 Metering 19 Image Quality /... Frame Rate 20 Image Size 21 ISO 22 White Balance 23 Exposure compensation Icons 2009/08/01 01:00 PM Page - Description Icons 1 Recording mode 2 Optical / Digital Zoom bar / Digital Zoom rate 3 Voice Memo Number of available shots...

User Manual (ENGLISH)
Page 22
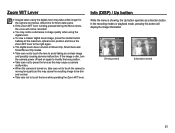
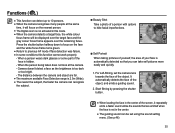
... movie clip. Press the shutter button all way down half way. Press the shutter button and movie clips are the same as the available recording time. Things to Watch Out for as long as those for MOVIE CLIP mode. 3. To take the picture. [Lightly press the shutter button] [... recording. 6. Doing so may appear on a solid surface or change to flash shot mode. å Shooting against the light : Please do not take pictures against the light, please use a tripod, support the camera on the LCD monitor. Stop Record 4. Movie clips will still be recorded if the shutter...
... movie clip. Press the shutter button all way down half way. Press the shutter button and movie clips are the same as the available recording time. Things to Watch Out for as long as those for MOVIE CLIP mode. 3. To take the picture. [Lightly press the shutter button] [... recording. 6. Doing so may appear on a solid surface or change to flash shot mode. å Shooting against the light : Please do not take pictures against the light, please use a tripod, support the camera on the LCD monitor. Stop Record 4. Movie clips will still be recorded if the shutter...
User Manual (ENGLISH)
Page 26
... not to touch the lens to avoid taking an unclear image and possibly causing camera malfunction. Zoom W/T Lever å Images taken using the digital zoom may take place. å If the Zoom W/T lever is being pressed during the Movie shots, the voice will display the image information. [Filming screen] [Information screen] 25 Info... button operates as this button will not be dim and unclear. å Take care not to touch the lens while operating the Zoom W/T lever. Allow time for this to take a little longer for the camera to process.
... not to touch the lens to avoid taking an unclear image and possibly causing camera malfunction. Zoom W/T Lever å Images taken using the digital zoom may take place. å If the Zoom W/T lever is being pressed during the Movie shots, the voice will display the image information. [Filming screen] [Information screen] 25 Info... button operates as this button will not be dim and unclear. å Take care not to touch the lens while operating the Zoom W/T lever. Allow time for this to take a little longer for the camera to process.
User Manual (ENGLISH)
Page 29
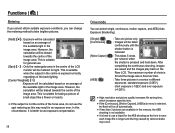
... mode when capturing images in a place or situation where flash photography is weak, the charging time will be automatically controlled to obtain a balanced correct exposure. The flash does not fire...å When taking an image in poorly lit conditions with "red eye" is dark, the camera flash will reduce the life of flash). The speck is caused by using the... automatically and will reduce the red-eye effect by the flash light reflecting off When a shot with the flash, there may be a white speck in the captured image. Flash ( ) /...
... mode when capturing images in a place or situation where flash photography is weak, the charging time will be automatically controlled to obtain a balanced correct exposure. The flash does not fire...å When taking an image in poorly lit conditions with "red eye" is dark, the camera flash will reduce the life of flash). The speck is caused by using the... automatically and will reduce the red-eye effect by the flash light reflecting off When a shot with the flash, there may be a white speck in the captured image. Flash ( ) /...
User Manual (ENGLISH)
Page 36
... å The Digital zoom is not activated in the center. å The guiding sound can take self pictures more easily and quickly. 1. The distance between the camera and object are emitted... detects the face of the object. When the person being taken does not look at the same time, it repeatedly emits a faster sound unlike the sounds that are far. å The maximum available...Detection range is 2.5m (Wide). å The nearer the subject, the faster the camera can recognize the subject. Ê Beauty Shot Take a photo of a person with options to hide facial imperfections. Ê Self...
... å The Digital zoom is not activated in the center. å The guiding sound can take self pictures more easily and quickly. 1. The distance between the camera and object are emitted... detects the face of the object. When the person being taken does not look at the same time, it repeatedly emits a faster sound unlike the sounds that are far. å The maximum available...Detection range is 2.5m (Wide). å The nearer the subject, the faster the camera can recognize the subject. Ê Beauty Shot Take a photo of a person with options to hide facial imperfections. Ê Self...
User Manual (ENGLISH)
Page 39
...standard exposure (0.0EV), short exposure (-1/2EV) and over exposure (+1/2EV). å High resolution and picture quality increases file saving time, which increases stand-by camera shake may result in the image area. Functions ( ) Metering If you cannot obtain suitable exposure conditions, you can select single, ...Multi] ( ) : Exposure will be calculated based on an average of the Back Move image area. In this may occur. The maximum number of shots is 30 and the image size is fixed as this circumstance, it is better to use . [Spot] ( ) : Only the rectangular ...
...standard exposure (0.0EV), short exposure (-1/2EV) and over exposure (+1/2EV). å High resolution and picture quality increases file saving time, which increases stand-by camera shake may result in the image area. Functions ( ) Metering If you cannot obtain suitable exposure conditions, you can select single, ...Multi] ( ) : Exposure will be calculated based on an average of the Back Move image area. In this may occur. The maximum number of shots is 30 and the image size is fixed as this circumstance, it is better to use . [Spot] ( ) : Only the rectangular ...
User Manual (ENGLISH)
Page 76
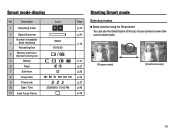
Description 1 Recording mode 2 Optical Zoom bar Number of available 3 shots remaining Remaining time 4 Memory card icon / Internal memory icon 5 Battery 6 Flash 7 Self-timer 8 Image Size 9 Frame rate 10 Date / Time 11 Auto Focus Frame Icons 00001 00:00:00 2009/08/01 01:00 PM Page p.75 p.24 p.16 p.14 p.27 p.29 p.36 p.37 p.49 p.39 Selecting modes Ê Mode selection using the Smart button You can use the Smart button at the top of your camera to select the correct smart mode. [Program mode] [Smart Auto mode] 75 Smart mode display Starting Smart mode No.
Description 1 Recording mode 2 Optical Zoom bar Number of available 3 shots remaining Remaining time 4 Memory card icon / Internal memory icon 5 Battery 6 Flash 7 Self-timer 8 Image Size 9 Frame rate 10 Date / Time 11 Auto Focus Frame Icons 00001 00:00:00 2009/08/01 01:00 PM Page p.75 p.24 p.16 p.14 p.27 p.29 p.36 p.37 p.49 p.39 Selecting modes Ê Mode selection using the Smart button You can use the Smart button at the top of your camera to select the correct smart mode. [Program mode] [Smart Auto mode] 75 Smart mode display Starting Smart mode No.


