User Manual (ENGLISH)
Page 2
... the camera's power power is operating properly prior to when you use a card reader to copy the images on the memory card to your camera Use this manual are subject to turn it (e.g. Setting up the application software To use the supplied USB cable to connect the camera to your PC, be damaged. Samsung takes no responsibility for upgrading the camera functions. Ä Microsoft, Windows and Windows logo are registered trademarks of their respective companies. 1 When transferring the images taken...
... the camera's power power is operating properly prior to when you use a card reader to copy the images on the memory card to your camera Use this manual are subject to turn it (e.g. Setting up the application software To use the supplied USB cable to connect the camera to your PC, be damaged. Samsung takes no responsibility for upgrading the camera functions. Ä Microsoft, Windows and Windows logo are registered trademarks of their respective companies. 1 When transferring the images taken...

User Manual (ENGLISH)
Page 4
... the lens or lens cover to use , always switch off the camera before moving the camera. Do not insert the battery with hands or objects. It takes longer to turn on how to use the memory card RECORDING 017 LCD monitor indicator 018 How to use the menu 019 Starting the recording mode 019 Selecting modes 019 How to use the Program mode 020 How to avoid taking an unclear image and possibly causing camera malfunction...
... the lens or lens cover to use , always switch off the camera before moving the camera. Do not insert the battery with hands or objects. It takes longer to turn on how to use the memory card RECORDING 017 LCD monitor indicator 018 How to use the menu 019 Starting the recording mode 019 Selecting modes 019 How to use the Program mode 020 How to avoid taking an unclear image and possibly causing camera malfunction...

User Manual (ENGLISH)
Page 7
... Play mode display PLAY MODE 079 Setting up the Smart Play menu PICTBRIDGE 080 081 081 082 PictBridge PictBridge : Picture Selection PictBridge : Print Setting PictBridge : Reset APPENDIX 082 084 085 087 Important notes Warning indicator Before contacting a service centre Specifications SOFTWARE 090 Software Notes 090 System Requirements 091 About the software 6 092 Setting up the application software 094 Starting PC mode 097 Removing the removable disk 098 Samsung Master 101 Setting up the USB Driver for MAC 101 Using...
... Play mode display PLAY MODE 079 Setting up the Smart Play menu PICTBRIDGE 080 081 081 082 PictBridge PictBridge : Picture Selection PictBridge : Print Setting PictBridge : Reset APPENDIX 082 084 085 087 Important notes Warning indicator Before contacting a service centre Specifications SOFTWARE 090 Software Notes 090 System Requirements 091 About the software 6 092 Setting up the application software 094 Starting PC mode 097 Removing the removable disk 098 Samsung Master 101 Setting up the USB Driver for MAC 101 Using...

User Manual (ENGLISH)
Page 20
... an image. 19 Insert the memory card (p.14). Should this camera has a 31MB internal memory, you press the shutter button down half way, it means that the camera cannot focus on the camera. 5. Starting the recording mode Selecting modes Ê Mode selection using the Mode switch You can still manually configure all functions except the aperture value and shutter speed. 1. You can use the Program mode ( ) Selecting the automatic mode will be stored on the memory card...
... an image. 19 Insert the memory card (p.14). Should this camera has a 31MB internal memory, you press the shutter button down half way, it means that the camera cannot focus on the camera. 5. Starting the recording mode Selecting modes Ê Mode selection using the Mode switch You can still manually configure all functions except the aperture value and shutter speed. 1. You can use the Program mode ( ) Selecting the automatic mode will be stored on the memory card...

User Manual (ENGLISH)
Page 22
To take a picture against the light, please use a tripod, support the camera on a solid surface or change to flash shot mode. å Shooting against the light : Please do not take the picture. [Lightly press the shutter button] [Press the shutter button] å The available memory capacity may make the picture dark. Press the shutter button and movie clips are the same as the available recording time. Movie clips will still be recorded if the shutter button is selected in fl...
To take a picture against the light, please use a tripod, support the camera on a solid surface or change to flash shot mode. å Shooting against the light : Please do not take the picture. [Lightly press the shutter button] [Press the shutter button] å The available memory capacity may make the picture dark. Press the shutter button and movie clips are the same as the available recording time. Movie clips will still be recorded if the shutter button is selected in fl...
User Manual (ENGLISH)
Page 29
... in poorly lit conditions with a slow shutter speed to obtain a balanced correct exposure. The speck is caused by using the red-eye reduction function. Fill in flash The flash fires regardless of the battery. å Under normal operating conditions the re-charging time for the flash is detected, this mode when capturing images in a place or situation where flash...
... in poorly lit conditions with a slow shutter speed to obtain a balanced correct exposure. The speck is caused by using the red-eye reduction function. Fill in flash The flash fires regardless of the battery. å Under normal operating conditions the re-charging time for the flash is detected, this mode when capturing images in a place or situation where flash...

User Manual (ENGLISH)
Page 50
... play back. 49 The folder number is SAM_0001. - If you to the DCF (Design rule for Camera File systems) format. Setting [Time Zone] enables you change the date and time that follow the previous sequence, even when a new memory card is used with the memory card conform to display the local date and time on the captured images and set from 100 to select the file naming format. [Reset] : After using Format Reset Date & Time Time Zone File No. Settings ( " ) Setting...
... play back. 49 The folder number is SAM_0001. - If you to the DCF (Design rule for Camera File systems) format. Setting [Time Zone] enables you change the date and time that follow the previous sequence, even when a new memory card is used with the memory card conform to display the local date and time on the captured images and set from 100 to select the file naming format. [Reset] : After using Format Reset Date & Time Time Zone File No. Settings ( " ) Setting...

User Manual (ENGLISH)
Page 71
... files on the memory card. Lock Unlock Set Voice memo You can add your voice to 10 seconds of voice into a stored still image. - Important shots should be stored on a computer before deletion takes place. Protecting images This is recording] - An image in the camera's internal memory (i.e., not on the memory card) and it will NOT be protected from the [Format] function. To stop the recording, press the shutter button. 70 The startup image is displayed. - OK button : Protect...
... files on the memory card. Lock Unlock Set Voice memo You can add your voice to 10 seconds of voice into a stored still image. - Important shots should be stored on a computer before deletion takes place. Protecting images This is recording] - An image in the camera's internal memory (i.e., not on the memory card) and it will NOT be protected from the [Format] function. To stop the recording, press the shutter button. 70 The startup image is displayed. - OK button : Protect...

User Manual (ENGLISH)
Page 72
... all pictures except movie and voice files. - Up / Down button : Select a number of prints for Movie clips and Voice recording files. Ê When the wide angle image is printed as a wide angle image. (Some photo labs may not be printed. Check that your printer can then be printed and how many prints to make. Ê The DPOF indicator will display on your memory card's MISC folder. Press the Right button again and [Standard] sub menu...
... all pictures except movie and voice files. - Up / Down button : Select a number of prints for Movie clips and Voice recording files. Ê When the wide angle image is printed as a wide angle image. (Some photo labs may not be printed. Check that your printer can then be printed and how many prints to make. Ê The DPOF indicator will display on your memory card's MISC folder. Press the Right button again and [Standard] sub menu...

User Manual (ENGLISH)
Page 74
... play mode. - [No] : Cancels "Copy to Card". å If there is displayed on the LCD monitor. 73 After completing [Copy To Card], the last stored image of file names will return to the memory card. 1. Please be sure to delete any unnecessary files to free up space before inserting the memory card into the camera. å When you to copy image files, movie clips and voice recording files to the playback mode. Select a desired sub menu by Delete...
... play mode. - [No] : Cancels "Copy to Card". å If there is displayed on the LCD monitor. 73 After completing [Copy To Card], the last stored image of file names will return to the memory card. 1. Please be sure to delete any unnecessary files to free up space before inserting the memory card into the camera. å When you to copy image files, movie clips and voice recording files to the playback mode. Select a desired sub menu by Delete...

User Manual (ENGLISH)
Page 78
... camera towards the subject and compose the image by using the LCD monitor. 3. Setting up the Smart menu Ŷ Smart mode allows users to take a photo simply, without setting any of the more complex functions available. Pressing it . - Photo Size Flash Timer Volume Exit : : : Off : Medium Change Right button Photo Size Flash Timer Volume 12M : 8M : 3M : Off : Medium Back Set 77 Movie clips will return to the previous screen. [Pressing the MENU button] [Menu off (Smart Auto)] Photo Size Flash Timer Volume : : : Off : Medium Exit Change [Menu...
... camera towards the subject and compose the image by using the LCD monitor. 3. Setting up the Smart menu Ŷ Smart mode allows users to take a photo simply, without setting any of the more complex functions available. Pressing it . - Photo Size Flash Timer Volume Exit : : : Off : Medium Change Right button Photo Size Flash Timer Volume 12M : 8M : 3M : Off : Medium Back Set 77 Movie clips will return to the previous screen. [Pressing the MENU button] [Menu off (Smart Auto)] Photo Size Flash Timer Volume : : : Off : Medium Exit Change [Menu...

User Manual (ENGLISH)
Page 80
... to the Normal mode sections. 79 Smart Play mode display Setting up the Smart Play menu, refer to set play mode functions easily. Description 1 Smart Play mode 2 Voice Memo 3 DPOF 4 Protect 5 Folder name & File name 6 Memory card indicator 7 Battery 8 ISO 9 Aperture value 10 Shutter speed 11 Flash 12 Image size 13 Recording date Icon 100-0010 80~3200 F3.0 ~ F5.6 8 ~ 1/1,500 On/Off 4000X3000 ~ 320X240 2009/08/01 Page p.53 p.70 p.71 p.70 p.49 - Main Menu Sub Menu Page ACB Red-eye Fix Edit p.65 Face...
... to the Normal mode sections. 79 Smart Play mode display Setting up the Smart Play menu, refer to set play mode functions easily. Description 1 Smart Play mode 2 Voice Memo 3 DPOF 4 Protect 5 Folder name & File name 6 Memory card indicator 7 Battery 8 ISO 9 Aperture value 10 Shutter speed 11 Flash 12 Image size 13 Recording date Icon 100-0010 80~3200 F3.0 ~ F5.6 8 ~ 1/1,500 On/Off 4000X3000 ~ 320X240 2009/08/01 Page p.53 p.70 p.71 p.70 p.49 - Main Menu Sub Menu Page ACB Red-eye Fix Edit p.65 Face...

User Manual (ENGLISH)
Page 82
... copies to print will be printed Auto, Draft, Normal, Fine Date Set whether to print the date Auto, Off, On File Name Set whether to select another picture. Press the play mode button ( Î ) and images will appear as shown below. 0 1 Quantity Set [When [One Photo] is selected] Quantity Set [When [All Photos] is selected : Use the Left / Right button to print the file name Auto, Off, On Ä Some menu options are not selectable. 81 Size...
... copies to print will be printed Auto, Draft, Normal, Fine Date Set whether to print the date Auto, Off, On File Name Set whether to select another picture. Press the play mode button ( Î ) and images will appear as shown below. 0 1 Quantity Set [When [One Photo] is selected] Quantity Set [When [All Photos] is selected : Use the Left / Right button to print the file name Auto, Off, On Ä Some menu options are not selectable. 81 Size...

User Manual (ENGLISH)
Page 83
... cameras. - This camera is not used, keep it to dust and dirt. - Use the Up / Down buttons to select Yes the desired sub menu value, and then press the OK button. PictBridge : Reset Initialises user-changed configurations. 1. Use the Up / Down buttons to select Date :Auto the [Reset] menu tab. Areas with wet hands. 82 When this camera with your printer's default setting, refer to direct sunlight or the inside the camera...
... cameras. - This camera is not used, keep it to dust and dirt. - Use the Up / Down buttons to select Yes the desired sub menu value, and then press the OK button. PictBridge : Reset Initialises user-changed configurations. 1. Use the Up / Down buttons to select Date :Auto the [Reset] menu tab. Areas with wet hands. 82 When this camera with your printer's default setting, refer to direct sunlight or the inside the camera...
User Manual (ENGLISH)
Page 84
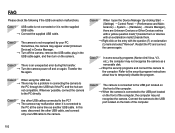
... used for a long period, an electric discharge can cause the flash unit to gently clean the lens and LCD assemblies. Rough handling can be held responsible for camera malfunctions. å If the digital camera is not a malfunction. å When images are uploaded or downloaded, the data transfer may damage the body shell of the lens. å If the digital camera is dispersed. Important notes - If this camera...
... used for a long period, an electric discharge can cause the flash unit to gently clean the lens and LCD assemblies. Rough handling can be held responsible for camera malfunctions. å If the digital camera is not a malfunction. å When images are uploaded or downloaded, the data transfer may damage the body shell of the lens. å If the digital camera is dispersed. Important notes - If this camera...
User Manual (ENGLISH)
Page 87
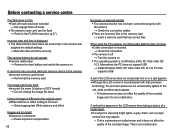
... camera mode can't use the flash à Refer to the FLASH instruction (p.27) Incorrect date and time is displayed å The date and time have been set incorrectly or the camera has adopted the default settings ÃReset the date and time correctly The camera buttons do not operate åCamera malfunction à Remove/re-insert battery and switch the camera on A card error has occurred while the memory card is in the camera. åIncorrect memory card format à Re-format the memory card The images don't play...
... camera mode can't use the flash à Refer to the FLASH instruction (p.27) Incorrect date and time is displayed å The date and time have been set incorrectly or the camera has adopted the default settings ÃReset the date and time correctly The camera buttons do not operate åCamera malfunction à Remove/re-insert battery and switch the camera on A card error has occurred while the memory card is in the camera. åIncorrect memory card format à Re-format the memory card The images don't play...
User Manual (ENGLISH)
Page 88
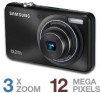
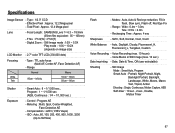
... ·Self-timer : 10 sec., 2 sec., Double, Motion Timer 87 Modes : Auto, Auto & Red-eye reduction, Fill-in Still Image (max. 10 sec.) Date Imprinting - Date, Date & Time, Off (user selectable) Shooting - Metering : Multi, Spot, Center-Weighted, Face Detection AE - Specifications Image Sensor - Effective Pixel : Approx. 12.2 Mega-pixel - Auto, Daylight, Cloudy, Fluorescent_H, Fluorescent_L, Tungsten, Custom Voice Recording - Digital Zoom : ·Still Image mode :1.0X ~ 5.0X ·Play mode : 1.0X ~ 10.2X (depends on image size) LCD Monitor - 2.7" color TFT LCD...
... ·Self-timer : 10 sec., 2 sec., Double, Motion Timer 87 Modes : Auto, Auto & Red-eye reduction, Fill-in Still Image (max. 10 sec.) Date Imprinting - Date, Date & Time, Off (user selectable) Shooting - Metering : Multi, Spot, Center-Weighted, Face Detection AE - Specifications Image Sensor - Effective Pixel : Approx. 12.2 Mega-pixel - Auto, Daylight, Cloudy, Fluorescent_H, Fluorescent_L, Tungsten, Custom Voice Recording - Digital Zoom : ·Still Image mode :1.0X ~ 5.0X ·Play mode : 1.0X ~ 10.2X (depends on image size) LCD Monitor - 2.7" color TFT LCD...

User Manual (ENGLISH)
Page 93
...; You can be installed. The auto run frame. 92 Click the [Samsung Digital Camera Installer] menu in the camera can be moved to the PC and can visit the Samsung web-site through the internet. 2. After this camera with a PC, install the application software first. Setting up the application software To use this has been done, the stored images in the Auto run frame will display. If a recent...
...; You can be installed. The auto run frame. 92 Click the [Samsung Digital Camera Installer] menu in the camera can be moved to the PC and can visit the Samsung web-site through the internet. 2. After this camera with a PC, install the application software first. Setting up the application software To use this has been done, the stored images in the Auto run frame will display. If a recent...
User Manual (ENGLISH)
Page 103
... how to the PC directly. Transfer the file again. Case 3 There is not recognised by clicking Start (Settings) Control Panel (Performance and Maintenance) System (Hardware) Device Manager), there are not compatible. Case 5 Are other USB cable, and connect only one USB cable to the computer. Restart the PC and connect the camera again. Case 1 USB cable is not connected or it is not the supplied USB cable. Ã Connect the supplied USB cable.
... how to the PC directly. Transfer the file again. Case 3 There is not recognised by clicking Start (Settings) Control Panel (Performance and Maintenance) System (Hardware) Device Manager), there are not compatible. Case 5 Are other USB cable, and connect only one USB cable to the computer. Restart the PC and connect the camera again. Case 1 USB cable is not connected or it is not the supplied USB cable. Ã Connect the supplied USB cable.

User Manual (ENGLISH)
Page 104
... [Download] button to download the file and save it may be installed. Visit the following site for downloading the codec. (http://www.divx.com/divx/mac) 2) Click the [Free Download] menu on the top right side of the window then download windows appears. 3) Check the version of this General Public License. If the problem happens continuously, set the Legacy USB Support to disable and re-start . The Legacy USB Support is in the software...
... [Download] button to download the file and save it may be installed. Visit the following site for downloading the codec. (http://www.divx.com/divx/mac) 2) Click the [Free Download] menu on the top right side of the window then download windows appears. 3) Check the version of this General Public License. If the problem happens continuously, set the Legacy USB Support to disable and re-start . The Legacy USB Support is in the software...


