
User Manual (ENGLISH)
Page 1
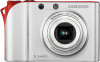
Click a button below for your camera. TL34HD This user manual includes detailed usage instructions for more information. Quick search Contents 1 Basic functions 2 Extended functions 3 Shooting options 4 Playback/Editing 5 Appendix Index Please read this manual thoroughly.
Click a button below for your camera. TL34HD This user manual includes detailed usage instructions for more information. Quick search Contents 1 Basic functions 2 Extended functions 3 Shooting options 4 Playback/Editing 5 Appendix Index Please read this manual thoroughly.

User Manual (ENGLISH)
Page 2
...in close to your subject's eyes can cause temporary or permanent damage. 1 Keep your camera away from small children and pets Keep your camera and all accessories out of the reach of your camera: Warning-situations that could cause injury to yourself or others Caution-situations that could cause ... the flash too close proximity (closer than 1 m/3 ft) to people or animals. Prevent damage to subjects' eyesight Do not use your camera near flammable or explosive gases and liquids Do not use the flash in the same compartment as well. Health and Safety Information Always...
...in close to your subject's eyes can cause temporary or permanent damage. 1 Keep your camera away from small children and pets Keep your camera and all accessories out of the reach of your camera: Warning-situations that could cause injury to yourself or others Caution-situations that could cause ... the flash too close proximity (closer than 1 m/3 ft) to people or animals. Prevent damage to subjects' eyesight Do not use your camera near flammable or explosive gases and liquids Do not use the flash in the same compartment as well. Health and Safety Information Always...

User Manual (ENGLISH)
Page 3
...-liquids can cause permanent damage to your camera's internal components. • Avoid using it for an extended period of time. Protect batteries, chargers, and memory cards from making contact with care • Use only Samsung-approved batteries and chargers. Forcing the connectors..., improperly connecting cables, or improperly installing batteries and memory cards can cause serious injuries or damage to your camera. 2 Health and Safety Information Handle and dispose ...
...-liquids can cause permanent damage to your camera's internal components. • Avoid using it for an extended period of time. Protect batteries, chargers, and memory cards from making contact with care • Use only Samsung-approved batteries and chargers. Forcing the connectors..., improperly connecting cables, or improperly installing batteries and memory cards can cause serious injuries or damage to your camera. 2 Health and Safety Information Handle and dispose ...

User Manual (ENGLISH)
Page 4
...result from fingerprints and scratches. Use only Samsung-approved accessories Using incompatible accessories may shorten battery life. Exercise caution when using the camera. Important Usage Information Allow only qualified personnel to service your camera's lens • Do not expose the lens...damage that may discolor the image sensor or cause it to malfunction. • Protect your lens from camera malfunction or improper use. 3 Clean your lens with your camera. • Never use a damaged charger, battery, or memory card. Ensure maximum battery and charger life...
...result from fingerprints and scratches. Use only Samsung-approved accessories Using incompatible accessories may shorten battery life. Exercise caution when using the camera. Important Usage Information Allow only qualified personnel to service your camera's lens • Do not expose the lens...damage that may discolor the image sensor or cause it to malfunction. • Protect your lens from camera malfunction or improper use. 3 Clean your lens with your camera. • Never use a damaged charger, battery, or memory card. Ensure maximum battery and charger life...
User Manual (ENGLISH)
Page 5
...trademarks of HDMI Licensing LLC. • QuickTime® and QuickTime® logo are trademarks or registered trademarks of camera functions. You will also learn how to connect your camera to your camera's layout, icons, and basic functions for shooting. 2 Extended functions 19 Learn how to take a photo by..., TV, or HDTV. 5 Appendix 67 Refer to play back photos, videos, or voice memos and edit photos or videos. ©2008 Samsung Electronics America, inc. Organization of the user manual 1 Basic functions 10 Learn about the options you can set in shooting mode. 4 Playback/Editing...
...trademarks of HDMI Licensing LLC. • QuickTime® and QuickTime® logo are trademarks or registered trademarks of camera functions. You will also learn how to connect your camera to your camera's layout, icons, and basic functions for shooting. 2 Extended functions 19 Learn how to take a photo by..., TV, or HDTV. 5 Appendix 67 Refer to play back photos, videos, or voice memos and edit photos or videos. ©2008 Samsung Electronics America, inc. Organization of the user manual 1 Basic functions 10 Learn about the options you can set in shooting mode. 4 Playback/Editing...

User Manual (ENGLISH)
Page 6
... next to a title These icons indicate that a function is available in this manual Icon Function Additional information Situations where you must select to be careful [ ] Camera buttons;
... next to a title These icons indicate that a function is available in this manual Icon Function Additional information Situations where you must select to be careful [ ] Camera buttons;
User Manual (ENGLISH)
Page 7
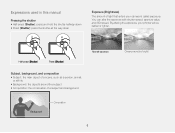
By altering the exposure, your camera is called exposure. Expressions used in this manual Pressing the shutter • Half-press [Shutter]: press and hold the shutter halfway down • Press [Shutter]: ...
By altering the exposure, your camera is called exposure. Expressions used in this manual Pressing the shutter • Half-press [Shutter]: press and hold the shutter halfway down • Press [Shutter]: ...

User Manual (ENGLISH)
Page 8
... (to apply a different tone) f 45 • Effect (to apply a different color filter) f 45 • Adjust saturation, sharpness, or contrast f 46 Reducing camera shake • Optical Image Stabilization (OIS) f 18 • 7 mode f 21 • Deleting all files in the memory card f 50 • Viewing fi... action • Adjust shutter speed in a slide show f 52 • Viewing files on a TV or HDTV f 59 • Connecting your camera to light) f 35 Taking photos of the display f 69 • Changing the language displayed on the screen f 69 • Setting the date and ...
... (to apply a different tone) f 45 • Effect (to apply a different color filter) f 45 • Adjust saturation, sharpness, or contrast f 46 Reducing camera shake • Optical Image Stabilization (OIS) f 18 • 7 mode f 21 • Deleting all files in the memory card f 50 • Viewing fi... action • Adjust shutter speed in a slide show f 52 • Viewing files on a TV or HDTV f 59 • Connecting your camera to light) f 35 Taking photos of the display f 69 • Changing the language displayed on the screen f 69 • Setting the date and ...

User Manual (ENGLISH)
Page 9
... in the dark 33 Preventing red-eye Red-eye 33 Using the flash 33 Adjusting the ISO speed ISO speed 35 Changing the camera's focus 36 Using macro Macro 36 Using auto focus AF 36 Using touch focus Touch AF 37 Adjusting the focus area AF area 37 ...40 Compensating for getting a clearer photo 26 Recording voice memos 28 Recording a voice memo 28 Adding a voice memo to a photo 28 3. Basic functions 10 Camera layout 11 Icons 13 Turning your photos 46 8 Contents 1. Extended functions 19 Shooting modes 20 2 Using the Auto mode 20 6 Using the Night mode 20...
... in the dark 33 Preventing red-eye Red-eye 33 Using the flash 33 Adjusting the ISO speed ISO speed 35 Changing the camera's focus 36 Using macro Macro 36 Using auto focus AF 36 Using touch focus Touch AF 37 Adjusting the focus area AF area 37 ...40 Compensating for getting a clearer photo 26 Recording voice memos 28 Recording a voice memo 28 Adding a voice memo to a photo 28 3. Basic functions 10 Camera layout 11 Icons 13 Turning your photos 46 8 Contents 1. Extended functions 19 Shooting modes 20 2 Using the Auto mode 20 6 Using the Night mode 20...
User Manual (ENGLISH)
Page 10
... menu 68 Accessing the settings menu 68 Sound setting 69 Display setting 69 Camera setting 70 Connection setting 71 Error messages 72 Camera maintenance 73 Cleaning your computer 61 For Windows users 61 For Mac users 64 Printing photos with a photo printer PictBridge 65 5. ...a print order DPOF 58 Viewing files on a TV or HDTV 59 Transferring files to your camera 73 About memory cards 74 About the battery 75 Before contacting a service center 76 Camera specifications 79 Correct Disposal of This Product 81 FCC notice 82 Index 83 9 Contents 4.
... menu 68 Accessing the settings menu 68 Sound setting 69 Display setting 69 Camera setting 70 Connection setting 71 Error messages 72 Camera maintenance 73 Cleaning your computer 61 For Windows users 61 For Mac users 64 Printing photos with a photo printer PictBridge 65 5. ...a print order DPOF 58 Viewing files on a TV or HDTV 59 Transferring files to your camera 73 About memory cards 74 About the battery 75 Before contacting a service center 76 Camera specifications 79 Correct Disposal of This Product 81 FCC notice 82 Index 83 9 Contents 4.

User Manual (ENGLISH)
Page 11
Basic functions 1. Camera layout 11 Icons 13 Turning your camera's layout, icons, and basic functions for shooting. Basic functions Learn about your camera on or off 14 Using the touch screen 15 Setting the display 16 Taking photos 17 Zooming 17 Reducing camera shake (OIS 18 1.
Basic functions 1. Camera layout 11 Icons 13 Turning your camera's layout, icons, and basic functions for shooting. Basic functions Learn about your camera on or off 14 Using the touch screen 15 Setting the display 16 Taking photos 17 Zooming 17 Reducing camera shake (OIS 18 1.

User Manual (ENGLISH)
Page 12
...prevent damage. • Forcing open the flash unit may cause damage to hide facial imperfections Take a photo with options to your camera. Microphone Icon 2 Mode AUTO Description Take a photo quickly and easily with minimal settings 1 PROGRAM Take a photo by setting options (...except for shutter speed and aperture value) 8 MANUAL Take a photo by setting options manually 7 DUAL IS Take a photo with options suitable for reducing camera shake Icon Mode 6 NIGHT 5 BEAUTY SHOT 4 SCENE 3 MOVIE Description Take a photo with options for shooting at night Take a photo of a ...
...prevent damage. • Forcing open the flash unit may cause damage to hide facial imperfections Take a photo with options to your camera. Microphone Icon 2 Mode AUTO Description Take a photo quickly and easily with minimal settings 1 PROGRAM Take a photo by setting options (...except for shutter speed and aperture value) 8 MANUAL Take a photo by setting options manually 7 DUAL IS Take a photo with options suitable for reducing camera shake Icon Mode 6 NIGHT 5 BEAUTY SHOT 4 SCENE 3 MOVIE Description Take a photo with options for shooting at night Take a photo of a ...

User Manual (ENGLISH)
Page 13
Camera layout Speaker Touch screen MENU button Access the camera settings menu Playback button Status lamp • Blinking: When saving a photo or video, recording a voice memo, being read by a computer or printer, or out of focus • Steady: When connecting to a computer or in focus Zoom T/Expand button Zoom W/Thumbnail button Battery chamber cover Insert a memory card and battery Basic functions 12 Tripod mount USB and A / V port
Camera layout Speaker Touch screen MENU button Access the camera settings menu Playback button Status lamp • Blinking: When saving a photo or video, recording a voice memo, being read by a computer or printer, or out of focus • Steady: When connecting to a computer or in focus Zoom T/Expand button Zoom W/Thumbnail button Battery chamber cover Insert a memory card and battery Basic functions 12 Tripod mount USB and A / V port

User Manual (ENGLISH)
Page 14
... Memory card inserted Available number of photos Available recording time Optical Image Stabilization (OIS) Current date and time Zoom ratio Voice memo Auto focus frame Camera shake Option set . Touch icons Icon Description Selected photo style Select a white balance Adjust the exposure with ACB Select a display type Return to the previous...
... Memory card inserted Available number of photos Available recording time Optical Image Stabilization (OIS) Current date and time Zoom ratio Voice memo Auto focus frame Camera shake Option set . Touch icons Icon Description Selected photo style Select a white balance Adjust the exposure with ACB Select a display type Return to the previous...

User Manual (ENGLISH)
Page 15
In Playback mode Press [Playback] to mute camera sounds. Press and hold [Playback] to view stored files. Basic functions 14 Turning your camera on or off Press [POWER] to turn your camera on or off.
In Playback mode Press [Playback] to mute camera sounds. Press and hold [Playback] to view stored files. Basic functions 14 Turning your camera on or off Press [POWER] to turn your camera on or off.

User Manual (ENGLISH)
Page 16
you use any sharp objects to scroll horizontally. Dragging Drag your finger. Do not use the camera in high humidity environments or with a wet finger - The screen may damage the screen. you use the touch screen. Doing so may not recognize ... your touches correctly when: - Using the touch screen Learn basic actions to open a menu or set an option. Touching Touch an icon to use the camera with the soft part of your finger left or right to touch the screen. you touch multiple items at the same time - Volume Medium...
you use any sharp objects to scroll horizontally. Dragging Drag your finger. Do not use the camera in high humidity environments or with a wet finger - The screen may damage the screen. you use the touch screen. Doing so may not recognize ... your touches correctly when: - Using the touch screen Learn basic actions to open a menu or set an option. Touching Touch an icon to use the camera with the soft part of your finger left or right to touch the screen. you touch multiple items at the same time - Volume Medium...

User Manual (ENGLISH)
Page 17
... Select a style of display for 3 seconds (touch the screen to be set as a start image or reset your camera, the current image will be saved in 3:2 ratio cannot be displayed when the camera is turned on the screen if you Hide Shooting, Playback perform no images, you must first take a photo...
... Select a style of display for 3 seconds (touch the screen to be set as a start image or reset your camera, the current image will be saved in 3:2 ratio cannot be displayed when the camera is turned on the screen if you Hide Shooting, Playback perform no images, you must first take a photo...

User Manual (ENGLISH)
Page 18
Press or press and hold [T] to zoom out. Basic functions 17 Press or press and hold [W] to zoom in on your subject in the frame. 3 Half-press [Shutter] to take a photo. Your camera has a 3.6X optical zoom and 5X digital zoom. By using both, you can shoot close-up to 18 times. Zoom ratio Zoom in up photos by adjusting the zoom. Zooming You can zoom in Zoom out • Green: In focus • Red: Out of focus 4 Press [Shutter] to focus. Taking photos 1 Rotate the mode dial to 2. 2 Align your subject.
Press or press and hold [T] to zoom out. Basic functions 17 Press or press and hold [W] to zoom in on your subject in the frame. 3 Half-press [Shutter] to take a photo. Your camera has a 3.6X optical zoom and 5X digital zoom. By using both, you can shoot close-up to 18 times. Zoom ratio Zoom in up photos by adjusting the zoom. Zooming You can zoom in Zoom out • Green: In focus • Red: Out of focus 4 Press [Shutter] to focus. Taking photos 1 Rotate the mode dial to 2. 2 Align your subject.

User Manual (ENGLISH)
Page 19
... use the OIS function with High Speed, M. Basic functions 18 Taking photos Digital zoom If the zoom indicator is in the digital range, your camera is too much camera shake - Capture, or Face Detection. • It may take a close-up shot • If you take longer to Center AF when ...digital zoom. you use digital zoom - you use the digital zoom. there is using the digital zoom. Deactivate the OIS function when you move your camera to on top of the OIS sensor. the battery is not available when using the digital zoom. • The focus area will appear on , ...
... use the OIS function with High Speed, M. Basic functions 18 Taking photos Digital zoom If the zoom indicator is in the digital range, your camera is too much camera shake - Capture, or Face Detection. • It may take a close-up shot • If you take longer to Center AF when ...digital zoom. you use digital zoom - you use the digital zoom. there is using the digital zoom. Deactivate the OIS function when you move your camera to on top of the OIS sensor. the battery is not available when using the digital zoom. • The focus area will appear on , ...

User Manual (ENGLISH)
Page 21
Use a tripod to prevent your camera from shaking. 1 Rotate the mode dial to 6. 2 Align your subject in the frame and half-press [Shutter] to focus. 3 Press [Shutter] to take the photo. 6 ...
Use a tripod to prevent your camera from shaking. 1 Rotate the mode dial to 6. 2 Align your subject in the frame and half-press [Shutter] to focus. 3 Press [Shutter] to take the photo. 6 ...


