User Manual
Page 5
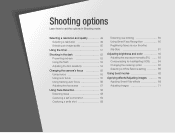
... in this manual are the property of their respective owners. • Camera specifications or contents of this manual may be changed without prior notice due to upgrade of camera functions. • Use this manual without prior permission. Extended functions 32 Learn how to configure your computer, photo printer, or TV. Settings 97 Refer to options to capture a photo and record a video by selecting a mode.
... in this manual are the property of their respective owners. • Camera specifications or contents of this manual may be changed without prior notice due to upgrade of camera functions. • Use this manual without prior permission. Extended functions 32 Learn how to configure your computer, photo printer, or TV. Settings 97 Refer to options to capture a photo and record a video by selecting a mode.

User Manual
Page 8
...) • Set ISO sensitivity options. (p. 54) • Use a tripod to Spot if a subject is a high contrast between light and dark areas, the subject may appear too dark. • Avoid shooting toward the sun. • Select Backlight in s mode. (p. 39) • Set the flash option to Fill in. (p. 52) • Adjust the exposure. (p. 63) • Set the Auto Contrast Balance (ACB) option...
...) • Set ISO sensitivity options. (p. 54) • Use a tripod to Spot if a subject is a high contrast between light and dark areas, the subject may appear too dark. • Avoid shooting toward the sun. • Select Backlight in s mode. (p. 39) • Set the flash option to Fill in. (p. 52) • Adjust the exposure. (p. 63) • Set the Auto Contrast Balance (ACB) option...
User Manual
Page 9
...;les as thumbnails f 76 • Deleting all files on the memory card f 78 • Viewing files as a slide show f 80 • Viewing files on a TV f 89 • Connecting your camera to a computer f 90 • Adjusting sound and volume f 99 • Adjusting the brightness of the display f 100 • Changing the display language f 100 • Setting the date and time f 100 • Before contacting a service center f 114 8
...;les as thumbnails f 76 • Deleting all files on the memory card f 78 • Viewing files as a slide show f 80 • Viewing files on a TV f 89 • Connecting your camera to a computer f 90 • Adjusting sound and volume f 99 • Adjusting the brightness of the display f 100 • Changing the display language f 100 • Setting the date and time f 100 • Before contacting a service center f 114 8
User Manual
Page 10
... battery 18 Turning on your camera 18 Performing the initial setup 19 Learning icons 21 Selecting options or menus 22 Using [MENU 22 Using [Fn 24 Setting the display and sound 25 Setting the display type 25 Setting the sound 25 Capturing photos 26 Zooming 27 Reducing camera shake (OIS or DIS 29 Tips for getting a clearer photo 30 Extended functions 32 Using the Smart Auto mode 33 Using the Program mode 35 Using the Live Panorama mode...
... battery 18 Turning on your camera 18 Performing the initial setup 19 Learning icons 21 Selecting options or menus 22 Using [MENU 22 Using [Fn 24 Setting the display and sound 25 Setting the display type 25 Setting the sound 25 Capturing photos 26 Zooming 27 Reducing camera shake (OIS or DIS 29 Tips for getting a clearer photo 30 Extended functions 32 Using the Smart Auto mode 33 Using the Program mode 35 Using the Live Panorama mode...
User Manual
Page 11
... Selecting a resolution 49 Selecting an image quality 50 Using the timer 51 Shooting in the dark 52 Preventing red-eye 52 Using the flash 52 Adjusting the ISO sensitivity 54 Changing the camera's focus 55 Using macro 55 Using auto focus 55 Using tracking auto focus 56 Adjusting the focus area 57 Using Face Detection 58 Detecting faces 58 Capturing a self portrait shot 59 Capturing a smile shot 59 Detecting eye blinking 60 Using Smart Face Recognition 60 Registering...
... Selecting a resolution 49 Selecting an image quality 50 Using the timer 51 Shooting in the dark 52 Preventing red-eye 52 Using the flash 52 Adjusting the ISO sensitivity 54 Changing the camera's focus 55 Using macro 55 Using auto focus 55 Using tracking auto focus 56 Adjusting the focus area 57 Using Face Detection 58 Detecting faces 58 Capturing a self portrait shot 59 Capturing a smile shot 59 Detecting eye blinking 60 Using Smart Face Recognition 60 Registering...

User Manual
Page 12
...;les by connecting the camera as a removable disk 93 Disconnecting the camera (for Windows XP 94 Transferring files to your Mac computer 95 Printing photos with a PictBridge photo printer ......... 96 Settings 97 Settings menu 98 Accessing the settings menu 98 Sound 99 Display 99 Settings 100 Appendixes 103 Error messages 104 Camera maintenance 105 Cleaning your camera 105 Using or storing the camera 106 About memory cards 107 About the battery 110 Before contacting a service center 114 Camera specifi...
...;les by connecting the camera as a removable disk 93 Disconnecting the camera (for Windows XP 94 Transferring files to your Mac computer 95 Printing photos with a PictBridge photo printer ......... 96 Settings 97 Settings menu 98 Accessing the settings menu 98 Sound 99 Display 99 Settings 100 Appendixes 103 Error messages 104 Camera maintenance 105 Cleaning your camera 105 Using or storing the camera 106 About memory cards 107 About the battery 110 Before contacting a service center 114 Camera specifi...

User Manual
Page 13
Unpacking 13 Camera layout 14 Inserting the battery and memory card ... 17 Charging the battery and turning on your camera 18 Charging the battery 18 Turning on your camera's layout, icons, and basic functions for getting a clearer photo 30 Basic functions Learn about your camera 18 Performing the initial setup 19 Learning icons 21 Selecting options or menus 22 Using [MENU 22 Using [Fn 24 Setting the display and sound 25 Setting the display type 25 Setting the sound 25 Capturing photos 26 Zooming 27 Reducing camera shake (OIS or DIS) ...... 29 Tips for shooting.
Unpacking 13 Camera layout 14 Inserting the battery and memory card ... 17 Charging the battery and turning on your camera 18 Charging the battery 18 Turning on your camera's layout, icons, and basic functions for getting a clearer photo 30 Basic functions Learn about your camera 18 Performing the initial setup 19 Learning icons 21 Selecting options or menus 22 Using [MENU 22 Using [Fn 24 Setting the display and sound 25 Setting the display type 25 Setting the sound 25 Capturing photos 26 Zooming 27 Reducing camera shake (OIS or DIS) ...... 29 Tips for shooting.
User Manual
Page 22
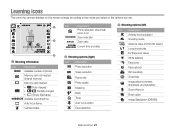
... (Recharge) Available recording time Auto focus frame Camera shake Icon Description Photo resolution when Intelli zoom is on Zoom indicator Zoom ratio Current time and date 2 Shooting options (right) Icon Description Photo resolution Video resolution Frame rate Photo quality Metering Flash Timer Auto focus option Face detection 3 Shooting options (left) Icon Description Actively moving subject Shooting mode Aperture value and shutter speed Long time shutter EV (Exposure Value) White balance Face tone Face retouch ISO sensitivity Smart filter Image adjust (constrast...
... (Recharge) Available recording time Auto focus frame Camera shake Icon Description Photo resolution when Intelli zoom is on Zoom indicator Zoom ratio Current time and date 2 Shooting options (right) Icon Description Photo resolution Video resolution Frame rate Photo quality Metering Flash Timer Auto focus option Face detection 3 Shooting options (left) Icon Description Actively moving subject Shooting mode Aperture value and shutter speed Long time shutter EV (Exposure Value) White balance Face tone Face retouch ISO sensitivity Smart filter Image adjust (constrast...
User Manual
Page 31
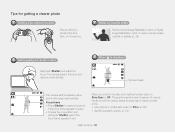
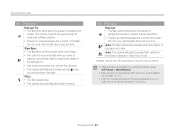
...) Half-pressing the shutter button Half-press [Shutter] and adjust the focus. Reducing camera shake Set the Optical Image Stabilization option or Digital Image Stabilization option to capture the photo if the focus frame appears in green. • Change the composition and half-press [Shutter] again if the focus frame appears in . (p. 52) • Set ISO sensitivity options. (p. 54) Basic functions 30 When is blocking the lens, flash, or...
...) Half-pressing the shutter button Half-press [Shutter] and adjust the focus. Reducing camera shake Set the Optical Image Stabilization option or Digital Image Stabilization option to capture the photo if the focus frame appears in green. • Change the composition and half-press [Shutter] again if the focus frame appears in . (p. 52) • Set ISO sensitivity options. (p. 54) Basic functions 30 When is blocking the lens, flash, or...

User Manual
Page 39
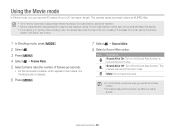
... functions 38 Using the Picture-in-Picture mode In the PIP Shot mode, you can capture or select a full-sized background photo, and then insert a smaller photo into the foreground. 1 In Shooting mode, press [M]. 2 Select d. 3 Half-press [Shutter] to focus, and then press [Shutter] to . • The maximum size of the insertion window is 1/4 of the screen, and the aspect ratio stays the same when changing the size. • When using...
... functions 38 Using the Picture-in-Picture mode In the PIP Shot mode, you can capture or select a full-sized background photo, and then insert a smaller photo into the foreground. 1 In Shooting mode, press [M]. 2 Select d. 3 Half-press [Shutter] to focus, and then press [Shutter] to . • The maximum size of the insertion window is 1/4 of the screen, and the aspect ratio stays the same when changing the size. • When using...
User Manual
Page 46
... writing speeds will not support high-resolution videos. If your card does not, set a lower resolution. • Memory cards with Sound Alive may differ from actual sounds. Sound Alive Off: Turn off the Sound Alive function. The camera can record HD videos of up to reduce the zoom noise. See Steps 7 and 8 below. 1 In Shooting mode, press [M]. 2 Select v. 3 Press [m]. 4 Select v “ Frame Rate. 5 Select a frame rate (the number of the zoom operating. Using the Movie mode...
... writing speeds will not support high-resolution videos. If your card does not, set a lower resolution. • Memory cards with Sound Alive may differ from actual sounds. Sound Alive Off: Turn off the Sound Alive function. The camera can record HD videos of up to reduce the zoom noise. See Steps 7 and 8 below. 1 In Shooting mode, press [M]. 2 Select v. 3 Press [m]. 4 Select v “ Frame Rate. 5 Select a frame rate (the number of the zoom operating. Using the Movie mode...
User Manual
Page 49
... Selecting an image quality 50 Using the timer 51 Shooting in Shooting mode. Shooting options Learn how to set the options in the dark 52 Preventing red-eye 52 Using the flash 52 Adjusting the ISO sensitivity 54 Changing the camera's focus 55 Using macro 55 Using auto focus 55 Using tracking auto focus 56 Adjusting the focus area 57 Using Face Detection 58 Detecting faces 58 Capturing a self portrait shot 59 Capturing a smile shot 59 Detecting eye blinking 60 Using Smart...
... Selecting an image quality 50 Using the timer 51 Shooting in Shooting mode. Shooting options Learn how to set the options in the dark 52 Preventing red-eye 52 Using the flash 52 Adjusting the ISO sensitivity 54 Changing the camera's focus 55 Using macro 55 Using auto focus 55 Using tracking auto focus 56 Adjusting the focus area 57 Using Face Detection 58 Detecting faces 58 Capturing a self portrait shot 59 Capturing a smile shot 59 Detecting eye blinking 60 Using Smart...
User Manual
Page 54
...; Use a tripod to reduce the red-eye effect. • There is dark. Auto: The flash will display the shake warning when you set Burst options or select Self-Portrait or Blink Detection. • Make sure that your photo. Do not move until the flash fires a second time. Available options may appear in your subjects are shooting in low light. Do...
...; Use a tripod to reduce the red-eye effect. • There is dark. Auto: The flash will display the shake warning when you set Burst options or select Self-Portrait or Blink Detection. • Make sure that your photo. Do not move until the flash fires a second time. Available options may appear in your subjects are shooting in low light. Do...

User Manual
Page 74
... Photo file information Memory in use File Information Icon Description Print order has been set (DPOF) Protected file Photo includes a registered face (Available only when you want to view files stored in the internal memory, remove your camera. 1 Press [P]. • The most recent file will be displayed. • If the camera is off, it will turn on the screen, press [D]. Starting Playback mode View photos or play videos stored in your memory card...
... Photo file information Memory in use File Information Icon Description Print order has been set (DPOF) Protected file Photo includes a registered face (Available only when you want to view files stored in the internal memory, remove your camera. 1 Press [P]. • The most recent file will be displayed. • If the camera is off, it will turn on the screen, press [D]. Starting Playback mode View photos or play videos stored in your memory card...
User Manual
Page 101
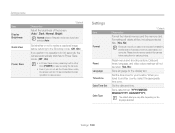
... operations for 30 seconds, the camera automatically switches to Power Save mode. (Off*, On) • In Power Save mode, press any button other than [POWER] to resume using them to capture photos. Set a date format. (YYYY/MM/DD, MM/DD/YYYY, DD/MM/YYYY) The default date type may differ depending on the language selected. Settings 100 Settings menu Item Display Brightness Quick View Power Save * Default Description Adjust the brightness of camera, a memory card reader, or a computer. Set the time zone for the display...
... operations for 30 seconds, the camera automatically switches to Power Save mode. (Off*, On) • In Power Save mode, press any button other than [POWER] to resume using them to capture photos. Set a date format. (YYYY/MM/DD, MM/DD/YYYY, DD/MM/YYYY) The default date type may differ depending on the language selected. Settings 100 Settings menu Item Display Brightness Quick View Power Save * Default Description Adjust the brightness of camera, a memory card reader, or a computer. Set the time zone for the display...
User Manual
Page 102
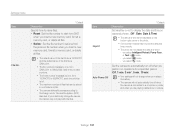
... intentionally change when you replace the battery. • The camera will be stored in s mode - Item Imprint Auto Power Off * Default Description Set whether or not to display the date and time on captured photos. (Off*, Date, Date & Time) • The date and time will not automatically turn off when the camera is connected to the Design rule for Camera File system (DCF) standard. Settings 101 you are playing a slide show or videos. you select d mode Set the camera...
... intentionally change when you replace the battery. • The camera will be stored in s mode - Item Imprint Auto Power Off * Default Description Set whether or not to display the date and time on captured photos. (Off*, Date, Date & Time) • The date and time will not automatically turn off when the camera is connected to the Design rule for Camera File system (DCF) standard. Settings 101 you are playing a slide show or videos. you select d mode Set the camera...
User Manual
Page 115
... work • The flash option may turn on the memory card. Recharge if needed. • Batteries are having problems with your camera's lifespan or performance. Get a new memory card. • Make sure that the camera is switched on your pocket. • Using the flash or recording videos depletes the battery quickly. This is inserted correctly. Before contacting a service center If you are consumable parts that must be replaced over time...
... work • The flash option may turn on the memory card. Recharge if needed. • Batteries are having problems with your camera's lifespan or performance. Get a new memory card. • Make sure that the camera is switched on your pocket. • Using the flash or recording videos depletes the battery quickly. This is inserted correctly. Before contacting a service center If you are consumable parts that must be replaced over time...

User Manual
Page 128
... Beauty Shot mode 41 Blink Detection 60 Brightness Playback mode 86 Shooting mode 63 Burst modes Auto Exposure Bracket (AEB) 68 Continuous 68 Motion Capture 68 C Camera maintenance 105 Camera specifications 117 Capturing an image from video 82 Charging 18 Cleaning Camera body 105 Display 105 Lens 105 Connecting to a computer Mac 95 Windows 90 Contrast Playback mode 86 Shooting mode 71 D Date/Time Set 20, 100 Deleting files 77 Digital Print Order Format (DPOF) 87 Digital zoom 27 Disconnecting the camera 94 Display...
... Beauty Shot mode 41 Blink Detection 60 Brightness Playback mode 86 Shooting mode 63 Burst modes Auto Exposure Bracket (AEB) 68 Continuous 68 Motion Capture 68 C Camera maintenance 105 Camera specifications 117 Capturing an image from video 82 Charging 18 Cleaning Camera body 105 Display 105 Lens 105 Connecting to a computer Mac 95 Windows 90 Contrast Playback mode 86 Shooting mode 71 D Date/Time Set 20, 100 Deleting files 77 Digital Print Order Format (DPOF) 87 Digital zoom 27 Disconnecting the camera 94 Display...
User Manual
Page 130
... 96 Picture in Picture mode 38 Playback button 16 Playback mode 73 Power button 14 Power Save mode 100 Printing photos 96 Program mode 35 Protecting files 77 Q Quick View 100 R Red-eye Playback mode 86 Shooting mode 52 Reducing camera shake Digital Image Stabilization (DIS) 29 Optical Image Stabilization (OIS) 29 Reset 100 Resolution Playback mode 83 Shooting mode 49 Retouching faces Playback mode 86 Shooting mode 41 Rotating 83 S Saturation Playback mode 86 Shooting mode 71 Scene mode 39 Self-Portrait 59 Service Center 114 Settings 100 Sharpness 71 Shooting Portraits Beauty Shot mode...
... 96 Picture in Picture mode 38 Playback button 16 Playback mode 73 Power button 14 Power Save mode 100 Printing photos 96 Program mode 35 Protecting files 77 Q Quick View 100 R Red-eye Playback mode 86 Shooting mode 52 Reducing camera shake Digital Image Stabilization (DIS) 29 Optical Image Stabilization (OIS) 29 Reset 100 Resolution Playback mode 83 Shooting mode 49 Retouching faces Playback mode 86 Shooting mode 41 Rotating 83 S Saturation Playback mode 86 Shooting mode 71 Scene mode 39 Self-Portrait 59 Service Center 114 Settings 100 Sharpness 71 Shooting Portraits Beauty Shot mode...

User Manual
Page 131
Index T Thumbnails 76 Timer Shooting mode 51 Timer lamp 14 Time settings 20 Time zone settings 19, 100 Transferring files Mac 95 Windows 90 Tripod mount 14 U Unpacking 13 USB port 14 V Video Playback mode 81 Shooting mode 45 Video Out 102 Viewing files Panoramic photos 80 Slide show 80 Smart Album 75 Thumbnails 76 TV 89 W White Balance 66 Z Zoom Using the zoom 27 Zoom button 15 Zoom sound settings 45 Appendixes 130
Index T Thumbnails 76 Timer Shooting mode 51 Timer lamp 14 Time settings 20 Time zone settings 19, 100 Transferring files Mac 95 Windows 90 Tripod mount 14 U Unpacking 13 USB port 14 V Video Playback mode 81 Shooting mode 45 Video Out 102 Viewing files Panoramic photos 80 Slide show 80 Smart Album 75 Thumbnails 76 TV 89 W White Balance 66 Z Zoom Using the zoom 27 Zoom button 15 Zoom sound settings 45 Appendixes 130


