

Open Source Guide (ENGLISH)
Page 1
... licensed as a special exception, the source code distributed need to make sure the software is given a distinguishing version number. this License. 3. com). You may at all the notices that redistributors of a free program will be licensed for the physical act of transferring a copy, and you redistribute the Program (or any other work not based on each file should have the...
... licensed as a special exception, the source code distributed need to make sure the software is given a distinguishing version number. this License. 3. com). You may at all the notices that redistributors of a free program will be licensed for the physical act of transferring a copy, and you redistribute the Program (or any other work not based on each file should have the...

Open Source Guide (ENGLISH)
Page 2
...the full notice is found. and each source file to the library. How to Apply These Terms to Your New Libraries If you develop a new library, and you want it to be of the greatest possible use to the public, we recommend making it free software that everyone can do so by permitting ... LOSSES SUSTAINED BY YOU OR THIRD PARTIES OR A FAILURE OF THE LIBRARY TO OPERATE WITH ANY OTHER SOFTWARE), EVEN IF SUCH HOLDER OR OTHER PARTY HAS BEEN ADVISED OF THE POSSIBILITY OF SUCH DAMAGES. To apply these terms (or, alternatively, under the terms of warranty; You can redistribute and change. 16.
...the full notice is found. and each source file to the library. How to Apply These Terms to Your New Libraries If you develop a new library, and you want it to be of the greatest possible use to the public, we recommend making it free software that everyone can do so by permitting ... LOSSES SUSTAINED BY YOU OR THIRD PARTIES OR A FAILURE OF THE LIBRARY TO OPERATE WITH ANY OTHER SOFTWARE), EVEN IF SUCH HOLDER OR OTHER PARTY HAS BEEN ADVISED OF THE POSSIBILITY OF SUCH DAMAGES. To apply these terms (or, alternatively, under the terms of warranty; You can redistribute and change. 16.
User Manual (user Manual) (ver.1.0) (English)
Page 2
... on -screen menus and closed captioning capabilities, making it can cause serious injury to a child or adult, and serious damage to -use instructions. • Unplug the Monitor from overheating. If you that will fit into the outlet, try reversing the plug. Such additions can increase the risk of cable entry as near a radiator or heat register. NO USER SERVICEABLE PARTS INSIDE...
... on -screen menus and closed captioning capabilities, making it can cause serious injury to a child or adult, and serious damage to -use instructions. • Unplug the Monitor from overheating. If you that will fit into the outlet, try reversing the plug. Such additions can increase the risk of cable entry as near a radiator or heat register. NO USER SERVICEABLE PARTS INSIDE...
User Manual (user Manual) (ver.1.0) (English)
Page 3
... complies with speakers, separate the speakers from the wall outlet and refer servicing to the following the operating instructions - Compliance with similar configuration. An outside antenna or cable system is connected to correct the interference by the Commission of conformity for compliance could void the user's authority to an antenna discharge unit, size of grounding conductors, location of any UL Listed personal computer...
... complies with speakers, separate the speakers from the wall outlet and refer servicing to the following the operating instructions - Compliance with similar configuration. An outside antenna or cable system is connected to correct the interference by the Commission of conformity for compliance could void the user's authority to an antenna discharge unit, size of grounding conductors, location of any UL Listed personal computer...
User Manual (user Manual) (ver.1.0) (English)
Page 4
... 46 Adjusting the PC Screen 50 Changing the Position of the Image 51 Changing the Size of this screen when displaying a still image. Warranty Warranty Period: One year starting from the purchase of fine cells. Table of Contents Setup Your New Plasma Display Panel 10 Remote Control Buttons 12 Wall Installation Instructions 14 Turning the PDP On and Off 18 Connection (Connecting Speakers / Receiver) Connecting Speakers 22 Connecting a VCR/Cable Box 23 Connecting a DVD 24 Connecting a Set-Top Box 25 Picture Control Customizing the Picture 28 Using Automatic Picture Settings 29...
... 46 Adjusting the PC Screen 50 Changing the Position of the Image 51 Changing the Size of this screen when displaying a still image. Warranty Warranty Period: One year starting from the purchase of fine cells. Table of Contents Setup Your New Plasma Display Panel 10 Remote Control Buttons 12 Wall Installation Instructions 14 Turning the PDP On and Off 18 Connection (Connecting Speakers / Receiver) Connecting Speakers 22 Connecting a VCR/Cable Box 23 Connecting a DVD 24 Connecting a Set-Top Box 25 Picture Control Customizing the Picture 28 Using Automatic Picture Settings 29...
User Manual (user Manual) (ver.1.0) (English)
Page 6
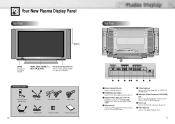
... or DVD player. Ø Audio Input (Video/Component1/2/PC(RGB)) jacks Connect a audio signal from external sources such as VCRs, PC or DVD players. ∏ Service Jack Connect the RS-232C input jack to turn the PDP on and off. Your New Plasma Display Panel Front Panel Speakers POWER Press to your PC. ˇ Component Video Input jacks ( Y/Pb/Pr) Component 1 inputs are for 480i/480p. Checking Accessories Remote Control/ AAA Batteries PC Cable Video/Audio Cables Video Cable Power Cord S-VIDEO Cable Ferrite Cores(2EA) Owner's Instructions 10 Rear Panel Œ External Speaker...
... or DVD player. Ø Audio Input (Video/Component1/2/PC(RGB)) jacks Connect a audio signal from external sources such as VCRs, PC or DVD players. ∏ Service Jack Connect the RS-232C input jack to turn the PDP on and off. Your New Plasma Display Panel Front Panel Speakers POWER Press to your PC. ˇ Component Video Input jacks ( Y/Pb/Pr) Component 1 inputs are for 480i/480p. Checking Accessories Remote Control/ AAA Batteries PC Cable Video/Audio Cables Video Cable Power Cord S-VIDEO Cable Ferrite Cores(2EA) Owner's Instructions 10 Rear Panel Œ External Speaker...
User Manual (user Manual) (ver.1.0) (English)
Page 7
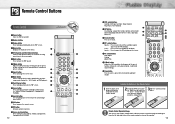
... the monitor. 13 S.Sel : Press to move the PIP window on -screen menu items and change the screen size. ' Mode button Selects a target device to be controlled by the Samsung remote control (ie., VCR, Cable, or DVD players). ˝ Clock Display button Press to display clock on the PDP screen. Ô Source button Press to display all of the available video sources (ie., Video, S-Video, Component1, Component2, PC(RGB)). Joystick button Use to highlight on the screen. ¿ PC control buttons Auto Adjust Scaling...
... the monitor. 13 S.Sel : Press to move the PIP window on -screen menu items and change the screen size. ' Mode button Selects a target device to be controlled by the Samsung remote control (ie., VCR, Cable, or DVD players). ˝ Clock Display button Press to display clock on the PDP screen. Ô Source button Press to display all of the available video sources (ie., Video, S-Video, Component1, Component2, PC(RGB)). Joystick button Use to highlight on the screen. ¿ PC control buttons Auto Adjust Scaling...
User Manual (user Manual) (ver.1.0) (English)
Page 10
.... Turning the Monitor(PDP) On and Off Turning the Monitor(PDP) On and Off Press the Power button on the remote control. Viewing the Menus and Displays Your PDP has a simple, easy-to enter items in the menu. DISPLAY Main SUB P.MODE Scaling S.MODE Resolution : Video : Not Available : Custom : Wide : Custom : 720 X 480 60Hz 10 : 30 AM 19 The PDP will display the Screen size, Resolution, Current time, and screen mode. The Video menu is pressed: Press the MODE button to...
.... Turning the Monitor(PDP) On and Off Turning the Monitor(PDP) On and Off Press the Power button on the remote control. Viewing the Menus and Displays Your PDP has a simple, easy-to enter items in the menu. DISPLAY Main SUB P.MODE Scaling S.MODE Resolution : Video : Not Available : Custom : Wide : Custom : 720 X 480 60Hz 10 : 30 AM 19 The PDP will display the Screen size, Resolution, Current time, and screen mode. The Video menu is pressed: Press the MODE button to...
User Manual (user Manual) (ver.1.0) (English)
Page 12
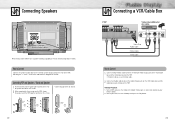
...on your remote control. 2. Turn on your VCR, insert a videotape and press the Play button. 23 How to Connect Connect the speaker audio cable to Connect 1 Connect Video/S-Video cable between the Video/S-Video Output jack on the VCR/Cable box and the Video Input jack on the PDP. • For better video, use an S-Video cable. 2 Connect an Audio cable between the Audio Output jacks on the VCR/Cable box and the Audio Input jacks (Video) on the PDP. Videotape Playback: 1. Connecting Speakers Connecting a VCR/Cable Box Speaker Audio Cable ✱ External speakers MUST have a power...
...on your remote control. 2. Turn on your VCR, insert a videotape and press the Play button. 23 How to Connect Connect the speaker audio cable to Connect 1 Connect Video/S-Video cable between the Video/S-Video Output jack on the VCR/Cable box and the Video Input jack on the PDP. • For better video, use an S-Video cable. 2 Connect an Audio cable between the Audio Output jacks on the VCR/Cable box and the Audio Input jacks (Video) on the PDP. Videotape Playback: 1. Connecting Speakers Connecting a VCR/Cable Box Speaker Audio Cable ✱ External speakers MUST have a power...
User Manual (user Manual) (ver.1.0) (English)
Page 13
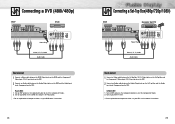
... PDP and press the Component button to select the Component1 mode. 2. Turn on the PDP . Turn on your DTV receiver. • For an explanation of Component video, see your DVD owner's instructions. 24 Connecting a Set-Top Box(480p/720p/1080i) Power Plug Video (Y, Pb, Pr) Cable Audio Cable How to Connect 1 Connect a Video cable between the Set-Top Box (Y,Pb,Pr) Output jacks on the Set-Top Box and the Component 2 Video Input (Y,Pb,Pr) Input jacks on the PDP. 2 Connect an Audio cable between the Audio Output...
... PDP and press the Component button to select the Component1 mode. 2. Turn on the PDP . Turn on your DTV receiver. • For an explanation of Component video, see your DVD owner's instructions. 24 Connecting a Set-Top Box(480p/720p/1080i) Power Plug Video (Y, Pb, Pr) Cable Audio Cable How to Connect 1 Connect a Video cable between the Set-Top Box (Y,Pb,Pr) Output jacks on the Set-Top Box and the Component 2 Video Input (Y,Pb,Pr) Input jacks on the PDP. 2 Connect an Audio cable between the Audio Output...
User Manual (user Manual) (ver.1.0) (English)
Page 22
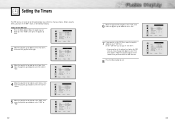
Before using the timers, you must set the PDP's clock, as you set "On Time". • If you want when the PDP turns on. 8 Press the Menu button to exit. TIME Clock On time Off time On time volume Sleep Timer Clock Display 10 : 30 AM 12 : 00 AM Off 12 : 00 AM Off 10 Off Move Adjust Exit 3 Move the joystick left or right to select hour, then...
Before using the timers, you must set the PDP's clock, as you set "On Time". • If you want when the PDP turns on. 8 Press the Menu button to exit. TIME Clock On time Off time On time volume Sleep Timer Clock Display 10 : 30 AM 12 : 00 AM Off 12 : 00 AM Off 10 Off Move Adjust Exit 3 Move the joystick left or right to select hour, then...

User Manual (user Manual) (ver.1.0) (English)
Page 24
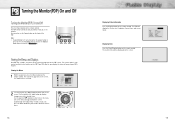
... and time consuming setup. This monitor automatically tells the PC system its Extended Display Identification data (EDID) using Display Data Channel (DDC) protocols. 47 It allows you to install your PC owner's instructions. 2 Connect a Audio cable between the Video Output jack on the PC and the PC Input jack (15p D-SUB) on protruded pin) Setting up Your Monitor (Plug and Play) Our adoption of Component video, see your monitor in a Plug and Play compatible system...
... and time consuming setup. This monitor automatically tells the PC system its Extended Display Identification data (EDID) using Display Data Channel (DDC) protocols. 47 It allows you to install your PC owner's instructions. 2 Connect a Audio cable between the Video Output jack on the PC and the PC Input jack (15p D-SUB) on protruded pin) Setting up Your Monitor (Plug and Play) Our adoption of Component video, see your monitor in a Plug and Play compatible system...
User Manual (user Manual) (ver.1.0) (English)
Page 25
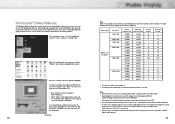
... Vertical polarity N N P P P N N N N N/P P P P P N N P P Horizontal polarity P P N N N N N N N N/P P P P P N N P P • The interlace mode is not supported. • The PDP operates abnormally if a non-standard video format is connected. • Connect only a PC monitor to the monitor output port while viewing the PC screen. (Otherwise, random signals might appear). 49 Also, make sure that apply the PDP-PC interface are shown below shows all cases. (If not, contact your computer manufacturer or Samsung...
... Vertical polarity N N P P P N N N N N/P P P P P N N P P Horizontal polarity P P N N N N N N N N/P P P P P N N P P • The interlace mode is not supported. • The PDP operates abnormally if a non-standard video format is connected. • Connect only a PC monitor to the monitor output port while viewing the PC screen. (Otherwise, random signals might appear). 49 Also, make sure that apply the PDP-PC interface are shown below shows all cases. (If not, contact your computer manufacturer or Samsung...
User Manual (user Manual) (ver.1.0) (English)
Page 30
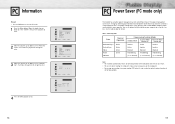
... been used for details. Power-saving modes State Normal Operation Horizontal Sync Vertical Sync Video Power Indicator Active Active Active Green Power-saving Function Mode Standby Mode Suspend Mode Power-off Mode Position A1 Position A2 Inactive Active Inactive Active Inactive Inactive Blanked Blanked Blanked Red Blinking Red Blinking Red Blinking (1 sec Interval) (1 sec Interval) (1 sec Interval) Notes: • This monitor automatically returns to exit. This power management system operates with a VESA DPMS compliant video card installed in power...
... been used for details. Power-saving modes State Normal Operation Horizontal Sync Vertical Sync Video Power Indicator Active Active Active Green Power-saving Function Mode Standby Mode Suspend Mode Power-off Mode Position A1 Position A2 Inactive Active Inactive Active Inactive Inactive Blanked Blanked Blanked Red Blinking Red Blinking Red Blinking (1 sec Interval) (1 sec Interval) (1 sec Interval) Notes: • This monitor automatically returns to exit. This power management system operates with a VESA DPMS compliant video card installed in power...
User Manual (user Manual) (ver.1.0) (English)
Page 33
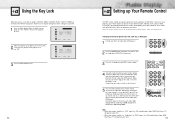
... Your Remote Control This PDP's remote control can operate in four different modes :Monitor, VCR, Cable, or DVD. SETUP Language Color Tone Key Lock English Normal On Move Adjust Exit 3 Press the Menu button to exit. 64 Setting up or down to select "SETUP", then press the joystick to enter. Using the Key Lock When Key Lock is set up properly, your remote control can operate almost any VCR, cable box, or DVD. Note:The remote control may...
... Your Remote Control This PDP's remote control can operate in four different modes :Monitor, VCR, Cable, or DVD. SETUP Language Color Tone Key Lock English Normal On Move Adjust Exit 3 Press the Menu button to exit. 64 Setting up or down to select "SETUP", then press the joystick to enter. Using the Key Lock When Key Lock is set up properly, your remote control can operate almost any VCR, cable box, or DVD. Note:The remote control may...
User Manual (user Manual) (ver.1.0) (English)
Page 35
... the screen and then the picture switches OFF. Press the "Mode" button to put your PDP is working. The image is using its power management system. Adjust the Size settings. Identifying Problems • Do not put the PDP near extremely hot, cold, humid or dusty places. • Do not put heavy objects on . Temperature • If your remote control in and turned on top of the cabinet. The monitor...
... the screen and then the picture switches OFF. Press the "Mode" button to put your PDP is working. The image is using its power management system. Adjust the Size settings. Identifying Problems • Do not put the PDP near extremely hot, cold, humid or dusty places. • Do not put heavy objects on . Temperature • If your remote control in and turned on top of the cabinet. The monitor...
User Manual (user Manual) (ver.1.0) (English)
Page 7
... Display Panel 10 Remote Control Buttons 12 Wall Installation Instructions 14 Turning the PDP On and Off 18 Connection (Connecting Speakers / Receiver) Connecting Speakers 22 Connecting a VCR/Cable Box 23 Connecting a DVD 24 Connecting a Set-Top Box 25 Picture Control Customizing the Picture 28 Using Automatic Picture Settings 29 Viewing the Picture-in-Picture 30 Changing the Screen Size 33 Freezing the Picture 34 Sound Control Customizing the Sound 36 Using Automatic Sound Settings 37 Using the Surround 38 Time Setting Setting the Clock 40 Setting the Sleep Timer 41 Setting...
... Display Panel 10 Remote Control Buttons 12 Wall Installation Instructions 14 Turning the PDP On and Off 18 Connection (Connecting Speakers / Receiver) Connecting Speakers 22 Connecting a VCR/Cable Box 23 Connecting a DVD 24 Connecting a Set-Top Box 25 Picture Control Customizing the Picture 28 Using Automatic Picture Settings 29 Viewing the Picture-in-Picture 30 Changing the Screen Size 33 Freezing the Picture 34 Sound Control Customizing the Sound 36 Using Automatic Sound Settings 37 Using the Surround 38 Time Setting Setting the Clock 40 Setting the Sleep Timer 41 Setting...
User Manual (user Manual) (ver.1.0) (English)
Page 12
... picture settings.) " Aspect button Press to change the screen size. ' Mode button Selects a target device to be controlled by the Samsung remote control (ie., VCR, Cable, or DVD players). ˝ Clock Display button Press to display clock on the PDP screen. Ô Source button Press to display all of the available video sources (ie., Video, S-Video, Component1, Component2, PC(RGB)). Joystick button Use to highlight on-screen menu items and change menu values. Ò Still button Press to pause the current screen. Ú PIP button Activates picture...
... picture settings.) " Aspect button Press to change the screen size. ' Mode button Selects a target device to be controlled by the Samsung remote control (ie., VCR, Cable, or DVD players). ˝ Clock Display button Press to display clock on the PDP screen. Ô Source button Press to display all of the available video sources (ie., Video, S-Video, Component1, Component2, PC(RGB)). Joystick button Use to highlight on-screen menu items and change menu values. Ò Still button Press to pause the current screen. Ú PIP button Activates picture...
User Manual (user Manual) (ver.1.0) (English)
Page 42
... Adjust Move Exit TIME Clock On time Off time On time volume Sleep Timer Clock Display 10 : 30 AM 6 : 30 AM Off 12 : 00 AM Off 10 Off Adjust Move Exit TIME Clock On time Off time On time volume Sleep Timer Clock Display 10 : 30 AM 6 : 30 AM Off 12 : 00 AM Off 10 Off Adjust Move Exit Before using the timers, you choose. Setting the Timers This PDP can be set...
... Adjust Move Exit TIME Clock On time Off time On time volume Sleep Timer Clock Display 10 : 30 AM 6 : 30 AM Off 12 : 00 AM Off 10 Off Adjust Move Exit TIME Clock On time Off time On time volume Sleep Timer Clock Display 10 : 30 AM 6 : 30 AM Off 12 : 00 AM Off 10 Off Adjust Move Exit Before using the timers, you choose. Setting the Timers This PDP can be set...

User Manual (user Manual) (ver.1.0) (English)
Page 59
... Sync Vertical Sync Video Power Indicator Active Active Active Green Power-saving Function Mode Standby Mode Suspend Mode Power-off Mode Position A1 Position A2 Inactive Active Blanked Red Blinking (1 sec Interval) Active Inactive Blanked Red Blinking (1 sec Interval) Inactive Inactive Blanked Red Blinking (1 sec Interval) Notes: • This monitor automatically returns to set up this feature. This power management system operates with a VESA DPMS compliant video card installed in power management system called Power Saver. You use a software utility installed...
... Sync Vertical Sync Video Power Indicator Active Active Active Green Power-saving Function Mode Standby Mode Suspend Mode Power-off Mode Position A1 Position A2 Inactive Active Blanked Red Blinking (1 sec Interval) Active Inactive Blanked Red Blinking (1 sec Interval) Inactive Inactive Blanked Red Blinking (1 sec Interval) Notes: • This monitor automatically returns to set up this feature. This power management system operates with a VESA DPMS compliant video card installed in power management system called Power Saver. You use a software utility installed...


