Quick Guide (ENGLISH)
Page 2
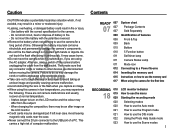
Contents Health and safety information 2 1 Camera layout 4 8 Setting up your camera... ...... 5 Unpacking 5 7 Inserting the battery and memory card 6 14 Charging the battery 6 12 Turning on your camera 7 17 Selecting options 7 34 Capturing photos or videos... 8 20 Playing files 9 54... Transferring files to a PC (Windows 10 86 Specifications 11 79 Health and safety information Warnings Do not use your camera near fuels, ...
Contents Health and safety information 2 1 Camera layout 4 8 Setting up your camera... ...... 5 Unpacking 5 7 Inserting the battery and memory card 6 14 Charging the battery 6 12 Turning on your camera 7 17 Selecting options 7 34 Capturing photos or videos... 8 20 Playing files 9 54... Transferring files to a PC (Windows 10 86 Specifications 11 79 Health and safety information Warnings Do not use your camera near fuels, ...
Quick Guide (ENGLISH)
Page 7
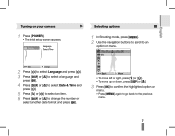
English Turning on your camera 1 Press [POWER]. ▪▪ The intial setup screen appears. Back Move ▪▪ To move left or right, press [ ] or To move up or down, ...
English Turning on your camera 1 Press [POWER]. ▪▪ The intial setup screen appears. Back Move ▪▪ To move left or right, press [ ] or To move up or down, ...

Quick Guide (ENGLISH)
Page 10
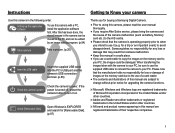
Disconnecting safely (for Windows XP) Click ▼ Click 3 Turn on the camera. 4 On your PC, select My Computer → Removable Disk → DCIM → 100SSCAM. 5 Select the files you want and drag or save them to the PC with the USB cable. Transferring files to a PC (Windows) 1 Insert the installation CD in a CD-ROM drive and follow the onscreen instructions. 2 Connect the camera to the PC. 10
Disconnecting safely (for Windows XP) Click ▼ Click 3 Turn on the camera. 4 On your PC, select My Computer → Removable Disk → DCIM → 100SSCAM. 5 Select the files you want and drag or save them to the PC with the USB cable. Transferring files to a PC (Windows) 1 Insert the installation CD in a CD-ROM drive and follow the onscreen instructions. 2 Connect the camera to the PC. 10
User Manual (ENGLISH)
Page 2
...(p.87) Thank you for any loss or damage that the camera is turned off, preset the camera button to turn it (e.g. If the Check the camera's power power is operating properly prior to when you use this camera with the camera to your PC, be sure to use of a card reader... the manufacturer holds no responsibility for buying a Samsung Digital Camera. å Prior to using this camera, please read the user manual thoroughly. å If you require After Sales service, please bring the camera and the cause of their respective companies. 1 Samsung takes no responsibility for a trip or an...
...(p.87) Thank you for any loss or damage that the camera is turned off, preset the camera button to turn it (e.g. If the Check the camera's power power is operating properly prior to when you use this camera with the camera to your PC, be sure to use of a card reader... the manufacturer holds no responsibility for buying a Samsung Digital Camera. å Prior to using this camera, please read the user manual thoroughly. å If you require After Sales service, please bring the camera and the cause of their respective companies. 1 Samsung takes no responsibility for a trip or an...
User Manual (ENGLISH)
Page 4
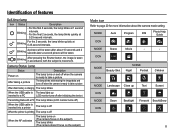
Do not insert the battery with the polarities reversed. å Remove the battery when not planning to turn on the LCD monitor and the colour may damage the cords or cables and cause a fire or electric shock. å Take care not to ... 008 Identification of time. Then make sure that any connector cords or cables to use the memory card 017 When using the camera for the camera. - It may experience the following. Use battery with hands or objects. Caution CAUTION indicates a potentially hazardous situation which, if not avoided, may be an...
Do not insert the battery with the polarities reversed. å Remove the battery when not planning to turn on the LCD monitor and the colour may damage the cords or cables and cause a fire or electric shock. å Take care not to ... 008 Identification of time. Then make sure that any connector cords or cables to use the memory card 017 When using the camera for the camera. - It may experience the following. Use battery with hands or objects. Caution CAUTION indicates a potentially hazardous situation which, if not avoided, may be an...
User Manual (ENGLISH)
Page 12
...with the subject's movement. ICON MODE Beauty Shot SCENE Night Portrait Children ICON MODE Landscape Close up inserted to a PC (LCD monitor turns off when the camera is ready to take a picture When flash battery is charging The lamp blinks When the USB cable is The lamp lights ... Blinking After pressing the Shutter button, the image is off When the AF activates The lamp turns on (The camera focus on the subject) The lamp blinks (The camera doesn't focus on and off when the camera is ready to take a picture After taking a picture The lamp blinks while saving the image...
...with the subject's movement. ICON MODE Beauty Shot SCENE Night Portrait Children ICON MODE Landscape Close up inserted to a PC (LCD monitor turns off when the camera is ready to take a picture When flash battery is charging The lamp blinks When the USB cable is The lamp lights ... Blinking After pressing the Shutter button, the image is off When the AF activates The lamp turns on (The camera focus on the subject) The lamp blinks (The camera doesn't focus on and off when the camera is ready to take a picture After taking a picture The lamp blinks while saving the image...
User Manual (ENGLISH)
Page 13
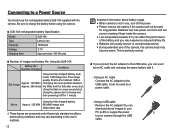
...229; Batteries will not be used for 5 minutes and then powering it . - This is not in use, turn off for 1 minute. Be sure to charge the battery before using the camera. Ê SLB-10A rechargeable battery Specification Model SLB-10A Type Lithium lon Capacity 1050mAh Voltage 3.7V ...download stored images to your PC (p.86) or supply the power to your camera through the USB cable. Using a USB cable : Remove the AC adapter.You can lose power over time and are measured under Samsung's standard conditions and shooting conditions and may become warm. Connecting to a Power ...
...229; Batteries will not be used for 5 minutes and then powering it . - This is not in use, turn off for 1 minute. Be sure to charge the battery before using the camera. Ê SLB-10A rechargeable battery Specification Model SLB-10A Type Lithium lon Capacity 1050mAh Voltage 3.7V ...download stored images to your PC (p.86) or supply the power to your camera through the USB cable. Using a USB cable : Remove the AC adapter.You can lose power over time and are measured under Samsung's standard conditions and shooting conditions and may become warm. Connecting to a Power ...

User Manual (ENGLISH)
Page 14
... more than 10 minutes before using the front side USB port of the PC doesn't meet the Power output standard (5V, 500mA), the camera may not be turned off while charging the battery. Ê Charging LED of the AC Adapter Charging LED Being Charged Red LED is on Charging is complete Green... not be fully charged. It may cause breakage of cable or camera. å If the charging LED of the AC Charger does not turn on the camera at the same time : remove other device. å Camera can not be detected using the camera. å Do not use the back side USB port of computer. å...
... more than 10 minutes before using the front side USB port of the PC doesn't meet the Power output standard (5V, 500mA), the camera may not be turned off while charging the battery. Ê Charging LED of the AC Adapter Charging LED Being Charged Red LED is on Charging is complete Green... not be fully charged. It may cause breakage of cable or camera. å If the charging LED of the AC Charger does not turn on the camera at the same time : remove other device. å Camera can not be detected using the camera. å Do not use the back side USB port of computer. å...

User Manual (ENGLISH)
Page 15
Inserting the memory card Ê Insert the memory card as shown - Turn off the camera's power before inserting the memory card. - Doing so may damage the... use spare battery) spare battery) Battery empty. (Recharge or use spare battery) Ä When using the camera and the battery in a place that are 4 indicators for battery condition that is excessively cold or hot, the... battery status on the LCD may be different from the actual battery status. 14 If the camera does not turn on after you have inserted battery, please check whether the battery (+ / -). - Have the front ...
Inserting the memory card Ê Insert the memory card as shown - Turn off the camera's power before inserting the memory card. - Doing so may damage the... use spare battery) spare battery) Battery empty. (Recharge or use spare battery) Ä When using the camera and the battery in a place that are 4 indicators for battery condition that is excessively cold or hot, the... battery status on the LCD may be different from the actual battery status. 14 If the camera does not turn on after you have inserted battery, please check whether the battery (+ / -). - Have the front ...

User Manual (ENGLISH)
Page 16
...different camera. å Turn off or the memory card is insufficient memory available : A [Memory Full] message will appear and the camera will not operate. Should this camera. å Do not use a memory card formatted by the Samsung warranty. å The memory card is used in another digital camera or... memory card reader. å If the memory card is warm. When the memory card is an electronic precision device. If the power is switched off the camera power whenever the ...
...different camera. å Turn off or the memory card is insufficient memory available : A [Memory Full] message will appear and the camera will not operate. Should this camera. å Do not use a memory card formatted by the Samsung warranty. å The memory card is used in another digital camera or... memory card reader. å If the memory card is warm. When the memory card is an electronic precision device. If the power is switched off the camera power whenever the ...
User Manual (ENGLISH)
Page 18
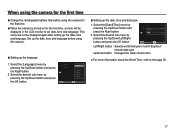
...the Up/Down/Left/Right button and press the OK button. When using the camera for the first time Ê Charge the rechargeable battery fully before using the camera for the first time. Ê When the camera is turned on for the first time, a menu will not be displayed in ...;ạ:㛨08/12/01 Français Deutsch Español Italiano Set Ê Setting up the date, time and language before using this camera. Ê Setting up the language 1. Select the [Date&Time] menu by pressing the Up/Down button and press the OK button. Language :English Date &...
...the Up/Down/Left/Right button and press the OK button. When using the camera for the first time Ê Charge the rechargeable battery fully before using the camera for the first time. Ê When the camera is turned on for the first time, a menu will not be displayed in ...;ạ:㛨08/12/01 Français Deutsch Español Italiano Set Ê Setting up the date, time and language before using this camera. Ê Setting up the language 1. Select the [Date&Time] menu by pressing the Up/Down button and press the OK button. Language :English Date &...
User Manual (ENGLISH)
Page 20
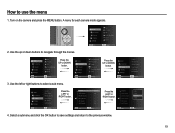
Turn on the camera and press the MENU button. Use the up or down buttons to select a sub menu. Use the left or right buttons to navigate through the .... Change 3. Select a submenu and click the OK button to save settings and return to use the menu 1. How to the previous window. A menu for each camera mode appears. 2. Volume Start Sound Shutter Sound Beep Sound AF Sound Self-Portrait Back Off :Medium Low:Off Med:1ium High:1 :On :On Set 19
Turn on the camera and press the MENU button. Use the up or down buttons to select a sub menu. Use the left or right buttons to navigate through the .... Change 3. Select a submenu and click the OK button to save settings and return to use the menu 1. How to the previous window. A menu for each camera mode appears. 2. Volume Start Sound Shutter Sound Beep Sound AF Sound Self-Portrait Back Off :Medium Low:Off Med:1ium High:1 :On :On Set 19
User Manual (ENGLISH)
Page 21
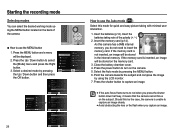
... batteries taking with minimal user interaction. 1. Press the shutter button to capture an image. å If the auto focus frame turns to red when you do not need to use the Auto mode ( ) Select this camera has a 9MB internal memory, you press the shutter button down half way, it means that the...
... batteries taking with minimal user interaction. 1. Press the shutter button to capture an image. å If the auto focus frame turns to red when you do not need to use the Auto mode ( ) Select this camera has a 9MB internal memory, you press the shutter button down half way, it means that the...
User Manual (ENGLISH)
Page 27
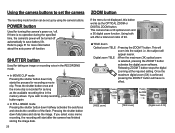
...more information about the auto power off . Using both will be set the camera The recording mode function can be turned off automatically to page 51 for as long as the OPTICAL ZOOM or DIGITAL ZOOM button. the subject will zoom into the subject i.e. SHUTTER button Used for... turning the camera's power on / off function. Press the shutter button once and the movie clip is selected, pressing the ZOOM T button activates the digital zoom software. POWER button Used for taking an image or recording ...
...more information about the auto power off . Using both will be set the camera The recording mode function can be turned off automatically to page 51 for as long as the OPTICAL ZOOM or DIGITAL ZOOM button. the subject will zoom into the subject i.e. SHUTTER button Used for... turning the camera's power on / off function. Press the shutter button once and the movie clip is selected, pressing the ZOOM T button activates the digital zoom software. POWER button Used for taking an image or recording ...
User Manual (ENGLISH)
Page 28
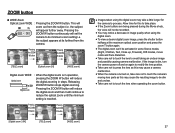
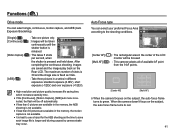
... zoom setting i.e. Pressing the ZOOM W button Pressing the ZOOM W button [TELE zoom] [Optical zoom 2X] [WIDE zoom] Digital zoom WIDE Optical zoom Digital zoom : When the digital zoom is turned on, take care not to touch the camera's moving lens parts as this to take a little longer for this may cause the resulting image to...
... zoom setting i.e. Pressing the ZOOM W button Pressing the ZOOM W button [TELE zoom] [Optical zoom 2X] [WIDE zoom] Digital zoom WIDE Optical zoom Digital zoom : When the digital zoom is turned on, take care not to touch the camera's moving lens parts as this to take a little longer for this may cause the resulting image to...
User Manual (ENGLISH)
Page 34
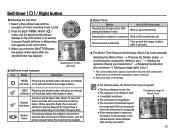
...) Detecting the subject's movement Blink (0.25 second interval) No movement is detected Turn on the flash charging time. Double self-timer Motion Timer A picture will be delayed for 30 seconds, or the camera doesn't sense stillness after about 10 seconds and 2 seconds later a second picture...6 seconds. *2: Move your hands fully)*2 Ã Stopping the detection (Do not move) Ã Taking an image (after 2 sec.) *1: The camera detects the subject's movement 6 seconds after the specified time has elapsed. Ê Self-timer mode indecator Icon Mode [Selecting the 10 SEC ...
...) Detecting the subject's movement Blink (0.25 second interval) No movement is detected Turn on the flash charging time. Double self-timer Motion Timer A picture will be delayed for 30 seconds, or the camera doesn't sense stillness after about 10 seconds and 2 seconds later a second picture...6 seconds. *2: Move your hands fully)*2 Ã Stopping the detection (Do not move) Ã Taking an image (after 2 sec.) *1: The camera detects the subject's movement 6 seconds after the specified time has elapsed. Ê Self-timer mode indecator Icon Mode [Selecting the 10 SEC ...
User Manual (ENGLISH)
Page 38
...automatically. Press the shutter button halfway. The higher the ISO value, the higher the camera's sensitivity to light and therefore the greater its capacity to take a picture. 37 The focus frame turns to green when the focus is automatically changed by variables such as the ISO value increases... the ISO sensitivity when taking pictures of yourself, the area of your face is automatically detected so that you use face detection options, your camera can detect a human face. ity. Press the shutter button fully to Auto. Ä [ISO] is enabled only in high luminance. However...
...automatically. Press the shutter button halfway. The higher the ISO value, the higher the camera's sensitivity to light and therefore the greater its capacity to take a picture. 37 The focus frame turns to green when the focus is automatically changed by variables such as the ISO value increases... the ISO sensitivity when taking pictures of yourself, the area of your face is automatically detected so that you use face detection options, your camera can detect a human face. ity. Press the shutter button fully to Auto. Ä [ISO] is enabled only in high luminance. However...
User Manual (ENGLISH)
Page 39
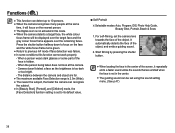
...hidden. - Camera doesn't detect a face as the brightness is set to its default value. Ê Self Portrait Ä Selectable modes: Auto, Program, DIS, Photo Help Guide, Beauty Shot, Portrait, Beach & Snow 1. Press the shutter button halfway down to focus on the nearest person. å The Digital zoom is.... - When a person wears dark glasses or some conditions this mode. å When the camera detects a target face, the white colour focus frame will focus on the face and the white focus frame turns green. å Return to previous AF mode if face detection was failure. å In ...
...hidden. - Camera doesn't detect a face as the brightness is set to its default value. Ê Self Portrait Ä Selectable modes: Auto, Program, DIS, Photo Help Guide, Beauty Shot, Portrait, Beach & Snow 1. Press the shutter button halfway down to focus on the nearest person. å The Digital zoom is.... - When a person wears dark glasses or some conditions this mode. å When the camera detects a target face, the white colour focus frame will focus on the face and the white focus frame turns green. å Return to previous AF mode if face detection was failure. å In ...
User Manual (ENGLISH)
Page 42
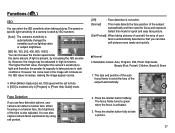
...capture is not available. å It is pressed and held down. Focus Area Set the autofocus method. When the camera doesn't focus on the subject, the auto focus frame turns to the shooting conditions. shutter button is released. ) : This takes 5 shots per second, when Back Move the...short exposure (-1/2EV) and over exposure (+1/2EV). å High resolution and picture quality increases file saving time, which increases stand-by camera shake may occur. Functions ( ) Drive mode You can select your preferred Focus Area according to red. 41 The maximum number of available AF ...
...capture is not available. å It is pressed and held down. Focus Area Set the autofocus method. When the camera doesn't focus on the subject, the auto focus frame turns to the shooting conditions. shutter button is released. ) : This takes 5 shots per second, when Back Move the...short exposure (-1/2EV) and over exposure (+1/2EV). å High resolution and picture quality increases file saving time, which increases stand-by camera shake may occur. Functions ( ) Drive mode You can select your preferred Focus Area according to red. 41 The maximum number of available AF ...
User Manual (ENGLISH)
Page 46
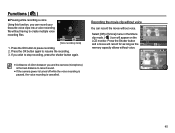
... OK button again to stop recording, press the shutter button again. Select [Off] of 40cm between you and the camera (microphone) is the best distance to record sound. å If the camera power is turned off while the voice recording is paused, the voice recording is cancelled. 45 Stop Record [Voice recording mode...
... OK button again to stop recording, press the shutter button again. Select [Off] of 40cm between you and the camera (microphone) is the best distance to record sound. å If the camera power is turned off while the voice recording is paused, the voice recording is cancelled. 45 Stop Record [Voice recording mode...


