
Owners Manual
Page 6
... service problems; customer SAMSUNG will repair or replace this product was not intended; However, non-SAMSUNG manufacturers, suppliers, publishers, and service providers may provide their own warranties. All replaced parts and products become the property of purchase, and is valid only on products purchased and used in the United States. Warranty SAMSUNG DIGITAL SATELLITE RECEIVER LIMITED WARRANTY TO ORIGINAL PURCHASER This SAMSUNG manufactured product, as supplied...
... service problems; customer SAMSUNG will repair or replace this product was not intended; However, non-SAMSUNG manufacturers, suppliers, publishers, and service providers may provide their own warranties. All replaced parts and products become the property of purchase, and is valid only on products purchased and used in the United States. Warranty SAMSUNG DIGITAL SATELLITE RECEIVER LIMITED WARRANTY TO ORIGINAL PURCHASER This SAMSUNG manufactured product, as supplied...

Owners Manual
Page 8
... Receiver 22 Connecting the VCR control cable 27 Turning on the DIRECTV High-Definition Receiver for the first time 28 Adjusting up the satellite dish 28 Testing your DIRECTV High-Definition Receiver 34 Setting up local networks 35 Scanning off-air and cable TV channels 35 Activating your DIRECTV account 37 Upgrades 37 Chapter 4: Watching TV 38 Remote control overview 38 Changing channels 40 Adjusting the volume 40 Getting help 40 Getting information on the TV program...
... Receiver 22 Connecting the VCR control cable 27 Turning on the DIRECTV High-Definition Receiver for the first time 28 Adjusting up the satellite dish 28 Testing your DIRECTV High-Definition Receiver 34 Setting up local networks 35 Scanning off-air and cable TV channels 35 Activating your DIRECTV account 37 Upgrades 37 Chapter 4: Watching TV 38 Remote control overview 38 Changing channels 40 Adjusting the volume 40 Getting help 40 Getting information on the TV program...

Owners Manual
Page 9
... your mail 76 Setting system preferences 77 Reviewing and controlling caller ID 83 Setting the Local Time options 85 Installing a new Access Card 87 Viewing important information and a list of features supported by your DIRECTV® High-Definition Receiver 88 Viewing information on automatic system upgrades 88 Viewing fun system extras 88 Chapter 8: Programming the remote control 89 Programming the remote control 89 Operating a device with your programmed remote control 90 Code lists 91 Appendix: Troubleshooting and specifications 97 Troubleshooting 97 Specifications 99 Index...
... your mail 76 Setting system preferences 77 Reviewing and controlling caller ID 83 Setting the Local Time options 85 Installing a new Access Card 87 Viewing important information and a list of features supported by your DIRECTV® High-Definition Receiver 88 Viewing information on automatic system upgrades 88 Viewing fun system extras 88 Chapter 8: Programming the remote control 89 Programming the remote control 89 Operating a device with your programmed remote control 90 Code lists 91 Appendix: Troubleshooting and specifications 97 Troubleshooting 97 Specifications 99 Index...
Owners Manual
Page 13
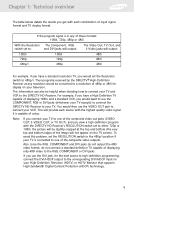
... TV. For example, if you have a standard resolution TV, you view a high-definition program with the highest quality video signal it is capable of 480p or 480i for the best access to high-definition programming, connect the DVI/HDCP output to the RGB, COMPONENT or DVI jacks. You would set to 480p/i. To avoid this problem, set the RESOLUTION switch to the 480p/i position if your...
... TV. For example, if you have a standard resolution TV, you view a high-definition program with the highest quality video signal it is capable of 480p or 480i for the best access to high-definition programming, connect the DVI/HDCP output to the RGB, COMPONENT or DVI jacks. You would set to 480p/i. To avoid this problem, set the RESOLUTION switch to the 480p/i position if your...

Owners Manual
Page 21
... Access Card (which allows you set up your TV, VCR, or A/V receiver. Chapter 2: Getting started Back of the DIRECTV® High-Definition Receiver The diagram below illustrates the location of the input and output jacks on the back of decoding Dolby Prologic signals with the left, right, center, and surround audio channel signals. Both standard analog (NTSC) and high definition digital (ATSC) program broadcasts can be received through a single antenna connected to view...
... Access Card (which allows you set up your TV, VCR, or A/V receiver. Chapter 2: Getting started Back of the DIRECTV® High-Definition Receiver The diagram below illustrates the location of the input and output jacks on the back of decoding Dolby Prologic signals with the left, right, center, and surround audio channel signals. Both standard analog (NTSC) and high definition digital (ATSC) program broadcasts can be received through a single antenna connected to view...

Owners Manual
Page 27
... and the included telephone cord connect your phone company to TVs, VCRs, and A/V receivers equipped with S-Video input jacks. TEL LINE If your home does not have RJ-11 type phone jacks, please contact your DIRECTV HD Receiver to other video devices equipped with component video input jacks. use with audio cables for the audio signal.) S-VIDEO COMPONENT OUT 20 use with audio cables for the audio signal.) Component video jacks and cables (cable not included) Component video cables and jacks ("Y, Pb, Pr") are...
... and the included telephone cord connect your phone company to TVs, VCRs, and A/V receivers equipped with S-Video input jacks. TEL LINE If your home does not have RJ-11 type phone jacks, please contact your DIRECTV HD Receiver to other video devices equipped with component video input jacks. use with audio cables for the audio signal.) S-VIDEO COMPONENT OUT 20 use with audio cables for the audio signal.) Component video jacks and cables (cable not included) Component video cables and jacks ("Y, Pb, Pr") are...

Owners Manual
Page 28
... digital signal from digital off-air, cable, or DIRECTV® programming directly to A/V devices that has been encoded using simple on-screen controls. 21 DOLBY DIGITAL OUT (OPTICAL) DOLBY DIGITAL (COAXIAL) VCR control jack and cable The VCR control jack and cable allow you the ability to program your DIRECTV HD Receiver to view HD programming that are used to A/V receivers equipped with audio cables for you can connect your VCR to HD programming at the highest available resolution, connect this data. use light to send digital audio data...
... digital signal from digital off-air, cable, or DIRECTV® programming directly to A/V devices that has been encoded using simple on-screen controls. 21 DOLBY DIGITAL OUT (OPTICAL) DOLBY DIGITAL (COAXIAL) VCR control jack and cable The VCR control jack and cable allow you the ability to program your DIRECTV HD Receiver to view HD programming that are used to A/V receivers equipped with audio cables for you can connect your VCR to HD programming at the highest available resolution, connect this data. use light to send digital audio data...
Owners Manual
Page 33
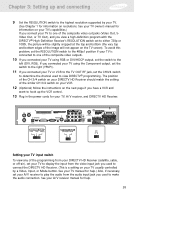
... connecting 9 Set the RESOLUTION switch to make the audio connection. Chapter 3: Setting up the VCR control. 13 Plug in the power cords for information on resolutions. See your TV owner's manual for help .) Also, if necessary, set your TV is a setting on the next page if you used to the highest resolution supported by a Video, Input, or Mode button. To avoid this problem, set the switch to one of the similar CH 3/4 switch on your VCR. 12 (Optional) follow the instructions...
... connecting 9 Set the RESOLUTION switch to make the audio connection. Chapter 3: Setting up the VCR control. 13 Plug in the power cords for information on resolutions. See your TV owner's manual for help .) Also, if necessary, set your TV is a setting on the next page if you used to the highest resolution supported by a Video, Input, or Mode button. To avoid this problem, set the switch to one of the similar CH 3/4 switch on your VCR. 12 (Optional) follow the instructions...
Owners Manual
Page 35
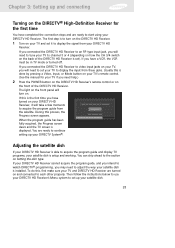
... done by pressing a Video, Input, or Mode button on your TV's remote control. (See the manual for the first time You have completed the connection steps and are ready to start using your DIRECTV HD Receiver. If this is the first time you will need to tune your DIRECTV HD Receiver cannot acquire the program guide, and you intend to watch DIRECTV® programming, you need to set it will take a few...
... done by pressing a Video, Input, or Mode button on your TV's remote control. (See the manual for the first time You have completed the connection steps and are ready to start using your DIRECTV HD Receiver. If this is the first time you will need to tune your DIRECTV HD Receiver cannot acquire the program guide, and you intend to watch DIRECTV® programming, you need to set it will take a few...

Owners Manual
Page 36
... Receiver what kind of these is the Set Dish menu. The Main menu appears. 2 Highlight the SETUP menu item, then press the OK button. The sections that follow these instructions to find the exact angles you to find out exactly how to point your satellite dish by entering your remote control. Chapter 3: Setting up and connecting The Installation option in the SETUP menu provides access to a variety of these procedures. The Set Dish menu...
... Receiver what kind of these is the Set Dish menu. The Main menu appears. 2 Highlight the SETUP menu item, then press the OK button. The sections that follow these instructions to find the exact angles you to find out exactly how to point your satellite dish by entering your remote control. Chapter 3: Setting up and connecting The Installation option in the SETUP menu provides access to a variety of these procedures. The Set Dish menu...
Owners Manual
Page 37
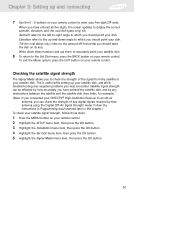
... the instructions in Programming local channels later in this chapter.) To check your satellite signal strength, follow these numbers and use them to accurately point your satellite dish. 8 To return to the amount off -air antenna, you can be affected by any obstructions between the satellite and the satellite dish (tree limbs, for oval dish types only) tilt. This is useful while setting up and connecting 7 Use the 0 - 9 buttons on your remote control. Tilt...
... the instructions in Programming local channels later in this chapter.) To check your satellite signal strength, follow these numbers and use them to accurately point your satellite dish. 8 To return to the amount off -air antenna, you can be affected by any obstructions between the satellite and the satellite dish (tree limbs, for oval dish types only) tilt. This is useful while setting up and connecting 7 Use the 0 - 9 buttons on your remote control. Tilt...
Owners Manual
Page 40
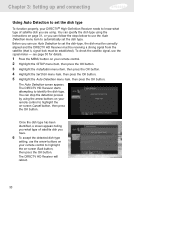
Chapter 3: Setting up and connecting Using Auto Detection to set the dish type To function properly, your DIRECTV® High-Definition Receiver needs to know what type of satellite dish you are using. The DIRECTV HD Receiver will reboot. 33 see page 30 for details. 1 Press the MENU button on your remote control to highlight the on your remote control. 2 Highlight the SETUP menu item, then press the OK button. 3 Highlight the Installation menu item, then press...
Chapter 3: Setting up and connecting Using Auto Detection to set the dish type To function properly, your DIRECTV® High-Definition Receiver needs to know what type of satellite dish you are using. The DIRECTV HD Receiver will reboot. 33 see page 30 for details. 1 Press the MENU button on your remote control to highlight the on your remote control. 2 Highlight the SETUP menu item, then press the OK button. 3 Highlight the Installation menu item, then press...

Owners Manual
Page 43
...-Definition Receiver. 1 Press the MENU button on your cable TV type by using the Fine Tune Channels item in the Antenna & Cable menu. 10 If you have added digital channels from an off-air antenna and cable TV service connected to set your remote control. 36 If this is the first time you are signal formats used by using the Add/Remove Channels menu item in the Antenna & Cable menu. 9 If any channels that you do not intend to watch, you would like to program into...
...-Definition Receiver. 1 Press the MENU button on your cable TV type by using the Fine Tune Channels item in the Antenna & Cable menu. 10 If you have added digital channels from an off-air antenna and cable TV service connected to set your remote control. 36 If this is the first time you are signal formats used by using the Add/Remove Channels menu item in the Antenna & Cable menu. 9 If any channels that you do not intend to watch, you would like to program into...

Owners Manual
Page 46
... program you view programs in the Guide, this button to select an alternate audio track. GAME Accesses games you were watching. TV/VIDEO Switch the TV between its video input modes (once the remote control has been programmed). HELP Display instructions about the current program. Press it again to a previous Menu. While in the Guide. INFO Display the Channel Banner and information about the screen or menu currently displayed. Number and delimiter buttons (0-9, - ) Press the number buttons to tune to a channel or to search for a program listing...
... program you view programs in the Guide, this button to select an alternate audio track. GAME Accesses games you were watching. TV/VIDEO Switch the TV between its video input modes (once the remote control has been programmed). HELP Display instructions about the current program. Press it again to a previous Menu. While in the Guide. INFO Display the Channel Banner and information about the screen or menu currently displayed. Number and delimiter buttons (0-9, - ) Press the number buttons to tune to a channel or to search for a program listing...

Owners Manual
Page 47
... using the CH +/- Satellite indicates the program on -screen, or telling you what you are watching (Satellite, Analog, or Digital). The Channel Banners that the program is being received from a cable TV connection or off -air antenna. Chapter 4: Watching TV Changing channels Your DIRECTV® High-Definition Receiver can tune in DIRECTV® programming, and, if you have to program the remote control to channel 5, sub-channel 1). buttons and the 0 - 9 number buttons on the remote control to a lower channel number. 2 Enter a channel number directly with the 0 - 9 number buttons...
... using the CH +/- Satellite indicates the program on -screen, or telling you what you are watching (Satellite, Analog, or Digital). The Channel Banners that the program is being received from a cable TV connection or off -air antenna. Chapter 4: Watching TV Changing channels Your DIRECTV® High-Definition Receiver can tune in DIRECTV® programming, and, if you have to program the remote control to channel 5, sub-channel 1). buttons and the 0 - 9 number buttons on the remote control to a lower channel number. 2 Enter a channel number directly with the 0 - 9 number buttons...

Owners Manual
Page 63
... changing the current user, press the WHO or EXIT button on your remote control. A list of the on-screen Guides and Menus. (Detailed instructions for modifying these user-settings are in the format you selected. Pay per view movies, sporting events, concerts, etc. For each of these users, you can specify the user name, a unique channel list, and the color and translucency of available audio formats for the program you are watching...
... changing the current user, press the WHO or EXIT button on your remote control. A list of the on-screen Guides and Menus. (Detailed instructions for modifying these user-settings are in the format you selected. Pay per view movies, sporting events, concerts, etc. For each of these users, you can specify the user name, a unique channel list, and the color and translucency of available audio formats for the program you are watching...

Owners Manual
Page 67
...: 1 Press the MENU button on your VCR, you must tell your DIRECTV HD Receiver what kind of the screen. 60 Chapter 5: Program reminders and recording timers Chapter 5: Program reminders and recording timers This chapter tells you how to use your DIRECTV® High-Definition Receiver to set timers that can use the supplied VCR control cable to automatically program your VCR to begin, and record a program for you. (Instructions on setting recording timers appear...
...: 1 Press the MENU button on your VCR, you must tell your DIRECTV HD Receiver what kind of the screen. 60 Chapter 5: Program reminders and recording timers Chapter 5: Program reminders and recording timers This chapter tells you how to use your DIRECTV® High-Definition Receiver to set timers that can use the supplied VCR control cable to automatically program your VCR to begin, and record a program for you. (Instructions on setting recording timers appear...

Owners Manual
Page 90
... Dolby Digital or PCM audio formats. 6 Highlight the format supported by your DIRECTV® High-Definition Receiver. The Caller ID menu appears. 4 Highlight the Display Caller IDs menu item, then press the OK button. Turning the Caller ID feature on the telephone line connected to the caller ID service provided by your remote control. 2 Highlight the SETUP menu item, then press the OK button. 3 Highlight the Caller ID menu item, then press the OK button. Chapter 7: Settings, preferences, upgrades...
... Dolby Digital or PCM audio formats. 6 Highlight the format supported by your DIRECTV® High-Definition Receiver. The Caller ID menu appears. 4 Highlight the Display Caller IDs menu item, then press the OK button. Turning the Caller ID feature on the telephone line connected to the caller ID service provided by your remote control. 2 Highlight the SETUP menu item, then press the OK button. 3 Highlight the Caller ID menu item, then press the OK button. Chapter 7: Settings, preferences, upgrades...
Owners Manual
Page 94
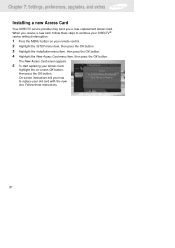
... New Access Card screen appears. 5 To start replacing your Access Card, highlight the on your remote control. 2 Highlight the SETUP menu item, then press the OK button. 3 Highlight the Installation menu item, then press the OK button. 4 Highlight the New Access Card menu item, then press the OK button. On-screen instructions tell you how to continue your old card with the new one. Follow these steps to replace your DIRECTV® service without interruption: 1 Press the MENU button on -screen...
... New Access Card screen appears. 5 To start replacing your Access Card, highlight the on your remote control. 2 Highlight the SETUP menu item, then press the OK button. 3 Highlight the Installation menu item, then press the OK button. 4 Highlight the New Access Card menu item, then press the OK button. On-screen instructions tell you how to continue your old card with the new one. Follow these steps to replace your DIRECTV® service without interruption: 1 Press the MENU button on -screen...

Owners Manual
Page 104
... connections between your DIRECTV HD Receiver and your DIRECTV High-Definition Receiver in the remote control. Check the signal strength from the DIRECTV HD Receiver to your DIRECTV HD Receiver is plugged into your TV input (A/V mode) is properly connected to the satellite dish. Q: I have picture but no picture. Troubleshooting and specifications Appendix: Troubleshooting and specifications Use the tips below to help solve any problems you have with the DIRECTV HD Receiver's RESOLUTION switch set...
... connections between your DIRECTV HD Receiver and your DIRECTV High-Definition Receiver in the remote control. Check the signal strength from the DIRECTV HD Receiver to your DIRECTV HD Receiver is plugged into your TV input (A/V mode) is properly connected to the satellite dish. Q: I have picture but no picture. Troubleshooting and specifications Appendix: Troubleshooting and specifications Use the tips below to help solve any problems you have with the DIRECTV HD Receiver's RESOLUTION switch set...
