
Owners Manual
Page 6
... to SAMSUNG. Non-SAMSUNG hardware and software products are set forth in the applicable end user license agreement. This limited warranty covers manufacturing defects in materials and workmanship encountered in normal, and except to the extent otherwise expressly provided for in this statement, noncommercial use of products, equipment, systems, utilities, services, parts, supplies, accessories, applications, installations, repairs, external wiring or connectors not supplied...
... to SAMSUNG. Non-SAMSUNG hardware and software products are set forth in the applicable end user license agreement. This limited warranty covers manufacturing defects in materials and workmanship encountered in normal, and except to the extent otherwise expressly provided for in this statement, noncommercial use of products, equipment, systems, utilities, services, parts, supplies, accessories, applications, installations, repairs, external wiring or connectors not supplied...

Owners Manual
Page 8
... RF cable only Connection option B 19 DIRECTV Receiver to TV with A/V cables Connection option C 21 DIRECTV Receiver to TV and VCR with RF cables only Connection option D 23 DIRECTV Receiver to TV and VCR with A/V cables Connection option E 25 DIRECTV Receiver to TV and A/V receiver Connection option F 27 DIRECTV Receiver to TV with Component Video inputs and digital A/V receiver Connecting the VCR control cable (model SIR-S310W only) ..........29 Turning on the DIRECTV Receiver for the first time 29 Adjusting the satellite dish 30 Testing your DIRECTV Receiver 36 Activating...
... RF cable only Connection option B 19 DIRECTV Receiver to TV with A/V cables Connection option C 21 DIRECTV Receiver to TV and VCR with RF cables only Connection option D 23 DIRECTV Receiver to TV and VCR with A/V cables Connection option E 25 DIRECTV Receiver to TV and A/V receiver Connection option F 27 DIRECTV Receiver to TV with Component Video inputs and digital A/V receiver Connecting the VCR control cable (model SIR-S310W only) ..........29 Turning on the DIRECTV Receiver for the first time 29 Adjusting the satellite dish 30 Testing your DIRECTV Receiver 36 Activating...

Owners Manual
Page 17
...) Using an optical digital audio cable, this jack. Antenna In The cable from an off-air TV antenna (not from the satellite dish connects to this jack connects your TV or VCR. Telephone line A telephone line connected to this jack allows you to your DIRECTV Receiver to view DIRECTV® programming). Access Card slot (model SIR-S310W only) This slot holds the Access Card (which allows you to a TV or VCR that accepts high-quality ("component") video input.
...) Using an optical digital audio cable, this jack. Antenna In The cable from an off-air TV antenna (not from the satellite dish connects to this jack connects your TV or VCR. Telephone line A telephone line connected to this jack allows you to your DIRECTV Receiver to view DIRECTV® programming). Access Card slot (model SIR-S310W only) This slot holds the Access Card (which allows you to a TV or VCR that accepts high-quality ("component") video input.
Owners Manual
Page 20
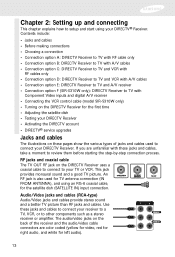
... your DIRECTV® Receiver. Use these pages show the various types of the receiver and the audio/video cable connectors are unfamiliar with Component Video inputs and digital A/V receiver • Connecting the VCR control cable (model SIR-S310W only) • Turning on the DIRECTV Receiver for the satellite dish (SATELLITE IN) input connection. Contents include: • Jacks and cables • Before making connections • Choosing a connection • Connection option A: DIRECTV Receiver to TV with RF cable only • Connection option B: DIRECTV Receiver to TV with...
... your DIRECTV® Receiver. Use these pages show the various types of the receiver and the audio/video cable connectors are unfamiliar with Component Video inputs and digital A/V receiver • Connecting the VCR control cable (model SIR-S310W only) • Turning on the DIRECTV Receiver for the satellite dish (SATELLITE IN) input connection. Contents include: • Jacks and cables • Before making connections • Choosing a connection • Connection option A: DIRECTV Receiver to TV with RF cable only • Connection option B: DIRECTV Receiver to TV with...

Owners Manual
Page 21
... on model SIR-S310W only) Optical digital jacks and cables use light to send digital audio data to A/V receivers equipped to S-Video connections. (These cables carry the video signal only; use with S-Video input jacks. If your home does not have RJ-11 type phone jacks, please contact your phone company to a phone line. A continuous land-based phone line connection is in the middle of the night; use for the audio signal.) Component video jacks and cables (cable not included, jack on -screen controls. 14 S-Video connections...
... on model SIR-S310W only) Optical digital jacks and cables use light to send digital audio data to A/V receivers equipped to S-Video connections. (These cables carry the video signal only; use with S-Video input jacks. If your home does not have RJ-11 type phone jacks, please contact your phone company to a phone line. A continuous land-based phone line connection is in the middle of the night; use for the audio signal.) Component video jacks and cables (cable not included, jack on -screen controls. 14 S-Video connections...
Owners Manual
Page 23
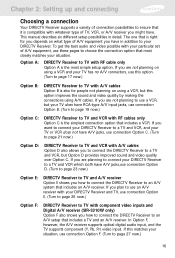
... does have RCA-type A/V input jacks, use connection Option C. (Turn to page 21 now.) Option D: DIRECTV Receiver to TV and VCR with A/V cables Option D also allows you are not planning on using a VCR, but your situation. If you to connect the DIRECTV Receiver to an A/V system that includes an A/V receiver. In Option F, however, the A/V receiver supports optical digital audio input, and the TV supports component (Y, Pb, Pr) video input. This manual describes six different setup possibilities in addition...
... does have RCA-type A/V input jacks, use connection Option C. (Turn to page 21 now.) Option D: DIRECTV Receiver to TV and VCR with A/V cables Option D also allows you are not planning on using a VCR, but your situation. If you to connect the DIRECTV Receiver to an A/V system that includes an A/V receiver. In Option F, however, the A/V receiver supports optical digital audio input, and the TV supports component (Y, Pb, Pr) video input. This manual describes six different setup possibilities in addition...

Owners Manual
Page 24
... watch DIRECTV® programming, tune your TV to channel 3 or 4 (depending on the position of the CH 3/4 switch on the back of your DIRECTV Receiver. 17 Chapter 2: Setting up and connecting Connection option A: DIRECTV Receiver to TV with RF cable only If connection option A best matches your needs, follow these steps: 1 Make sure your TV and DIRECTV Receiver are turned off and unplugged. 2 Connect the RG-6 coaxial cable running from your satellite dish...
... watch DIRECTV® programming, tune your TV to channel 3 or 4 (depending on the position of the CH 3/4 switch on the back of your DIRECTV Receiver. 17 Chapter 2: Setting up and connecting Connection option A: DIRECTV Receiver to TV with RF cable only If connection option A best matches your needs, follow these steps: 1 Make sure your TV and DIRECTV Receiver are turned off and unplugged. 2 Connect the RG-6 coaxial cable running from your satellite dish...

Owners Manual
Page 32
... picture quality. 10 Plug in the power cords for instructions.) Next Step Now turn to page 29 to the appropriate audio and video input jacks on your TV and A/V receiver both have S-Video jacks, you can also make the S-Video connections shown in ). 7 Connect another set of A/V cables (not included) to the second set of audio and video output jacks on your TV. 9 (Optional) if your TV. To watch DIRECTV® programming Set...
... picture quality. 10 Plug in the power cords for instructions.) Next Step Now turn to page 29 to the appropriate audio and video input jacks on your TV and A/V receiver both have S-Video jacks, you can also make the S-Video connections shown in ). 7 Connect another set of A/V cables (not included) to the second set of audio and video output jacks on your TV. 9 (Optional) if your TV. To watch DIRECTV® programming Set...

Owners Manual
Page 34
... TV with Component Video inputs and digital A/V receiver 1 Make sure your TV, A/V receiver, and DIRECTV Receiver are turned off and unplugged. 2 Connect the RG-6 coaxial cable running from your satellite dish to the SATELLITE IN jack on the back of your DIRECTV Receiver. 3 Connect the coaxial cable running from your cable TV system or off-air TV antenna to the IN FROM ANTENNA jack on the back of the DIRECTV Receiver. 4 Connect the supplied phone cord to...
... TV with Component Video inputs and digital A/V receiver 1 Make sure your TV, A/V receiver, and DIRECTV Receiver are turned off and unplugged. 2 Connect the RG-6 coaxial cable running from your satellite dish to the SATELLITE IN jack on the back of your DIRECTV Receiver. 3 Connect the coaxial cable running from your cable TV system or off-air TV antenna to the IN FROM ANTENNA jack on the back of the DIRECTV Receiver. 4 Connect the supplied phone cord to...
Owners Manual
Page 36
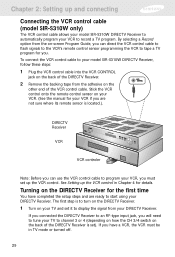
... channel 3 or 4 (depending on how the CH 3/4 switch on the other end of the VCR control cable. See Setting up the VCR control in TV mode or turned off. 29 If you connected the DIRECTV Receiver to an RF-type input jack, you will need to record a TV program. Turning on -screen Program Guide, you can use the VCR control cable to program your VCR to tune your model SIR-S310W DIRECTV Receiver, follow these steps: 1 Plug the VCR control cable into the VCR CONTROL...
... channel 3 or 4 (depending on how the CH 3/4 switch on the other end of the VCR control cable. See Setting up the VCR control in TV mode or turned off. 29 If you connected the DIRECTV Receiver to an RF-type input jack, you will need to record a TV program. Turning on -screen Program Guide, you can use the VCR control cable to program your VCR to tune your model SIR-S310W DIRECTV Receiver, follow these steps: 1 Plug the VCR control cable into the VCR CONTROL...

Owners Manual
Page 39
... remote control. This is useful while setting up your dish. To exit the Menu system, press the EXIT button on your remote control. Checking the satellite signal strength The Signal Meter allows you to check the strength of the signal from the satellite to your dish. Chapter 2: Setting up and connecting Azimuth refers to the left-to-right angle to which you should point your satellite dish, and while troubleshooting any reception problems...
... remote control. This is useful while setting up your dish. To exit the Menu system, press the EXIT button on your remote control. Checking the satellite signal strength The Signal Meter allows you to check the strength of the signal from the satellite to your dish. Chapter 2: Setting up and connecting Azimuth refers to the left-to-right angle to which you should point your satellite dish, and while troubleshooting any reception problems...
Owners Manual
Page 47
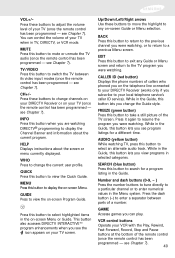
... program enhancements when you were watching. INFO Press this button lets you were watching, or to return to your DIRECTV Receiver (works only if you change the current user profile. EXIT Press this button lets you subscribe to a previous Menu screen. AUDIO (yellow button) While watching TV, press this button to enter a separator between its video input modes (once the remote control has been programmed - Press the dash button (-) to view the Quick Guide. CALLER ID (red button) Displays the phone numbers...
... program enhancements when you were watching. INFO Press this button lets you were watching, or to return to your DIRECTV Receiver (works only if you change the current user profile. EXIT Press this button lets you subscribe to a previous Menu screen. AUDIO (yellow button) While watching TV, press this button to enter a separator between its video input modes (once the remote control has been programmed - Press the dash button (-) to view the Quick Guide. CALLER ID (red button) Displays the phone numbers...

Owners Manual
Page 56
... Guide directly to a specific channel, press the 0-9 number buttons on your remote control to highlight the channel entry in the Guide. To see a Channel Detail Screen containing more information on a highlighted program, press the INFO button on your remote control. buttons on your remote control. 3 To move up and down in the channel list, or forward and backward in time. Chapter 3: Watching TV Getting around in the Grid Guide You can use the Grid Guide to get information on a channel...
... Guide directly to a specific channel, press the 0-9 number buttons on your remote control to highlight the channel entry in the Guide. To see a Channel Detail Screen containing more information on a highlighted program, press the INFO button on your remote control. buttons on your remote control. 3 To move up and down in the channel list, or forward and backward in time. Chapter 3: Watching TV Getting around in the Grid Guide You can use the Grid Guide to get information on a channel...

Owners Manual
Page 59
... Banner shows information about the program showing on the highlighted channel. These icons remind you about the Guide functions of the red, green, yellow, and blue buttons on your remote control. Then use the Logo Guide. The Logo Guide appears. 3 Or, you can set the default Guide Style so that the Logo Guide always appears whenever you are watching. The Logo Guide appears on your screen. 2 Or, press the GUIDE button on your remote control. Current time...
... Banner shows information about the program showing on the highlighted channel. These icons remind you about the Guide functions of the red, green, yellow, and blue buttons on your remote control. Then use the Logo Guide. The Logo Guide appears. 3 Or, you can set the default Guide Style so that the Logo Guide always appears whenever you are watching. The Logo Guide appears on your screen. 2 Or, press the GUIDE button on your remote control. Current time...

Owners Manual
Page 60
buttons on your remote control. 3 To move the Logo Guide directly to a specific channel, press the 0-9 number buttons on your remote control to move up , down through the channel logos a full page at a time, press the CH+ and CH- Here's how: 1 To highlight different program listings in the Logo Guide, use the Logo Guide to get information about the programs currently showing on your remote control. To return to the Logo Guide, highlight the Back...
buttons on your remote control. 3 To move the Logo Guide directly to a specific channel, press the 0-9 number buttons on your remote control to move up , down through the channel logos a full page at a time, press the CH+ and CH- Here's how: 1 To highlight different program listings in the Logo Guide, use the Logo Guide to get information about the programs currently showing on your remote control. To return to the Logo Guide, highlight the Back...
Owners Manual
Page 64
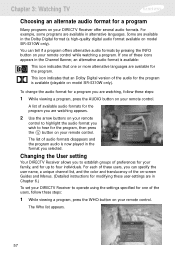
... to operate using the settings specified for the program. You can specify the user name, a unique channel list, and the color and translucency of the on-screen Guides and Menus. (Detailed instructions for the program is available (playable on your remote control. A list of the audio for modifying these steps: 1 While viewing a program, press the WHO button on your remote control. Some are watching, follow these user-settings are in the Dolby Digital format (a high-quality digital audio format...
... to operate using the settings specified for the program. You can specify the user name, a unique channel list, and the color and translucency of the on-screen Guides and Menus. (Detailed instructions for the program is available (playable on your remote control. A list of the audio for modifying these steps: 1 While viewing a program, press the WHO button on your remote control. Some are watching, follow these user-settings are in the Dolby Digital format (a high-quality digital audio format...
Owners Manual
Page 70
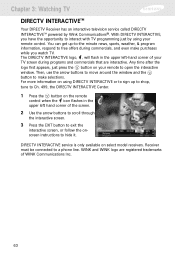
... news, sports, weather, & program information, respond to free offers during programs and commercials that are registered trademarks of the screen. 2 Use the arrow buttons to scroll through the interactive screen. 3 Press the EXIT button to exit the interactive screen, or follow the onscreen instructions to hide it. You can get up to shop, tune to a phone line. For more information on the remote control when the icon flashes in the upper...
... news, sports, weather, & program information, respond to free offers during programs and commercials that are registered trademarks of the screen. 2 Use the arrow buttons to scroll through the interactive screen. 3 Press the EXIT button to exit the interactive screen, or follow the onscreen instructions to hide it. You can get up to shop, tune to a phone line. For more information on the remote control when the icon flashes in the upper...
Owners Manual
Page 74
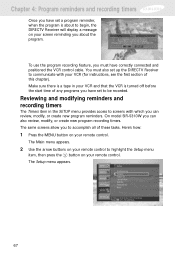
... the SETUP menu provides access to screens with your screen reminding you about to begin, the DIRECTV Receiver will display a message on your VCR (for instructions, see the first section of this chapter). Reviewing and modifying reminders and recording timers The Timers item in your VCR and that the VCR is about the program. The Main menu appears. 2 Use the arrow buttons on your remote control to highlight the Setup menu item...
... the SETUP menu provides access to screens with your screen reminding you about to begin, the DIRECTV Receiver will display a message on your VCR (for instructions, see the first section of this chapter). Reviewing and modifying reminders and recording timers The Timers item in your VCR and that the VCR is about the program. The Main menu appears. 2 Use the arrow buttons on your remote control to highlight the Setup menu item...

Owners Manual
Page 75
... listed here. 4 To review your previously scheduled program reminders and recording timers, look through this list. 5 To modify or check the details for any previously scheduled timers, use the arrow buttons on your remote control to highlight that you scheduled using the Timers screen in the SETUP menu, you can modify the channel number, the start time and date, the end time and date, the frequency, and (on model SIRS310W) the mode...
... listed here. 4 To review your previously scheduled program reminders and recording timers, look through this list. 5 To modify or check the details for any previously scheduled timers, use the arrow buttons on your remote control to highlight that you scheduled using the Timers screen in the SETUP menu, you can modify the channel number, the start time and date, the end time and date, the frequency, and (on model SIRS310W) the mode...

Owners Manual
Page 102
... To control whether your DIRECTV Receiver captures caller ID information, follow these steps: 1 Press the MENU button on the Caller ID menu reflects your local telephone service. Chapter 6: Settings, preferences, upgrades, and extras Reviewing and controlling Caller ID The Caller ID item in the SETUP menu allows you to view a list of calls that occur while you are recording a program. 95 The Main menu appears. 2 Use the arrow buttons on your remote control to the caller ID service provided...
... To control whether your DIRECTV Receiver captures caller ID information, follow these steps: 1 Press the MENU button on the Caller ID menu reflects your local telephone service. Chapter 6: Settings, preferences, upgrades, and extras Reviewing and controlling Caller ID The Caller ID item in the SETUP menu allows you to view a list of calls that occur while you are recording a program. 95 The Main menu appears. 2 Use the arrow buttons on your remote control to the caller ID service provided...
