
Owners Manual
Page 6
..., equipment, systems, utilities, services, parts, supplies, accessories, applications, installations, repairs, external wiring or connectors not supplied and authorized by SAMSUNG, or which this product, at our option and at no charge as stipulated herein, with respect to software products distributed by SAMSUNG under the SAMSUNG brand name are provided on products purchased and used in the United States. All replaced parts and products become the...
..., equipment, systems, utilities, services, parts, supplies, accessories, applications, installations, repairs, external wiring or connectors not supplied and authorized by SAMSUNG, or which this product, at our option and at no charge as stipulated herein, with respect to software products distributed by SAMSUNG under the SAMSUNG brand name are provided on products purchased and used in the United States. All replaced parts and products become the...

Owners Manual
Page 8
... RF cable only Connection option B 19 DIRECTV Receiver to TV with A/V cables Connection option C 21 DIRECTV Receiver to TV and VCR with RF cables only Connection option D 23 DIRECTV Receiver to TV and VCR with A/V cables Connection option E 25 DIRECTV Receiver to TV and A/V receiver Connection option F 27 DIRECTV Receiver to TV with Component Video inputs and digital A/V receiver Connecting the VCR control cable (model SIR-S310W only) ..........29 Turning on the DIRECTV Receiver for the first time 29 Adjusting the satellite dish 30 Testing your DIRECTV Receiver 36 Activating...
... RF cable only Connection option B 19 DIRECTV Receiver to TV with A/V cables Connection option C 21 DIRECTV Receiver to TV and VCR with RF cables only Connection option D 23 DIRECTV Receiver to TV and VCR with A/V cables Connection option E 25 DIRECTV Receiver to TV and A/V receiver Connection option F 27 DIRECTV Receiver to TV with Component Video inputs and digital A/V receiver Connecting the VCR control cable (model SIR-S310W only) ..........29 Turning on the DIRECTV Receiver for the first time 29 Adjusting the satellite dish 30 Testing your DIRECTV Receiver 36 Activating...

Owners Manual
Page 17
... S-Video input. Telephone line A telephone line connected to this jack connects the DIRECTV Receiver to this jack. Component Out (Y, Pb, Pr video) (SIR-S310W only) Using standard A/V cables, these jacks connect the DIRECTV Receiver to view DIRECTV® programming). Antenna In The cable from an off-air TV antenna (not from the satellite dish connects to your DIRECTV Receiver to a TV or VCR that accepts high-quality ("component") video input. Audio Out Using standard stereo audio cables, these jacks connect your TV or VCR. Access Card slot (model...
... S-Video input. Telephone line A telephone line connected to this jack connects the DIRECTV Receiver to this jack. Component Out (Y, Pb, Pr video) (SIR-S310W only) Using standard A/V cables, these jacks connect the DIRECTV Receiver to view DIRECTV® programming). Antenna In The cable from an off-air TV antenna (not from the satellite dish connects to your DIRECTV Receiver to a TV or VCR that accepts high-quality ("component") video input. Audio Out Using standard stereo audio cables, these jacks connect your TV or VCR. Access Card slot (model...
Owners Manual
Page 20
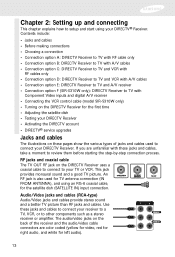
... connect your DIRECTV Receiver • Activating the DIRECTV account • DIRECTV® service upgrades Jacks and cables The illustrations on the DIRECTV Receiver for the first time • Adjusting the satellite dish • Testing your DIRECTV Receiver. An RF jack is also used to review them before starting the step-by-step connection process. If you are unfamiliar with Component Video inputs and digital A/V receiver • Connecting the VCR control cable (model SIR-S310W only) • Turning...
... connect your DIRECTV Receiver • Activating the DIRECTV account • DIRECTV® service upgrades Jacks and cables The illustrations on the DIRECTV Receiver for the first time • Adjusting the satellite dish • Testing your DIRECTV Receiver. An RF jack is also used to review them before starting the step-by-step connection process. If you are unfamiliar with Component Video inputs and digital A/V receiver • Connecting the VCR control cable (model SIR-S310W only) • Turning...

Owners Manual
Page 21
... digital jacks and cables use light to send digital audio data to A/V receivers equipped to S-Video connections. (These cables carry the video signal only; Component video connections provide a TV picture superior to receive and interpret this data. Unlike the round RCA-type connectors, S-Video connectors must be aligned before you can plug in the cable. (This cable carries the video signal only; use with A/V cables for the audio signal.) Optical digital audio jack and cable (cable not included, jack on -screen controls. 14 If your home...
... digital jacks and cables use light to send digital audio data to A/V receivers equipped to S-Video connections. (These cables carry the video signal only; Component video connections provide a TV picture superior to receive and interpret this data. Unlike the round RCA-type connectors, S-Video connectors must be aligned before you can plug in the cable. (This cable carries the video signal only; use with A/V cables for the audio signal.) Optical digital audio jack and cable (cable not included, jack on -screen controls. 14 If your home...
Owners Manual
Page 23
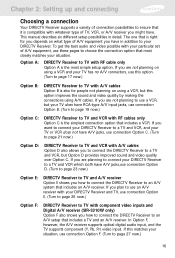
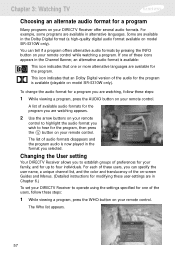
... on what type of A/V equipment, use connection Option D. (Turn to page 23 now.) Option E: DIRECTV Receiver to TV and A/V receiver Option E shows you how to connect the DIRECTV Receiver to a TV and VCR, but Option D provides improved sound and video quality over Option C. If this option. (Turn to page 17 now.) Option B: DIRECTV Receiver to TV with A/V cables Option B is compatible with component video inputs and Digital A/V receiver (SIR-S310W only) Option F also shows you how to connect the DIRECTV Receiver to TV...
... on what type of A/V equipment, use connection Option D. (Turn to page 23 now.) Option E: DIRECTV Receiver to TV and A/V receiver Option E shows you how to connect the DIRECTV Receiver to a TV and VCR, but Option D provides improved sound and video quality over Option C. If this option. (Turn to page 17 now.) Option B: DIRECTV Receiver to TV with A/V cables Option B is compatible with component video inputs and Digital A/V receiver (SIR-S310W only) Option F also shows you how to connect the DIRECTV Receiver to TV...

Owners Manual
Page 24
To watch DIRECTV® programming To watch DIRECTV® programming, tune your TV to channel 3 or 4 (depending on the position of the CH 3/4 switch on the back of your DIRECTV Receiver. 17 Next Step Now turn to page 29 to start using your DIRECTV Receiver). Chapter 2: Setting up and connecting Connection option A: DIRECTV Receiver to TV with RF cable only If connection option A best matches your needs, follow these steps: 1 Make sure your...
To watch DIRECTV® programming To watch DIRECTV® programming, tune your TV to channel 3 or 4 (depending on the position of the CH 3/4 switch on the back of your DIRECTV Receiver. 17 Next Step Now turn to page 29 to start using your DIRECTV Receiver). Chapter 2: Setting up and connecting Connection option A: DIRECTV Receiver to TV with RF cable only If connection option A best matches your needs, follow these steps: 1 Make sure your...

Owners Manual
Page 32
... the manuals for your A/V receiver and TV for your TV, A/V receiver, and DIRECTV Receiver. This step is optional; To watch DIRECTV® programming Set your A/V receiver and TV to the appropriate input mode. Chapter 2: Setting up and connecting Connection option E: DIRECTV Receiver to TV and A/V receiver If connection option E best matches your needs, follow these steps: 1 Make sure your TV, A/V receiver, and DIRECTV Receiver are turned off and unplugged. 2 Connect the RG-6 coaxial cable running from your satellite dish...
... the manuals for your A/V receiver and TV for your TV, A/V receiver, and DIRECTV Receiver. This step is optional; To watch DIRECTV® programming Set your A/V receiver and TV to the appropriate input mode. Chapter 2: Setting up and connecting Connection option E: DIRECTV Receiver to TV and A/V receiver If connection option E best matches your needs, follow these steps: 1 Make sure your TV, A/V receiver, and DIRECTV Receiver are turned off and unplugged. 2 Connect the RG-6 coaxial cable running from your satellite dish...

Owners Manual
Page 34
... your DIRECTV Receiver. 3 Connect the coaxial cable running from the OPTICAL DIGITAL AUDIO OUT jack. See your TV manual for your TV, A/V receiver, and DIRECTV Receiver. To watch DIRECTV® programming Set your TV to the Component Video input mode. (This is a setting on your DIRECTV Receiver. 27 Chapter 2: Setting up and connecting Connection option F (SIR-S310W only): DIRECTV Receiver to TV with Component Video inputs and digital A/V receiver 1 Make sure your TV, A/V receiver, and DIRECTV Receiver are turned off -air TV antenna to...
... your DIRECTV Receiver. 3 Connect the coaxial cable running from the OPTICAL DIGITAL AUDIO OUT jack. See your TV manual for your TV, A/V receiver, and DIRECTV Receiver. To watch DIRECTV® programming Set your TV to the Component Video input mode. (This is a setting on your DIRECTV Receiver. 27 Chapter 2: Setting up and connecting Connection option F (SIR-S310W only): DIRECTV Receiver to TV with Component Video inputs and digital A/V receiver 1 Make sure your TV, A/V receiver, and DIRECTV Receiver are turned off -air TV antenna to...
Owners Manual
Page 36
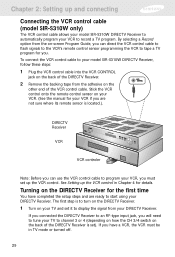
... model SIR-S310W DIRECTV Receiver to automatically program your VCR to display the signal from your DIRECTV Receiver. DIRECTV Receiver VCR VCR controler Note: Before you must be in Chapter 4 for you. If you connected the DIRECTV Receiver to an RF-type input jack, you will need to tune your TV to program your VCR, you can direct the VCR control cable to flash signals to the VCR's remote control sensor programming the VCR to tape a TV program for details. By selecting a Record option...
... model SIR-S310W DIRECTV Receiver to automatically program your VCR to display the signal from your DIRECTV Receiver. DIRECTV Receiver VCR VCR controler Note: Before you must be in Chapter 4 for you. If you connected the DIRECTV Receiver to an RF-type input jack, you will need to tune your TV to program your VCR, you can direct the VCR control cable to flash signals to the VCR's remote control sensor programming the VCR to tape a TV program for details. By selecting a Record option...

Owners Manual
Page 39
... reception problems you may encounter. Chapter 2: Setting up and connecting Azimuth refers to the left-to-right angle to which you should point your remote control. To check your satellite signal strength, follow these numbers and use them to accurately point your satellite dish. 8 To return to the Set Dish menu, press the BACK button on its axis. The SETUP menu appears. 3 Use the arrow buttons on your remote control. Tilt...
... reception problems you may encounter. Chapter 2: Setting up and connecting Azimuth refers to the left-to-right angle to which you should point your remote control. To check your satellite signal strength, follow these numbers and use them to accurately point your satellite dish. 8 To return to the Set Dish menu, press the BACK button on its axis. The SETUP menu appears. 3 Use the arrow buttons on your remote control. Tilt...

Owners Manual
Page 46
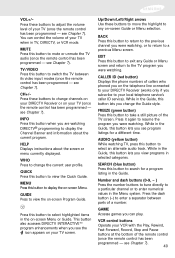
... POWER Press the POWER button to operate that let you control the way you watch TV. Your remote control does not need to be programmed to change channels, access the Guide, or get information about a program). Chapter 3: Watching TV This chapter covers all of the things you can operate your TV, VCR, DVD player, or other features that device. See Chapter 7: Programming the remote control. SET Use this button to start playing a DVD, you are controlling on your DIRECTV® Receiver's remote control. TV, VCR, DVD...
... POWER Press the POWER button to operate that let you control the way you watch TV. Your remote control does not need to be programmed to change channels, access the Guide, or get information about a program). Chapter 3: Watching TV This chapter covers all of the things you can operate your TV, VCR, DVD player, or other features that device. See Chapter 7: Programming the remote control. SET Use this button to start playing a DVD, you are controlling on your DIRECTV® Receiver's remote control. TV, VCR, DVD...
Owners Manual
Page 47
... display the Channel Banner and information about the screen or menu currently displayed. VCR control buttons Operate your TV when in TV, DIRECTV, or VCR mode. MENU Press this button to exit any on -screen Program Guide. GUIDE Press to display the on the telephone line connected to your DIRECTV Receiver (works only if you subscribe to select highlighted items in the Guide, this button to resume the program you were watching. Press it again to search for a different time. SEARCH (blue button...
... display the Channel Banner and information about the screen or menu currently displayed. VCR control buttons Operate your TV when in TV, DIRECTV, or VCR mode. MENU Press this button to exit any on -screen Program Guide. GUIDE Press to display the on the telephone line connected to your DIRECTV Receiver (works only if you subscribe to select highlighted items in the Guide, this button to resume the program you were watching. Press it again to search for a different time. SEARCH (blue button...

Owners Manual
Page 56
... 3: Watching TV Getting around in the Grid Guide You can use the Grid Guide to get information on a channel (rather than a program), use the arrow buttons on your remote control. 5 To get detailed information about the highlighted channel. 6 Press the INFO key on your remote control. buttons on your remote control. 3 To move up to 7 days on SIR-S310W. 2 To move the Grid Guide directly to a specific channel, press the 0-9 number buttons on your remote control to enter...
... 3: Watching TV Getting around in the Grid Guide You can use the Grid Guide to get information on a channel (rather than a program), use the arrow buttons on your remote control. 5 To get detailed information about the highlighted channel. 6 Press the INFO key on your remote control. buttons on your remote control. 3 To move up to 7 days on SIR-S310W. 2 To move the Grid Guide directly to a specific channel, press the 0-9 number buttons on your remote control to enter...

Owners Manual
Page 59
... remote control. Displaying and clearing the Logo Guide To display or clear the Logo Guide: 1 Press the MENU button on your remote control to highlight the Logo Guide option, and press the button on your remote control. Picture-in this section to display the list of the program on the highlighted channel. The channel logo list; Chapter 3: Watching TV Using the Logo Guide The Logo Guide displays 21 channel logos and a Channel Banner showing information about the program currently showing on the highlighted channel...
... remote control. Displaying and clearing the Logo Guide To display or clear the Logo Guide: 1 Press the MENU button on your remote control to highlight the Logo Guide option, and press the button on your remote control. Picture-in this section to display the list of the program on the highlighted channel. The channel logo list; Chapter 3: Watching TV Using the Logo Guide The Logo Guide displays 21 channel logos and a Channel Banner showing information about the program currently showing on the highlighted channel...

Owners Manual
Page 60
... Guide directly to a specific channel, press the 0-9 number buttons on your remote control to enter the desired channel number. 4 As you highlight each channel logo in the Logo Guide, information about the program currently showing on your remote control. To see more information on a highlighted program, press the INFO button on the highlighted channel appears in the Channel Banner. To return to the Logo Guide, highlight the Back item from the on-screen list and press the button...
... Guide directly to a specific channel, press the 0-9 number buttons on your remote control to enter the desired channel number. 4 As you highlight each channel logo in the Logo Guide, information about the program currently showing on your remote control. To see more information on a highlighted program, press the INFO button on the highlighted channel appears in the Channel Banner. To return to the Logo Guide, highlight the Back item from the on-screen list and press the button...
Owners Manual
Page 64
... the Dolby Digital format (a high-quality digital audio format available on your remote control while watching a program. For each of the users, follow these steps: 1 While viewing a program, press the WHO button on your remote control to highlight the audio format you selected. Some are watching appears. 2 Use the arrow buttons on model SIR-S310W only). If one of these users, you can tell if a program offers alternative audio formats by pressing the INFO button on your remote control. The list...
... the Dolby Digital format (a high-quality digital audio format available on your remote control while watching a program. For each of the users, follow these steps: 1 While viewing a program, press the WHO button on your remote control to highlight the audio format you selected. Some are watching appears. 2 Use the arrow buttons on model SIR-S310W only). If one of these users, you can tell if a program offers alternative audio formats by pressing the INFO button on your remote control. The list...
Owners Manual
Page 70
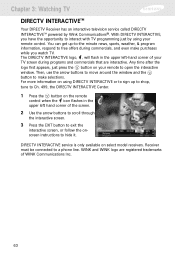
... trademarks of the screen. 2 Use the arrow buttons to scroll through the interactive screen. 3 Press the EXIT button to exit the interactive screen, or follow the onscreen instructions to make purchases while you have the opportunity to a phone line. For more information on the remote control when the icon flashes in the upper left hand corner of WINK Communications Inc. 63 DIRECTV INTERACTIVE service is only available...
... trademarks of the screen. 2 Use the arrow buttons to scroll through the interactive screen. 3 Press the EXIT button to exit the interactive screen, or follow the onscreen instructions to make purchases while you have the opportunity to a phone line. For more information on the remote control when the icon flashes in the upper left hand corner of WINK Communications Inc. 63 DIRECTV INTERACTIVE service is only available...

Owners Manual
Page 75
... a program reminder or a recording timer). • For timers that timer from the list, then press the button on your remote control. 68 and right-arrow buttons on your remote control to highlight the option you wish to change. • For new timers or for timers you previously scheduled using the on-screen Guide, you can modify the channel number, the start time and date, the end time and date, the frequency...
... a program reminder or a recording timer). • For timers that timer from the list, then press the button on your remote control. 68 and right-arrow buttons on your remote control to highlight the option you wish to change. • For new timers or for timers you previously scheduled using the on-screen Guide, you can modify the channel number, the start time and date, the end time and date, the frequency...

Owners Manual
Page 102
... your remote control. The Caller ID menu appears. 4 Use the arrow buttons on your remote control. Chapter 6: Settings, preferences, upgrades, and extras Reviewing and controlling Caller ID The Caller ID item in the SETUP menu allows you to view a list of calls that occur while you are recording a program. 95 The Caller ID feature only works if you subscribe to highlight the Display Caller IDs menu item, then press the button on your remote control to the caller ID service...
... your remote control. The Caller ID menu appears. 4 Use the arrow buttons on your remote control. Chapter 6: Settings, preferences, upgrades, and extras Reviewing and controlling Caller ID The Caller ID item in the SETUP menu allows you to view a list of calls that occur while you are recording a program. 95 The Caller ID feature only works if you subscribe to highlight the Display Caller IDs menu item, then press the button on your remote control to the caller ID service...
