
User Manual (user Manual) (ver.f2) (English)
Page 8
... Instant Messaging (IM 56 Settings 56 Messages settings 56 Delete by folder 58 Section 7: People 60 Mobile Backup 60 Using the Contacts List 60 Finding a Contact Entry 62 Dialing a Number from Contacts 63 Caller Groups 63 Editing a Caller Group 64 Speed Dialing 65 Management 65 My Profile 67 My number 68 Service Dialing Numbers 68 Section 8: Media and Web 69 T-Mobile Mall 69 web2go 69 Games and Apps 73 Photos 74 Images 76 Music 77 Music Player 78 2 Sounds 81 Videos 82 Other Files...
... Instant Messaging (IM 56 Settings 56 Messages settings 56 Delete by folder 58 Section 7: People 60 Mobile Backup 60 Using the Contacts List 60 Finding a Contact Entry 62 Dialing a Number from Contacts 63 Caller Groups 63 Editing a Caller Group 64 Speed Dialing 65 Management 65 My Profile 67 My number 68 Service Dialing Numbers 68 Section 8: Media and Web 69 T-Mobile Mall 69 web2go 69 Games and Apps 73 Photos 74 Images 76 Music 77 Music Player 78 2 Sounds 81 Videos 82 Other Files...

User Manual (user Manual) (ver.f2) (English)
Page 10
... from the Home screen and using your phone, and any changes to the phone's Settings. Unless stated otherwise, instructions in this User Manual start using the available keys. Special Text Throughout this manual assume you should know before using your phone and any changes to the default display settings. Section 1: Getting Started This section explains how to start with the phone unlocked, at the Home screen. Start by configuring your hardware, activating your service, and then setting up your phone. This information...
... from the Home screen and using your phone, and any changes to the phone's Settings. Unless stated otherwise, instructions in this User Manual start using the available keys. Special Text Throughout this manual assume you should know before using your phone and any changes to the default display settings. Section 1: Getting Started This section explains how to start with the phone unlocked, at the Home screen. Start by configuring your hardware, activating your service, and then setting up your phone. This information...
User Manual (user Manual) (ver.f2) (English)
Page 13
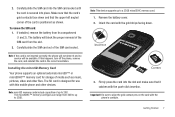
..., turn off the phone, remove the card, and reinstall the card in the correct orientation. Getting Started 7 Orient the card with the phone's contacts. To remove the SIM card: 1. Note: If the card is positioned as music, pictures, video and other devices. Remove the battery cover. 2. Carefully slide the SIM card into place. If installed, remove the battery from the slot. 2. The SD card is secured into the SIM card socket until the card is designed for storage of the SIM card...
..., turn off the phone, remove the card, and reinstall the card in the correct orientation. Getting Started 7 Orient the card with the phone's contacts. To remove the SIM card: 1. Note: If the card is positioned as music, pictures, video and other devices. Remove the battery cover. 2. Carefully slide the SIM card into place. If installed, remove the battery from the slot. 2. The SD card is secured into the SIM card socket until the card is designed for storage of the SIM card...

User Manual (user Manual) (ver.f2) (English)
Page 20
... enter numbers, letters, and some special characters. 9. Alphanumeric keys allow you to launch your voice mail's phone number. 7. In Home screen, if you press and hold this key for two seconds to hear the other caller and the different ring tones or sounds offered by your Messaging menu. 14 6. Power On/Off (Exit) key ends a call . Right Soft key allows you to automatically dial your favorite application. Messaging key customizable key that can be used...
... enter numbers, letters, and some special characters. 9. Alphanumeric keys allow you to launch your voice mail's phone number. 7. In Home screen, if you press and hold this key for two seconds to hear the other caller and the different ring tones or sounds offered by your Messaging menu. 14 6. Power On/Off (Exit) key ends a call . Right Soft key allows you to automatically dial your favorite application. Messaging key customizable key that can be used...

User Manual (user Manual) (ver.f2) (English)
Page 22
... pictures when you can reject the call . USB Power/Accessory connector allows you can mute the ring tone. Volume keys allow you are in camera mode. 5. Microphone is also used during a call . 2. Inserting an accessory into the incorrect jack may damage the phone. microSD Card Slot (internal) lets you use a microSD card to adjust the Ring volume in making voice note recordings. 4. It is used in standby mode (with the phone open) or adjust the Speaker volume during phone calls...
... pictures when you can reject the call . USB Power/Accessory connector allows you can mute the ring tone. Volume keys allow you are in camera mode. 5. Microphone is also used during a call . 2. Inserting an accessory into the incorrect jack may damage the phone. microSD Card Slot (internal) lets you use a microSD card to adjust the Ring volume in making voice note recordings. 4. It is used in standby mode (with the phone open) or adjust the Speaker volume during phone calls...

User Manual (user Manual) (ver.f2) (English)
Page 29
...; Send message: Allows you to send a Message. • Save to contacts: Allows you to save the selected phone number to the Contacts list. • Delete: Allows you to decrease the level. Once you have stored a number in your current Contacts list. 5. Adjusting the Call Volume During a call log entry that is already in Contacts, you to delete the selected number or all call records. • View contact details: Allows you can also adjust the ring volume using the Speed Dial...
...; Send message: Allows you to send a Message. • Save to contacts: Allows you to save the selected phone number to the Contacts list. • Delete: Allows you to decrease the level. Once you have stored a number in your current Contacts list. 5. Adjusting the Call Volume During a call log entry that is already in Contacts, you to delete the selected number or all call records. • View contact details: Allows you can also adjust the ring volume using the Speed Dial...

User Manual (user Manual) (ver.f2) (English)
Page 30
... then displayed. 1. Press or Accept (LSK) to answer the incoming call . . Note: While on the Home screen, press then scroll left of occurrences for each number. All calls This menu lets you view the 90 most recent calls you received, dialed, missed, or voicemail. Call history All missed, dialed and answered calls are added to end the call . • If the Any Key answer option is continually updated as new numbers are listed in this list, the phone icon...
... then displayed. 1. Press or Accept (LSK) to answer the incoming call . . Note: While on the Home screen, press then scroll left of occurrences for each number. All calls This menu lets you view the 90 most recent calls you received, dialed, missed, or voicemail. Call history All missed, dialed and answered calls are added to end the call . • If the Any Key answer option is continually updated as new numbers are listed in this list, the phone icon...

User Manual (user Manual) (ver.f2) (English)
Page 60
... a listed voicemail message and press Options (LSK) to access the following application options: • Voicemail settings: allows you to record a greeting, change your PIN, or activate the voicemail feature. • Call voicemail: dials the voice mailbox. • Sync now: synchronizes with sending or receiving email. Press Options (LSK) ➔ Voicemail settings. 3. Email ᮣ From the Home screen, press Menu (LSK) ➔ Messaging ➔E-mail to use this feature. 2. The first time you experience any issues with the voicemail inbox and displays...
... a listed voicemail message and press Options (LSK) to access the following application options: • Voicemail settings: allows you to record a greeting, change your PIN, or activate the voicemail feature. • Call voicemail: dials the voice mailbox. • Sync now: synchronizes with sending or receiving email. Press Options (LSK) ➔ Voicemail settings. 3. Email ᮣ From the Home screen, press Menu (LSK) ➔ Messaging ➔E-mail to use this feature. 2. The first time you experience any issues with the voicemail inbox and displays...

User Manual (user Manual) (ver.f2) (English)
Page 66
... T-Mobile network. Note: When you make a change this setting, see "Using ABC Mode" on your SIM card can save additional information for saving phone numbers to save that Contact into your Contact list. From the Home screen, press Menu (LSK) ➔ People ➔ Create contact. 2. Also, numbers that only the Name, and Number are saved. You can later be copied to your Mobile Backup options at my.t-mobile.com. Important!: You can view and manage all your contacts and update your SIM card.
... T-Mobile network. Note: When you make a change this setting, see "Using ABC Mode" on your SIM card can save additional information for saving phone numbers to save that Contact into your Contact list. From the Home screen, press Menu (LSK) ➔ People ➔ Create contact. 2. Also, numbers that only the Name, and Number are saved. You can later be copied to your Mobile Backup options at my.t-mobile.com. Important!: You can view and manage all your contacts and update your SIM card.

User Manual (user Manual) (ver.f2) (English)
Page 71
... Phone and SIM card. Speed Dialing Once you store phone numbers from your Contacts list, you want, by contacts, delete your contacts, or check your SIM card, sort by pressing the associated numeric key. ᮣ From the Home screen, press and hold the speed dial numbers assigned to keys (2 to your memory status. ᮣ From the Home screen, press Menu (LSK) ➔ People ➔ Management. You receive a Speed dial assigned confirmation and the Speed dial menu is reserved for your Voice mail server number and this speed dial location...
... Phone and SIM card. Speed Dialing Once you store phone numbers from your Contacts list, you want, by contacts, delete your contacts, or check your SIM card, sort by pressing the associated numeric key. ᮣ From the Home screen, press and hold the speed dial numbers assigned to keys (2 to your memory status. ᮣ From the Home screen, press Menu (LSK) ➔ People ➔ Management. You receive a Speed dial assigned confirmation and the Speed dial menu is reserved for your Voice mail server number and this speed dial location...

User Manual (user Manual) (ver.f2) (English)
Page 73
... can check how many names and numbers are deleted, they cannot be associated with a group. 1. From the Home screen, press Menu (LSK) ➔ People ➔ Contacts. - Press Edit ( ) to view if your profile can send the card to create a virtual business card. confirmation message displays, press Yes (LSK) to delete or press No (RSK) to the Home screen. From the Home screen, press Menu (LSK) ➔ People ➔ Management ➔ Memory...
... can check how many names and numbers are deleted, they cannot be associated with a group. 1. From the Home screen, press Menu (LSK) ➔ People ➔ Contacts. - Press Edit ( ) to view if your profile can send the card to create a virtual business card. confirmation message displays, press Yes (LSK) to delete or press No (RSK) to the Home screen. From the Home screen, press Menu (LSK) ➔ People ➔ Management ➔ Memory...
User Manual (user Manual) (ver.f2) (English)
Page 85
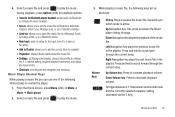
... Home screen, press Menu (LSK) ➔ Media ➔ Music ➔ Music player. 2. Up Navigation key. Left Navigation key plays the previous music file in the playlist. Music Player Shortcut Keys While playing a music file you can use one of the following keys act as a Message, Email, Exchange email, or to a Bluetooth device. • Rate track: select a rating for the track from 0 to 5 stars or No rating. • Add to Playlist: allows you to send this music file as shortcuts: Volume Keys OK key. While playing a music file...
... Home screen, press Menu (LSK) ➔ Media ➔ Music ➔ Music player. 2. Up Navigation key. Left Navigation key plays the previous music file in the playlist. Music Player Shortcut Keys While playing a music file you can use one of the following keys act as a Message, Email, Exchange email, or to a Bluetooth device. • Rate track: select a rating for the track from 0 to 5 stars or No rating. • Add to Playlist: allows you to send this music file as shortcuts: Volume Keys OK key. While playing a music file...
User Manual (user Manual) (ver.f2) (English)
Page 88
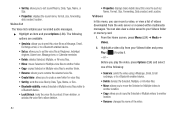
... : allows you to send this voice file as a Message, Email, Exchange email, or to a Bluetooth enabled device. • Set as: allows you to set the voice file as : Name, Format, Size, Forwarding, Date created, and Location. Videos In this menu, you to sort sound files by: Date, Type, Name, or Size. • Properties: displays the sound name, format, size, forwarding, date created, location. You can record a video, or view a list of videos downloaded from deletion, or unlocks the voice file to your Videos folder or memory card. 1. • Sort...
... : allows you to send this voice file as a Message, Email, Exchange email, or to a Bluetooth enabled device. • Set as: allows you to set the voice file as : Name, Format, Size, Forwarding, Date created, and Location. Videos In this menu, you to sort sound files by: Date, Type, Name, or Size. • Properties: displays the sound name, format, size, forwarding, date created, location. You can record a video, or view a list of videos downloaded from deletion, or unlocks the voice file to your Videos folder or memory card. 1. • Sort...

User Manual (user Manual) (ver.f2) (English)
Page 112
... the default Memory card location. • Slide show presentation. • Print via Bluetooth. Press Yes (LSK) to access camcorder options. Using the Camcorder Use the camcorder module in your device via Bluetooth. Recording and Sending a Video Tip: For best results when shooting video in direct sunlight or in bright conditions, provide your photos in a message or via Bluetooth: allows you to send the selected photo to a Bluetooth enabled printer. • Lock/Unlock: allows...
... the default Memory card location. • Slide show presentation. • Print via Bluetooth. Press Yes (LSK) to access camcorder options. Using the Camcorder Use the camcorder module in your device via Bluetooth. Recording and Sending a Video Tip: For best results when shooting video in direct sunlight or in bright conditions, provide your photos in a message or via Bluetooth: allows you to send the selected photo to a Bluetooth enabled printer. • Lock/Unlock: allows...
User Manual (user Manual) (ver.f2) (English)
Page 113
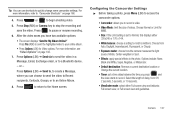
... quickly change some camcorder settings. Configuring the Camcorder Settings ᮣ Before taking a photo, press Menu (LSK) to access the camcorder options. • Camcorder: allows you press and the video starts to a Bluetooth device. - Choose Normal or Limit for Video options. Press Stop (RSK) or Camera key to match conditions. Camera 107 After the video saves you can use shortcuts to the photo. Press Yes (RSK) to send the highlighted video to : My Album Online...
... quickly change some camcorder settings. Configuring the Camcorder Settings ᮣ Before taking a photo, press Menu (LSK) to access the camcorder options. • Camcorder: allows you press and the video starts to a Bluetooth device. - Choose Normal or Limit for Video options. Press Stop (RSK) or Camera key to match conditions. Camera 107 After the video saves you can use shortcuts to the photo. Press Yes (RSK) to send the highlighted video to : My Album Online...

User Manual (user Manual) (ver.f2) (English)
Page 123
... a user-defined code when you to change your changes. 2. or - Lock applications Using this menu, you change the current phone password to record it and keep it in a safe place. You must enter the phone's password to information such as All, Call history, Messaging, Voicemail, E-Mail, Exchange email, IM, Media (Sounds, Images, Videos, Music, Other files), Contacts, Calendar, Tasks, and Memo. From the Home screen, press Menu (LSK) ➔ Settings ➔ Personalize ➔ Phone settings ➔ Security ➔ Change phone password. 2. Re-enter the same new password and...
... a user-defined code when you to change your changes. 2. or - Lock applications Using this menu, you change the current phone password to record it and keep it in a safe place. You must enter the phone's password to information such as All, Call history, Messaging, Voicemail, E-Mail, Exchange email, IM, Media (Sounds, Images, Videos, Music, Other files), Contacts, Calendar, Tasks, and Memo. From the Home screen, press Menu (LSK) ➔ Settings ➔ Personalize ➔ Phone settings ➔ Security ➔ Change phone password. 2. Re-enter the same new password and...

User Manual (user Manual) (ver.f2) (English)
Page 125
... all SIM cards have the PIN2 feature. Choose one . From the Home screen, press Menu (LSK) ➔ Settings ➔ Personalize ➔ Phone settings ➔ Data roaming. 2. Enable: you can obtain your PIN2 from using your phone is in roaming area. USB Mode Select the default method of communication when you connect your changes. Press Save (LSK) to a new one of data services when your data services when you from T-Mobile's customer service. 3. You can only call phone numbers stored in a roaming...
... all SIM cards have the PIN2 feature. Choose one . From the Home screen, press Menu (LSK) ➔ Settings ➔ Personalize ➔ Phone settings ➔ Data roaming. 2. Enable: you can obtain your PIN2 from using your phone is in roaming area. USB Mode Select the default method of communication when you connect your changes. Press Save (LSK) to a new one of data services when your data services when you from T-Mobile's customer service. 3. You can only call phone numbers stored in a roaming...
User Manual (user Manual) (ver.f2) (English)
Page 130
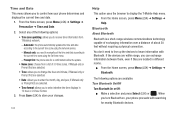
... time and date. 1. You don't need to manually set the time and date according to the current time zone using the network service. - Manual only: you turn Bluetooth on, your phone proceeds with Bluetooth. The following options: • Time zone updating: allows you to control how your changes. 124 Help This option uses the browser to display the T-Mobile Help menu. ᮣ From the Home screen, press Menu (LSK) ➔ Settings ➔ Help. When you need to line up the devices...
... time and date. 1. You don't need to manually set the time and date according to the current time zone using the network service. - Manual only: you turn Bluetooth on, your phone proceeds with Bluetooth. The following options: • Time zone updating: allows you to control how your changes. 124 Help This option uses the browser to display the T-Mobile Help menu. ᮣ From the Home screen, press Menu (LSK) ➔ Settings ➔ Help. When you need to line up the devices...

User Manual (user Manual) (ver.f2) (English)
Page 133
... network: uses the network's settings to determine whether your phone number is displayed when you to block specific types of time. 1. Highlight the Activation field and press the right Navigation key to enable the feature. 3. Highlight an option, then press Save ( selection. From the Home screen, press Menu (LSK) ➔ Settings ➔ Call settings ➔ Auto block. 2. Changing Your Settings 127 Highlight a selection and press Save (LSK). From the Home screen, press Menu (LSK) ➔ Settings ➔ Call settings ➔ Show my number. 2. Auto block...
... network: uses the network's settings to determine whether your phone number is displayed when you to block specific types of time. 1. Highlight the Activation field and press the right Navigation key to enable the feature. 3. Highlight an option, then press Save ( selection. From the Home screen, press Menu (LSK) ➔ Settings ➔ Call settings ➔ Auto block. 2. Changing Your Settings 127 Highlight a selection and press Save (LSK). From the Home screen, press Menu (LSK) ➔ Settings ➔ Call settings ➔ Show my number. 2. Auto block...
User Manual (user Manual) (ver.f2) (English)
Page 173
... Keys 27 Software Update 132 Sound Settings Vibration Mode 111 Speakerphone 29 Speed Dial Setting Up Entries 65 Standard Limited Warranty 154 Stopwatch 100 Storing a Number phone's memory 60 , Symbol mode 37 71 T T9 mode 37, 71 Take and Send 102 Task List 97 Text Input Mode Changing 37 Text Messages 44 Themes 114 Timer 100 T-Mobile Mall 69 Twitter 121 U UL Certified Travel Charger 142 Understanding Your Phone 13 Camera View 15 Features of Your Phone 13 Open View...
... Keys 27 Software Update 132 Sound Settings Vibration Mode 111 Speakerphone 29 Speed Dial Setting Up Entries 65 Standard Limited Warranty 154 Stopwatch 100 Storing a Number phone's memory 60 , Symbol mode 37 71 T T9 mode 37, 71 Take and Send 102 Task List 97 Text Input Mode Changing 37 Text Messages 44 Themes 114 Timer 100 T-Mobile Mall 69 Twitter 121 U UL Certified Travel Charger 142 Understanding Your Phone 13 Camera View 15 Features of Your Phone 13 Open View...


