
User Manual (user Manual) (ver.1.0) (English)
Page 1
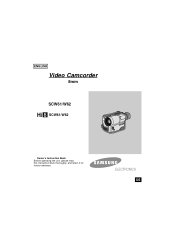
ELECTRONICS US ENGLISH Video Camcorder 8mm SCW61/W62 Hi SCW61/W62 Owner's Instruction Book Before operating the unit, please read this instruction book thoroughly, and retain it for future reference.
ELECTRONICS US ENGLISH Video Camcorder 8mm SCW61/W62 Hi SCW61/W62 Owner's Instruction Book Before operating the unit, please read this instruction book thoroughly, and retain it for future reference.

User Manual (user Manual) (ver.1.0) (English)
Page 2
...12 Descriptions s Front View/Side View/Rear View 13, 14, 15 s OSD (On Screen Display) ...16 Accessories Supplied with the Camcorder 18 Preparing Adjusting the Hand Strap and Shoulder Strap 19 Lithium Battery Installation...20 Connecting the Power Source ...21 s To use the AC... First Recording ...26 Hints for Stable Image Recording ...28 s Recording with Viewfinder ...28 Adjusting Focus of the VIEWFINDER...28 Playing back a tape on the CAMCORDER 29 s Viewing a Still Picture...30 s Picture Search ...30 Advanced Recording Zooming In and Out ...31 Digital Zoom ...32 EASY mode (for beginners) ...
...12 Descriptions s Front View/Side View/Rear View 13, 14, 15 s OSD (On Screen Display) ...16 Accessories Supplied with the Camcorder 18 Preparing Adjusting the Hand Strap and Shoulder Strap 19 Lithium Battery Installation...20 Connecting the Power Source ...21 s To use the AC... First Recording ...26 Hints for Stable Image Recording ...28 s Recording with Viewfinder ...28 Adjusting Focus of the VIEWFINDER...28 Playing back a tape on the CAMCORDER 29 s Viewing a Still Picture...30 s Picture Search ...30 Advanced Recording Zooming In and Out ...31 Digital Zoom ...32 EASY mode (for beginners) ...
User Manual (user Manual) (ver.1.0) (English)
Page 3
... Playback (Using the PAL60 System 53 DSE in PLAYER mode...54 Maintenance Cleaning and Taking care of the Camcorder 54 s Cleaning the Viewfinder ...54 s Cleaning the Video Heads ...55 s Storing the Camcorder ...55 Using Your Camcorder Abroad 56 Troubleshooting Self Diagnosis Display ...57 Checking ...58 Moisture Condensation ...60 Specifications ...61 Index ...62 Warranty...
... Playback (Using the PAL60 System 53 DSE in PLAYER mode...54 Maintenance Cleaning and Taking care of the Camcorder 54 s Cleaning the Viewfinder ...54 s Cleaning the Video Heads ...55 s Storing the Camcorder ...55 Using Your Camcorder Abroad 56 Troubleshooting Self Diagnosis Display ...57 Checking ...58 Moisture Condensation ...60 Specifications ...61 Index ...62 Warranty...
User Manual (user Manual) (ver.1.0) (English)
Page 5
...Direct sunlight can damage the inside to hot temperature outside to the viewfinder. for example: s When you take the camcorder from cool temperature inside of the viewfinder. Please make sure that the viewfinder is activated unexpectedly, and you want to form inside the... camcorder. Be careful when placing the camcorder under sunlight or by a window. 2) Do not pick up the camcorder by the viewfinder. 3) Unintended rotation may cause damage to warm temperature inside during ...
...Direct sunlight can damage the inside to hot temperature outside to the viewfinder. for example: s When you take the camcorder from cool temperature inside of the viewfinder. Please make sure that the viewfinder is activated unexpectedly, and you want to form inside the... camcorder. Be careful when placing the camcorder under sunlight or by a window. 2) Do not pick up the camcorder by the viewfinder. 3) Unintended rotation may cause damage to warm temperature inside during ...
User Manual (user Manual) (ver.1.0) (English)
Page 6
...; Make sure that the battery pack is charged before recording outdoors. ✤ To preserve battery power, keep your camcorder turned off when you are not operating it. ✤ When your camcorder is in CAMERA mode, if it is left in STANDBY for more than 5 minutes without operation, it . &#...turn off to protect against unexpected battery discharge. ✤ Make sure that the battery pack is removed. ✤ The lithium battery for the camcorder lasts about 8~10 months under normal operation from time of installation. ✤ When the lithium battery becomes weak or dead, the date/time ...
...; Make sure that the battery pack is charged before recording outdoors. ✤ To preserve battery power, keep your camcorder turned off when you are not operating it. ✤ When your camcorder is in CAMERA mode, if it is left in STANDBY for more than 5 minutes without operation, it . &#...turn off to protect against unexpected battery discharge. ✤ Make sure that the battery pack is removed. ✤ The lithium battery for the camcorder lasts about 8~10 months under normal operation from time of installation. ✤ When the lithium battery becomes weak or dead, the date/time ...
User Manual (user Manual) (ver.1.0) (English)
Page 7
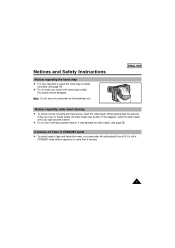
Note: Do not carry the camcorder by the handstrap only. If this happens, clean the video heads with a dry type cassette cleaner. ✤ Do not use a wet type cassette cleaner. ENGLISH ... are noisy or hardly visible, the video heads may be dirty. It may damage the video heads. (see page 19) ✤ Do not insert your camcorder will automatically turn off if it is very important to adjust the hand strap for more than 5 minutes. 7 Notices and Safety Instructions Notices regarding video...
Note: Do not carry the camcorder by the handstrap only. If this happens, clean the video heads with a dry type cassette cleaner. ✤ Do not use a wet type cassette cleaner. ENGLISH ... are noisy or hardly visible, the video heads may be dirty. It may damage the video heads. (see page 19) ✤ Do not insert your camcorder will automatically turn off if it is very important to adjust the hand strap for more than 5 minutes. 7 Notices and Safety Instructions Notices regarding video...
User Manual (user Manual) (ver.1.0) (English)
Page 8
...or electric shock. RETAIN INSTRUCTIONS: The safety and operating instructions should be hazardous. 7. Do not use a mounting accessory recommended by the CAMCORDER product manufacturer as they may fall, causing serious injury to a child or adult, and serious damage to overturn. for example, near a... bathtub, wash bowl, kitchen sink, laundry tub, in the literature accompanying this CAMCORDER on the CAMCORDER and in the operating instructions should use liquid or aerosol cleaners. Use only with care. This symbol is intended to alert the...
...or electric shock. RETAIN INSTRUCTIONS: The safety and operating instructions should be hazardous. 7. Do not use a mounting accessory recommended by the CAMCORDER product manufacturer as they may fall, causing serious injury to a child or adult, and serious damage to overturn. for example, near a... bathtub, wash bowl, kitchen sink, laundry tub, in the literature accompanying this CAMCORDER on the CAMCORDER and in the operating instructions should use liquid or aerosol cleaners. Use only with care. This symbol is intended to alert the...
User Manual (user Manual) (ver.1.0) (English)
Page 9
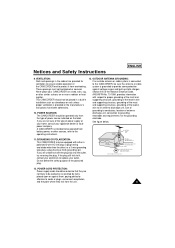
...to conductors, location of power supply at your home, consult your appliance dealer or local power company. GROUNDING OR POLARIZATION: This CAMCORDER may be operated from the type of the polarized plug. Notices and Safety Instructions ENGLISH 9. These openings must not be routed ...so that they exit from overheating. POWER SOURCES: The CAMCORDER should be walked on or near a radiator or heat register. If you are not likely to be operated only from battery power,...
...to conductors, location of power supply at your home, consult your appliance dealer or local power company. GROUNDING OR POLARIZATION: This CAMCORDER may be operated from the type of the polarized plug. Notices and Safety Instructions ENGLISH 9. These openings must not be routed ...so that they exit from overheating. POWER SOURCES: The CAMCORDER should be walked on or near a radiator or heat register. If you are not likely to be operated only from battery power,...
User Manual (user Manual) (ver.1.0) (English)
Page 10
...AND LIQUIDS: Never push objects of other electric light or power circuits where it checked by the operating instructions. d. If the CAMCORDER has been exposed to qualified service personnel under the following the operating instructions, adjust only those controls that could result in damage ...an outside antenna system should be sure the service technician has used replacement parts specified by a qualified technician to restore the CAMCORDER to service this CAMCORDER during a lightning storm or when it from touching such power lines or circuits as they may result in a fire or...
...AND LIQUIDS: Never push objects of other electric light or power circuits where it checked by the operating instructions. d. If the CAMCORDER has been exposed to qualified service personnel under the following the operating instructions, adjust only those controls that could result in damage ...an outside antenna system should be sure the service technician has used replacement parts specified by a qualified technician to restore the CAMCORDER to service this CAMCORDER during a lightning storm or when it from touching such power lines or circuits as they may result in a fire or...
User Manual (user Manual) (ver.1.0) (English)
Page 12
...You have to adjust the zoom fully wide for macro recording. (see page 31) EASY This mode enables even the beginner to Know Your Camcorder Features Your camcorder has many features for recording and playing back. ENGLISH Getting to easily make a recording. (see page 34) Multi PLAYBACK (PAL60) PAL60 ...is a recording technique that lets you to be viewed on this camcorder (NTSC format) can be filmed. (see page 38) 22x High ratio zoom lens Zooming is a special output signal format with a light background, use...
...You have to adjust the zoom fully wide for macro recording. (see page 31) EASY This mode enables even the beginner to Know Your Camcorder Features Your camcorder has many features for recording and playing back. ENGLISH Getting to easily make a recording. (see page 34) Multi PLAYBACK (PAL60) PAL60 ...is a recording technique that lets you to be viewed on this camcorder (NTSC format) can be filmed. (see page 38) 22x High ratio zoom lens Zooming is a special output signal format with a light background, use...
User Manual (user Manual) (ver.1.0) (English)
Page 13
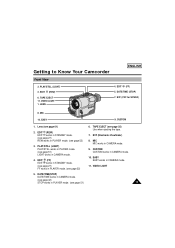
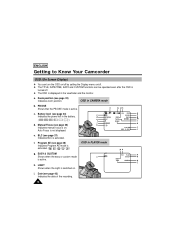
Getting to Know Your Camcorder ENGLISH Front View 3. EASY 9. TAPE EJECT (see page 52) 3. EASY EASY works in CAMERA mode. 10. VIDEO LIGHT 5. TAPE EJECT 11. EDIT (REW) EDIT works ...) LIGHT works in PLAYER mode. (see page 51) 13 EDIT (FF) 5. DATE/TIME (STOP) 7. MIC 10. PLAY/STILL (LIGHT) 2. VIDEO LIGHT 1. LENS 4. EVF (CVF for SCW62) 8. EDIT (FF) EDIT works in STANDBY mode. (see page 27) FF works in CAMERA mode. 4. MIC MIC works in PLAYER mode. (see page 52) 6. DATE...
Getting to Know Your Camcorder ENGLISH Front View 3. EASY 9. TAPE EJECT (see page 52) 3. EASY EASY works in CAMERA mode. 10. VIDEO LIGHT 5. TAPE EJECT 11. EDIT (REW) EDIT works ...) LIGHT works in PLAYER mode. (see page 51) 13 EDIT (FF) 5. DATE/TIME (STOP) 7. MIC 10. PLAY/STILL (LIGHT) 2. VIDEO LIGHT 1. LENS 4. EVF (CVF for SCW62) 8. EDIT (FF) EDIT works in STANDBY mode. (see page 27) FF works in CAMERA mode. 4. MIC MIC works in PLAYER mode. (see page 52) 6. DATE...
User Manual (user Manual) (ver.1.0) (English)
Page 14
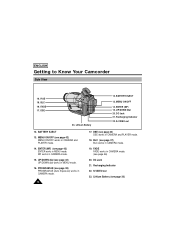
... 40) DSE works in CAMERA mode. 15. Recharging Indicator 22. Lithium Battery 12. ENTER (MF) (see page 20) DSE 23. ENGLISH Getting to Know Your Camcorder Side View 16. MENU ON/OFF 14. Lithium Battery (see page 42) ENTER works in CAMERA mode. 19.
... 40) DSE works in CAMERA mode. 15. Recharging Indicator 22. Lithium Battery 12. ENTER (MF) (see page 20) DSE 23. ENGLISH Getting to Know Your Camcorder Side View 16. MENU ON/OFF 14. Lithium Battery (see page 42) ENTER works in CAMERA mode. 19.
User Manual (user Manual) (ver.1.0) (English)
Page 15
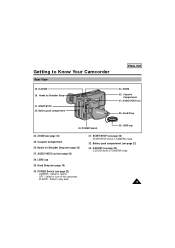
ZOOM 25. ZOOM (see page 22) - LENS cap 29. POWER Switch (see page 32) 25. PLAYER : Select to turn off the camcorder. - Battery pack compartment (see page 20) 27. Hooks for Shoulder Strap (see page 22) 33. Hand Strap 30. POWER Switch 28. Hooks for Shoulder Strap .... OFF : Select to play back. 31. START/STOP (see page 50) 28. Battery pack compartment ENGLISH 24. LENS cap 24. CAMERA : Select to Know Your Camcorder Rear View 33. Getting to record. - AUDIO/VIDEO out 29. AUDIO/VIDEO out (see page 26) START/STOP works in CAMERA mode. 15
ZOOM 25. ZOOM (see page 22) - LENS cap 29. POWER Switch (see page 32) 25. PLAYER : Select to turn off the camcorder. - Battery pack compartment (see page 20) 27. Hooks for Shoulder Strap (see page 22) 33. Hand Strap 30. POWER Switch 28. Hooks for Shoulder Strap .... OFF : Select to play back. 31. START/STOP (see page 50) 28. Battery pack compartment ENGLISH 24. LENS cap 24. CAMERA : Select to Know Your Camcorder Rear View 33. Getting to record. - AUDIO/VIDEO out 29. AUDIO/VIDEO out (see page 26) START/STOP works in CAMERA mode. 15
User Manual (user Manual) (ver.1.0) (English)
Page 16
... left in PLAYER mode g. Battery level (see page 32) Indicates zoom position. f. h. Date (see page 37) Indicates BLC is activated. ENGLISH Getting to Know Your Camcorder OSD (On Screen Display) ✤ You can be operated even after the OSD is turned off by setting the Display menu on . c. a q ps W W TT 500...
... left in PLAYER mode g. Battery level (see page 32) Indicates zoom position. f. h. Date (see page 37) Indicates BLC is activated. ENGLISH Getting to Know Your Camcorder OSD (On Screen Display) ✤ You can be operated even after the OSD is turned off by setting the Display menu on . c. a q ps W W TT 500...
User Manual (user Manual) (ver.1.0) (English)
Page 17
...Indicates the operation mode is activated. l. r. s. Digital zoom (see page 40) Indicates the DSE mode is activated. Tape counter Indicates amount of the Camcorder. The White Balance modes are SEPIA, B/W, NEG., MIRROR, ART, MOSAIC, WIDE(16:9) and CINEMA. m. DSE (Digital Special Effect) (see page...see page 44) Indicates the recorded title you are STBY, REC, STOP, PLAY, FF, REW, EJECT. Getting to Know Your Camcorder OSD (On Screen Display) j. Title (see page 60) Monitors the moisture condensation. p. It is superimposed on the scene. The operation ...
...Indicates the operation mode is activated. l. r. s. Digital zoom (see page 40) Indicates the DSE mode is activated. Tape counter Indicates amount of the Camcorder. The White Balance modes are SEPIA, B/W, NEG., MIRROR, ART, MOSAIC, WIDE(16:9) and CINEMA. m. DSE (Digital Special Effect) (see page...see page 44) Indicates the recorded title you are STBY, REC, STOP, PLAY, FF, REW, EJECT. Getting to Know Your Camcorder OSD (On Screen Display) j. Title (see page 60) Monitors the moisture condensation. p. It is superimposed on the scene. The operation ...
User Manual (user Manual) (ver.1.0) (English)
Page 18
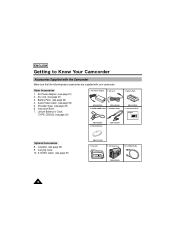
... 8. AUDIO/VIDEO Cable 5. Cassette. (see page 21) 3. Lithium Battery AD63-00202A Optional Accessories 8. Instruction Book Video Camcorder 8mm AD39-40200A 7. Cassette 9. AC cord. (see page 25) 9. Carrying Case. 10. Basic Accessories 1. ENGLISH Getting to Know Your... Camcorder Accessories Supplied with the Camcorder Make sure that the following basic accessories are supplied with your camcorder. AC Power Adapter. (see page 50) 5. Audio/Video Cable. (see page 21) 2. ...
... 8. AUDIO/VIDEO Cable 5. Cassette. (see page 21) 3. Lithium Battery AD63-00202A Optional Accessories 8. Instruction Book Video Camcorder 8mm AD39-40200A 7. Cassette 9. AC cord. (see page 25) 9. Carrying Case. 10. Basic Accessories 1. ENGLISH Getting to Know Your... Camcorder Accessories Supplied with the Camcorder Make sure that the following basic accessories are supplied with your camcorder. AC Power Adapter. (see page 50) 5. Audio/Video Cable. (see page 21) 2. ...
User Manual (user Manual) (ver.1.0) (English)
Page 19
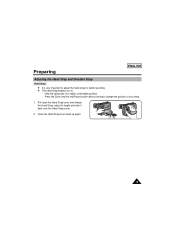
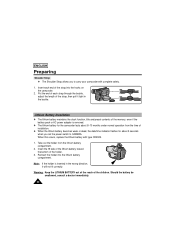
Hold the camcorder in a stable, comfortable position. - Pull open the Hand Strap cover and release the Hand Strap, adjust its length and stick it back onto the Hand Strap cover. 2. Press the Zoom and the red Record button without having to : - Close the Hand Strap cover back up again. 19 Preparing ENGLISH Adjusting the Hand Strap and Shoulder Strap Hand Strap ✤ It is very important to adjust the hand strap for better recording. ✤ The hand strap enables you to change the position of your hand. 1.
Hold the camcorder in a stable, comfortable position. - Pull open the Hand Strap cover and release the Hand Strap, adjust its length and stick it back onto the Hand Strap cover. 2. Press the Zoom and the red Record button without having to : - Close the Hand Strap cover back up again. 19 Preparing ENGLISH Adjusting the Hand Strap and Shoulder Strap Hand Strap ✤ It is very important to adjust the hand strap for better recording. ✤ The hand strap enables you to change the position of your hand. 1.
User Manual (user Manual) (ver.1.0) (English)
Page 20
... of installation. ✤ When the lithium battery becomes weak or dead, the date/time indicator flashes for the camcorder lasts about 5 seconds when you to CAMERA. Reinsert the holder into the hooks on the camcorder. 2. Insert each strap through the buckle, adjust the length of the children. Should the battery be swallowed...
... of installation. ✤ When the lithium battery becomes weak or dead, the date/time indicator flashes for the camcorder lasts about 5 seconds when you to CAMERA. Reinsert the holder into the hooks on the camcorder. 2. Insert each strap through the buckle, adjust the length of the children. Should the battery be swallowed...
User Manual (user Manual) (ver.1.0) (English)
Page 21
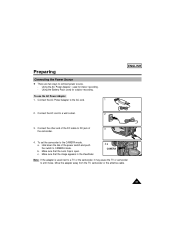
Using the AC Power Adapter : used for outdoor recording. c. Move the adapter away from the TV, camcorder or the antenna cable. 21 Connect the AC Power Adapter to the CAMERA mode. To set the camcorder to the AC cord. 1 2. To use the AC Power Adapter 1. Connect the AC cord to DC... jack of 3 the camcorder. 4. a. Using the Battery Pack: used next to a TV or the camcorder, it may cause the TV or camcorder to emit noise. b. Connect the other end of the power switch and push the switch to connect...
Using the AC Power Adapter : used for outdoor recording. c. Move the adapter away from the TV, camcorder or the antenna cable. 21 Connect the AC Power Adapter to the CAMERA mode. To set the camcorder to the AC cord. 1 2. To use the AC Power Adapter 1. Connect the AC cord to DC... jack of 3 the camcorder. 4. a. Using the Battery Pack: used next to a TV or the camcorder, it may cause the TV or camcorder to emit noise. b. Connect the other end of the power switch and push the switch to connect...
User Manual (user Manual) (ver.1.0) (English)
Page 22
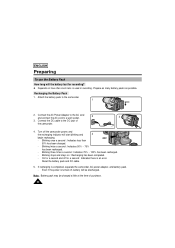
Recharging the Battery Pack 1. Even if the power is completed, separate the camcorder, AC power adapter, and battery pack. - ENGLISH Preparing To use the Battery Pack How long will the battery last for a second : Indicates there is an ... discharged. Prepare as many battery packs as possible. OFF - Blinking three times a second : Indicates 75% ~ 100% has been recharged. - Attach the battery pack to the camcorder. 1 2. Turn off for recording? ✤ Depends on : Recharging has been completed. - On for a second and off the...
Recharging the Battery Pack 1. Even if the power is completed, separate the camcorder, AC power adapter, and battery pack. - ENGLISH Preparing To use the Battery Pack How long will the battery last for a second : Indicates there is an ... discharged. Prepare as many battery packs as possible. OFF - Blinking three times a second : Indicates 75% ~ 100% has been recharged. - Attach the battery pack to the camcorder. 1 2. Turn off for recording? ✤ Depends on : Recharging has been completed. - On for a second and off the...


