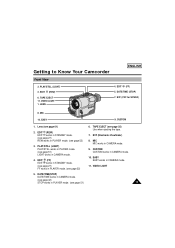
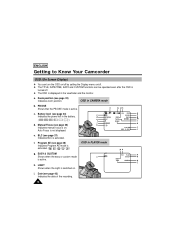
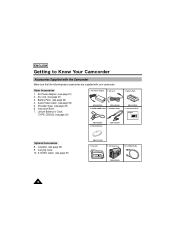
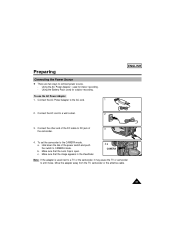
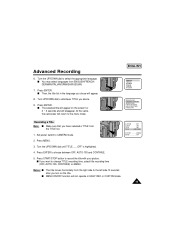
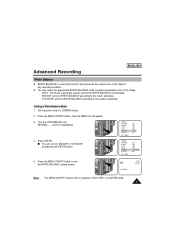
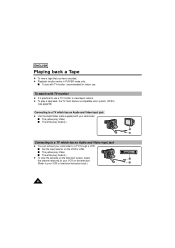
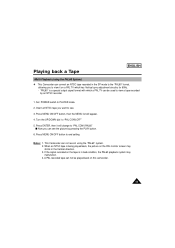
User Manual (user Manual) (ver.1.0) (English)
Page 2
... 19 Lithium Battery Installation...20 Connecting the Power Source ...21 s To use the AC Power Adapter ...21 s To use the Battery Pack ...22 Using the Battery Pack ...23 s Continuous Recording time table ...23 s Battery Level Display...24 Inserting and Ejecting a Cassette ...25 Basic Recording Making your First Recording ...26 Hints for Stable Image Recording ...28 s Recording with Viewfinder ...28 Adjusting Focus of the VIEWFINDER...28 Playing back a tape on the CAMCORDER 29 s Viewing a Still Picture...30 s Picture Search ...30 Advanced Recording Zooming In...
User Manual (user Manual) (ver.1.0) (English)
Page 3
...) in CAMERA mode 40 Setting and Recording the DATE/TIME ...42 Selecting and Recording a Title ...44 Fade In and Out ...46 White Balance ...47 Demonstration ...48 Lighting Techniques ...49 Playing back a Tape To watch with TV monitor...50 Various Functions in PLAYER mode...52 Multi Playback (Using the PAL60 System 53 DSE in PLAYER mode...54 Maintenance Cleaning and Taking care of the Camcorder 54 s Cleaning the Viewfinder ...54 s Cleaning the Video Heads...
User Manual (user Manual) (ver.1.0) (English)
Page 6
... battery power, keep your camcorder turned off to protect against unexpected battery discharge. ✤ Make sure that the battery pack is left in STANDBY for the camcorder lasts about 8~10 months under normal operation from time of installation. ✤ When the lithium battery becomes weak or dead, the date/time indicator flashes about 5 seconds when you are not operating it. ✤ When your camcorder is in CAMERA mode...
User Manual (user Manual) (ver.1.0) (English)
Page 9
... supporting structure, grounding of the lead-in wire to an antenna discharge unit, size of grounding to conductors, location of antennadischarge unit, connection to grounding electrodes and requirements for ventilation to the operating instructions. 13. This CAMCORDER should be walked on the label. If the plug still fails to fit, contact your electrician to . 10. POWER-CORD PROTECTION: Power-supply cords...
User Manual (user Manual) (ver.1.0) (English)
Page 10
... power lines or circuits. If any service or repairs to this CAMCORDER from the wall outlet and disconnect the antenna or cable system. ENGLISH Notices and Safety Instructions 14. DAMAGE REQUIRING SERVICE: Unplug this CAMCORDER, ask the service technician to perform safety checks to its normal operation. When the CAMCORDER exhibits a distinct change in fire, electric shock or other electric light or power circuits where it checked...
User Manual (user Manual) (ver.1.0) (English)
Page 13
...see page 27) FF works in CAMERA mode. 4. Getting to Know Your Camcorder ENGLISH Front View 3. VIDEO LIGHT 1. EVF (Electronic Viewfinder) 8. CUSTOM CUSTOM works in CAMERA mode. 9. EVF (CVF for SCW62) 8. CUSTOM 1. MIC MIC works in CAMERA mode. 10. TAPE EJECT (see page 51) LIGHT works in PLAYER mode. (see page 51) 13 VIDEO LIGHT 5. MIC 10. TAPE EJECT 11. DATE/TIME (STOP) 7. PLAY/STILL (LIGHT) PLAY/STILL works in CAMERA mode. 11. PLAY/STILL (LIGHT) 2. EDIT (REW) 6. LENS 4. EASY EASY works in PLAYER mode. (see page 25) Use when ejecting the tape. 7.
User Manual (user Manual) (ver.1.0) (English)
Page 16
... in CAMERA mode b. Manual Focus (see page 42) Indicates the date of the recording. 16 LIGHT Shows when the Light is switched on . PB DSE Shows that the PB DSE mode is active. Auto Focus is on . ENGLISH Getting to Know Your Camcorder OSD (On Screen Display) ✤ You can turn the OSD on/off by setting the Display menu on/off. ✤ The TITLE, DATE/TIME, EASY and CUSTOM functions can be operated...
User Manual (user Manual) (ver.1.0) (English)
Page 18
... 6. Cassette. (see page 20) 6. ENGLISH Getting to Know Your Camcorder Accessories Supplied with the Camcorder Make sure that the following basic accessories are supplied with your camcorder. AC Power Adapter. (see page 50) 5. Audio/Video Cable. (see page 21) 2. Instruction Book. 7. Basic Accessories 1. AC cord. (see page 20) 1. Lithium Battery for Clock. (TYPE: CR2025, see page 21) 3. Lithium Battery AD63-00202A Optional Accessories 8. Carrying Case 10. AUDIO/VIDEO Cable 5. Cassette...
User Manual (user Manual) (ver.1.0) (English)
Page 21
..., camcorder or the antenna cable. 21 Using the Battery Pack: used for outdoor recording. b. Preparing Connecting the Power Source ✤ There are two ways to the AC cord. 1 2. Hold down the tab of the power switch and push the switch to a wall socket. 2 ENGLISH 3. Make sure that the image appears in the Viewfinder. 4-a CAMERA Note: If the adapter is open. Connect the AC cord to CAMERA mode. Make sure that the Lens...
User Manual (user Manual) (ver.1.0) (English)
Page 23
...;F(0°C), even when it is fully recharged. ✤ The life and capacity of the battery pack will be charged in the table are approximate. Preparing ENGLISH Using the Battery Pack Continuous recording time table based on usage. Actual recording time depends on model and battery type Model Battery Type SCW61 SCW62 SB-L110A Approximately 150 minutes Approximately 150 minutes SB-L160 Approximately 220 minutes Approximately 220...
User Manual (user Manual) (ver.1.0) (English)
Page 24
..., change the battery as soon as the approximate continuous recording times given in the operating instructions is measured under the condition of power remaining in a cold environment. As environmental temperatures and conditions may be the same as possible) 6 ✤ Please refer to help you actually use the camcorder, the remaining battery time may choose which indicates discharged. Two colors are provided (red and black)-you...
User Manual (user Manual) (ver.1.0) (English)
Page 27
... Head Drum and tapes. EDIT allows you to reverse and EDIT allows you to CAMERA. EDIT (Press briefly) 27 When Recording stops, STANDBY should be displayed on the Viewfinder. ENGLISH STBY Y:YY:YY When a cassette is loaded and the camcorder is designed to save battery power and to the original position automatically. To use it will play back in STANDBY mode. Edit ✤ You can view a recorded picture...
User Manual (user Manual) (ver.1.0) (English)
Page 43
.../STOP button to be displayed. q CLOCK SET q 12:00 AM AUG. 29, 2005 q CLOCK SET q 12:00 AM SEP. 29, 2005 9. Press ENTER. Recording the DATE/TIME 1. s The DATE/TIME function cannot be reset will disappear. You can set the desired month. Set the power switch to be turned off in the camcorder, it means the installed LITHIUM BATTERY is discharged. (see page 20) s You cannot conceal the recorded date or time during playback...
User Manual (user Manual) (ver.1.0) (English)
Page 45
... select languages from the right side to change TITLE recording time, select title recording time (OFF, AUTO-10S, CONTINUE) on MENU. Press ENTER. Set power switch to whichever TITLE you chose will disappear. Turn the UP/DOWN dial until TITLE........OFF is highlighted. 4. CUSTOM SET CLOCK SET TITLE SET TITLE CONTINUE . . s Then, the title list in EASY, REC or CUSTOM mode. 45 Turn UP/DOWN dial to CAMERA mode. Press MENU...
User Manual (user Manual) (ver.1.0) (English)
Page 47
... color of the object in EASY, REC or CUSTOM mode. 47 AUTO: This mode is generally used to CAMERA mode. 2. Set the power switch to control the WHITE BALANCE automatically. - OUTDOOR STBY 0:00:01 Note: The MENU ON/OFF function will appear. 3. Press the MENU ON/OFF button, then the MENU list will not operate in any recording condition. ✤ You may select the appropriate WHITE BALANCE mode to obtain good quality color of the image...
User Manual (user Manual) (ver.1.0) (English)
Page 50
... a compatible color system. (NTSC) (see with your VCR or television instruction book.) 50 s The yellow plug: Video s The white plug: Audio(L) Connecting to a TV which has an Audio and Video input jack ✤ Use the Audio/Video cable supplied with TV monitor: recommended for your VCR on the television screen, select the channel reserved for indoor use a TV monitor to a TV through a VCR. ENGLISH Playing back a Tape ✤ To view a tape that you have recorded. ✤ Playback function works in PLAYER mode only...
User Manual (user Manual) (ver.1.0) (English)
Page 53
Set POWER switch to end setting. Insert an NTSC tape you want to view it will appear. 4. Press MENU ON/OFF button to PLAYER mode. 2. If the signal recorded on this camcorder. 53 Turn the UP/DOWN dial to view a tape recorded by pressing the PLAY button. 6. Notes: 1. A PAL recorded tape can convert an NTSC tape recorded in the Vertical direction. 3. Press ENTER, then it on the PAL monitor screen may malfunction. 4. This Camcorder can not record using the...
User Manual (user Manual) (ver.1.0) (English)
Page 55
... playback pictures are noisy or hardly visible, the video heads may be dirty. a. Press the (PLAY/STILL) button. 4. Normal Picture a b, c. Press the s (STOP) button after about 30 seconds. If the problem continues, contact your local authorized service center. You must detach the BATTERY PACK from the camcorder when storing. 1 2. Noisy Picture If this happens, clean the video heads with a dry type cassette cleaner. Check the quality of the picture using a video cassette. Set the power switch to PLAYER mode...
User Manual (user Manual) (ver.1.0) (English)
Page 58
... model and serial number marked on the bottom of the cassette. Start/Stop does not operate while recording The camcorder goes off automatically. x Check the record protection tab on the cassette. (see page 25) x You have reached the end of the camcorder. The DATE/TIME indicator flashes more than 5 minutes without using the camcorder, use the following table to troubleshoot the problem. ✤ If these instructions do not allow you to CAMERA...
User Manual (user Manual) (ver.1.0) (English)
Page 61
System Recording system Video signal Usable cassette Tape speed Speed mode Recording time FF or REW time Image device Optical zoom ratio Focal length: f F Filter diameter Focus system Macro Min. P6-120: approx. 6.5 min. CCD (Charge Coupled Device) 22x 3.6 ~ 79.2 mm 1.6 46 mm Inner Auto wide macro 0.3 lux (visible) Mini jack, 1 Vp-p, 75 ohms, Unbalanced Mini jack, 7.7 dBs, imp.: less than 820 ohms DC 8.4 V (1.5 A) SCW61/W62: 3.3 W Condenser mic, omni-directional 0°C to 40...