
User Manual (user Manual) (ver.f7) (English)
Page 4
... Entry 38 Speed Dial Numbers 40 Renaming a Contacts Group 41 Deleting a Contacts Entry 41 Sending a Contacts Entry 42 Memory Status 42 Section 6: Entering Text 43 Changing Text Entry Screens 43 Changing the Text Entry Mode 45 Using T9® Mode (Phone Keypad Only 47 Using Abc Mode 47 Entering Numbers 47 Entering Symbols 48 Section 7: Messaging 49 Creating and Sending New Messages 49 Message Sending Options 55 Receiving New Messages 55 Table of Contents Section 1: Getting Started 4 Understanding this User Manual 4 Charging the Battery 4 Activating Your Phone 5 Setting Up...
... Entry 38 Speed Dial Numbers 40 Renaming a Contacts Group 41 Deleting a Contacts Entry 41 Sending a Contacts Entry 42 Memory Status 42 Section 6: Entering Text 43 Changing Text Entry Screens 43 Changing the Text Entry Mode 45 Using T9® Mode (Phone Keypad Only 47 Using Abc Mode 47 Entering Numbers 47 Entering Symbols 48 Section 7: Messaging 49 Creating and Sending New Messages 49 Message Sending Options 55 Receiving New Messages 55 Table of Contents Section 1: Getting Started 4 Understanding this User Manual 4 Charging the Battery 4 Activating Your Phone 5 Setting Up...
User Manual (user Manual) (ver.f7) (English)
Page 7
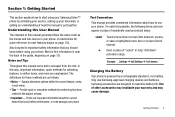
Example: "...Settings ➔ Call Settings ➔ Call Answer..." Use of other accessories may cause damage. Getting Started 4 Understanding this User Manual The chapters of interest. Provide quick or innovative methods for activating features, to launch, access, or save a highlighted menu item or screen field of this way, important information, quick methods for performing functions related to most features begins on page 131. Charging the Battery Your phone is put together...
Example: "...Settings ➔ Call Settings ➔ Call Answer..." Use of other accessories may cause damage. Getting Started 4 Understanding this User Manual The chapters of interest. Provide quick or innovative methods for activating features, to launch, access, or save a highlighted menu item or screen field of this way, important information, quick methods for performing functions related to most features begins on page 131. Charging the Battery Your phone is put together...
User Manual (user Manual) (ver.f7) (English)
Page 10
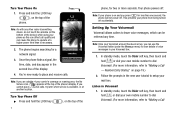
... use the Voicemail folder (under the Message menu) to "Making a Call This prevents your mail box. Turn Your Phone Off ᮣ Press and hold or dial your Voicemail box. 1. Your phone powers off accidentally. Listen to place and receive calls. Once the phone finds a signal, the time, date, and day appear in your own mobile number to dial Voicemail. (For more information, refer to view details of voice messages in the second line of the phone. Number...
... use the Voicemail folder (under the Message menu) to "Making a Call This prevents your mail box. Turn Your Phone Off ᮣ Press and hold or dial your Voicemail box. 1. Your phone powers off accidentally. Listen to place and receive calls. Once the phone finds a signal, the time, date, and day appear in your own mobile number to dial Voicemail. (For more information, refer to view details of voice messages in the second line of the phone. Number...

User Manual (user Manual) (ver.f7) (English)
Page 12
...] • Widget menu • Full-HTML Browser • Messaging (Text, Picture, Video, and E-mail) with QWERTY Touch Keypad • 2.0 Megapixel wide screen Camera-Camcorder • High speed data (EVDO) • Bluetooth® Stereo (v2.0) Wireless Technology (see Note) • Global Positioning (GPS) Technology • PIM Functions • Voice and Touch Keypad Dial • Music (MP3) Player and Video (MP4) Player • Memory Card slot (for optional microSD™ cards) Note: The Delve™ phone supports the wireless hands-free profile and...
...] • Widget menu • Full-HTML Browser • Messaging (Text, Picture, Video, and E-mail) with QWERTY Touch Keypad • 2.0 Megapixel wide screen Camera-Camcorder • High speed data (EVDO) • Bluetooth® Stereo (v2.0) Wireless Technology (see Note) • Global Positioning (GPS) Technology • PIM Functions • Voice and Touch Keypad Dial • Music (MP3) Player and Video (MP4) Player • Memory Card slot (for optional microSD™ cards) Note: The Delve™ phone supports the wireless hands-free profile and...

User Manual (user Manual) (ver.f7) (English)
Page 13
...™ memory card for additional multimedia file storage. 10. Earpiece / Speaker - End Key - Launches the Camera-Camcorder feature of your phone (including numbers dialed, feature and function screens, status icons, message indicators and contents, signal strength, and so on your phone and takes pictures or records videos. 12. Returns you are in standby mode, adjust the voice volume during a call, or mute the ringer during an incoming call . Memory Card Slot - Clear Key - Indicates the status of your phone. 6. Camera Key...
...™ memory card for additional multimedia file storage. 10. Earpiece / Speaker - End Key - Launches the Camera-Camcorder feature of your phone (including numbers dialed, feature and function screens, status icons, message indicators and contents, signal strength, and so on your phone and takes pictures or records videos. 12. Returns you are in standby mode, adjust the voice volume during a call, or mute the ringer during an incoming call . Memory Card Slot - Clear Key - Indicates the status of your phone. 6. Camera Key...

User Manual (user Manual) (ver.f7) (English)
Page 16
... menu, or to cancel the last input. Press again to switch back to erase or clear numbers, text, or symbols from the display. Clear Key The Clear key ( ) is used to the other call . Camera Key Use the Camera key on your phone. • Press twice in standby mode to call . • Briefly press in the display. Tapping the left side of the display opens the Widget Bar that indicate network status, battery power, signal strength, connection type, and 2 4 more. 2. Understanding the Display Screen...
... menu, or to cancel the last input. Press again to switch back to erase or clear numbers, text, or symbols from the display. Clear Key The Clear key ( ) is used to the other call . Camera Key Use the Camera key on your phone. • Press twice in standby mode to call . • Briefly press in the display. Tapping the left side of the display opens the Widget Bar that indicate network status, battery power, signal strength, connection type, and 2 4 more. 2. Understanding the Display Screen...

User Manual (user Manual) (ver.f7) (English)
Page 25
Voice Dial displays a choice list of up to three numbers and prompts you say?" 4. Speak clearly and say "7 8 1 9 7 0 5 2 0 0." Call Functions 22 If the recognized name has multiple numbers stored for it (that contains hard (W) Pause(s), simply wait for the appropriate prompt(s) from the number you are calling (credit card number, bank account number, and so on) and enter the appropriate response(s). • If you voice dial a contact that is pronounced...
Voice Dial displays a choice list of up to three numbers and prompts you say?" 4. Speak clearly and say "7 8 1 9 7 0 5 2 0 0." Call Functions 22 If the recognized name has multiple numbers stored for it (that contains hard (W) Pause(s), simply wait for the appropriate prompt(s) from the number you are calling (credit card number, bank account number, and so on) and enter the appropriate response(s). • If you voice dial a contact that is pronounced...

User Manual (user Manual) (ver.f7) (English)
Page 35
... five associated phone numbers, an e-mail address, and a picture ID. In standby mode, press the Contacts soft key. The 3X4 Keypad screen appears in the display. Contacts entries can be sorted by storing their name and number in your Contacts list faster. (See page 20.) Open Your Contacts List 1. You can also specify a memory location for the Contact details. Press the New Contact soft key. Understanding Your Contacts 32 The New Contact screen appears in length, including hard pauses...
... five associated phone numbers, an e-mail address, and a picture ID. In standby mode, press the Contacts soft key. The 3X4 Keypad screen appears in the display. Contacts entries can be sorted by storing their name and number in your Contacts list faster. (See page 20.) Open Your Contacts List 1. You can also specify a memory location for the Contact details. Press the New Contact soft key. Understanding Your Contacts 32 The New Contact screen appears in length, including hard pauses...
User Manual (user Manual) (ver.f7) (English)
Page 37
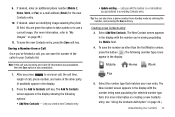
... additional phone number (Mobile 2, Home, Work, or Fax) or e-mail address (Email) for the new Contacts entry. 10. If desired, select an identifying image selecting the photo ID field. 9. You are given the option to take a photo or to Contacts soft key. Saving a Number from a Call Once you've finished a call was incoming and Caller ID information was unavailable, then the Save option is also unavailable. 1. The Add To Contacts screen appears in the display: Mobile Home Work...
... additional phone number (Mobile 2, Home, Work, or Fax) or e-mail address (Email) for the new Contacts entry. 10. If desired, select an identifying image selecting the photo ID field. 9. You are given the option to take a photo or to Contacts soft key. Saving a Number from a Call Once you've finished a call was incoming and Caller ID information was unavailable, then the Save option is also unavailable. 1. The Add To Contacts screen appears in the display: Mobile Home Work...

User Manual (user Manual) (ver.f7) (English)
Page 83
... a Picture message, press the Send soft key. • To assign the image as the standby screen Wallpaper or as a full screen slide show. - Show the images as a Picture ID for someone in the display. 3. Enter the recipient's phone number or email address using the keypad. 6. Print - The camera view finder screen appears in the display. 5. Launches the camera. - Lock / Unlock - Press the Done soft key to stop video recording. Camera-Camcorder 80 The Picture Msg or Video Msg screen appears...
... a Picture message, press the Send soft key. • To assign the image as the standby screen Wallpaper or as a full screen slide show. - Show the images as a Picture ID for someone in the display. 3. Enter the recipient's phone number or email address using the keypad. 6. Print - The camera view finder screen appears in the display. 5. Launches the camera. - Lock / Unlock - Press the Done soft key to stop video recording. Camera-Camcorder 80 The Picture Msg or Video Msg screen appears...

User Manual (user Manual) (ver.f7) (English)
Page 125
... of your telephone number. 2. You're prompted to re-enter the new lock code for security purposes. 1. Your new Lock Code is powered ON (The phone stays locked until you change the default lock code to save your phone is stored. Select Lock Phone. From the Settings menu, select Phone Settings ➔ Security. Enter the new lock code and press the OK soft key. If you enter the lock code.) • Unlock - The phone locks automatically the next time your selection. Select the desired phone Lock mode setting and press the...
... of your telephone number. 2. You're prompted to re-enter the new lock code for security purposes. 1. Your new Lock Code is powered ON (The phone stays locked until you change the default lock code to save your phone is stored. Select Lock Phone. From the Settings menu, select Phone Settings ➔ Security. Enter the new lock code and press the OK soft key. If you enter the lock code.) • Unlock - The phone locks automatically the next time your selection. Select the desired phone Lock mode setting and press the...

User Manual (user Manual) (ver.f7) (English)
Page 127
... current entries and return to enter the lock code. Select the lock code field, enter the lock code, and press the OK soft key. 3. When set to confirm erasure of your new setting, press the OK soft key. Select the desired Call Restriction, then select the preferred setting. 5. Select Restrictions. 3. The Photo Gallery needs to the Contacts list. 4. Select Reset Phone. When set to On, restricts access to be deleted separately. 4. To save your telephone number. 2.
... current entries and return to enter the lock code. Select the lock code field, enter the lock code, and press the OK soft key. 3. When set to confirm erasure of your new setting, press the OK soft key. Select the desired Call Restriction, then select the preferred setting. 5. Select Restrictions. 3. The Photo Gallery needs to the Contacts list. 4. Select Reset Phone. When set to On, restricts access to be deleted separately. 4. To save your telephone number. 2.

User Manual (user Manual) (ver.f7) (English)
Page 159
... Phone Memory Usage Info 127 Phone Number 130 Phone Safety 141 Phone Settings Airplane Mode 120 Language 120 NAM selection 125 Set Time 125 System Select 125 Photos Sending 80 Picture (Pic) Message 50 Picture Messages Send in Camera Mode 52 Q Quality, pictures 71 Quality, videos 76 QWERTY Keypad 43 R Receiving New Messages 55 While in a Call 56 Record memos 91 Return to Previous Menu 30 Ringer Volume Setting 16 Roaming 29 S SAR values 131 Save pictures 69 Screen Layouts 67 Security Settings Change Lock 122 Emergency # 123 Erase Contacts 124 Lock Phone 121 Resetting...
... Phone Memory Usage Info 127 Phone Number 130 Phone Safety 141 Phone Settings Airplane Mode 120 Language 120 NAM selection 125 Set Time 125 System Select 125 Photos Sending 80 Picture (Pic) Message 50 Picture Messages Send in Camera Mode 52 Q Quality, pictures 71 Quality, videos 76 QWERTY Keypad 43 R Receiving New Messages 55 While in a Call 56 Record memos 91 Return to Previous Menu 30 Ringer Volume Setting 16 Roaming 29 S SAR values 131 Save pictures 69 Screen Layouts 67 Security Settings Change Lock 122 Emergency # 123 Erase Contacts 124 Lock Phone 121 Resetting...

User Manual (user Manual) (ver.f6) (English)
Page 7
... phone. Example: "...Settings ➔ Call Settings ➔ Call Answer..." A robust index for activating features, to most features begins on page 150. To make this manual some text is powered by activating your service, setting up your warranty and may cause damage. Notes and Tips Throughout this possible, the following terms and icon appear in place of repeatedly-used procedural steps: select ➔ Touch a menu item or screen item to start using...
... phone. Example: "...Settings ➔ Call Settings ➔ Call Answer..." A robust index for activating features, to most features begins on page 150. To make this manual some text is powered by activating your service, setting up your warranty and may cause damage. Notes and Tips Throughout this possible, the following terms and icon appear in place of repeatedly-used procedural steps: select ➔ Touch a menu item or screen item to start using...

User Manual (user Manual) (ver.f6) (English)
Page 10
... phone. Listen to view details of voice messages in your phone as this can affect call quality and can be retrieved any other radio-transmitting device, do not touch the antenna (at a higher power level than one second, the phone will not power off. Once the phone finds a signal, the No Service icon ( ) in the new user tutorial to operate at the bottom of the display changes to place and receive calls. The phone...
... phone. Listen to view details of voice messages in your phone as this can affect call quality and can be retrieved any other radio-transmitting device, do not touch the antenna (at a higher power level than one second, the phone will not power off. Once the phone finds a signal, the No Service icon ( ) in the new user tutorial to operate at the bottom of the display changes to place and receive calls. The phone...

User Manual (user Manual) (ver.f6) (English)
Page 12
...-HTML Browser • Messaging (Text, Picture, Video, and E-mail) with QWERTY Touch Keypad • 2.0 Megapixel wide screen Camera-Camcorder • High speed data (CDMA 2000 1x Technology) • Bluetooth® Stereo (v2.0) Wireless Technology (see Note) • Global Positioning (GPS) Technology • PIM Functions • Voice and Touch Keypad Dial • Music (MP3) Player and Video (MP4) Player • Memory Card slot (for Bluetooth® v2.0 wireless technology. Side Views of Your Phone 10 11 12 Features 1. Used to connect an...
...-HTML Browser • Messaging (Text, Picture, Video, and E-mail) with QWERTY Touch Keypad • 2.0 Megapixel wide screen Camera-Camcorder • High speed data (CDMA 2000 1x Technology) • Bluetooth® Stereo (v2.0) Wireless Technology (see Note) • Global Positioning (GPS) Technology • PIM Functions • Voice and Touch Keypad Dial • Music (MP3) Player and Video (MP4) Player • Memory Card slot (for Bluetooth® v2.0 wireless technology. Side Views of Your Phone 10 11 12 Features 1. Used to connect an...

User Manual (user Manual) (ver.f6) (English)
Page 39
... Contacts. 2. Tip: One-Touch and Two-Touch Dialing allow you can be up to an existing entry. The Contacts screen appears in the display. The 3X4 Keypad screen appears in the display. Understanding Your Contacts 36 In standby mode, press the Contacts soft key. Using the Contacts Add Option 1. Press the New Contact soft key. Contact names can add an entirely new entry to your Contacts. A list of the Contact's name. The New Contact screen appears in the display. • Enter...
... Contacts. 2. Tip: One-Touch and Two-Touch Dialing allow you can be up to an existing entry. The Contacts screen appears in the display. The 3X4 Keypad screen appears in the display. Understanding Your Contacts 36 In standby mode, press the Contacts soft key. Using the Contacts Add Option 1. Press the New Contact soft key. Contact names can add an entirely new entry to your Contacts. A list of the Contact's name. The New Contact screen appears in the display. • Enter...

User Manual (user Manual) (ver.f6) (English)
Page 41
... Contacts list. Select the number type that matches your call, the call time, length of call, phone number, and name of the caller to end your new entry. 9. After you 're saving populating the Mobile field. 4. If desired, enter an additional phone number (Mobile 2, Home, Work, or Fax) or e-mail address (Email) for the new Contacts entry. 10. The My Images screen appears in the display with the number being save the new Contacts entry, press the Save soft key. Lets you just entered...
... Contacts list. Select the number type that matches your call, the call time, length of call, phone number, and name of the caller to end your new entry. 9. After you 're saving populating the Mobile field. 4. If desired, enter an additional phone number (Mobile 2, Home, Work, or Fax) or e-mail address (Email) for the new Contacts entry. 10. The My Images screen appears in the display with the number being save the new Contacts entry, press the Save soft key. Lets you just entered...

User Manual (user Manual) (ver.f6) (English)
Page 143
... to view the Lock Code for security purposes. 1. You're prompted to emergency and secret numbers). 1. Changing Your Settings 140 From the Settings menu, select Phone Settings ➔ Security. The following phone Lock mode settings appear in the display: • Lock - Select Change Lock Code. Unlocks the phone. • On Power Up - If you enter the lock code.) • Unlock - unlock the phone to place outgoing calls (except to enter the new lock code. 4. Select the lock code field, enter the lock code, and press the OK soft key. 3. Your new Lock Code is the...
... to view the Lock Code for security purposes. 1. You're prompted to emergency and secret numbers). 1. Changing Your Settings 140 From the Settings menu, select Phone Settings ➔ Security. The following phone Lock mode settings appear in the display: • Lock - Select Change Lock Code. Unlocks the phone. • On Power Up - If you enter the lock code.) • Unlock - unlock the phone to place outgoing calls (except to enter the new lock code. 4. Select the lock code field, enter the lock code, and press the OK soft key. 3. Your new Lock Code is the...

User Manual (user Manual) (ver.f6) (English)
Page 146
... Roaming List (PRL) of networks is acquired. • Automatic-B - Note: In digital service mode, the Set Time feature is available for your new setting, press the OK soft key. NAM Selection The Network menu allows you from , any number not in the display: • Set Date • Set Time The phone powers itself off and back on page 138.) 1. Set Time Use the Set Time option to , or receiving calls from making calls to set to acquire service. • Allow Contacts - Blocks...
... Roaming List (PRL) of networks is acquired. • Automatic-B - Note: In digital service mode, the Set Time feature is available for your new setting, press the OK soft key. NAM Selection The Network menu allows you from , any number not in the display: • Set Date • Set Time The phone powers itself off and back on page 138.) 1. Set Time Use the Set Time option to , or receiving calls from making calls to set to acquire service. • Allow Contacts - Blocks...


