

Instruction Booklet
Page 1
ENGLISH Digital Video Camcorder SCD55/D60 AF Auto Focus CCD Charge Coupled Device LCD Liquid Crystal Display Owner's Instruction Book Before operating the unit, please read this instruction book thoroughly, and retain it for future reference. US PATENT 4415844
ENGLISH Digital Video Camcorder SCD55/D60 AF Auto Focus CCD Charge Coupled Device LCD Liquid Crystal Display Owner's Instruction Book Before operating the unit, please read this instruction book thoroughly, and retain it for future reference. US PATENT 4415844
Instruction Booklet
Page 2
ENGLISH C o n t e n t s Notices and Safety Instructio 4-12 Getting to Know Your Camcorder Accessories Supplied with your Camcorder ...13 Features...14 Descriptions FRONT & LEFT VIEW...15 LEFT SIDE VIEW ...16 RIGHT & TOP VIEW ...17 REAR & BOTTOM VIEW ...18 REMOTE CONTROL...19 On Screen ...
ENGLISH C o n t e n t s Notices and Safety Instructio 4-12 Getting to Know Your Camcorder Accessories Supplied with your Camcorder ...13 Features...14 Descriptions FRONT & LEFT VIEW...15 LEFT SIDE VIEW ...16 RIGHT & TOP VIEW ...17 REAR & BOTTOM VIEW ...18 REMOTE CONTROL...19 On Screen ...
Instruction Booklet
Page 3
... LCD ...55 To watch with TV monitor ...55 Playback ...56 Various Functions in PLAYER mode ...57 IEEE 1394 Data Transfer 58 RS-232C Data Transfer (SCD60 only) 60 Maintenance After finishing a recording ...63 Cleaning and Maintaining the Camcorder ...64 Using Your Camcorder Abroad 65 Troubleshooting 66 Specifications 68 Index 69 Warranty 70 3
... LCD ...55 To watch with TV monitor ...55 Playback ...56 Various Functions in PLAYER mode ...57 IEEE 1394 Data Transfer 58 RS-232C Data Transfer (SCD60 only) 60 Maintenance After finishing a recording ...63 Cleaning and Maintaining the Camcorder ...64 Using Your Camcorder Abroad 65 Troubleshooting 66 Specifications 68 Index 69 Warranty 70 3
Instruction Booklet
Page 4
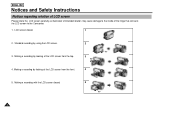
LCD screen closed . 2 90° 3 90° 4 90° 5 90° 4 Making a recording with the LCD screen closed . 1 2. Unintended rotation may cause damage to the inside of LCD screen Please rotate the LCD screen carefully as illustrated. ENGLISH Notices and Safety Instructions Notices regarding rotation of the hinge that connects the LCD screen to the Camcorder. 1. Making a recording by looking at the LCD screen from the front. 5. Making a recording by using the LCD screen. 3. Standard recording by looking at the LCD screen from the top. 4.
LCD screen closed . 2 90° 3 90° 4 90° 5 90° 4 Making a recording with the LCD screen closed . 1 2. Unintended rotation may cause damage to the inside of LCD screen Please rotate the LCD screen carefully as illustrated. ENGLISH Notices and Safety Instructions Notices regarding rotation of the hinge that connects the LCD screen to the Camcorder. 1. Making a recording by looking at the LCD screen from the front. 5. Making a recording by using the LCD screen. 3. Standard recording by looking at the LCD screen from the top. 4.
Instruction Booklet
Page 5
...from rain, sea water, and any other program materials may be against the law. Sometimes malfunction cannot be repaired. 5 Do not leave the camcorder exposed to default.) Please make sure that the condensation has disappeared completely. For example, in a parked car in a dry, warm room with...button using a sharp-pointed object. (If you want to override it may cause condensation to warm inside to hot outside to form inside the camcorder. If the "DEW" protection feature is activated unexpectedly, and you press the RESET button, all the settings including the date and time, ...
...from rain, sea water, and any other program materials may be against the law. Sometimes malfunction cannot be repaired. 5 Do not leave the camcorder exposed to default.) Please make sure that the condensation has disappeared completely. For example, in a parked car in a dry, warm room with...button using a sharp-pointed object. (If you want to override it may cause condensation to warm inside to hot outside to form inside the camcorder. If the "DEW" protection feature is activated unexpectedly, and you press the RESET button, all the settings including the date and time, ...

Instruction Booklet
Page 6
...time, because the LCD uses up more than 24 hours. 6 ENGLISH Notices and Safety Instructions Notices regarding charging the lithium battery in the camcorder 1. Notices regarding the battery pack 1 Make sure that the battery pack is not used. To retain the date and time, charge the...will automatically turn off to use the viewfinder instead of its life, please contact your camcorder is in CAMERAmode, if it is charged before recording outdoors. 1 To preserve battery power, keep your camcorder turned off when you are not operating it will be dealt with a lithium battery ...
...time, because the LCD uses up more than 24 hours. 6 ENGLISH Notices and Safety Instructions Notices regarding charging the lithium battery in the camcorder 1. Notices regarding the battery pack 1 Make sure that the battery pack is not used. To retain the date and time, charge the...will automatically turn off to use the viewfinder instead of its life, please contact your camcorder is in CAMERAmode, if it is charged before recording outdoors. 1 To preserve battery power, keep your camcorder turned off when you are not operating it will be dealt with a lithium battery ...

Instruction Booklet
Page 7
... electronic viewfinder 1. Notices regarding the LENS 1 Do not shoot in direct sunlight with the LENS pointing towards the sun. Do not place the camcorder so that you may cause damage to see. When you use the viewfinder. 3. Notices regarding Record or Playback using high precision technology. Do ...not pick up the camcorder by a window. 2. However, there may be some tiny dots(red, blue or green in any way. 2. Direct sunlight can damage the CCD...
... electronic viewfinder 1. Notices regarding the LENS 1 Do not shoot in direct sunlight with the LENS pointing towards the sun. Do not place the camcorder so that you may cause damage to see. When you use the viewfinder. 3. Notices regarding Record or Playback using high precision technology. Do ...not pick up the camcorder by a window. 2. However, there may be some tiny dots(red, blue or green in any way. 2. Direct sunlight can damage the CCD...
Instruction Booklet
Page 9
...presence of important operating and maintenance instructions in the literature accompanying this CAMCORDER near a swimming pool or lake. 8. ACCESSORIES: Do not place this CAMCORDER from the wall outlet before the CAMCORDER is operated. 2.RETAIN INSTRUCTIONS: The safety and operating instructions should be... PARTS INSIDE, REFER SERVICING TO QUALIFIED SERVICE PERSONNEL. for dusting cabinets. 6. PORTABLE CART WARNING (Symbol provided by the CAMCORDER product manufacturer as they may cause the appliance and cart combination to wide slot and fully insert. To prevent electric shock...
...presence of important operating and maintenance instructions in the literature accompanying this CAMCORDER near a swimming pool or lake. 8. ACCESSORIES: Do not place this CAMCORDER from the wall outlet before the CAMCORDER is operated. 2.RETAIN INSTRUCTIONS: The safety and operating instructions should be... PARTS INSIDE, REFER SERVICING TO QUALIFIED SERVICE PERSONNEL. for dusting cabinets. 6. PORTABLE CART WARNING (Symbol provided by the CAMCORDER product manufacturer as they may cause the appliance and cart combination to wide slot and fully insert. To prevent electric shock...
Instruction Booklet
Page 10
... plug. If the plug still fails to fit, contact your electrician to be operated only from overheating. GROUNDING OR POLARIZATION: This CAMCORDER may be blocked or covered. If you are not likely to the operating instructions. 11. OUTDOOR ANTENNA GROUNDING: If an outside ... grounding to conductors, location of antenna-discharge unit, connection to grounding electrodes and requirements for ventilation to ensure reliable operation of the CAMCORDER and to . 10. VENTILATION: Slots and openings in installation such as a bookcase or rack unless proper ventilation is grounded to ...
... plug. If the plug still fails to fit, contact your electrician to be operated only from overheating. GROUNDING OR POLARIZATION: This CAMCORDER may be blocked or covered. If you are not likely to the operating instructions. 11. OUTDOOR ANTENNA GROUNDING: If an outside ... grounding to conductors, location of antenna-discharge unit, connection to grounding electrodes and requirements for ventilation to ensure reliable operation of the CAMCORDER and to . 10. VENTILATION: Slots and openings in installation such as a bookcase or rack unless proper ventilation is grounded to ...
Instruction Booklet
Page 11
...time, unplug it checked by a technician before use. 18. Refer all servicing to rain or water. b.If any kind onto the CAMCORDER. d.If the CAMCORDER does not operate normally by following conditions: a.When the power-supply cord or plug is in a fire or electric shock. Notices and...following the operating instructions, adjust only those controls that are required, be located in damage and will prevent damage to the CAMCORDER due to this CAMCORDER through openings as the original part. SERVICING: Do not attempt to determine that could result in safe operating order. 11 ...
...time, unplug it checked by a technician before use. 18. Refer all servicing to rain or water. b.If any kind onto the CAMCORDER. d.If the CAMCORDER does not operate normally by following conditions: a.When the power-supply cord or plug is in a fire or electric shock. Notices and...following the operating instructions, adjust only those controls that are required, be located in damage and will prevent damage to the CAMCORDER due to this CAMCORDER through openings as the original part. SERVICING: Do not attempt to determine that could result in safe operating order. 11 ...
Instruction Booklet
Page 13
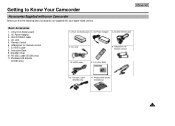
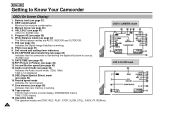
... cable 8. AAbatteries for Remote control 7. RS-232C cable (SCD60 only) 11. Shoulder Strap 10. AC cord 5. Photoland RS diskette (SCD60 only) 13 Getting to Know Your Camcorder Accessories Supplied with your Camcorder Make sure that the following basic accessories are supplied with your... digital video camera. RS-232C cable (SCD60 only) 11. Remote Control 6. S-VIDEO cable 8....
... cable 8. AAbatteries for Remote control 7. RS-232C cable (SCD60 only) 11. Shoulder Strap 10. AC cord 5. Photoland RS diskette (SCD60 only) 13 Getting to Know Your Camcorder Accessories Supplied with your Camcorder Make sure that the following basic accessories are supplied with your... digital video camera. RS-232C cable (SCD60 only) 11. Remote Control 6. S-VIDEO cable 8....
Instruction Booklet
Page 14
ENGLISH Getting to Know Your Camcorder Features • Digital data transfer function with IEEE1394 By incorporating the IEEE 1394... it possible to produce or edit various images. • Digital still image transfer function with RS-232C (SCD60 only) You can transfer still images to your PC using the RS-232C connection without any add-on card...) allows you to give your films a creative look by adding various special effects. • Intelligent-Back Light Compensation (SCD60 only) / Back Light Compensation When you shoot a subject with a light source or light background behind the subject, use...
ENGLISH Getting to Know Your Camcorder Features • Digital data transfer function with IEEE1394 By incorporating the IEEE 1394... it possible to produce or edit various images. • Digital still image transfer function with RS-232C (SCD60 only) You can transfer still images to your PC using the RS-232C connection without any add-on card...) allows you to give your films a creative look by adding various special effects. • Intelligent-Back Light Compensation (SCD60 only) / Back Light Compensation When you shoot a subject with a light source or light background behind the subject, use...
Instruction Booklet
Page 15
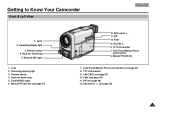
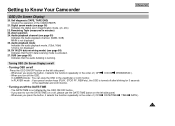
... 3. Lens 2. Fade (see page 49) 12. Edit search +,11. External MIC input 1. Edit search +,- (see page 47) 10. Manual FOCUS dial 7. Getting to Know Your Camcorder Front & Left View ENGLISH 1.
... 3. Lens 2. Fade (see page 49) 12. Edit search +,11. External MIC input 1. Edit search +,- (see page 47) 10. Manual FOCUS dial 7. Getting to Know Your Camcorder Front & Left View ENGLISH 1.
Instruction Booklet
Page 16
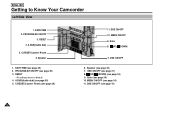
... ON/OFF (see page 41) 16 ENGLISH Getting to default. 4. RESET 4. DATE/TIME (see page 34) 9. C.RESET(Counter Reset) 6. All settings return to Know Your Camcorder Left Side View 1. OSD ON/OFF (see page 21) 8. (UP), (DOWN) (see page 45) 2. RESET - Speaker (see page 33) 7.
... ON/OFF (see page 41) 16 ENGLISH Getting to default. 4. RESET 4. DATE/TIME (see page 34) 9. C.RESET(Counter Reset) 6. All settings return to Know Your Camcorder Left Side View 1. OSD ON/OFF (see page 21) 8. (UP), (DOWN) (see page 45) 2. RESET - Speaker (see page 33) 7.
Instruction Booklet
Page 17
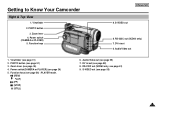
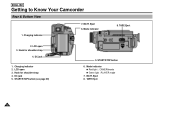
... 3. Audio/Video out 1. Power switch(CAMERA or PLAYER) (see page 56) : PLAYER mode. (REW) (PLAY) (FF) (STOP) (STILL) 6. Zoom lever 4. RS-232C out (SCD60 only) 7. Function keys (see page 24) 5. Audio/Video out (see page 55) 17 S-VIDEO out (see page 55) 7. Power switch (CAMERA or PLAYER) 5. S-VIDEO out 8. ...Viewfinder (see page 36) 4. Zoom lever (see page 31) 2. DV in /out 6. DV in /out (see page 58) 8. RS-232C out (SCD60 only, see page 51) 3. Viewfinder 2. PHOTO button (see page 61) 9. Function keys ENGLISH 9. Getting to Know Your...
... 3. Audio/Video out 1. Power switch(CAMERA or PLAYER) (see page 56) : PLAYER mode. (REW) (PLAY) (FF) (STOP) (STILL) 6. Zoom lever 4. RS-232C out (SCD60 only) 7. Function keys (see page 24) 5. Audio/Video out (see page 55) 17 S-VIDEO out (see page 55) 7. Power switch (CAMERA or PLAYER) 5. S-VIDEO out 8. ...Viewfinder (see page 36) 4. Zoom lever (see page 31) 2. DV in /out 6. DV in /out (see page 58) 8. RS-232C out (SCD60 only, see page 51) 3. Viewfinder 2. PHOTO button (see page 61) 9. Function keys ENGLISH 9. Getting to Know Your...
Instruction Booklet
Page 18
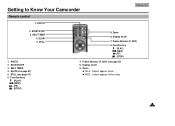
Eject 6. Charging indicator 2. TAPE Eject 18 LCD open 3. START/STOP button 6. Eject 8. Mode indicator 8. Hook for shoulder strap 4. START/STOP button (see page 29) 5. LCD open 3. Hook for shoulder strap 4. BATT. ENGLISH Getting to Know Your Camcorder Rear & Bottom View 1. Mode indicator Red light : CAMERAmode Green light : PLAYER mode 7. BATT. TAPE Eject 2. DC jack 5. Charging indicator 7. DC jack 1.
Eject 6. Charging indicator 2. TAPE Eject 18 LCD open 3. START/STOP button 6. Eject 8. Mode indicator 8. Hook for shoulder strap 4. START/STOP button (see page 29) 5. LCD open 3. Hook for shoulder strap 4. BATT. ENGLISH Getting to Know Your Camcorder Rear & Bottom View 1. Mode indicator Red light : CAMERAmode Green light : PLAYER mode 7. BATT. TAPE Eject 2. DC jack 5. Charging indicator 7. DC jack 1.
Instruction Booklet
Page 19
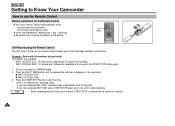
Function keys (PLAY) ( R E W ) ( F F ) (STOP) 9. Frame Advance (F. ADV) (see page 57) 5. SELF TIMER 4. START/STOP 3. PHOTO 2. Frame Advance (F. SLOW 5. Getting to Know Your Camcorder Remote control 1. Display on /off 7. Zoom TELE : Subject appears closer WIDE : Subject appears farther away 19 SLOW (see page 57) 8. Zoom 8. START/STOP 3. Function key (PLAY) ( R E W ) ( F F ) (STOP) 7. Display on /off 9. SELF TIMER 4. ADV) 6. PHOTO ENGLISH 2. STILL 1. STILL (see page 57) 6.
Function keys (PLAY) ( R E W ) ( F F ) (STOP) 9. Frame Advance (F. ADV) (see page 57) 5. SELF TIMER 4. START/STOP 3. PHOTO 2. Frame Advance (F. SLOW 5. Getting to Know Your Camcorder Remote control 1. Display on /off 7. Zoom TELE : Subject appears closer WIDE : Subject appears farther away 19 SLOW (see page 57) 8. Zoom 8. START/STOP 3. Function key (PLAY) ( R E W ) ( F F ) (STOP) 7. Display on /off 9. SELF TIMER 4. ADV) 6. PHOTO ENGLISH 2. STILL 1. STILL (see page 57) 6.
Instruction Booklet
Page 20
...) 14. Iris and Shutter speed (see page 47) (I-BLC for SCD60 only) 5. Record speed mode Indicates the record speed. 17. Zero memory (see page 38) Indicates that the camcorder is transferring the digital still picture to Know Your Camcorder OSD (On Screen Display) 1. White Balance mode (see page 42)... focus (see page 44) Indicates the Audio record mode. (12bit, 16bit) 12bit is TIME CODE display. 19. ENGLISH Getting to your pc. (SCD60 only) 11. Self record and waiting timer indicators 10.DV-CAPTURE data transferring (see page 45) 12.PIP (Picture in PLAYER mode Operation mode The...
...) 14. Iris and Shutter speed (see page 47) (I-BLC for SCD60 only) 5. Record speed mode Indicates the record speed. 17. Zero memory (see page 38) Indicates that the camcorder is transferring the digital still picture to Know Your Camcorder OSD (On Screen Display) 1. White Balance mode (see page 42)... focus (see page 44) Indicates the Audio record mode. (12bit, 16bit) 12bit is TIME CODE display. 19. ENGLISH Getting to your pc. (SCD60 only) 11. Self record and waiting timer indicators 10.DV-CAPTURE data transferring (see page 45) 12.PIP (Picture in PLAYER mode Operation mode The...
Instruction Booklet
Page 21
Zoom position 24. If you want to Know Your Camcorder ENGLISH OSD (On Screen Display) 20. Remaining Tape (measured in minutes) 23. Audio playback mode Indicates the audio playback mode. (12bit, 16bit) 12 bit is .../TIME on or off, please use the DATE/TIME button on the left side panel. - Self diagnosis (TAPE, TAPE END) Checks the operation of the CAMCORDER. 21. When you press the button, it selects the function repeatedly in the order of ( OFF DATE/TIME TIME DATE ). 21 DUB (see page 58...
Zoom position 24. If you want to Know Your Camcorder ENGLISH OSD (On Screen Display) 20. Remaining Tape (measured in minutes) 23. Audio playback mode Indicates the audio playback mode. (12bit, 16bit) 12 bit is .../TIME on or off, please use the DATE/TIME button on the left side panel. - Self diagnosis (TAPE, TAPE END) Checks the operation of the CAMCORDER. 21. When you press the button, it selects the function repeatedly in the order of ( OFF DATE/TIME TIME DATE ). 21 DUB (see page 58...
Instruction Booklet
Page 22
...Installation for the Remote Control 1 You must insert or replace these batteries when : - You purchase the camcorder. - markings. 1 Be careful not to CAMERA mode. 2. Set the camcorder to reverse the polarity of your family Two options are available - When recording with all members of the ...battery. ENGLISH Getting to Know Your Camcorder How to stop recording automatically. The remote control doesn't work. 1 Insert two AAbatteries, following the + and - WAIT-10S/SELF-30S...
...Installation for the Remote Control 1 You must insert or replace these batteries when : - You purchase the camcorder. - markings. 1 Be careful not to CAMERA mode. 2. Set the camcorder to reverse the polarity of your family Two options are available - When recording with all members of the ...battery. ENGLISH Getting to Know Your Camcorder How to stop recording automatically. The remote control doesn't work. 1 Insert two AAbatteries, following the + and - WAIT-10S/SELF-30S...


