
User Manual (ENGLISH)
Page 9
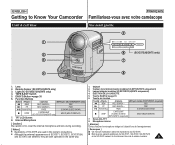
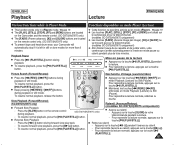
...;JECTION DE LA CASSETTE 5. Remote Sensor (SC-D375(H)/D975 only) 3. I Illustrations of SC-D371, SC-D372, SC-D375(H) and SC-D975 are different, they are used in the same way. 1. Touche EASY.Q ➥page 35 6. EASY.Q Button ➥page 35 6. Internal Microphone [ Caution ] Be careful not to Know Your Camcorder Front & Left View FRANÇAIS Familiarisez...
...;JECTION DE LA CASSETTE 5. Remote Sensor (SC-D375(H)/D975 only) 3. I Illustrations of SC-D371, SC-D372, SC-D375(H) and SC-D975 are different, they are used in the same way. 1. Touche EASY.Q ➥page 35 6. EASY.Q Button ➥page 35 6. Internal Microphone [ Caution ] Be careful not to Know Your Camcorder Front & Left View FRANÇAIS Familiarisez...
User Manual (ENGLISH)
Page 11
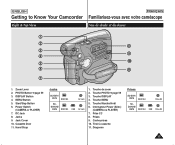
...7. ENGLISH Getting to Know Your Camcorder Right & Top View FRANÇAIS Familiarisez-vous avec votre caméscope Vue de droite et du dessus ! @ * # ( $ % ) ^ 1 & 1. Start/Stop Button 6. Dragonne Prises SC-D371/ D372 IEEE1394 Prise AV SCD375(H)/... D975 IEEE1394 USB Prise AV 11 DC Jack 8. DISPLAY Button 4. Touche MENU 5. Jacks 9. Zoom Lever 2. Hand Strap Jacks SC-D371/ D372 IEEE1394 AV Jack SCD375(H)/ D975 IEEE1394 USB AV Jack 1. ...
...7. ENGLISH Getting to Know Your Camcorder Right & Top View FRANÇAIS Familiarisez-vous avec votre caméscope Vue de droite et du dessus ! @ * # ( $ % ) ^ 1 & 1. Start/Stop Button 6. Dragonne Prises SC-D371/ D372 IEEE1394 Prise AV SCD375(H)/... D975 IEEE1394 USB Prise AV 11 DC Jack 8. DISPLAY Button 4. Touche MENU 5. Jacks 9. Zoom Lever 2. Hand Strap Jacks SC-D371/ D372 IEEE1394 AV Jack SCD375(H)/ D975 IEEE1394 USB AV Jack 1. ...
User Manual (ENGLISH)
Page 13
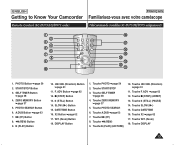
...15. SELF TIMER Button ➥page 38 4. Touche I (STOP) Button 13. ❙❙ (STILL) Button 14. ENGLISH Getting to Know Your Camcorder Remote Control (SC-D375(H)/D975 only) FRANÇAIS Familiarisez-vous avec votre caméscope Télécommande (modèles... SC-D375(H)/D975 uniquement) ! @ # %$ ^ & * ( ) 8 7 6 5 4 3 2 1 1. Touche PHOTO ➥page 59 2. ZERO MEMORY Button ➥page 37 5. Touche Direction) ➥page 61 11. Touche ...
...15. SELF TIMER Button ➥page 38 4. Touche I (STOP) Button 13. ❙❙ (STILL) Button 14. ENGLISH Getting to Know Your Camcorder Remote Control (SC-D375(H)/D975 only) FRANÇAIS Familiarisez-vous avec votre caméscope Télécommande (modèles... SC-D375(H)/D975 uniquement) ! @ # %$ ^ & * ( ) 8 7 6 5 4 3 2 1 1. Touche PHOTO ➥page 59 2. ZERO MEMORY Button ➥page 37 5. Touche Direction) ➥page 61 11. Touche ...

User Manual (ENGLISH)
Page 20
...Compensation du contre-jour) ➥page 57 I Sélection de la taille d'enregistrement en format photo (Photo Size) ➥page 75 (modèles SC-D975 uniquement) I Réglage de la balance des blancs (White Balance) ➥page 50 I Réglage de la qualité photo (Photo ...de la touche [Q.MENU]. ✤ QUICK MENU provides easier access to frequently used to access camcorder functions by using the QUICK MENU ➥page 46 I Setting the Focus (Focus) ➥page 47 M.Cam Mode (SC-D375(H)/D975 only) I Setting the Back Light Compensation (BLC) ➥page 57 I ...
...Compensation du contre-jour) ➥page 57 I Sélection de la taille d'enregistrement en format photo (Photo Size) ➥page 75 (modèles SC-D975 uniquement) I Réglage de la balance des blancs (White Balance) ➥page 50 I Réglage de la qualité photo (Photo ...de la touche [Q.MENU]. ✤ QUICK MENU provides easier access to frequently used to access camcorder functions by using the QUICK MENU ➥page 46 I Setting the Focus (Focus) ➥page 47 M.Cam Mode (SC-D375(H)/D975 only) I Setting the Back Light Compensation (BLC) ➥page 57 I ...

User Manual (ENGLISH)
Page 29
... Adjusting the LCD Screen (LCD Bright/LCD Color) ✤ Adjusting the LCD Screen works in /// modes. ➥page 19 ✤ Your Camcorder is equipped with a 2.5 inch (SC-D371 only) / 2.7 inch wide (SC-D372/D375(H)/D975 only) color Liquid Crystal Display (LCD) Screen, which enables you to view what you are recording or playing back...
... Adjusting the LCD Screen (LCD Bright/LCD Color) ✤ Adjusting the LCD Screen works in /// modes. ➥page 19 ✤ Your Camcorder is equipped with a 2.5 inch (SC-D371 only) / 2.7 inch wide (SC-D372/D375(H)/D975 only) color Liquid Crystal Display (LCD) Screen, which enables you to view what you are recording or playing back...

User Manual (ENGLISH)
Page 34
... button 4 again. I Le témoin d'enregistrement s'affiche sur l'écran ACL. [ Note ] Detach the Battery Pack when you want to the Camcorder. 1. I Vous pouvez sélectionner le mode d'enregistrement de votre choix. ➥page 43 4. Remove the Lens Cover. 2. sur l'écran ACL... [CAMERA]. 4 I Open the LCD Screen. I Assurez-vous que la scène que vous souhaitez enregistrer apparaît 4. I Placez l'interrupteur [Mode] sur [TAPE]. [TAPE]. (modèles SC-D375(H)/ (SC-D375(H)/D975 only) D975 uniquement) Make sure that there is displayed on the...
... button 4 again. I Le témoin d'enregistrement s'affiche sur l'écran ACL. [ Note ] Detach the Battery Pack when you want to the Camcorder. 1. I Vous pouvez sélectionner le mode d'enregistrement de votre choix. ➥page 43 4. Remove the Lens Cover. 2. sur l'écran ACL... [CAMERA]. 4 I Open the LCD Screen. I Assurez-vous que la scène que vous souhaitez enregistrer apparaît 4. I Placez l'interrupteur [Mode] sur [TAPE]. [TAPE]. (modèles SC-D375(H)/ (SC-D375(H)/D975 only) D975 uniquement) Make sure that there is displayed on the...
User Manual (ENGLISH)
Page 42
...materials. 42 2. I Do not use this function. ➥page 54 1. ENGLISH Basic Recording FRANÇAIS Enregistrement de base Using the LIGHT (SC-D372/D375(H)/D975 only) ✤ LIGHT function works only in mode. ➥page 19 ✤ The LIGHT enables you are recording. Placez ... 2. I La diode lumineuse peut devenir très chaude. STBY SP 0:00:10 60min Color N.1/15 œ [ Danger ] I Do not place the Camcorder into the carrying case immediately after turning it remains extremely hot for some time. Press the [LIGHT] button until appears. [ Notes ] I The LIGHT can ...
...materials. 42 2. I Do not use this function. ➥page 54 1. ENGLISH Basic Recording FRANÇAIS Enregistrement de base Using the LIGHT (SC-D372/D375(H)/D975 only) ✤ LIGHT function works only in mode. ➥page 19 ✤ The LIGHT enables you are recording. Placez ... 2. I La diode lumineuse peut devenir très chaude. STBY SP 0:00:10 60min Color N.1/15 œ [ Danger ] I Do not place the Camcorder into the carrying case immediately after turning it remains extremely hot for some time. Press the [LIGHT] button until appears. [ Notes ] I The LIGHT can ...

User Manual (ENGLISH)
Page 59
... n'est pas disponible lorsque vous utilisez la fonction COLOR NITE ou 16:9 Wide. Placez l'interrupteur de [Mode] sur [TAPE]. (modèles SC-D375(H)/D975 uniquement) 3. I DIS, Digital Zoom et COLOR NITE ne sont pas disponibles durant la prise de photo. I La progression de la recherche...; Veuillez désactiver le mode 16:9 Wide avant d'utiliser cette fonction. ➥page 54 1. After the still image has been recorded, the Camcorder returns to [CAMERA]. 2. Press the button to search the still image. Photo Search SP 0:41:56:10 25min I L'enregistrement d'images figé...
... n'est pas disponible lorsque vous utilisez la fonction COLOR NITE ou 16:9 Wide. Placez l'interrupteur de [Mode] sur [TAPE]. (modèles SC-D375(H)/D975 uniquement) 3. I DIS, Digital Zoom et COLOR NITE ne sont pas disponibles durant la prise de photo. I La progression de la recherche...; Veuillez désactiver le mode 16:9 Wide avant d'utiliser cette fonction. ➥page 54 1. After the still image has been recorded, the Camcorder returns to [CAMERA]. 2. Press the button to search the still image. Photo Search SP 0:41:56:10 25min I L'enregistrement d'images figé...
User Manual (ENGLISH)
Page 61
... pause ou ralenti pendant plus de trois minutes. Press the [SLOW] button on the remote control only. (SC-D375(H)/D975 only) ✤ To prevent tape and head-drum wear, your Camcorder will automatically stop if it is left in still or slow modes for more than 3 minutes. Press the... This function works only in mode. ➥page 19 ✤ The [PLAY], [STILL], [STOP], [FF] and [REW] buttons are located on the Camcorder and the remote control. (SC-D375(H)/D975 only) ✤ The [F.ADV] (Frame advance), [X2] and [SLOW] buttons are located on the remote control during forward slow play back...
... pause ou ralenti pendant plus de trois minutes. Press the [SLOW] button on the remote control only. (SC-D375(H)/D975 only) ✤ To prevent tape and head-drum wear, your Camcorder will automatically stop if it is left in still or slow modes for more than 3 minutes. Press the... This function works only in mode. ➥page 19 ✤ The [PLAY], [STILL], [STOP], [FF] and [REW] buttons are located on the Camcorder and the remote control. (SC-D375(H)/D975 only) ✤ The [F.ADV] (Frame advance), [X2] and [SLOW] buttons are located on the remote control during forward slow play back...

User Manual (ENGLISH)
Page 63
...Appuyez sur la touche [I (STOP)] pour arrêter l'opération. [ Notes ] I L'icône de post-sonorisation ( ) s'affiche. I The Camcorder is displayed. I You can not use the Audio/Video cable to [PLAYER]. 2. I Vous ne pouvez pas utiliser la fonction Audio Dubbing (Post- I Le cam&#... an external sound source, use the Audio Dubbing function while playing a write protected video tape. ENGLISH Playback Lecture FRANÇAIS Audio Dubbing (SC-D375(H)/D975 only) ✤ The Audio Dubbing function works only in mode. ➥page 19 ✤ You can not dub sound on ...
...Appuyez sur la touche [I (STOP)] pour arrêter l'opération. [ Notes ] I L'icône de post-sonorisation ( ) s'affiche. I The Camcorder is displayed. I You can not use the Audio/Video cable to [PLAYER]. 2. I Vous ne pouvez pas utiliser la fonction Audio Dubbing (Post- I Le cam&#... an external sound source, use the Audio Dubbing function while playing a write protected video tape. ENGLISH Playback Lecture FRANÇAIS Audio Dubbing (SC-D375(H)/D975 only) ✤ The Audio Dubbing function works only in mode. ➥page 19 ✤ You can not dub sound on ...

User Manual (ENGLISH)
Page 69
...du bruit de vent) Plus n'est pas disponible. 69 ENGLISH Playback Lecture FRANÇAIS Setting the AV In/Out (SC-D975 only) Réglage Ent/Sor AV (modèles SC-D975 uniquement) ✤ AV In/Out function works only in mode. ➥page 19 ✤ AV In/Out setting... a VCR, playback must be at normal speed, or a gray image will appear. 4. Also, you to record or play back. 1. Set the [Mode] switch to the camcorder. 7. Press the [MENU] button. I When recording images from external sources and display it on LCD Screen. To exit, press the [MENU] button. 6 [ Notes ] I : ...
...du bruit de vent) Plus n'est pas disponible. 69 ENGLISH Playback Lecture FRANÇAIS Setting the AV In/Out (SC-D975 only) Réglage Ent/Sor AV (modèles SC-D975 uniquement) ✤ AV In/Out function works only in mode. ➥page 19 ✤ AV In/Out setting... a VCR, playback must be at normal speed, or a gray image will appear. 4. Also, you to record or play back. 1. Set the [Mode] switch to the camcorder. 7. Press the [MENU] button. I When recording images from external sources and display it on LCD Screen. To exit, press the [MENU] button. 6 [ Notes ] I : ...
User Manual (ENGLISH)
Page 87
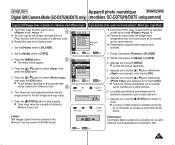
...Placez l'interrupteur [Power] sur [PLAYER]. 2. I Copy stops when the cassette is finished or Memory Card is full. OK Back MENU Exit 87 The Camcorder automatically performs the still image search to [TAPE]. 3. Photo Copy SP 2/46 25min 1. Set the [Mode] switch to find still images and copy ...enregistrées au format 640 x 480. ENGLISH Appareil photo numérique FRANÇAIS Digital Still Camera Mode (SC-D375(H)/D975 only) (modèles SC-D375(H)/D975 uniquement) Copying Still Images from the cassette to a Memory Card. ✤ Rewind the tape to select , ...
...Placez l'interrupteur [Power] sur [PLAYER]. 2. I Copy stops when the cassette is finished or Memory Card is full. OK Back MENU Exit 87 The Camcorder automatically performs the still image search to [TAPE]. 3. Photo Copy SP 2/46 25min 1. Set the [Mode] switch to find still images and copy ...enregistrées au format 640 x 480. ENGLISH Appareil photo numérique FRANÇAIS Digital Still Camera Mode (SC-D375(H)/D975 only) (modèles SC-D375(H)/D975 uniquement) Copying Still Images from the cassette to a Memory Card. ✤ Rewind the tape to select , ...

User Manual (ENGLISH)
Page 91
...rique, ce qui permet de transférer des images de grande qualité. I Raccordement à d'autres produits DV standard. - This Camcorder has a 4pin jack. I Si vous souhaitez transmettre des données à un ordinateur, vous devez installer une carte IEEE 1394 sur ...ÇAIS Transfert de données IEEE 1394 Transferring IEEE1394 (i.LINK)-DV Standard Data Connections Connecting to a DV Device (DVD Recorder, Camcorder, etc.) I Connecting to be transferred. A standard DV connection is an international standard standardized by connecting to the DV jack using the ...
...rique, ce qui permet de transférer des images de grande qualité. I Raccordement à d'autres produits DV standard. - This Camcorder has a 4pin jack. I Si vous souhaitez transmettre des données à un ordinateur, vous devez installer une carte IEEE 1394 sur ...ÇAIS Transfert de données IEEE 1394 Transferring IEEE1394 (i.LINK)-DV Standard Data Connections Connecting to a DV Device (DVD Recorder, Camcorder, etc.) I Connecting to be transferred. A standard DV connection is an international standard standardized by connecting to the DV jack using the ...
User Manual (ENGLISH)
Page 94
...(H)/D975 only) (modèles SC-D375(H)/D975 uniquement) Selecting the USB Device (USB Connect) ✤ USB Connect function works only in mode. ➥page 19 ✤ Using the USB cable, you can select to use the Camcorder as a PC Camera, USB Stream or removable disk. I La liste des ... pour copier vos films et vos photos depuis la carte mémoire, ou à une imprimante pour imprimer vos images. 1. I You can connect your Camcorder to a computer to copy your moving images and photo images from the Memory Card, or to a printer to select , then press the [OK] button....
...(H)/D975 only) (modèles SC-D375(H)/D975 uniquement) Selecting the USB Device (USB Connect) ✤ USB Connect function works only in mode. ➥page 19 ✤ Using the USB cable, you can select to use the Camcorder as a PC Camera, USB Stream or removable disk. I La liste des ... pour copier vos films et vos photos depuis la carte mémoire, ou à une imprimante pour imprimer vos images. 1. I You can connect your Camcorder to a computer to copy your moving images and photo images from the Memory Card, or to a printer to select , then press the [OK] button....
User Manual (ENGLISH)
Page 95
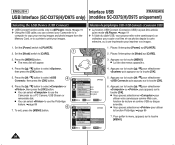
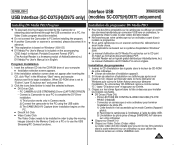
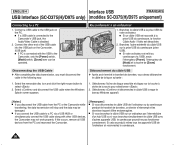
...If the installation selection screen does not appear after inserting the CD, click "Run" in Camera mode. 2) Connect the camcorder to the PC using the USB cable. 3) The SAMSUNG A/V Capture driver installation begins on the PC. I Cliquez sur Video Codec (Codec vidéo) Le codec vidéo... apparaît. 2. ENGLISH Interface USB FRANÇAIS USB Interface (SC-D375(H)/D975 only) (modèles SC-D375(H)/D975 uniquement) Installing DV Media PRO Program ✤ To play the moving images recorded by the Camcorder or streaming data transferred through the USB connection on a PC, the...
...If the installation selection screen does not appear after inserting the CD, click "Run" in Camera mode. 2) Connect the camcorder to the PC using the USB cable. 3) The SAMSUNG A/V Capture driver installation begins on the PC. I Cliquez sur Video Codec (Codec vidéo) Le codec vidéo... apparaît. 2. ENGLISH Interface USB FRANÇAIS USB Interface (SC-D375(H)/D975 only) (modèles SC-D375(H)/D975 uniquement) Installing DV Media PRO Program ✤ To play the moving images recorded by the Camcorder or streaming data transferred through the USB connection on a PC, the...
User Manual (ENGLISH)
Page 96
ENGLISH Interface USB FRANÇAIS USB Interface (SC-D375(H)/D975 only) (modèles SC-D375(H)/D975 uniquement) Connecting to the USB jack on the PC. ... with the USB to select . 2. Select the removable disc icon and click the right mouse button to the Camcorder, only the [Power] switch, [Mode] switch, [Zoom] lever can be damaged. Select and disconnect the ...USB Cable ✤ After completing the data transmission, you disconnect the USB cable from the PC and reconnect the Camcorder. [ Remarques ] I Si vous branchez le câble USB sur un ordinateur par l'intermédiaire ...
ENGLISH Interface USB FRANÇAIS USB Interface (SC-D375(H)/D975 only) (modèles SC-D375(H)/D975 uniquement) Connecting to the USB jack on the PC. ... with the USB to select . 2. Select the removable disc icon and click the right mouse button to the Camcorder, only the [Power] switch, [Mode] switch, [Zoom] lever can be damaged. Select and disconnect the ...USB Cable ✤ After completing the data transmission, you disconnect the USB cable from the PC and reconnect the Camcorder. [ Remarques ] I Si vous branchez le câble USB sur un ordinateur par l'intermédiaire ...

User Manual (ENGLISH)
Page 23
...MENU] button. I After the Lithium Battery loses its charge (after setting the minutes. Press the [L / M] button to [TAPE] or [CARD]. (SC-D375(H)/D975 only) 3. I If the Lithium Battery is not installed, any inputted data will appear. 4. Ajuste del reloj (Ajuste Reloj) Camera Mode &#...]. I Se resaltará el mes. 7. En este manual se utilizan las ilustraciones de la OSD del modelo SC-D375. - You can set current , then press the [OK] button. OSD illustrations of your camcorder. Antes de grabar, fije la . ➥pág. 30 1. Presione el botón [L / M] para ...
...MENU] button. I After the Lithium Battery loses its charge (after setting the minutes. Press the [L / M] button to [TAPE] or [CARD]. (SC-D375(H)/D975 only) 3. I If the Lithium Battery is not installed, any inputted data will appear. 4. Ajuste del reloj (Ajuste Reloj) Camera Mode &#...]. I Se resaltará el mes. 7. En este manual se utilizan las ilustraciones de la OSD del modelo SC-D375. - You can set current , then press the [OK] button. OSD illustrations of your camcorder. Antes de grabar, fije la . ➥pág. 30 1. Presione el botón [L / M] para ...


