

User Manual (ENGLISH)
Page 17
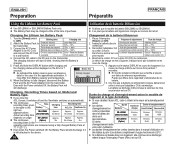
.... Interrupteur Power (Alim.) (CAMÉRA ou LECTEUR) 7. Hand Strap Hook Jacks SC-D263 External IEEE1394 MIC AV Cable SC-D363 External IEEE1394 USB AV MIC Cable SC-D362/ D364/ D365/ External IEEE1394 USB Multi D366 MIC Cable 1. Cache-prises 9. Power Switch 7. DC Jack QMUEINCUK ERA R AV/ S USB DV... 1. Zoom Lever (VOL/Menu Dial) 2. Prise CC 8. Boucle pour dragonne Prises SC-D263 Micro IEEE1394 externe Câble AV SC-D363 Micro IEEE1394 USB Câble externe AV SC-D362/ D364/ D365/ D366 Micro externe IEEE1394 USB Câble multiple 11 QUICK MENU Button 4....
.... Interrupteur Power (Alim.) (CAMÉRA ou LECTEUR) 7. Hand Strap Hook Jacks SC-D263 External IEEE1394 MIC AV Cable SC-D363 External IEEE1394 USB AV MIC Cable SC-D362/ D364/ D365/ External IEEE1394 USB Multi D366 MIC Cable 1. Cache-prises 9. Power Switch 7. DC Jack QMUEINCUK ERA R AV/ S USB DV... 1. Zoom Lever (VOL/Menu Dial) 2. Prise CC 8. Boucle pour dragonne Prises SC-D263 Micro IEEE1394 externe Câble AV SC-D363 Micro IEEE1394 USB Câble externe AV SC-D362/ D364/ D365/ D366 Micro externe IEEE1394 USB Câble multiple 11 QUICK MENU Button 4....
User Manual (ENGLISH)
Page 22
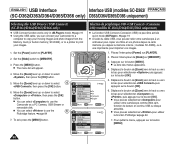
... given Time in the operating instructions are approximations. Connect the AC Power Three times per second 50% ~ 75% 3. a second Pack and the DC Cable 1. Deux fois par seconde 3. Replacez la batterie et le cordon CC 4. Branchez le cordon CC sur la prise CC (DC) du caméscope...LSM160. ✤ Il se peut que la batterie soit légèrement chargée au moment de l'achat. still discharge. Connect the DC cable to [Off]. activé. ✤ Les durées Durée d'enregistrement en Batterie continu présentées dans le tableau de...
... given Time in the operating instructions are approximations. Connect the AC Power Three times per second 50% ~ 75% 3. a second Pack and the DC Cable 1. Deux fois par seconde 3. Replacez la batterie et le cordon CC 4. Branchez le cordon CC sur la prise CC (DC) du caméscope...LSM160. ✤ Il se peut que la batterie soit légèrement chargée au moment de l'achat. still discharge. Connect the DC cable to [Off]. activé. ✤ Les durées Durée d'enregistrement en Batterie continu présentées dans le tableau de...

User Manual (ENGLISH)
Page 68
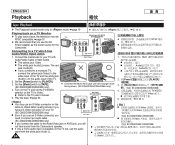
.... [ Notes ] I To utilize an external MIC or sound source, connect a microphone to start dubbing. ENGLISH Playback Lecture FRANÇAIS Audio Dubbing (SC-D364/D366 only) ✤ The Audio Dubbing function works only in mode. ➥page 19 ✤ You can not dub sound on a pre-recorded tape... the function to the original sound on a pre-recorded tape recorded in LP or 16 bit mode. ✤ You can not use the Multi-AV Cable (or AV JACK; I The Camcorder is displayed. Placez l'interrupteur de [Mode] sur [TAPE]. 3. I Pour travailler avec un microphone externe, branchez ...
.... [ Notes ] I To utilize an external MIC or sound source, connect a microphone to start dubbing. ENGLISH Playback Lecture FRANÇAIS Audio Dubbing (SC-D364/D366 only) ✤ The Audio Dubbing function works only in mode. ➥page 19 ✤ You can not dub sound on a pre-recorded tape... the function to the original sound on a pre-recorded tape recorded in LP or 16 bit mode. ✤ You can not use the Multi-AV Cable (or AV JACK; I The Camcorder is displayed. Placez l'interrupteur de [Mode] sur [TAPE]. 3. I Pour travailler avec un microphone externe, branchez ...

User Manual (ENGLISH)
Page 73
... le bouton [Start/Stop] pour faire basculer le caméscope en mode REC PAUSE (PAUSE ENR.). Insert the blank tape with the 2 Multi-AV Cable. ➥pages 64~65 2. Insérez la cassette vierge, languette de protection rabattue, dans le caméscope. Press the [MENU] button....sur . 10.Pour quitter le menu, appuyez sur le bouton [MENU]. 11. Placez l'interrupteur [Power] sur [PLAYER]. (modèles SC-D363/D364/D365/D366 uniquement) ERA MERA R ER (SC-D363/D364/D365/D366 only) 4. Move the [Zoom] lever up or down to select , then press the [OK] button. 9. Allumez le ...
... le bouton [Start/Stop] pour faire basculer le caméscope en mode REC PAUSE (PAUSE ENR.). Insert the blank tape with the 2 Multi-AV Cable. ➥pages 64~65 2. Insérez la cassette vierge, languette de protection rabattue, dans le caméscope. Press the [MENU] button....sur . 10.Pour quitter le menu, appuyez sur le bouton [MENU]. 11. Placez l'interrupteur [Power] sur [PLAYER]. (modèles SC-D363/D364/D365/D366 uniquement) ERA MERA R ER (SC-D363/D364/D365/D366 only) 4. Move the [Zoom] lever up or down to select , then press the [OK] button. 9. Allumez le ...

User Manual (ENGLISH)
Page 90
...the ACL Screen. ENGLISH Digital Still Camera Mode Mode Digital Still Camera (Appareil photo FRANÇAIS (SC-D363/D364/D365/D366 only) numérique) (modèles SC-D363/D364/D365 /D366 uniquement) Marking Images for the photo image that you can set the number of copies ... depending on the number of the stored images. 1. I L'option peut prendre un certain temps en fonction du nombre d'images I Use the USB cable provided with a ✤ Ce caméscope prend en charge le format d'impression DPOF (Digital Print printer supporting DPOF. ✤ There are commercially...
...the ACL Screen. ENGLISH Digital Still Camera Mode Mode Digital Still Camera (Appareil photo FRANÇAIS (SC-D363/D364/D365/D366 only) numérique) (modèles SC-D363/D364/D365 /D366 uniquement) Marking Images for the photo image that you can set the number of copies ... depending on the number of the stored images. 1. I L'option peut prendre un certain temps en fonction du nombre d'images I Use the USB cable provided with a ✤ Ce caméscope prend en charge le format d'impression DPOF (Digital Print printer supporting DPOF. ✤ There are commercially...

User Manual (ENGLISH)
Page 91
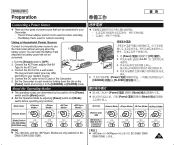
...ordinateur. Set the [Mode] switch to [PLAYER]. 2. Mettez votre imprimante hors tension. I Turn your Camcorder to a PictBridge printer using the provided USB cable. Connect your Camcorder on . I L'écran du menu PictBridge apparaît automatiquement après un bref instant. I : reliez à une... to select , then press the [OK] button. Turn your printer's power off. ENGLISH PictBridgeTM (SC-D363/D364/D365/D366 only) PictBridgeTM (modèles SC- Pour imprimer directement vos images enregistrées en utilisant la fonction Pictbridge, connectez votre camé...
...ordinateur. Set the [Mode] switch to [PLAYER]. 2. Mettez votre imprimante hors tension. I Turn your Camcorder to a PictBridge printer using the provided USB cable. Connect your Camcorder on . I L'écran du menu PictBridge apparaît automatiquement après un bref instant. I : reliez à une... to select , then press the [OK] button. Turn your printer's power off. ENGLISH PictBridgeTM (SC-D363/D364/D365/D366 only) PictBridgeTM (modèles SC- Pour imprimer directement vos images enregistrées en utilisant la fonction Pictbridge, connectez votre camé...
User Manual (ENGLISH)
Page 96
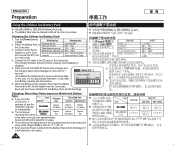
...puis appuyez sur le bouton [OK]. 6. ENGLISH USB Interface Interface USB (modèles SC-D362/ FRANÇAIS (SC-D362/D363/D364/D365/D366 only) D363/D364/D365/D366 uniquement) Selecting the USB Device (USB Connect) (SC-D363/D364/D365/D366 only) Sélection du périphérique USB (Connexion USB) (... to a printer to print your moving images and photo images from the Memory Card (or built-in mode. ➥page 19 ✤ Using the USB cable, you can connect your Camcorder to a computer to select or , then press the [OK] button. ERA MERA R ER 1 PLAYE CA PLAY CAM M....
...puis appuyez sur le bouton [OK]. 6. ENGLISH USB Interface Interface USB (modèles SC-D362/ FRANÇAIS (SC-D362/D363/D364/D365/D366 only) D363/D364/D365/D366 uniquement) Selecting the USB Device (USB Connect) (SC-D363/D364/D365/D366 only) Sélection du périphérique USB (Connexion USB) (... to a printer to print your moving images and photo images from the Memory Card (or built-in mode. ➥page 19 ✤ Using the USB cable, you can connect your Camcorder to a computer to select or , then press the [OK] button. ERA MERA R ER 1 PLAYE CA PLAY CAM M....

User Manual (ENGLISH)
Page 97
... needs to be viewed using the USB cable. 3) The SAMSUNG A/V Capture driver installation begins on a PC or to use the USB Streaming/PC Camera functions. USB PC CAMERA & STREAMING Driver (CAPTURE DRIVER) - Pilote du disque amovible USB (Windows® 98SE uniquement) (modèles SC-D363/D364/D365/D366 uniquement) - Cliquez sur les ic...
... needs to be viewed using the USB cable. 3) The SAMSUNG A/V Capture driver installation begins on a PC or to use the USB Streaming/PC Camera functions. USB PC CAMERA & STREAMING Driver (CAPTURE DRIVER) - Pilote du disque amovible USB (Windows® 98SE uniquement) (modèles SC-D363/D364/D365/D366 uniquement) - Cliquez sur les ic...

User Manual (ENGLISH)
Page 98
ENGLISH USB Interface Interface USB (modèles SC-D362/ FRANÇAIS (SC-D362/D363/D364/D365/D366 only) D363/D364/D365/D366 uniquement) Connecting to the USB jack on the PC. Connect a USB cable to a PC 1. I If you disconnect the USB cable from the PC and reconnect the Camcorder. [ Remarques ] I Si un câble USB...
ENGLISH USB Interface Interface USB (modèles SC-D362/ FRANÇAIS (SC-D362/D363/D364/D365/D366 only) D363/D364/D365/D366 uniquement) Connecting to the USB jack on the PC. Connect a USB cable to a PC 1. I If you disconnect the USB cable from the PC and reconnect the Camcorder. [ Remarques ] I Si un câble USB...

User Manual (ENGLISH)
Page 4
...Recorder, Camcorder, etc 87 Connecting to a PC ...87 System Requirements...87 Recording with a DV Connection Cable 88 USB Interface (SC-D362/D363/D364/D365/D366 only) ...89 Using USB Interface (SC-D362/D363/D364/D365/D366 only 89 Transferring a Digital Image through a USB Connection 89 USB Connection Speed depending on ...the System 89 System Requirements...89 Selecting the USB Device (USB Connect) (SC-D363/D364/D365/D366 only 90 Installing DV Media PRO Program 91 Connecting to a PC ...92 Disconnecting the USB Cable 92 Using the PC Camera Function 93 Using the USB Streaming Function 94 ...
...Recorder, Camcorder, etc 87 Connecting to a PC ...87 System Requirements...87 Recording with a DV Connection Cable 88 USB Interface (SC-D362/D363/D364/D365/D366 only) ...89 Using USB Interface (SC-D362/D363/D364/D365/D366 only 89 Transferring a Digital Image through a USB Connection 89 USB Connection Speed depending on ...the System 89 System Requirements...89 Selecting the USB Device (USB Connect) (SC-D363/D364/D365/D366 only 90 Installing DV Media PRO Program 91 Connecting to a PC ...92 Disconnecting the USB Cable 92 Using the PC Camera Function 93 Using the USB Streaming Function 94 ...

User Manual (ENGLISH)
Page 8
... Cable (SC-D362 /D364/D365/D366) 8. D362/D363/D364/D365/ D366 11. 12. 8 Remote Control (SC-D364/D366 only) 9. Multi SC-D362/ D364/D365/D366 6. / 7. Basic Accessories 1. USB Cable (SC-D362/ D363/D364/D365/D366 only) 10. Audio/Video Cable (SC-D263/D363) 7. D263/D363 5. D364/D366 0 CR2025 8. CD SC- Lithium Ion Battery Pack 1. AC Cord 6. SC-D364/D366 9. D362/D363/D364/ D365/D366 10. Multi Cable (SC-D362/ D364/D365...
... Cable (SC-D362 /D364/D365/D366) 8. D362/D363/D364/D365/ D366 11. 12. 8 Remote Control (SC-D364/D366 only) 9. Multi SC-D362/ D364/D365/D366 6. / 7. Basic Accessories 1. USB Cable (SC-D362/ D363/D364/D365/D366 only) 10. Audio/Video Cable (SC-D263/D363) 7. D263/D363 5. D364/D366 0 CR2025 8. CD SC- Lithium Ion Battery Pack 1. AC Cord 6. SC-D364/D366 9. D362/D363/D364/ D365/D366 10. Multi Cable (SC-D362/ D364/D365...

User Manual (ENGLISH)
Page 11
... QMUEINCUK ERA R AV/ S USB DV MIC PLAYE CAM 8. Jack Cover 9. Hand Strap Hook Jacks SC-D263 External IEEE1394 MIC AV Cable SC-D363 External IEEE1394 USB AV MIC Cable SC-D362/ D364/ D365/ External IEEE1394 USB Multi D366 MIC Cable 1. / 2. SC-D263 SC-D363 SC-D362/ D364/ D365/ D366 IEEE1394 AV IEEE1394 USB AV IEEE1394 USB AV 11 QUICK MENU Button...
... QMUEINCUK ERA R AV/ S USB DV MIC PLAYE CAM 8. Jack Cover 9. Hand Strap Hook Jacks SC-D263 External IEEE1394 MIC AV Cable SC-D363 External IEEE1394 USB AV MIC Cable SC-D362/ D364/ D365/ External IEEE1394 USB Multi D366 MIC Cable 1. / 2. SC-D263 SC-D363 SC-D362/ D364/ D365/ D366 IEEE1394 AV IEEE1394 USB AV IEEE1394 USB AV 11 QUICK MENU Button...
User Manual (ENGLISH)
Page 16
...q 0 [Power] [Off] 0 0 50% 50% ~ 75% 75% ~ 90% 90% ~ 100% - 0 0 0 5. and connect the AC Cord a second Pack and the DC Cable to the Camcorder. Press and hold the DISPLAY button while charging and the charging status will still discharge if it is the approximate estimation. Even...; ✤ The continuous recording times in the table to [Off]. 2. Attach the Battery Pack to a wall socket. 4. Connect the DC cable to blink, showing that the Battery is fully charged, disconnect the Battery Pack and the AC Power Adapter from Battery capacity and temperature. 6. charging...
...q 0 [Power] [Off] 0 0 50% 50% ~ 75% 75% ~ 90% 90% ~ 100% - 0 0 0 5. and connect the AC Cord a second Pack and the DC Cable to the Camcorder. Press and hold the DISPLAY button while charging and the charging status will still discharge if it is the approximate estimation. Even...; ✤ The continuous recording times in the table to [Off]. 2. Attach the Battery Pack to a wall socket. 4. Connect the DC cable to blink, showing that the Battery is fully charged, disconnect the Battery Pack and the AC Power Adapter from Battery capacity and temperature. 6. charging...
User Manual (ENGLISH)
Page 19
...; [Power] [Mode] 0 ✤ [Power] [Mode] 0 [Power] PLAY PLAY PLAY PLAY CAM [Mode] SC- D363/D364/ D365/D366 [ ] I The and the Modes are determined by holding down the tab on SC- Turn the [Power] switch to a wall socket. About the Operating Modes ✤ The operating modes are only enabled... to use the Camcorder without worrying about the battery power. D363/ D364/ D365/ D366. ✤ 0 - 0 - 0 0 QMUEINCUK PLAYE 0 CA 1. [Power] [Off] 0 2. The Battery Pack: used for outdoor recording. Connect the DC cable to your resident country. 4.
...; [Power] [Mode] 0 ✤ [Power] [Mode] 0 [Power] PLAY PLAY PLAY PLAY CAM [Mode] SC- D363/D364/ D365/D366 [ ] I The and the Modes are determined by holding down the tab on SC- Turn the [Power] switch to a wall socket. About the Operating Modes ✤ The operating modes are only enabled... to use the Camcorder without worrying about the battery power. D363/ D364/ D365/ D366. ✤ 0 - 0 - 0 0 QMUEINCUK PLAYE 0 CA 1. [Power] [Off] 0 2. The Battery Pack: used for outdoor recording. Connect the DC cable to your resident country. 4.

User Manual (ENGLISH)
Page 58
... √ - I ✤ AV 0 0 ✤ 0 0 LCD 0 [Zoom] 0 0 58 I (STOP)] button. 0 ➥ 19 LCD 0 1. [Power] [PLAYER] 2. [Mode] [TAPE] SC-D363/D364/ D365/D366 3. 0 ➥ 32 4. Insert the tape you can view the picture you hear sounds once the tape is in play operation, press the [I Levels... may be adjusted from the speaker. ✤ When the AV cable is in mode. ➥page 29 QMUENICUK ✤ &#...
... √ - I ✤ AV 0 0 ✤ 0 0 LCD 0 [Zoom] 0 0 58 I (STOP)] button. 0 ➥ 19 LCD 0 1. [Power] [PLAYER] 2. [Mode] [TAPE] SC-D363/D364/ D365/D366 3. 0 ➥ 32 4. Insert the tape you can view the picture you hear sounds once the tape is in play operation, press the [I Levels... may be adjusted from the speaker. ✤ When the AV cable is in mode. ➥page 29 QMUENICUK ✤ &#...

User Manual (ENGLISH)
Page 62
... sound source input. 0 I To dub an external sound source, set the function to I SC- (SC-D365/D366 only). ➥page 67 D364/D365/D366 0 ➥ 67 62 ENGLISH Playback Audio Dubbing (SC-D364/D366 only) SC-D364/D366 ✤ The Audio Dubbing function works only in mode. ➥page 19 ✤ ...0 ➥ 19 ✤ You can not dub sound on a pre-recorded tape in LP or 16 bit mode. ✤ LP 16 0 ✤ You can not use the Multi-AV Cable...
... sound source input. 0 I To dub an external sound source, set the function to I SC- (SC-D365/D366 only). ➥page 67 D364/D365/D366 0 ➥ 67 62 ENGLISH Playback Audio Dubbing (SC-D364/D366 only) SC-D364/D366 ✤ The Audio Dubbing function works only in mode. ➥page 19 ✤ ...0 ➥ 19 ✤ You can not dub sound on a pre-recorded tape in LP or 16 bit mode. ✤ LP 16 0 ✤ You can not use the Multi-AV Cable...
User Manual (ENGLISH)
Page 64
... / Video 0 I 0 5. 0 ➥ 63 [ Notes ] I You may use the audio cable with the triangle mark facing down. (SC-D362/D364/D365/D366 only) AV Cable TV (SC-D263/D363) AV Camcorder 0 2. [Power] [PLAYER] 0 3. [Mode] [TAPE] 0 SC-D363/D364/ D365/D366 4. Audio(R) I Refer to the TV user's manual. 5. I QMUEINCUK PLAYE CAM [ ... ✤ We recommend that you use an S-Video connector, you Signal flow AV Cable need to connect an audio cable. (SC-D362/D364/D365/D366 only) I If you connect the cable to the Audio/Video jack or AV/S jack, you will not hear sound from...
... / Video 0 I 0 5. 0 ➥ 63 [ Notes ] I You may use the audio cable with the triangle mark facing down. (SC-D362/D364/D365/D366 only) AV Cable TV (SC-D263/D363) AV Camcorder 0 2. [Power] [PLAYER] 0 3. [Mode] [TAPE] 0 SC-D363/D364/ D365/D366 4. Audio(R) I Refer to the TV user's manual. 5. I QMUEINCUK PLAYE CAM [ ... ✤ We recommend that you use an S-Video connector, you Signal flow AV Cable need to connect an audio cable. (SC-D362/D364/D365/D366 only) I If you connect the cable to the Audio/Video jack or AV/S jack, you will not hear sound from...

User Manual (ENGLISH)
Page 65
...339;œ (REW)] /[√√(FF)] buttons, AV Cable find the first position you wish to play back. Mono Multi Cable (SC-D362/D364/ D365/D366) I I The white jack: Audio(L) - Connect a TV to [TAPE]. (SC-D363/D364/D365/D366 only) 5. VCR0 VCR on the TV 0 ...yellow jack: Video I Audio(L) - Set the [Power] switch to [TAPE]. (SC-D363/D364/D365/D366 only) 3. TV Antenna Signal flow Multi Cable QMUEINCUK PLAYE CAM 3. [Power] 0 [PLAYER] 4. [Mode] [TAPE] 0 SC-D363/D364/D365/D366 I (SC-D263/D363) AV Camcorder 6. 0 VCR 0 [Power] switch to a TV through ...
...339;œ (REW)] /[√√(FF)] buttons, AV Cable find the first position you wish to play back. Mono Multi Cable (SC-D362/D364/ D365/D366) I I The white jack: Audio(L) - Connect a TV to [TAPE]. (SC-D363/D364/D365/D366 only) 5. VCR0 VCR on the TV 0 ...yellow jack: Video I Audio(L) - Set the [Power] switch to [TAPE]. (SC-D363/D364/D365/D366 only) 3. TV Antenna Signal flow Multi Cable QMUEINCUK PLAYE CAM 3. [Power] 0 [PLAYER] 4. [Mode] [TAPE] 0 SC-D363/D364/D365/D366 I (SC-D263/D363) AV Camcorder 6. 0 VCR 0 [Power] switch to a TV through ...
User Manual (ENGLISH)
Page 67
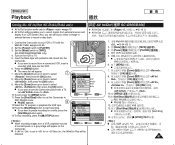
Set the [Mode] switch to REC PAUSE mode. Insert the blank tape with the Multi-AV Cable. ➥pages 64~65 2 2. Press the [MENU] button. I PAUSE 0 12. Multi-AV VCR 0 ➥ 64~65 2. [Mode] [TAPE] 0 3. [Power] [PLAYER] 0 4. Start/Stop / REC... up or down to select , then press the [OK] button. 7 Player Mode √Record 8. Press the [Start/Stop] button to set the Camcorder to [TAPE]. (SC-D363/D364/D365/D366 only) 4. Back 13.Press the [Start/Stop] button to [PLAYER]. VHS 0 13. [Start/Stop] / 0 I [Start/Stop] / 0 14. [I (STOP)] 0 [ ] I VCR ...
Set the [Mode] switch to REC PAUSE mode. Insert the blank tape with the Multi-AV Cable. ➥pages 64~65 2 2. Press the [MENU] button. I PAUSE 0 12. Multi-AV VCR 0 ➥ 64~65 2. [Mode] [TAPE] 0 3. [Power] [PLAYER] 0 4. Start/Stop / REC... up or down to select , then press the [OK] button. 7 Player Mode √Record 8. Press the [Start/Stop] button to set the Camcorder to [TAPE]. (SC-D363/D364/D365/D366 only) 4. Back 13.Press the [Start/Stop] button to [PLAYER]. VHS 0 13. [Start/Stop] / 0 I [Start/Stop] / 0 14. [I (STOP)] 0 [ ] I VCR ...
User Manual (ENGLISH)
Page 84
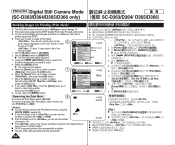
...; 20 I The last recorded image appears. Delete All I 0 0 0 USB 0 0 ENGLISH Digital Still Camera Mode (SC-D363/D364/D365/D366 only) SC-D363/D364/ D365/D366 Marking Images for Print Mark the photo image that you select , move the [Zoom] lever up or down ...to select the quantity, then press the [OK] button. Protect √Off 3. If you want to . ZOOM Move OK Select MENU Exit I 84 0 ➥ 19 DPOF 0 DPOF 0 2 - I Use the USB cable...
...; 20 I The last recorded image appears. Delete All I 0 0 0 USB 0 0 ENGLISH Digital Still Camera Mode (SC-D363/D364/D365/D366 only) SC-D363/D364/ D365/D366 Marking Images for Print Mark the photo image that you select , move the [Zoom] lever up or down ...to select the quantity, then press the [OK] button. Protect √Off 3. If you want to . ZOOM Move OK Select MENU Exit I 84 0 ➥ 19 DPOF 0 DPOF 0 2 - I Use the USB cable...


