
User Manual (ENGLISH)
Page 22
...;lecteur de mise Charging, Recording Times based on Model and sous tension est sur Off. Press and hold the DISPLAY button while charging and 5. Battery Info niveau de charge s'affiche sur l'écran ACL pendant 7 secondes. I As indicated the battery level is given as reference Battery charged I El nivel de la batería indicado que se facilita al usuario data for the user, it is...
...;lecteur de mise Charging, Recording Times based on Model and sous tension est sur Off. Press and hold the DISPLAY button while charging and 5. Battery Info niveau de charge s'affiche sur l'écran ACL pendant 7 secondes. I As indicated the battery level is given as reference Battery charged I El nivel de la batería indicado que se facilita al usuario data for the user, it is...

User Manual (ENGLISH)
Page 63
.... Set the [Power] switch to its previous mode. Déplacez le bouton de [Zoom] vers le haut ou vers le bas pour sélectionner , puis appuyez sur le bouton [OK]. I Still image recording is not available while COLOR NITE or 16:9 Wide is in use still image recording by using the [PHOTO] button on the remote control records the still image with automatic focusing. (SC-D364/D366 only) I You can use . Search MENU...
.... Set the [Power] switch to its previous mode. Déplacez le bouton de [Zoom] vers le haut ou vers le bas pour sélectionner , puis appuyez sur le bouton [OK]. I Still image recording is not available while COLOR NITE or 16:9 Wide is in use still image recording by using the [PHOTO] button on the remote control records the still image with automatic focusing. (SC-D364/D366 only) I You can use . Search MENU...

User Manual (ENGLISH)
Page 2
...Setting : System Menu Setting 23 Setting the Clock (Clock Set) ...23 Setting the Wireless Remote Control Acceptance (Remote) (SC-D364/D366 only 24 Setting the Beep Sound (Beep Sound 25 Setting the Shutter Sound (Shutter Sound) (SC-D363/D364/D365/D366 only 26 Selecting the OSD Language (Language 27 Viewing the Demonstration (Demonstration 28 Initial Setting : Display Menu Setting 29 Adjusting the LCD Screen (LCD Bright/ LCD Color 29 Displaying the Date/Time (Date/Time 30 Setting the TV Display (TV Display 31 Basic Recording 32 Using the Viewfinder...32 Inserting / Ejecting a Cassette...
...Setting : System Menu Setting 23 Setting the Clock (Clock Set) ...23 Setting the Wireless Remote Control Acceptance (Remote) (SC-D364/D366 only 24 Setting the Beep Sound (Beep Sound 25 Setting the Shutter Sound (Shutter Sound) (SC-D363/D364/D365/D366 only 26 Selecting the OSD Language (Language 27 Viewing the Demonstration (Demonstration 28 Initial Setting : Display Menu Setting 29 Adjusting the LCD Screen (LCD Bright/ LCD Color 29 Displaying the Date/Time (Date/Time 30 Setting the TV Display (TV Display 31 Basic Recording 32 Using the Viewfinder...32 Inserting / Ejecting a Cassette...

User Manual (ENGLISH)
Page 13
.../STOP Button 3. SELF TIMER Button ➥page 38 4. ZERO MEMORY Button ➥page 37 5. F. DATE/TIME Button 16. ADV ➥ 60 12. ENGLISH Getting to Know Your Camcorder Remote Control (SC-D364/D366 only) 1. PHOTO 2. START/STOP 3. ZERO MEMORY 5. PHOTO SEARCH 6. A.DUB 7. √√ (FF) 8. œœ (REW) 9. √ (PLAY) 10 Direction) SC-D364/D366 18. DISPLAY 17. W/T (Zoom) 16. I (STOP) Button 13. ❙❙ (STILL) Button 14. PHOTO Button ➥page 57 2. PHOTO SEARCH Button 6. ADV Button ➥page 60 12. SLOW...
.../STOP Button 3. SELF TIMER Button ➥page 38 4. ZERO MEMORY Button ➥page 37 5. F. DATE/TIME Button 16. ADV ➥ 60 12. ENGLISH Getting to Know Your Camcorder Remote Control (SC-D364/D366 only) 1. PHOTO 2. START/STOP 3. ZERO MEMORY 5. PHOTO SEARCH 6. A.DUB 7. √√ (FF) 8. œœ (REW) 9. √ (PLAY) 10 Direction) SC-D364/D366 18. DISPLAY 17. W/T (Zoom) 16. I (STOP) Button 13. ❙❙ (STILL) Button 14. PHOTO Button ➥page 57 2. PHOTO SEARCH Button 6. ADV Button ➥page 60 12. SLOW...
User Manual (ENGLISH)
Page 16
... the battery level is given as reference data for 7 Battery Info seconds. Actual recording time depends on Model and Battery Type. ✤ If you close the LCD Screen, it is fully charged, disconnect the Battery Pack and the AC Power Adapter from Battery capacity and temperature. 6. Reset the Battery 3. Charging, Recording Times based on usage. ✤ ✤ The continuous recording times in the table to [Off]. 2. Turn the [Power] switch Blinking time to the right are measured using a fully charged Battery...
... the battery level is given as reference data for 7 Battery Info seconds. Actual recording time depends on Model and Battery Type. ✤ If you close the LCD Screen, it is fully charged, disconnect the Battery Pack and the AC Power Adapter from Battery capacity and temperature. 6. Reset the Battery 3. Charging, Recording Times based on usage. ✤ ✤ The continuous recording times in the table to [Off]. 2. Turn the [Power] switch Blinking time to the right are measured using a fully charged Battery...
User Manual (ENGLISH)
Page 17
... How often the Zoom function is recommended that you are using. - - Battery Level Display The battery level display indicates the amount of the Battery Pack you have several batteries available. I / circuited. I The life and capacity of the Battery Pack will turn off soon, change the battery as soon as possible.) (Blinking) 0 0 0 / / LCD 0 a. The type and capacity of power remaining in the Battery Pack. It is used (Blinking) (The Camcorder will be recharged in...
... How often the Zoom function is recommended that you are using. - - Battery Level Display The battery level display indicates the amount of the Battery Pack you have several batteries available. I / circuited. I The life and capacity of the Battery Pack will turn off soon, change the battery as soon as possible.) (Blinking) 0 0 0 / / LCD 0 a. The type and capacity of power remaining in the Battery Pack. It is used (Blinking) (The Camcorder will be recharged in...

User Manual (ENGLISH)
Page 23
... automatically recorded onto a tape. To exit, press the [MENU] button. I If the Lithium Battery is not installed, any inputted data will be highlighted first. 5 6. Set the [Mode] switch to [TAPE] or [MEMORY]. (SCD363/D364/D365/D366 only) 3. I The month will not be backed up to select , then press the [OK] button. ENGLISH Initial Setting : System Menu Setting Setting the Clock (Clock Set) ✤ Clock setup works in /// modes. ➥page 19 ✤ The Date/Time is displayed.
... automatically recorded onto a tape. To exit, press the [MENU] button. I If the Lithium Battery is not installed, any inputted data will be highlighted first. 5 6. Set the [Mode] switch to [TAPE] or [MEMORY]. (SCD363/D364/D365/D366 only) 3. I The month will not be backed up to select , then press the [OK] button. ENGLISH Initial Setting : System Menu Setting Setting the Clock (Clock Set) ✤ Clock setup works in /// modes. ➥page 19 ✤ The Date/Time is displayed.

User Manual (ENGLISH)
Page 36
... used, it will play in reverse for 3 seconds and return to record a new image in Record Search mode. I Pressing [Start/Stop] button after REC SEARCH will overwrite the images recorded after that point. (REC SEARCH) 1. [Start/Stop] / 0 STBY COLOR NITE 2. [REC SEARCH -] [REC SEARCH +] - + LIGHT I STBY 0 [REC SEARCH -] - 3 0 [ ] COLOR NITE I 0 LIGHT I REC SEARCH [Start/Stop] / 0 When a cassette is loaded and the Camcorder is designed to [CAMERA]. ENGLISH Basic Recording Reviewing and Searching when a Recording (REC SEARCH) ✤ The REC SEARCH function works...
... used, it will play in reverse for 3 seconds and return to record a new image in Record Search mode. I Pressing [Start/Stop] button after REC SEARCH will overwrite the images recorded after that point. (REC SEARCH) 1. [Start/Stop] / 0 STBY COLOR NITE 2. [REC SEARCH -] [REC SEARCH +] - + LIGHT I STBY 0 [REC SEARCH -] - 3 0 [ ] COLOR NITE I 0 LIGHT I REC SEARCH [Start/Stop] / 0 When a cassette is loaded and the Camcorder is designed to [CAMERA]. ENGLISH Basic Recording Reviewing and Searching when a Recording (REC SEARCH) ✤ The REC SEARCH function works...
User Manual (ENGLISH)
Page 44
... you use this Camcorder to play ): This mode permits 90 minutes of recording time with a DVM60 tape. ✤ The Audio Mode function works in both and modes. ➥page 19 ✤ This Camcorder records sound in other equipment may not be recorded onto the Main (Sound1) track. Set the [Power] switch to [TAPE]. (SC-D363/D364/D365/D366 only) 3. To exit, press the [MENU] button. I When is selected, no indication is displayed. Move the [Zoom] lever...
... you use this Camcorder to play ): This mode permits 90 minutes of recording time with a DVM60 tape. ✤ The Audio Mode function works in both and modes. ➥page 19 ✤ This Camcorder records sound in other equipment may not be recorded onto the Main (Sound1) track. Set the [Power] switch to [TAPE]. (SC-D363/D364/D365/D366 only) 3. To exit, press the [MENU] button. I When is selected, no indication is displayed. Move the [Zoom] lever...

User Manual (ENGLISH)
Page 58
... play operation, press the [I The Camcorder stops automatically after rewinding is connected to start playback. Set the [Mode] switch to adjust the volume. I (STOP)] button. Take the following steps to lower the volume or mute the sound while playing a tape on the LCD Screen. ✤ 1. COLOR NITE 5. LIGHT I To stop the play , use the [Zoom] lever to [TAPE]. (SC-D363/D364/D365/D366 only) 56 3. Press the [œœ (REW)] button to rewind the tape to . [05] † ... I (STOP)] button. 0 ➥ 19 LCD 0 1. [Power...
... play operation, press the [I The Camcorder stops automatically after rewinding is connected to start playback. Set the [Mode] switch to adjust the volume. I (STOP)] button. Take the following steps to lower the volume or mute the sound while playing a tape on the LCD Screen. ✤ 1. COLOR NITE 5. LIGHT I To stop the play , use the [Zoom] lever to [TAPE]. (SC-D363/D364/D365/D366 only) 56 3. Press the [œœ (REW)] button to rewind the tape to . [05] † ... I (STOP)] button. 0 ➥ 19 LCD 0 1. [Power...
User Manual (ENGLISH)
Page 84
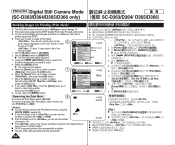
... All Files † MENU Exit 9. To remove individual file's Print Mark, select the file and set to . 2/46 800x600 [ Notes ] I You can directly access the Print Mark function using the [QUICK MENU]. ➥page 20 I If the Print Mark is set to , you can set the number of copies to mark. 4. LCD 0 999 0 - 0 1. [Power] [PLAYER] 0 2. [Mode] [MEMORY] 0 I 0 0 0 USB 0 0 ENGLISH Digital Still Camera Mode (SC-D363/D364/D365/D366 only) SC-D363/D364/ D365/D366 Marking Images for Print Mark the photo image...
... All Files † MENU Exit 9. To remove individual file's Print Mark, select the file and set to . 2/46 800x600 [ Notes ] I You can directly access the Print Mark function using the [QUICK MENU]. ➥page 20 I If the Print Mark is set to , you can set the number of copies to mark. 4. LCD 0 999 0 - 0 1. [Power] [PLAYER] 0 2. [Mode] [MEMORY] 0 I 0 0 0 USB 0 0 ENGLISH Digital Still Camera Mode (SC-D363/D364/D365/D366 only) SC-D363/D364/ D365/D366 Marking Images for Print Mark the photo image...
User Manual (ENGLISH)
Page 85
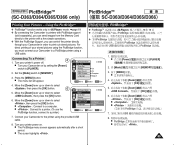
... menu list will appear. 4. USB 0 0 0 7. Connect your printer's power off. Turn your Camcorder to the printer using the PictBridge function, 0 PictBridge PictBridge 0 you can control the printer directly 0 through your Camcorder in mode. ➥page 19 ✤ PictBridgeTM 0 ➥ 19 ✤ By connecting the Camcorder to printers with PictBridge support ✤ PictBridge (sold separately), you can send images from the Memory Card directly to the printer with a few simple operations...
... menu list will appear. 4. USB 0 0 0 7. Connect your printer's power off. Turn your Camcorder to the printer using the PictBridge function, 0 PictBridge PictBridge 0 you can control the printer directly 0 through your Camcorder in mode. ➥page 19 ✤ PictBridgeTM 0 ➥ 19 ✤ By connecting the Camcorder to printers with PictBridge support ✤ PictBridge (sold separately), you can send images from the Memory Card directly to the printer with a few simple operations...
User Manual (ENGLISH)
Page 89
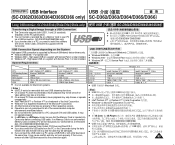
.../D364/D365/D366 USB ✤ USB 1.1 2.0 0 ✤ USB 0 SC-D363/D364/ D365/D366 ✤ DV / / DirectX 9.0 0 USB USB Microsoft (Windows) I Windows 2000 - I If you need to a PC using a USB HUB or with Service Pack 4 or later installed. I USB 2.0 works for Macintosh systems. [ Notes ] I Do not connect the Camcorder to install the software (DV Driver, Video Codec, DirectX 9.0) supplied with Service Pack 1 or later installed. If no Memory Card or an unformatted Memory Card is not available for removable disk and USB streaming functions. Service...
.../D364/D365/D366 USB ✤ USB 1.1 2.0 0 ✤ USB 0 SC-D363/D364/ D365/D366 ✤ DV / / DirectX 9.0 0 USB USB Microsoft (Windows) I Windows 2000 - I If you need to a PC using a USB HUB or with Service Pack 4 or later installed. I USB 2.0 works for Macintosh systems. [ Notes ] I Do not connect the Camcorder to install the software (DV Driver, Video Codec, DirectX 9.0) supplied with Service Pack 1 or later installed. If no Memory Card or an unformatted Memory Card is not available for removable disk and USB streaming functions. Service...
User Manual (ENGLISH)
Page 103
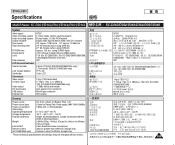
... recording system Audio recording system Usable cassette Tape speed Tape recording time FF/REW time Image device Lens Filter diameter LCD Screen/Viewfinder Size/dot number LCD Screen Method Viewfinder Connectors Video output S-video output Audio output DV input/output USB output External mic NTSC 2 rotary heads, Helical scanning system Rotary heads, 12/16b PCM system Digital video tape (6.35mm width): Mini DV cassette SP: approx. 18.81mm/s LP: approx. 12.56mm/s SP: 60 minutes (when using DVM 60), LP: 90 minutes (when using DVM 60) Approx. 150 sec. (using DVM60 tape) CCD (Charge Coupled Device...
... recording system Audio recording system Usable cassette Tape speed Tape recording time FF/REW time Image device Lens Filter diameter LCD Screen/Viewfinder Size/dot number LCD Screen Method Viewfinder Connectors Video output S-video output Audio output DV input/output USB output External mic NTSC 2 rotary heads, Helical scanning system Rotary heads, 12/16b PCM system Digital video tape (6.35mm width): Mini DV cassette SP: approx. 18.81mm/s LP: approx. 12.56mm/s SP: 60 minutes (when using DVM 60), LP: 90 minutes (when using DVM 60) Approx. 150 sec. (using DVM60 tape) CCD (Charge Coupled Device...
User Manual (ENGLISH)
Page 3
... installation such as vases, should be operated only from the unit. 20. If you are not sure of the type of the National Electrical Code, ANSI/NFPA No. 70-1984, provides information with either a polarized 2-wire AC line plug (a plug having a third (grounding) pin. A CAMCORDER is provided or the manufacturer's instructions have been adhered to protect it from battery power...
... installation such as vases, should be operated only from the unit. 20. If you are not sure of the type of the National Electrical Code, ANSI/NFPA No. 70-1984, provides information with either a polarized 2-wire AC line plug (a plug having a third (grounding) pin. A CAMCORDER is provided or the manufacturer's instructions have been adhered to protect it from battery power...
User Manual (ENGLISH)
Page 6
... System Menu Setting 23 Setting the Clock (Clock Set 23 Setting the Wireless Remote Control Acceptance (Remote) (SC-D364/D366 only 24 Setting the Beep Sound (Beep Sound 25 2 Setting the Shutter Sound (Shutter Sound) (SC-D363/D364/D365/D366 only 26 Selecting the OSD Language (Language 27 Viewing the Demonstration (Demonstration 28 Initial Setting : Display Menu Setting 29 Adjusting the LCD Screen (LCD Bright/ LCD Color) ..........29 Displaying the Date/Time (Date/Time 30 Setting the TV Display (TV Display 31 Basic Recording 32 Using the Viewfinder 32 Inserting / Ejecting a Cassette...
... System Menu Setting 23 Setting the Clock (Clock Set 23 Setting the Wireless Remote Control Acceptance (Remote) (SC-D364/D366 only 24 Setting the Beep Sound (Beep Sound 25 2 Setting the Shutter Sound (Shutter Sound) (SC-D363/D364/D365/D366 only 26 Selecting the OSD Language (Language 27 Viewing the Demonstration (Demonstration 28 Initial Setting : Display Menu Setting 29 Adjusting the LCD Screen (LCD Bright/ LCD Color) ..........29 Displaying the Date/Time (Date/Time 30 Setting the TV Display (TV Display 31 Basic Recording 32 Using the Viewfinder 32 Inserting / Ejecting a Cassette...

User Manual (ENGLISH)
Page 62
...)] button to the Camcorder, you recorded on the LCD Screen. 1. Adjusting the LCD Bright/LCD Color during Playback ✤ You can adjust the LCD Bright/LCD Color during playback. ✤ The adjustment method is connected to start playback. Take the following steps to lower the volume or mute the sound while playing a tape on the LCD Screen. Set the [Power] switch to adjust the volume. I A volume level display will not hear sound from the builtin Speaker. - I To stop the play , use the LCD Screen for playback, you wish to [TAPE]. (SC...
...)] button to the Camcorder, you recorded on the LCD Screen. 1. Adjusting the LCD Bright/LCD Color during Playback ✤ You can adjust the LCD Bright/LCD Color during playback. ✤ The adjustment method is connected to start playback. Take the following steps to lower the volume or mute the sound while playing a tape on the LCD Screen. Set the [Power] switch to adjust the volume. I A volume level display will not hear sound from the builtin Speaker. - I To stop the play , use the LCD Screen for playback, you wish to [TAPE]. (SC...

User Manual (ENGLISH)
Page 88
... 6. I The option may require extended operation time depending on the number of copies to . Set the [Power] switch to mark. 4. Using the REV/FWD)] buttons, search for Printing (Print Mark) ✤ The Print Mark function works only in mode. ➥page 19 ✤ This Camcorder supports the DPOF (Digital Print Order Format) print format. ✤ You can automatically print images recorded on a Memory Card with the Camcorder. 2/46 800x600 100-0002 84...
... 6. I The option may require extended operation time depending on the number of copies to . Set the [Power] switch to mark. 4. Using the REV/FWD)] buttons, search for Printing (Print Mark) ✤ The Print Mark function works only in mode. ➥page 19 ✤ This Camcorder supports the DPOF (Digital Print Order Format) print format. ✤ You can automatically print images recorded on a Memory Card with the Camcorder. 2/46 800x600 100-0002 84...

User Manual (ENGLISH)
Page 107
... recording system Audio recording system Usable cassette Tape speed Tape recording time FF/REW time Image device Lens Filter diameter LCD Screen/Viewfinder Size/dot number LCD Screen Method Viewfinder Connectors Video output S-video output Audio output DV input/output USB output External mic NTSC 2 rotary heads, Helical scanning system Rotary heads, 12/16b PCM system Digital video tape (6.35mm width): Mini DV cassette SP: approx. 18.81mm/s LP: approx. 12.56mm/s SP: 60 minutes (when using DVM 60), LP: 90 minutes (when using DVM 60) Approx. 150 sec. (using DVM60 tape) CCD (Charge Coupled Device...
... recording system Audio recording system Usable cassette Tape speed Tape recording time FF/REW time Image device Lens Filter diameter LCD Screen/Viewfinder Size/dot number LCD Screen Method Viewfinder Connectors Video output S-video output Audio output DV input/output USB output External mic NTSC 2 rotary heads, Helical scanning system Rotary heads, 12/16b PCM system Digital video tape (6.35mm width): Mini DV cassette SP: approx. 18.81mm/s LP: approx. 12.56mm/s SP: 60 minutes (when using DVM 60), LP: 90 minutes (when using DVM 60) Approx. 150 sec. (using DVM60 tape) CCD (Charge Coupled Device...
User Manual (ENGLISH)
Page 23
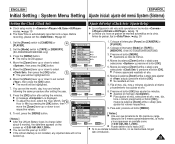
... to select , then press the [OK] button. Mueva la palanca [Zoom] arriba o abajo para seleccionar y presione el botón [OK]. 5. Set the [Power] switch to [TAPE] or [MEMORY]. (SC-D363/D364/D365/D366 only) 3. Camera Mode √System Clock Set Remote Beep Sound Language Demonstration √On √On √English √On ZOOM Move OK Select MENU Exit 1. Press the [OK] button after setting the year. 8. Presione el botó...
... to select , then press the [OK] button. Mueva la palanca [Zoom] arriba o abajo para seleccionar y presione el botón [OK]. 5. Set the [Power] switch to [TAPE] or [MEMORY]. (SC-D363/D364/D365/D366 only) 3. Camera Mode √System Clock Set Remote Beep Sound Language Demonstration √On √On √English √On ZOOM Move OK Select MENU Exit 1. Press the [OK] button after setting the year. 8. Presione el botó...


