
User Manual
Page 3
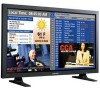
... of brightness and contrast of this PDP) on a video game or when hooking up a PC to this screen when displaying a still image. ◆ Cell Defect The plasma display panel consists of fine cells. Checking Parts PPM42S3Q & PPM50H3Q Owner's Instructions Remote Control/ AAA Batteries Power Cord Speaker Wires (2EA) Stand-Base (2EA) 2 Install CD - BN68-00654A-01Eng 4/19/04 4:12 PM Page 3 User Instructions ENG ◆ Screen Image retention Do not display a still image (such as on the plasma display panel...
... of brightness and contrast of this PDP) on a video game or when hooking up a PC to this screen when displaying a still image. ◆ Cell Defect The plasma display panel consists of fine cells. Checking Parts PPM42S3Q & PPM50H3Q Owner's Instructions Remote Control/ AAA Batteries Power Cord Speaker Wires (2EA) Stand-Base (2EA) 2 Install CD - BN68-00654A-01Eng 4/19/04 4:12 PM Page 3 User Instructions ENG ◆ Screen Image retention Do not display a still image (such as on the plasma display panel...
User Manual
Page 4
... the Remote Control 9 ■ Assembling the Stand-Base 9 ■ Installing the Display on the Wall Attachment Panel 10 ■ Installing the Display Vertically 12 ■ Before Using the Video Wall and the Multiple Display Control function ........ 12 ■ Connecting Speakers 13 ■ Switching On and Off 15 ■ Choosing Your Language 15 ◆ USING YOUR DISPLAY ■ Selecting the Color System (Video or S-Video Mode 16 ■ Changing the Picture Mode 16 ■ Adjusting the Picture Settings 17 ■ Adjusting the Picture Settings (PC or DVI Mode 18...
... the Remote Control 9 ■ Assembling the Stand-Base 9 ■ Installing the Display on the Wall Attachment Panel 10 ■ Installing the Display Vertically 12 ■ Before Using the Video Wall and the Multiple Display Control function ........ 12 ■ Connecting Speakers 13 ■ Switching On and Off 15 ■ Choosing Your Language 15 ◆ USING YOUR DISPLAY ■ Selecting the Color System (Video or S-Video Mode 16 ■ Changing the Picture Mode 16 ■ Adjusting the Picture Settings 17 ■ Adjusting the Picture Settings (PC or DVI Mode 18...

User Manual
Page 5
... Sound of the Sub Picture 34 ◆ ADDITIONAL INFORMATION AND CONNECTIONS ■ Viewing Pictures From External Sources 34 ■ Connecting to the Audio/Video Input 35 ■ Connecting to the S-Video Input 36 ■ Connecting to the DVD/DTV RECEIVER Input 36 ■ Connecting to the DVI Input 37 ■ Connecting to the RGB(PC) Input 37 ■ Setting up Your PC Software (Windows only 38 ■ Pin Configurations 39 ■ Input Mode (PC/DVI 40 ■ Power...
... Sound of the Sub Picture 34 ◆ ADDITIONAL INFORMATION AND CONNECTIONS ■ Viewing Pictures From External Sources 34 ■ Connecting to the Audio/Video Input 35 ■ Connecting to the S-Video Input 36 ■ Connecting to the DVD/DTV RECEIVER Input 36 ■ Connecting to the DVI Input 37 ■ Connecting to the RGB(PC) Input 37 ■ Setting up Your PC Software (Windows only 38 ■ Pin Configurations 39 ■ Input Mode (PC/DVI 40 ■ Power...
User Manual
Page 6
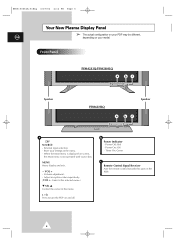
... Plasma Display Panel ➢ The actual configuration on your PDP may be different, ENG depending on screen, the Main menu is displayed on your settings in the menu. When the Main menu is not operated with source key. Store your model. b Power Indicator - Green c Remote Control Signal Receiver Aim the remote control towards this spot on and off. Front Panel PPM42S3Q/PPM50H3Q a bc Speaker PPM63H3Q Speaker a bc a SOURCE - MENU Menu display and exit. - VOL + - Power Off; Red...
... Plasma Display Panel ➢ The actual configuration on your PDP may be different, ENG depending on screen, the Main menu is displayed on your settings in the menu. When the Main menu is not operated with source key. Store your model. b Power Indicator - Green c Remote Control Signal Receiver Aim the remote control towards this spot on and off. Front Panel PPM42S3Q/PPM50H3Q a bc Speaker PPM63H3Q Speaker a bc a SOURCE - MENU Menu display and exit. - VOL + - Power Off; Red...
User Manual
Page 8
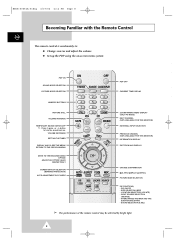
... by bright light. 8 LOCATION SELECTION (LOCATE) - INTERCHANGE THE MAIN AND THE SUB PICTURE (SWAP) - BN68-00654A-01Eng 4/19/04 4:12 PM Page 8 Becoming Familiar with the Remote Control ENG The remote control is used mainly to: ◆ Change sources and adjust the volume ◆ Set up the PDP using the on-screen menu system PDP ON SOUND MODE SELECTION PICTURE MODE SELECTION PDP OFF CURRENT TIME DISPLAY NUMERIC BUTTONS PICTURE STILL VOLUME INCREASE TEMPORARY SOUND SWITCH...
... by bright light. 8 LOCATION SELECTION (LOCATE) - INTERCHANGE THE MAIN AND THE SUB PICTURE (SWAP) - BN68-00654A-01Eng 4/19/04 4:12 PM Page 8 Becoming Familiar with the Remote Control ENG The remote control is used mainly to: ◆ Change sources and adjust the volume ◆ Set up the PDP using the on-screen menu system PDP ON SOUND MODE SELECTION PICTURE MODE SELECTION PDP OFF CURRENT TIME DISPLAY NUMERIC BUTTONS PICTURE STILL VOLUME INCREASE TEMPORARY SOUND SWITCH...
User Manual
Page 10
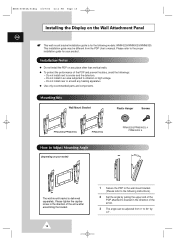
... subjected to the following models: WMN4230/WMN5030/WMN6330. Do not install next to the proper installation guide for your model) PPM42S3Q/PPM50H3Q: 4 PPM63H3Q: 6 The wall mount bracket is for the following instructions.) 2 Set the angle by ±2°. Installation Notes ◆ Do not install the PDP on any heating apparatus. ◆ Use only recommended parts and components. Mounting Kits Wall Mount Bracket Plastic Hanger Screws PPM42S3Q/PPM50H3Q PPM63H3Q How...
... subjected to the following models: WMN4230/WMN5030/WMN6330. Do not install next to the proper installation guide for your model) PPM42S3Q/PPM50H3Q: 4 PPM63H3Q: 6 The wall mount bracket is for the following instructions.) 2 Set the angle by ±2°. Installation Notes ◆ Do not install the PDP on any heating apparatus. ◆ Use only recommended parts and components. Mounting Kits Wall Mount Bracket Plastic Hanger Screws PPM42S3Q/PPM50H3Q PPM63H3Q How...
User Manual
Page 12
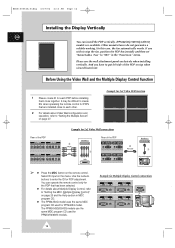
... CD. ◆ The PPM42S3Q model uses the same MDC program CD used for 2x2 Video Wall connections Rear of the PDP on top when viewed from front. Use the numeric buttons to enter the ID for Multiple Display Control connections 12 Example for 2x2 Video Wall function Rear of the PDP Example for PPM50H3/63H3 models. The PPM50H3Q/63H3Q models use the wall attachment panel exclusively when installing vertically. If you have...
... CD. ◆ The PPM42S3Q model uses the same MDC program CD used for 2x2 Video Wall connections Rear of the PDP on top when viewed from front. Use the numeric buttons to enter the ID for Multiple Display Control connections 12 Example for 2x2 Video Wall function Rear of the PDP Example for PPM50H3/63H3 models. The PPM50H3Q/63H3Q models use the wall attachment panel exclusively when installing vertically. If you have...
User Manual
Page 15
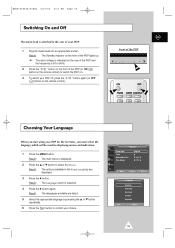
... frequency is selected. 4 Press the √ button again. Store 15 ENG Front of the PDP (or ON ( ) button on the remote control) to switch the PDP on the remote control). Result: The Language option is 50 or 60Hz. 2 Press the " I / " button again (or OFF ( ) button on . 3 To switch your PDP. 1 Plug the mains lead into an appropriate socket. Function Language Time Selectable Fan Film Mode English...
... frequency is selected. 4 Press the √ button again. Store 15 ENG Front of the PDP (or ON ( ) button on the remote control) to switch the PDP on the remote control). Result: The Language option is 50 or 60Hz. 2 Press the " I / " button again (or OFF ( ) button on . 3 To switch your PDP. 1 Plug the mains lead into an appropriate socket. Function Language Time Selectable Fan Film Mode English...

User Manual
Page 17
... make any changes to these settings, the picture mode is automatically switched to select Adjust. Warm2 - Mode Adjust Color Tone Size Digital NR Picture œ Dynamic √ √ œ Normal √ Wide œ Off √ Move Enter Return Adjust (Dynamic) Contrast 100 Brightness 45 Sharpness 75 Color 55 Move Adjust Store Mode Adjust Color Tone Size Digital NR Picture œ Dynamic √ √ œ Normal √ Wide œ Off √ Move Sel. button to control picture quality. 1 Press the MENU button...
... make any changes to these settings, the picture mode is automatically switched to select Adjust. Warm2 - Mode Adjust Color Tone Size Digital NR Picture œ Dynamic √ √ œ Normal √ Wide œ Off √ Move Enter Return Adjust (Dynamic) Contrast 100 Brightness 45 Sharpness 75 Color 55 Move Adjust Store Mode Adjust Color Tone Size Digital NR Picture œ Dynamic √ √ œ Normal √ Wide œ Off √ Move Sel. button to control picture quality. 1 Press the MENU button...

User Manual
Page 18
... by using the SOURCE button. Custom (PC mode only) - Result: The options available in DVI mode. 9 Press the ▲ or ▼ button to select the option (Red, Green, Blue) to be adjusted. Press the œ or √ button. button to select color Adjust. Result: The Color Adjust menu is displayed. ➣ ◆ When select the Color Tone to Custom, the Color Adjust menu is displayed. 4 Press the ▲ or ▼ button to select the option (Contrast, Brightness...
... by using the SOURCE button. Custom (PC mode only) - Result: The options available in DVI mode. 9 Press the ▲ or ▼ button to select the option (Red, Green, Blue) to be adjusted. Press the œ or √ button. button to select color Adjust. Result: The Color Adjust menu is displayed. ➣ ◆ When select the Color Tone to Custom, the Color Adjust menu is displayed. 4 Press the ▲ or ▼ button to select the option (Contrast, Brightness...

User Manual
Page 21
Result: The main menu is displayed with the settings, press the store them. Press the ▲ or ▼ button to reach the required setting. 6 When you make any changes to the equalizer settings, the sound mode is automatically switched to select Equalizer. Sound Mode Equalizer Auto Volume Melody Pseudo Stereo Virtual Surround œ Custom √ √ œ Off √ œ Off √ œ Off √ œ...
Result: The main menu is displayed with the settings, press the store them. Press the ▲ or ▼ button to reach the required setting. 6 When you make any changes to the equalizer settings, the sound mode is automatically switched to select Equalizer. Sound Mode Equalizer Auto Volume Melody Pseudo Stereo Virtual Surround œ Custom √ √ œ Off √ œ Off √ œ Off √ œ...

User Manual
Page 24
... Setup group are automatically reset with the factory default values. ➢ The Panning and Reset menus can also do simply by pressing the or √ button. 9 When you are satisfied with the Auto Adjustment selected. 5 Press the √ button over again. Result: The screen size and frequency are displayed. 3 Press the √ button. Adjust the screen position by pressing the AUTO button. 6 Press the ▲ or ▼ button to select Frequency...
... Setup group are automatically reset with the factory default values. ➢ The Panning and Reset menus can also do simply by pressing the or √ button. 9 When you are satisfied with the Auto Adjustment selected. 5 Press the √ button over again. Result: The screen size and frequency are displayed. 3 Press the √ button. Adjust the screen position by pressing the AUTO button. 6 Press the ▲ or ▼ button to select Frequency...
User Manual
Page 25
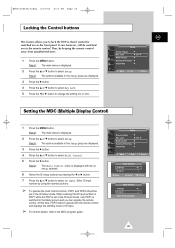
...; button to change the setting (On or Off). Enter ID Input Number 25 Result: The main menu is set in the Setup group are displayed. 3 Press the √ button. 4 Press the ▲ or ▼ button to select Multi Control. 5 Press the √ button. It can operate the remote control. Setup Screen Adjust Key Lock Multi Control Burning Protection Video Wall √ œ Off Move Sel. Result: The main menu is switched to the Menu screen and...
...; button to change the setting (On or Off). Enter ID Input Number 25 Result: The main menu is set in the Setup group are displayed. 3 Press the √ button. 4 Press the ▲ or ▼ button to select Multi Control. 5 Press the √ button. It can operate the remote control. Setup Screen Adjust Key Lock Multi Control Burning Protection Video Wall √ œ Off Move Sel. Result: The main menu is switched to the Menu screen and...
User Manual
Page 26
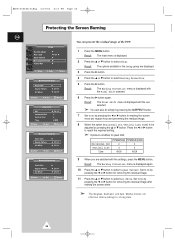
... √ button for removing the residual image. 11 Press the ▲ or ▼ button to select All White. Setup Screen Adjust Key Lock Multi Control Burning Protection Video Wall √ œ Off Move Enter Return 1 Press the MENU button. Result: The Burning Protection menu is displayed. 2 Press the ▲ or ▼ button to select Setup. PPM42S3Q PPM50/63H3Q Horizontal Dot 2 4 Vertical Line 4 4 Time 4MIN 4MIN Burning Protection Pixel Shift Signal Pattern All White √...
... √ button for removing the residual image. 11 Press the ▲ or ▼ button to select All White. Setup Screen Adjust Key Lock Multi Control Burning Protection Video Wall √ œ Off Move Enter Return 1 Press the MENU button. Result: The Burning Protection menu is displayed. 2 Press the ▲ or ▼ button to select Setup. PPM42S3Q PPM50/63H3Q Horizontal Dot 2 4 Vertical Line 4 4 Time 4MIN 4MIN Burning Protection Pixel Shift Signal Pattern All White √...

User Manual
Page 28
... Information ENG Setup Image Lock Key Lock Multi Control Burning Protection Video Wall Information √ œ Off Move Enter Return PC Information Resolution V Frequency H Frequency 1024x768 60 48 Return 1 Press the MENU button. Result: The resolution, vertical frequency and horizontal frequency are displayed. 3 Press the √ button. 4 Press the ▲ or ▼ button to select Setup. Displaying the Setting Information You can view the setting status you select by pressing the "INFO" button on the remote control. Result...
... Information ENG Setup Image Lock Key Lock Multi Control Burning Protection Video Wall Information √ œ Off Move Enter Return PC Information Resolution V Frequency H Frequency 1024x768 60 48 Return 1 Press the MENU button. Result: The resolution, vertical frequency and horizontal frequency are displayed. 3 Press the √ button. 4 Press the ▲ or ▼ button to select Setup. Displaying the Setting Information You can view the setting status you select by pressing the "INFO" button on the remote control. Result...

User Manual
Page 30
...menu is displayed. 2 Press the ▲ or ▼ button to the hour or minute. Result: The Time menu is set. However, this feature will not work when the "Off Time" is set the time at which you wish the PDP to be switched off time so that the PDP will automatically be switched...√ Sel. Press the √ button. Set the time at which you wish the PDP to be turned off, if you are displayed. 3 Press the √ button. 4 Press the ▲ or ▼ button to select Timer. In the same above, set to select On Time Volume. This feature prevents a leakage accident or...
...menu is displayed. 2 Press the ▲ or ▼ button to the hour or minute. Result: The Time menu is set. However, this feature will not work when the "Off Time" is set the time at which you wish the PDP to be switched off time so that the PDP will automatically be switched...√ Sel. Press the √ button. Set the time at which you wish the PDP to be turned off, if you are displayed. 3 Press the √ button. 4 Press the ▲ or ▼ button to select Timer. In the same above, set to select On Time Volume. This feature prevents a leakage accident or...

User Manual
Page 32
... ▲ or ▼ button to select Swap. Select a source of the sub picture by pressing the œ or √ button. Return 32 Swap Size Position Sound Sel. Move PIP œ On √ œ Video √ √ œ Large √ œ √ œ Main √ Sel. Swap Size Position Sound Sel. Return You can monitor the video input from any connected devices while monitoring other video input. 1 Press the MENU button.
... ▲ or ▼ button to select Swap. Select a source of the sub picture by pressing the œ or √ button. Return 32 Swap Size Position Sound Sel. Move PIP œ On √ œ Video √ √ œ Large √ œ √ œ Main √ Sel. Swap Size Position Sound Sel. Return You can monitor the video input from any connected devices while monitoring other video input. 1 Press the MENU button.

User Manual
Page 34
... main picture, set to the sound of the sub picture. Move œ On √ œ Video √ √ œ Large √ œ √ œ Sub √ Sel. Viewing Pictures From External Sources AV Input Video S-Video Component1 Component2 PC1 PC2 DVI Connected Not Connected Connected Not Connected Not Connected Sel. Result: The input sources available are displayed. 3 Press the √ button. 4 Press the ▲ or ▼ button to select Sound Sel.. Swap Size Position Sound Sel...
... main picture, set to the sound of the sub picture. Move œ On √ œ Video √ √ œ Large √ œ √ œ Sub √ Sel. Viewing Pictures From External Sources AV Input Video S-Video Component1 Component2 PC1 PC2 DVI Connected Not Connected Connected Not Connected Not Connected Sel. Result: The input sources available are displayed. 3 Press the √ button. 4 Press the ▲ or ▼ button to select Sound Sel.. Swap Size Position Sound Sel...

User Manual
Page 41
... computer. This power management system operates with a VESA DPMS compliant video card installed in power management system called Power Saver. You use a software utility installed on your computer to normal operation when horizontal and vertical sync return. ◆ This occurs when moving the computer's mouse or pressing a key on the keyboard. ◆ For energy conservation, turn your monitor OFF when it is not needed, or when...
... computer. This power management system operates with a VESA DPMS compliant video card installed in power management system called Power Saver. You use a software utility installed on your computer to normal operation when horizontal and vertical sync return. ◆ This occurs when moving the computer's mouse or pressing a key on the keyboard. ◆ For energy conservation, turn your monitor OFF when it is not needed, or when...
User Manual
Page 42
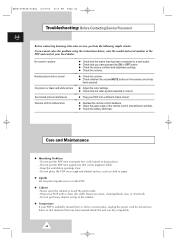
... use water, cleaning fluids, wax, or chemicals. - No sound or picture Normal picture but no sound No picture or black and white picture Sound and picture interference Remote control malfunctions ◆ Check that the mains lead has been connected to a warm place, unplug the power cord for at least two hours so that moisture that may have pressed the ON or OFF button. ◆ Check the picture contrast and brightness settings. ◆ Check the volume. ◆ Check...
... use water, cleaning fluids, wax, or chemicals. - No sound or picture Normal picture but no sound No picture or black and white picture Sound and picture interference Remote control malfunctions ◆ Check that the mains lead has been connected to a warm place, unplug the power cord for at least two hours so that moisture that may have pressed the ON or OFF button. ◆ Check the picture contrast and brightness settings. ◆ Check the volume. ◆ Check...


