Owners Instructions
Page 11
BN68-00457B-01_ENG 2003.10.23 3:20 PM Page 11 ENG Contents (continued) ◆ USING YOUR DISPLAY (CONTINUED) ■ Locking the Control buttons 31 ■ Setting the MDC (Multiple Display Control 31 ■ Protecting the Screen Burning 32 ■ Setting the Multiple Screen 33 ■ ...
BN68-00457B-01_ENG 2003.10.23 3:20 PM Page 11 ENG Contents (continued) ◆ USING YOUR DISPLAY (CONTINUED) ■ Locking the Control buttons 31 ■ Setting the MDC (Multiple Display Control 31 ■ Protecting the Screen Burning 32 ■ Setting the Multiple Screen 33 ■ ...
Owners Instructions
Page 29
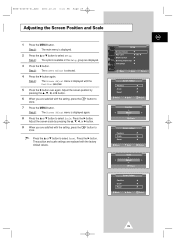
... over again. Adjust the screen scale by pressing the or √ button. 6 When you are satisfied with the factory default values. Setup Screen Adjust Key Lock Multi Control Burning Protection Video Wall √ œ Off Move Enter Return Screen Adjust Position √ Scale √ Reset √ Move √ Enter Return Position...
... over again. Adjust the screen scale by pressing the or √ button. 6 When you are satisfied with the factory default values. Setup Screen Adjust Key Lock Multi Control Burning Protection Video Wall √ œ Off Move Enter Return Screen Adjust Position √ Scale √ Reset √ Move √ Enter Return Position...
Owners Instructions
Page 30
... or right by using pressing the or √ button. ➢ Press the ▲ or ▼ button to select Position. Result: The Image Lock menu is displayed again. 8 Press the ▲ or ▼ button to select Reset. The zoom and panning settings are replaced with the settings, press... the MENU button. Result: The Image Lock is displayed. Result: The Image Lock menu is displayed again. 11 Press the ▲ or ▼ button to select Setup. Press the √ button. Move the...
... or right by using pressing the or √ button. ➢ Press the ▲ or ▼ button to select Position. Result: The Image Lock menu is displayed again. 8 Press the ▲ or ▼ button to select Reset. The zoom and panning settings are replaced with the settings, press... the MENU button. Result: The Image Lock is displayed. Result: The Image Lock menu is displayed again. 11 Press the ▲ or ▼ button to select Setup. Press the √ button. Move the...
Owners Instructions
Page 31
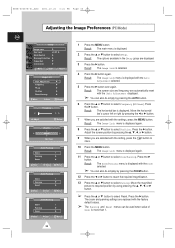
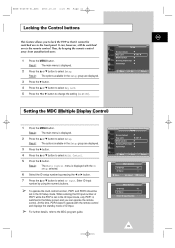
... Result: The options available in the Setup group are displayed. 3 Press the √ button. 4 Press the ▲ or ▼ button to select Key Lock. 5 Press the œ or √ button to select Setup. At this time, PDP2 doesn't operate with the ID Setup selected. 6 Select the ID ... standby mode of ID Input. ➢ For further details, refer to select Multi Control. 5 Press the √ button. Setup Screen Adjust Key Lock Multi Control Burning Protection Video Wall √ œ Off Move Enter Return Multi Control ID Setup 01 ID Input -- Enter ID Input Number 31 ...
... Result: The options available in the Setup group are displayed. 3 Press the √ button. 4 Press the ▲ or ▼ button to select Key Lock. 5 Press the œ or √ button to select Setup. At this time, PDP2 doesn't operate with the ID Setup selected. 6 Select the ID ... standby mode of ID Input. ➢ For further details, refer to select Multi Control. 5 Press the √ button. Setup Screen Adjust Key Lock Multi Control Burning Protection Video Wall √ œ Off Move Enter Return Multi Control ID Setup 01 ID Input -- Enter ID Input Number 31 ...
Owners Instructions
Page 32
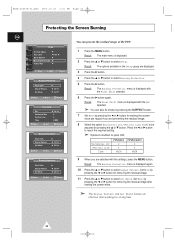
Setup Screen Adjust Key Lock Multi Control Burning Protection Video Wall √ œ Off 1 Press the MENU button. Press the œ or √ button to select Signal Pattern. Result: The .... Return 6 Press the √ button again. Result: The Burning Protection menu is displayed with the settings, press the MENU button. Horizontal Dot Vertical Line Time PPM42S3 2 4 4MIN PPM50/63H3 4 4 4MIN Burning Protection Pixel Shift Signal Pattern All White √ œ Off √ œ Off √ Move œ √ Sel. Set to...
Setup Screen Adjust Key Lock Multi Control Burning Protection Video Wall √ œ Off 1 Press the MENU button. Press the œ or √ button to select Signal Pattern. Result: The .... Return 6 Press the √ button again. Result: The Burning Protection menu is displayed with the settings, press the MENU button. Horizontal Dot Vertical Line Time PPM42S3 2 4 4MIN PPM50/63H3 4 4 4MIN Burning Protection Pixel Shift Signal Pattern All White √ œ Off √ œ Off √ Move œ √ Sel. Set to...
Owners Instructions
Page 33
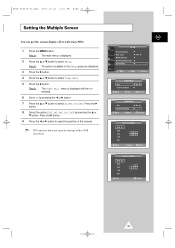
... button. Return 33 Press the √ button. 9 Press the œ or √ button to select Video Wall. 5 Press the √ button. Setup Screen Adjust Key Lock Multi Control Burning Protection Video Wall √ œ Off Move Enter Return Video Wall Set Screen Divider œ On √ √ Move œ √ Sel...
... button. Return 33 Press the √ button. 9 Press the œ or √ button to select Video Wall. 5 Press the √ button. Setup Screen Adjust Key Lock Multi Control Burning Protection Video Wall √ œ Off Move Enter Return Video Wall Set Screen Divider œ On √ √ Move œ √ Sel...
Owners Instructions
Page 34
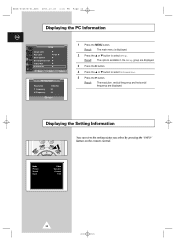
... Sound Clock Video Dynamic Custom 11:45 34 BN68-00457B-01_ENG 2003.10.23 3:21 PM Page 34 Displaying the PC Information ENG Setup Image Lock Key Lock Multi Control Burning Protection Video Wall Information √ œ Off Move Enter Return PC Information Resolution V Frequency H Frequency 1024x768 60 48 Return 1 Press the...
... Sound Clock Video Dynamic Custom 11:45 34 BN68-00457B-01_ENG 2003.10.23 3:21 PM Page 34 Displaying the PC Information ENG Setup Image Lock Key Lock Multi Control Burning Protection Video Wall Information √ œ Off Move Enter Return PC Information Resolution V Frequency H Frequency 1024x768 60 48 Return 1 Press the...


