
User Manual
Page 3
... 19 yy Sound Menu 20 Changing the Preset Sound Mode 20 Adjusting Sound Settings 20 Sound Settings 20 yy Setup Menu 21 Setting the Time 21 Using the Sleep Timer 21 Setting the On / Off Timer 21 Locking Programs 22 Other Features 23 Picture In Picture (PIP) 25 yy Support Menu 25 Advanced Features yy Network Connection 27 Connecting to a Wired Network 27 Connecting to a Wireless Network 29 yy Media Play 33 Connecting a USB Device 33 Connecting to open the relevant submenu within the OSD (on screen display). 3 English...
... 19 yy Sound Menu 20 Changing the Preset Sound Mode 20 Adjusting Sound Settings 20 Sound Settings 20 yy Setup Menu 21 Setting the Time 21 Using the Sleep Timer 21 Setting the On / Off Timer 21 Locking Programs 22 Other Features 23 Picture In Picture (PIP) 25 yy Support Menu 25 Advanced Features yy Network Connection 27 Connecting to a Wired Network 27 Connecting to a Wireless Network 29 yy Media Play 33 Connecting a USB Device 33 Connecting to open the relevant submenu within the OSD (on screen display). 3 English...
User Manual
Page 4
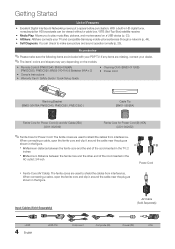
... make sure picture and sound operate normally (p. 25). yy AllShare: AllShare connects your PDP TV. Getting Started List of the cord inserted in the AC outlet: 3/4 inch A B Power Cord xx Ferrite Core (AV Cable): The ferrite cores are used to shield the cables from interference. yy Remote Control (PN63C540: BN59-00996A)y (PN63C550, PN63C590: BN59-01041A) & Batteries (AAA x 2) yy Owner's Instructions yy Warranty Card / Safety Guide / Quick Setup Guide yy Cleaning...
... make sure picture and sound operate normally (p. 25). yy AllShare: AllShare connects your PDP TV. Getting Started List of the cord inserted in the AC outlet: 3/4 inch A B Power Cord xx Ferrite Core (AV Cable): The ferrite cores are used to shield the cables from interference. yy Remote Control (PN63C540: BN59-00996A)y (PN63C550, PN63C590: BN59-01041A) & Batteries (AAA x 2) yy Owner's Instructions yy Warranty Card / Safety Guide / Quick Setup Guide yy Cleaning...

User Manual
Page 9
... PC/DVI AUDIO IN xx When using the HDMI connection for audio. PN63C540 R W Red White HDMI Cable (Not Supplied) Device HDMI OUT Device PN63C550 / PN63C590 R W Red White HDMI to DVI Cable (Not Supplied) Audio Cable (Not Supplied) W R DVI OUT AUDIO OUT R-AUDIO-L HDMI Cable (Not Supplied) Device HDMI OUT Device HDMI to HDMI) adapter. Available devices: DVD, Blu-ray player, HD cable box, HD STB (Set-Top-Box) satellite receiver. The PC/DVI AUDIO IN jack is connected to purchase a certified HDMI cable. If such a problem occurs, ask the manufacturer of the external device...
... PC/DVI AUDIO IN xx When using the HDMI connection for audio. PN63C540 R W Red White HDMI Cable (Not Supplied) Device HDMI OUT Device PN63C550 / PN63C590 R W Red White HDMI to DVI Cable (Not Supplied) Audio Cable (Not Supplied) W R DVI OUT AUDIO OUT R-AUDIO-L HDMI Cable (Not Supplied) Device HDMI OUT Device HDMI to HDMI) adapter. Available devices: DVD, Blu-ray player, HD cable box, HD STB (Set-Top-Box) satellite receiver. The PC/DVI AUDIO IN jack is connected to purchase a certified HDMI cable. If such a problem occurs, ask the manufacturer of the external device...

User Manual
Page 13
...;When a PC with the ▲ or ▼ button. MENU 1 MEDIA.P MENU FAV.CH TOOLS INFO 2 3 RETURN EXIT 4 A B CD 1 MENU button: Displays the main on the screen: Picture, Sound, Channel, Setup, Input, Application, Support. Press ENTERE to DVI PC or DVI Devices mode under Edit Name. Press ENTERE to select TV or an external input sources such as a DVD / Blu-ray player / cable box / STB satellite receiver. 02 Connections Changing the Input Source Source List Use to confirm the selection. Select an icon...
...;When a PC with the ▲ or ▼ button. MENU 1 MEDIA.P MENU FAV.CH TOOLS INFO 2 3 RETURN EXIT 4 A B CD 1 MENU button: Displays the main on the screen: Picture, Sound, Channel, Setup, Input, Application, Support. Press ENTERE to DVI PC or DVI Devices mode under Edit Name. Press ENTERE to select TV or an external input sources such as a DVD / Blu-ray player / cable box / STB satellite receiver. 02 Connections Changing the Input Source Source List Use to confirm the selection. Select an icon...
User Manual
Page 17
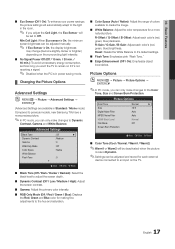
... light intensity. ■■ No Signal Power Off (Off / 15 min. / 30 min. / 60 min.): To avoid unnecessary energy consumption, set to the hue and saturation. 17 English R-Gain / G-Gain / B-Gain: Adjust each color's (red, green, blue) darkness. 03 Basic Features ■■ Eco Sensor (Off / On): To enhance your power savings; Picture Options Color Tone Size Digital Noise Filter MPEG Noise Filter HDMI Black Level Film Mode Screen Burn...
... light intensity. ■■ No Signal Power Off (Off / 15 min. / 30 min. / 60 min.): To avoid unnecessary energy consumption, set to the hue and saturation. 17 English R-Gain / G-Gain / B-Gain: Adjust each color's (red, green, blue) darkness. 03 Basic Features ■■ Eco Sensor (Off / On): To enhance your power savings; Picture Options Color Tone Size Digital Noise Filter MPEG Noise Filter HDMI Black Level Film Mode Screen Burn...

User Manual
Page 19
... a display dialog box will appear. 3. Navigate to the "Settings" tab on the Windows start menu. 2. Auto Protection Time (10 min. / 20 min. / 40 min. / 1 hour / Off): Set the time the screen remains idle with an HDMI/DVI cable. The Screen Saver prevents the formation of screen. ■■ Position: Adjust the PC's screen positioning if it is "60" or "60 Hz". Picture Reset (OK / Cancel) Resets your current picture mode to its default settings...
... a display dialog box will appear. 3. Navigate to the "Settings" tab on the Windows start menu. 2. Auto Protection Time (10 min. / 20 min. / 40 min. / 1 hour / Off): Set the time the screen remains idle with an HDMI/DVI cable. The Screen Saver prevents the formation of screen. ■■ Position: Adjust the PC's screen positioning if it is "60" or "60 Hz". Picture Reset (OK / Cancel) Resets your current picture mode to its default settings...

User Manual
Page 21
... power cord, you can select the Digital Audio output (SPDIF) format from a digital channel. ✎✎ The antenna must set the clock again. Clock Mode (Auto / Manual) −− Auto: Set the current time automatically using an external device such as an A/V Receiver/Home theater. ■■ Audio Format: During the reception of a digital TV broadcast, you have to the factory defaults. On Time ▲ Inactivate ▼ Off Time Inactivate Volume 20 Timer 1 00 00 Source TV 00 00 Antenna Cable...
... power cord, you can select the Digital Audio output (SPDIF) format from a digital channel. ✎✎ The antenna must set the clock again. Clock Mode (Auto / Manual) −− Auto: Set the current time automatically using an external device such as an A/V Receiver/Home theater. ■■ Audio Format: During the reception of a digital TV broadcast, you have to the factory defaults. On Time ▲ Inactivate ▼ Off Time Inactivate Volume 20 Timer 1 00 00 Source TV 00 00 Antenna Cable...

User Manual
Page 24
...; Menu Transparency (Bright / Dark): Set the Transparency of captions depends on the program being broadcasted. If you may not be selected in Game Mode, the screen shakes slightly. Equalizer is Black. Basic Features ■■ Caption Mode: You can enjoy a more realistic gaming experience by the broadcaster. Foreground Color: Options include Default, White, Black, Red, Green, Blue, Yellow, Magenta and Cyan. Options include Default, Transparent, Translucent, Solid and Flashing. Background Color...
...; Menu Transparency (Bright / Dark): Set the Transparency of captions depends on the program being broadcasted. If you may not be selected in Game Mode, the screen shakes slightly. Equalizer is Black. Basic Features ■■ Caption Mode: You can enjoy a more realistic gaming experience by the broadcaster. Foreground Color: Options include Default, White, Black, Red, Green, Blue, Yellow, Magenta and Cyan. Options include Default, Transparent, Translucent, Solid and Flashing. Background Color...
User Manual
Page 25
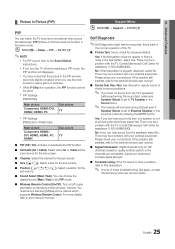
... Air or Cable as the input source for the sub-screen. ■■ Channel: Select the channel for the sub-screen. ■■ Size (Õ / Ã): Select a size for the sub-picture. ■■ Position Select a position for the sub-picture. ■■ Sound Select (Main / Sub): You can choose the desired sound (Main / Sub) in the PIP mode. ■■ Wireless Remote Control (On/Off): Turn on/off...
... Air or Cable as the input source for the sub-screen. ■■ Channel: Select the channel for the sub-screen. ■■ Size (Õ / Ã): Select a size for the sub-picture. ■■ Position Select a position for the sub-picture. ■■ Sound Select (Main / Sub): You can choose the desired sound (Main / Sub) in the PIP mode. ■■ Wireless Remote Control (On/Off): Turn on/off...

User Manual
Page 26
... USB and upgrade. 26 English Contact Samsung View this information when connecting external devices to download products and software. When software is represented as "Year/Month/Day_Version". We advise you to write down your settings so that you want to their default settings. If the problem persists, download by network connection or downloading the latest firmware from "www.samsung.com," to disconnect the power or or TV Rear Panel remove the USB drive until upgrades...
... USB and upgrade. 26 English Contact Samsung View this information when connecting external devices to download products and software. When software is represented as "Year/Month/Day_Version". We advise you to write down your settings so that you want to their default settings. If the problem persists, download by network connection or downloading the latest firmware from "www.samsung.com," to disconnect the power or or TV Rear Panel remove the USB drive until upgrades...

User Manual
Page 33
... Media Play (USB) mode. ✎ If you can select Media Play. Turn on your TV, you should be installed. − You can play files saved on a USB Mass Storage Class (MSC) device. O MENUm → Application → Media Play (USB) → ENTERE MediaPlay Videos SUM Change Device ¦ Connecting a USB Device 1. TV Side Panel PC LAN or External Modem (ADSL/VDSL/Cable TV) Samsung TV Rear Panel Wireless LAN Adapter Wireless IP sharer LAN Cable (Not Supplied) Modem Cable (Not Supplied...
... Media Play (USB) mode. ✎ If you can select Media Play. Turn on your TV, you should be installed. − You can play files saved on a USB Mass Storage Class (MSC) device. O MENUm → Application → Media Play (USB) → ENTERE MediaPlay Videos SUM Change Device ¦ Connecting a USB Device 1. TV Side Panel PC LAN or External Modem (ADSL/VDSL/Cable TV) Samsung TV Rear Panel Wireless LAN Adapter Wireless IP sharer LAN Cable (Not Supplied) Modem Cable (Not Supplied...

User Manual
Page 34
... the content in Auto Protection Time, the Screensaver will have been downloaded from damage or loss of files on the screen. xx The Play Continuously function, which resumes playing of MSC are Thumb drives, Flash Card Readers and USB HDD (USB HUB are connected, some external hard disk drives may not be supported. Examples of a video, may not be supported. SAMSUNG is loading. xx Connect a USB HDD to...
... the content in Auto Protection Time, the Screensaver will have been downloaded from damage or loss of files on the screen. xx The Play Continuously function, which resumes playing of MSC are Thumb drives, Flash Card Readers and USB HDD (USB HUB are connected, some external hard disk drives may not be supported. Examples of a video, may not be supported. SAMSUNG is loading. xx Connect a USB HDD to...

User Manual
Page 39
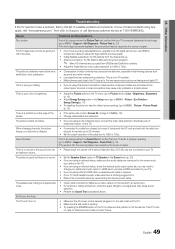
.... 04 Advanced Features Videos/Music/Photos Play Option menu During file playback, press the TOOLS button. Videos > > > > > > Music > > Photos > > > > > > > > > > Settings Using the Setup Menu ■■ Continuous Movie Play Help (Resume Play) (On / Off): Select to your preference. You can adjust the picture size to display the help pop-up message for continuous movie playback. ■■ Get DivX® VOD registration code: Shows the registration...
.... 04 Advanced Features Videos/Music/Photos Play Option menu During file playback, press the TOOLS button. Videos > > > > > > Music > > Photos > > > > > > > > > > Settings Using the Setup Menu ■■ Continuous Movie Play Help (Resume Play) (On / Off): Select to your preference. You can adjust the picture size to display the help pop-up message for continuous movie playback. ■■ Get DivX® VOD registration code: Shows the registration...
User Manual
Page 43
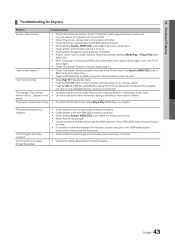
... cannot use the play function when Plug & Play (initial setup) is properly connected. • Connect the optical cable between TV and the receiver. 43 English appears on the screen. • Select View TV in the Anynet+ menu. • Press the SOURCE button on the TV remote control and select a non- The TV Program cannot be connected. • Check if the Anynet+ device power cord is properly connected. • Check the Anynet+ device's Video/Audio/HDMI cable connections...
... cannot use the play function when Plug & Play (initial setup) is properly connected. • Connect the optical cable between TV and the receiver. 43 English appears on the screen. • Select View TV in the Anynet+ menu. • Press the SOURCE button on the TV remote control and select a non- The TV Program cannot be connected. • Check if the Anynet+ device power cord is properly connected. • Check the Anynet+ device's Video/Audio/HDMI cable connections...
User Manual
Page 44
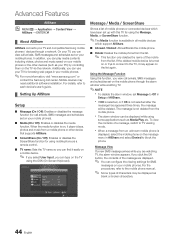
...; Application → Content View → AllShare → ENTERE ¦¦ About AllShare AllShare connects your TV and compatible Samsung mobile phones / devices through the alarm window while watching TV. ✎✎NOTE xx To disable the alarm window, set Message to Off in Setup of AllShare. In addition, you can play media contents including videos, photos and music saved...
...; Application → Content View → AllShare → ENTERE ¦¦ About AllShare AllShare connects your TV and compatible Samsung mobile phones / devices through the alarm window while watching TV. ✎✎NOTE xx To disable the alarm window, set Message to Off in Setup of AllShare. In addition, you can play media contents including videos, photos and music saved...
User Manual
Page 49
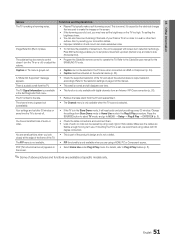
... Speaker in the Setup menu (go to "Remote control does not work" below. 49 English Support - Self Diagnosis - Picture - Support - There is properly displayed, the poor picture may caused by the source or signal. Sound Test) (p. 25) If the audio is not connected to reset it. (reconnect the AC cord and wait until the cable box reboots. Make sure a video cable is OK, the sound problem may be caused by the source or signal. When changing channels, the picture...
... Speaker in the Setup menu (go to "Remote control does not work" below. 49 English Support - Self Diagnosis - Picture - Support - There is properly displayed, the poor picture may caused by the source or signal. Sound Test) (p. 25) If the audio is not connected to reset it. (reconnect the AC cord and wait until the cable box reboots. Make sure a video cable is OK, the sound problem may be caused by the source or signal. When changing channels, the picture...
User Manual
Page 50
... signal can cause picture distortion. Auto Program then select Auto and make sure the correct Cable TV signal type is set -top-box. There is no signal. "PC" is always shown on digital channels. • Check Caption Setup menu. PC Connection A "Mode Not Supported" message appears. • Set your PC's output resolution so it should be connected to the TV input. Replace the Component video cables with Component cable connection. • Remove the left and right audio connections from an antenna or cable connection...
... signal can cause picture distortion. Auto Program then select Auto and make sure the correct Cable TV signal type is set -top-box. There is no signal. "PC" is always shown on digital channels. • Check Caption Setup menu. PC Connection A "Mode Not Supported" message appears. • Set your PC's output resolution so it should be connected to the TV input. Replace the Component video cables with Component cable connection. • Remove the left and right audio connections from an antenna or cable connection...
User Manual
Page 51
... menu when connected via HDMI or Component (p. 24). • Caption must be activated on page 9 of audio or video can create excessive noise. Press the SOURCE button to select TV mode, and go to the Cable/Set user manual for long term use. Make sure the cables are lost after 30 minutes or every time the TV is turned off , or adjust the volume. • Program the Cable/Set remote control to a wall, we recommend using a HDMI...
... menu when connected via HDMI or Component (p. 24). • Caption must be activated on page 9 of audio or video can create excessive noise. Press the SOURCE button to select TV mode, and go to the Cable/Set user manual for long term use. Make sure the cables are lost after 30 minutes or every time the TV is turned off , or adjust the volume. • Program the Cable/Set remote control to a wall, we recommend using a HDMI...

User Manual
Page 54
... M Media Play Melody Menu Transparency Mono Music N Navigate Network Connection Network Setup O ON/OFF button Optimal resolution P Photos Picture Size PIP Plug & Play Power Indicator 6, 7, 14 14 18 16 17 12 R Receiver Recording Remote Control Repeat Mode RGB Only Mode Rotate 9, 40 10, 40 47 23 52 S Select All Self Diagnosis Sharpness Signal Information Sleep Timer Slide Show Software Upgrade Source List Speaker Select Specifications Symbol T 33 24 Timer 24 Title 20 Tools 37 Troubleshooting TV Speaker U 13 27 USB Drive 28 V Video Formats 6 Videos...
... M Media Play Melody Menu Transparency Mono Music N Navigate Network Connection Network Setup O ON/OFF button Optimal resolution P Photos Picture Size PIP Plug & Play Power Indicator 6, 7, 14 14 18 16 17 12 R Receiver Recording Remote Control Repeat Mode RGB Only Mode Rotate 9, 40 10, 40 47 23 52 S Select All Self Diagnosis Sharpness Signal Information Sleep Timer Slide Show Software Upgrade Source List Speaker Select Specifications Symbol T 33 24 Timer 24 Title 20 Tools 37 Troubleshooting TV Speaker U 13 27 USB Drive 28 V Video Formats 6 Videos...

Brochure
Page 2
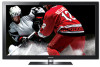
..., clear Plasma HD action in -home service, backed by Power Consumption < 1watt Component: 2 (back) Audio SRS TruSurround HD™: Get crisp, clear digitalquality sound via the remote. ConnectShare™ Movie: Connect a thumb drive or digital camera quickly and easily. Calibration Mode Vesa Wall Mount Support: 23.6" x 15.7" Connections 4 HDMI® 2 USB PC Input: 1 - Backside Digital Audio: 1 - S. SRS TruSurround HD is a registered trademark of Samsung Electronics Co., Ltd. Screen images are subject to change without stand weight: 87...
..., clear Plasma HD action in -home service, backed by Power Consumption < 1watt Component: 2 (back) Audio SRS TruSurround HD™: Get crisp, clear digitalquality sound via the remote. ConnectShare™ Movie: Connect a thumb drive or digital camera quickly and easily. Calibration Mode Vesa Wall Mount Support: 23.6" x 15.7" Connections 4 HDMI® 2 USB PC Input: 1 - Backside Digital Audio: 1 - S. SRS TruSurround HD is a registered trademark of Samsung Electronics Co., Ltd. Screen images are subject to change without stand weight: 87...


