
User Manual Ver.1.0 (English)
Page 1
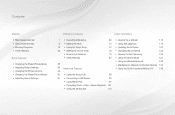
... • Changing the Preset Sound Modes • Adjusting Sound Settings Preference Features Other Information 1 • Executing initial setup 69 6 • Setting the Time 70 18 • Using the Sleep Timer 72 29 • Setting the On/Off Timer 73 • Economical Solutions 78 •...Manual 118 • Using Self Diagnosis 119 • Updating the Software 122 • Changing the Use Mode 125 • Viewing Contact Samsung 126 • Using the Sports Mode 127 • Using the Wireless Network 128 • Managing the Network Connected Devices 145 • ...
... • Changing the Preset Sound Modes • Adjusting Sound Settings Preference Features Other Information 1 • Executing initial setup 69 6 • Setting the Time 70 18 • Using the Sleep Timer 72 29 • Setting the On/Off Timer 73 • Economical Solutions 78 •...Manual 118 • Using Self Diagnosis 119 • Updating the Software 122 • Changing the Use Mode 125 • Viewing Contact Samsung 126 • Using the Sports Mode 127 • Using the Wireless Network 128 • Managing the Network Connected Devices 145 • ...
User Manual Ver.1.0 (English)
Page 2
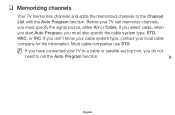
... channels Your TV memorizes channels and adds the memorized channels to run the Auto Program function. ▶ English Before your TV to a cable or satellite set top box, you don't know your cable system type, contact your local cable company for the information. If you do not need to the Channel...
... channels Your TV memorizes channels and adds the memorized channels to run the Auto Program function. ▶ English Before your TV to a cable or satellite set top box, you don't know your cable system type, contact your local cable company for the information. If you do not need to the Channel...
User Manual Ver.1.0 (English)
Page 5
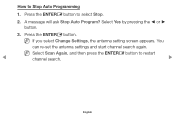
Press the ENTERE button. You can re-set the antenna settings and start channel search again. A message will ask Stop Auto Program? Press the ENTERE button to restart ◀ channel search. ▶ English NN If you select Change Settings, the antenna setting screen appears. NN Select Scan Again, and then press the ENTERE button to select Stop. 2. How to Stop Auto Programming 1. Select Yes by pressing the ◄ or ► button. 3.
Press the ENTERE button. You can re-set the antenna settings and start channel search again. A message will ask Stop Auto Program? Press the ENTERE button to restart ◀ channel search. ▶ English NN If you select Change Settings, the antenna setting screen appears. NN Select Scan Again, and then press the ENTERE button to select Stop. 2. How to Stop Auto Programming 1. Select Yes by pressing the ◄ or ► button. 3.
User Manual Ver.1.0 (English)
Page 8
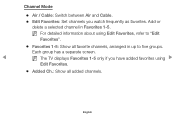
Add or delete a selected channel in up to "Edit Favorites". ●● Favorites 1-5: Show all added channels. English Each group has a separate screen. ◀ NN The TV displays Favorites 1-5 only if you watch frequently as favorites. NN For detailed information about using ▶ Edit Favorites. ●● Added Ch.: Show all favorite channels, arranged in Favorites 1-5. Channel Mode ●● Air / Cable: Switch between Air and Cable. ●● Edit Favorites: Set channels you have added favorites using Edit Favorites, refer to five groups.
Add or delete a selected channel in up to "Edit Favorites". ●● Favorites 1-5: Show all added channels. English Each group has a separate screen. ◀ NN The TV displays Favorites 1-5 only if you watch frequently as favorites. NN For detailed information about using ▶ Edit Favorites. ●● Added Ch.: Show all favorite channels, arranged in Favorites 1-5. Channel Mode ●● Air / Cable: Switch between Air and Cable. ●● Edit Favorites: Set channels you have added favorites using Edit Favorites, refer to five groups.

User Manual Ver.1.0 (English)
Page 9
... Manager screen, and then press the ENTERE button. Press the buttons to use this function. 1. NN You must set the current time first using the Time → Clock function in the System menu to set each menu option. ▶ ●● Antenna: Select the desired broadcasting signal. ●● Channel: Select the...
... Manager screen, and then press the ENTERE button. Press the buttons to use this function. 1. NN You must set the current time first using the Time → Clock function in the System menu to set each menu option. ▶ ●● Antenna: Select the desired broadcasting signal. ●● Channel: Select the...
User Manual Ver.1.0 (English)
Page 10
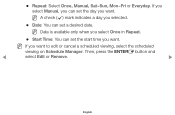
Then, press the ENTERE button and ◀ select Edit or Remove. ▶ English NN If you want. NN Date is available only when you select Once in Repeat. ●● Start Time: You can set the day you want . If you select Manual, you want to edit or cancel a scheduled viewing, select the scheduled viewing on Schedule Manager. ●● Repeat: Select Once, Manual, Sat~Sun, Mon~Fri or Everyday. NN A check (c) mark indicates a day you selected. ●● Date: You can set the start time you can set a desired date.
Then, press the ENTERE button and ◀ select Edit or Remove. ▶ English NN If you want. NN Date is available only when you select Once in Repeat. ●● Start Time: You can set the day you want . If you select Manual, you want to edit or cancel a scheduled viewing, select the scheduled viewing on Schedule Manager. ●● Repeat: Select Once, Manual, Sat~Sun, Mon~Fri or Everyday. NN A check (c) mark indicates a day you selected. ●● Date: You can set the start time you can set a desired date.
User Manual Ver.1.0 (English)
Page 29
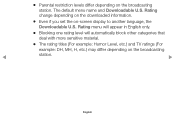
...;● Parental restriction levels differ depending on the broadcasting ◀ station. ▶ English Rating change depending on the downloaded information. ●● Even if you set the on-screen display to another language, the Downloadable U.S.
...;● Parental restriction levels differ depending on the broadcasting ◀ station. ▶ English Rating change depending on the downloaded information. ●● Even if you set the on-screen display to another language, the Downloadable U.S.
User Manual Ver.1.0 (English)
Page 30
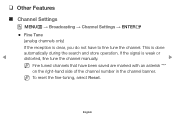
... the fine-tuning, select Reset. This is done automatically during the search and store operation. ❑❑ Other Features ■■ Channel Settings OO MENUm → Broadcasting → Channel Settings → ENTERE ●● Fine Tune (analog channels only) If the reception is clear, you do not have been saved are marked...
... the fine-tuning, select Reset. This is done automatically during the search and store operation. ❑❑ Other Features ■■ Channel Settings OO MENUm → Broadcasting → Channel Settings → ENTERE ●● Fine Tune (analog channels only) If the reception is clear, you do not have been saved are marked...
User Manual Ver.1.0 (English)
Page 37
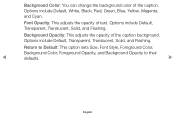
... Default, White, Black, Red, Green, Blue, Yellow, Magenta, and Cyan. Background Opacity: This adjusts the opacity of the caption background. Return to Default: This option sets Size, Font Style, Foreground Color, Background Color, Foreground Opacity, and Background Opacity to their ◀ defaults. ▶ English
... Default, White, Black, Red, Green, Blue, Yellow, Magenta, and Cyan. Background Opacity: This adjusts the opacity of the caption background. Return to Default: This option sets Size, Font Style, Foreground Color, Background Color, Foreground Opacity, and Background Opacity to their ◀ defaults. ▶ English
User Manual Ver.1.0 (English)
Page 38
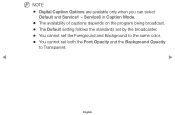
NN NOTE ●● Digital Caption Options are available only when you can select Default and Service1 ~ Service6 in Caption Mode. ●● The availability of captions depends on the program being broadcast. ●● The Default setting follows the standards set by the broadcaster. ●● You cannot set the Foreground and Background to the same color. ●● You cannot set both the Font Opacity and the Background Opacity to Transparent. ◀ ▶ English
NN NOTE ●● Digital Caption Options are available only when you can select Default and Service1 ~ Service6 in Caption Mode. ●● The availability of captions depends on the program being broadcast. ●● The Default setting follows the standards set by the broadcaster. ●● You cannot set the Foreground and Background to the same color. ●● You cannot set both the Font Opacity and the Background Opacity to Transparent. ◀ ▶ English

User Manual Ver.1.0 (English)
Page 40
❑❑ Adjusting Picture Settings ■■ Backlight for LED TV / Cell Light for PDP TV / Contrast / Brightness / Sharpness / Color / Tint (G/R) OO MENUm → Picture → Cell Light → ENTERE Your television has several options for PDP TV , ▶ Contrast, Brightness, Sharpness, Color or Tint (G/R), the OSD will be adjusted accordingly. Select an option using the buttons, and then press ENTERE. English NN NOTE ◀ ●● When you make changes to Backlight for LED TV / Cell Light for adjusting picture quality.
❑❑ Adjusting Picture Settings ■■ Backlight for LED TV / Cell Light for PDP TV / Contrast / Brightness / Sharpness / Color / Tint (G/R) OO MENUm → Picture → Cell Light → ENTERE Your television has several options for PDP TV , ▶ Contrast, Brightness, Sharpness, Color or Tint (G/R), the OSD will be adjusted accordingly. Select an option using the buttons, and then press ENTERE. English NN NOTE ◀ ●● When you make changes to Backlight for LED TV / Cell Light for adjusting picture quality.
User Manual Ver.1.0 (English)
Page 41
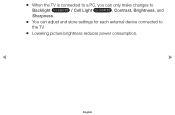
●● When the TV is connected to a PC, you can only make changes to Backlight for LED TV / Cell Light for PDP TV , Contrast, Brightness, and Sharpness. ●● You can adjust and store settings for each external device connected to the TV. ●● Lowering picture brightness reduces power consumption. ◀ ▶ English
●● When the TV is connected to a PC, you can only make changes to Backlight for LED TV / Cell Light for PDP TV , Contrast, Brightness, and Sharpness. ●● You can adjust and store settings for each external device connected to the TV. ●● Lowering picture brightness reduces power consumption. ◀ ▶ English

User Manual Ver.1.0 (English)
Page 42
... an option using the buttons, and then press ENTERE. ●● Picture Size: If you use your TV's 16:9 mode most of the time. 16:9: Sets the picture to 16:9 wide screen mode. ◀ Zoom1: Magnifies the picture moderately. English Cuts off the top and sides. ▶ Zoom2: Magnifies the picture... Size provides various picture size and aspect ratio options. However, we highly recommend you have a cable box or satellite receiver, it may have its own set of the picture so it fits the entire screen.
... an option using the buttons, and then press ENTERE. ●● Picture Size: If you use your TV's 16:9 mode most of the time. 16:9: Sets the picture to 16:9 wide screen mode. ◀ Zoom1: Magnifies the picture moderately. English Cuts off the top and sides. ▶ Zoom2: Magnifies the picture... Size provides various picture size and aspect ratio options. However, we highly recommend you have a cable box or satellite receiver, it may have its own set of the picture so it fits the entire screen.
User Manual Ver.1.0 (English)
Page 43
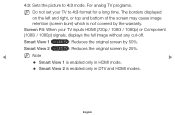
...for LED TV : Reduces the original screen by 25%. ◀ NN Note ▶ ●● Smart View 1 is enabled only in DTV and HDMI modes. 4:3: Sets the picture to 4:3 format for a long time. Smart View 1 for LED TV : Reduces the original screen by the warranty. For analog TV programs. NN Do... not set your TV inputs HDMI (720p / 1080i / 1080p) or Component (1080i / 1080p) signals, displays the full image without any cut-off. Screen Fit: When your...
...for LED TV : Reduces the original screen by 25%. ◀ NN Note ▶ ●● Smart View 1 is enabled only in DTV and HDMI modes. 4:3: Sets the picture to 4:3 format for a long time. Smart View 1 for LED TV : Reduces the original screen by the warranty. For analog TV programs. NN Do... not set your TV inputs HDMI (720p / 1080i / 1080p) or Component (1080i / 1080p) signals, displays the full image without any cut-off. Screen Fit: When your...

User Manual Ver.1.0 (English)
Page 44
..., and then press ENTERE. Press the ▲/▼ buttons to Zoom1, Zoom2, Wide Fit, or Screen Fit. Position is only available if Picture Size is set to move the picture up or down. 4. NN To use the Position function after selecting Zoom1, Zoom2 or Wide Fit, follow these steps: 1.
..., and then press ENTERE. Press the ▲/▼ buttons to Zoom1, Zoom2, Wide Fit, or Screen Fit. Position is only available if Picture Size is set to move the picture up or down. 4. NN To use the Position function after selecting Zoom1, Zoom2 or Wide Fit, follow these steps: 1.
User Manual Ver.1.0 (English)
Page 46
... Definition) is: 16:9 - 1080i/1080p (1920x1080) or 720p (1280x720) NN You can vary depending on the TV. NN The picture size can adjust and store settings for each external device you have connected to an input on the input resolution when you play content using Videos in Media Play.
... Definition) is: 16:9 - 1080i/1080p (1920x1080) or 720p (1280x720) NN You can vary depending on the TV. NN The picture size can adjust and store settings for each external device you have connected to an input on the input resolution when you play content using Videos in Media Play.
User Manual Ver.1.0 (English)
Page 48
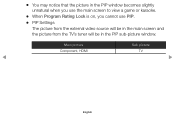
●● You may notice that the picture in the PIP window becomes slightly unnatural when you use the main screen to view a game or karaoke. ●● When Program Rating Lock is on, you cannot use PIP. ●● PIP Settings The picture from the external video source will be in the main screen and the picture from the TV's tuner will be in the PIP sub-picture window. Main picture Sub picture Component, HDMI TV ◀ ▶ English
●● You may notice that the picture in the PIP window becomes slightly unnatural when you use the main screen to view a game or karaoke. ●● When Program Rating Lock is on, you cannot use PIP. ●● PIP Settings The picture from the external video source will be in the main screen and the picture from the TV's tuner will be in the PIP sub-picture window. Main picture Sub picture Component, HDMI TV ◀ ▶ English
User Manual Ver.1.0 (English)
Page 50
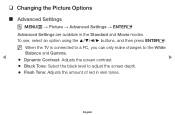
.... ●● Flesh Tone: Adjusts the amount of red in the Standard and Movie modes. ❑❑ Changing the Picture Options ■■ Advanced Settings OO MENUm → Picture → Advanced Settings → ENTERE Advanced Settings are available in skin tones. To use, select an option using the buttons, and then press ENTERE.
.... ●● Flesh Tone: Adjusts the amount of red in the Standard and Movie modes. ❑❑ Changing the Picture Options ■■ Advanced Settings OO MENUm → Picture → Advanced Settings → ENTERE Advanced Settings are available in skin tones. To use, select an option using the buttons, and then press ENTERE.
User Manual Ver.1.0 (English)
Page 51
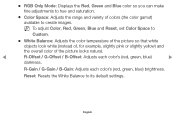
English Reset: Resets the White Balance to its default settings. NN To adjust Color, Red, Green, Blue and Reset, set Color Space to Custom. ●● White Balance: Adjusts the color temperature of the picture so that white objects look white (instead of, for example, ...
English Reset: Resets the White Balance to its default settings. NN To adjust Color, Red, Green, Blue and Reset, set Color Space to Custom. ●● White Balance: Adjusts the color temperature of the picture so that white objects look white (instead of, for example, ...
User Manual Ver.1.0 (English)
Page 52
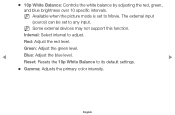
NN Some external devices may not support this function. Interval: Select interval to its default settings. ●● Gamma: Adjusts the primary color intensity. English NN Available when the picture mode is set to Movie. The external input (source) can be set to any input. Red: Adjust the red level. ●● 10p White Balance: Controls the white balance by adjusting the red, green, and blue brightness over 10 specific intervals. Green: Adjust the green level. ◀ Blue: Adjust the blue level. ▶ Reset: Resets the 10p White Balance to adjust.
NN Some external devices may not support this function. Interval: Select interval to its default settings. ●● Gamma: Adjusts the primary color intensity. English NN Available when the picture mode is set to Movie. The external input (source) can be set to any input. Red: Adjust the red level. ●● 10p White Balance: Controls the white balance by adjusting the red, green, and blue brightness over 10 specific intervals. Green: Adjust the green level. ◀ Blue: Adjust the blue level. ▶ Reset: Resets the 10p White Balance to adjust.


