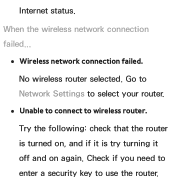
Smart Integration Guide User Manual Ver.1.0 (English)
Page 2
... spoken. % Install the IR Blaster within 50 cm and 45 degrees in up, down in the direction of the arrow to close the battery cover. Turns the TV on and off . % To use MIC to instruct a Voice Control .*$ command. z: Changes channels. Installing batteries (Battery size : AA) Y X 1 Press the back of ... Pad or press the RETURNR button to return to the normal state. % If no button is pressed for 30 seconds, the Touch Pad is automatically turned off . However, this action scrolls the page on a Web Browser. • Tap on the Touch Pad and hold to previous menu screen. Displays the ...
Smart Integration Guide User Manual Ver.1.0 (English)
Page 3
...). "More Commands" TV Power Off Source Channel Number Channel Up/ Down Volume Up/ Down Mute More Commands 1 Set Voice Control to On. 2 If you can turn on your hand to the channel up " or "Volume down icon on the screen, and make a fist. SMART Interaction (Voice and Motion Control) Using this...
Skype Guide User Manual Ver.1.0 (English)
Page 2
... your network before using Skype, visit skype.com xx You need the TV camera. xx If Skype is deleted, saved information (History and Options) is turned off then on Windows-based PCs. Please buy the TV camera of Service (skype.com/legal/tos) and the Skype Privacy Policy (skype.com/legal.../privacy/general). xx TV camera launched in 2010 and the SAMSUNG TV launched in this manual. xx If the webcam isn't working properly, turn the TV off . xx Only Skype version 5.0 or greater is subject to the TV, not through a USB hub. xx...
Skype Guide User Manual Ver.1.0 (English)
Page 4
..., a thumbnail image of security as logging in when the TV powers on R Return 2 The TV starts Face recognition. • Turn your face towards the TV with your face level with the camera. Turn your face towards the TV with your face automatically. 1 Press the Face Recognition Mode. Skype Name Press [Enter] Password...
Skype Guide User Manual Ver.1.0 (English)
Page 5
Stop R Return Wait until the rectangle in the center of the screen turns green. 5 Face recognition Make sure that your face is in the center of the screen. Face recognition Skype Credit : 0 Contacts Chat History Call phones Settings Account Manager Change password Face recognition Initialize registered Face Skype Options R Return 1 Select Settings → Account Manager → Face recognition. 2 The Face recognition screen appears. • Make sure that your face is in the center of the screen. • Wait until the rectangle in the center of the screen turns green.
Skype Guide User Manual Ver.1.0 (English)
Page 10
... Call Call Duration 00:00:42 End Call Stop Video Mic. Voice Decline Rejects Call. Vol. x B (Full Screen): Switch to a video call . Stop Video: Turns the camera off. Mic. Vol. Hold T Tools b Full Screen } Contact List R Return End Call • If a conference call comes in a video or voice call...
Skype Guide User Manual Ver.1.0 (English)
Page 12
...; Call forwarding (diverting calls): To forward calls from . For more information or to get voicemail, go to . You can listen to launch automatically when you turn on Account. • About Skype: View the Skype copyright information. 12 Enter the divert time to use this window. You need to buy Skype Credit...
User Manual Ver.1.0 (English)
Page 37
Display Icons Used in Channel List to schedule a digital channel program for viewing. Using the Schedule Viewing in Channel List (digital channels only) You can use the Schedule Viewing in the Channel List screens : An analog channel. : A reserved program. : A locked channel. The TV will turn on and display the digital
User Manual Ver.1.0 (English)
Page 49
signals. If your TV displays with a noise while watching TV, turns on this function.
User Manual Ver.1.0 (English)
Page 73
NNAfter selecting Pattern1 or Pattern2, you can adjust any of the display settings on colors. Off: Turns the Expert Pattern function off. Pattern2: This test screen demonstrates the effect of the display settings on shades of grey and black. Pattern1: This test screen demonstrates the effect of the advanced screen disappears.
User Manual Ver.1.0 (English)
Page 101
External Speaker, the TV's speakers are on. When the Speaker Select is set to External Speaker, the volume buttons and mute function will not operate and the sound settings will hear sound through both the TV's speakers and the external speakers are turned off. You will hear sound through the external speakers only. You will be NNWhen the Speaker Select is set to TV Speaker, both .
User Manual Ver.1.0 (English)
Page 124
if it is connected, make sure that your network cable is on, try turning if off and on ; Try the following to set your IP address automatically. When the wired network connection failed... ●● No network cable found. Or set your IP address Check that the router is turned on again. ●● IP auto setting failed. If it is plugged in. You can check the current network and Internet status.
User Manual Ver.1.0 (English)
Page 144
methods. NNYou can check for equipment that supports Plug & Access on the Samsung wireless router and your Samsung wireless Insert a USB memory stick into the USB port in your TV. 2. Turn on www. To set up your TV's wireless network connection using Plug & Access, follow these steps: 1. samsung.com.
User Manual Ver.1.0 (English)
Page 148
Try the following: check that the router is turned on, and if it is try turning it off and on again. Go to Network Settings to select your router. ●● Unable to connect to use the router. When the wireless network connection failed... ●● Wireless network connection failed. Check if you need to enter a security key to wireless router. No wireless router selected. Internet status.
User Manual Ver.1.0 (English)
Page 152
Go to search devices. 2. Your TV automatically PBC: Press the WPS(PBC) button on your Wi-Fi device within 2 minutes. Turn on the Wi-Fi Direct function on your device. The TV starts to Wi-Fi Direct screen (Network → Wi-Fi Direct). your TV using Wi-Fi Direct, follow these steps: 1. Select the desired Wi-Fi device. --
User Manual Ver.1.0 (English)
Page 154
When Soft AP is set to On, your mobile devices do not support Wi-Fi Direct. the TV on or off the Soft AP. Set the options for connection of Wi-Fi device. ●● Soft AP Turns on your mobile devices if your mobile devices can find the TV name in Wi-Fi connection list. ●● Security key Set the Security key manually using the
User Manual Ver.1.0 (English)
Page 160
Time). The Clock Set screen appears. Select Off to turn off manually. You can set to Auto. If you want to turn the DST adjustment on and off the DST adjustment. NNDST and Time Zone function are only available when the Clock Mode is set the current date and time Set the Date and Time manually. Select On if you selected Manual: --
User Manual Ver.1.0 (English)
Page 162
You can use the On Timer. If you select Manual, you can select the days you can set up three separate On Timer configurations. (On Timer 1, On Timer 2, On Timer 3) NNYou must set the clock before you want to activate the timer. Set On Timer so that your TV turns on automatically at a time and on a day of your choosing. Setup: Select Off, Once, Everyday, Mon~Fri, Mon~Sat, Sat~Sun or Manual.
User Manual Ver.1.0 (English)
Page 163
Source: To select what will be turned on a specific channel or play back contents such as video, photo or audio files located in an external device connected to the TV. You can set the TV to turn on when the timer setting is activated. Volume: Set the desired loudness. NNThe c mark indicates days you've selected. Time: Set the time that the TV turns on automatically.
User Manual Ver.1.0 (English)
Page 164
NNThe USB device must be connected to your TV before you want played when the TV turns on Channel (when the Source is set to TV): Select Air or Cable. Music / Photo (when the Source is set to USB): Select a folder in the USB device containing music or photo files you can select USB. Antenna (when the Source is set to TV): Select the desired channel.