
User Guide
Page 7
... group Air a Antenna { Program View L CH Mode E Watch k Page ●● The displayed image may differ depending on the Channel List remote control, the Channel List screen is Added Channels 6-1 TV#6 displayed at once. 7 a3 TV#7 Air 23 TV#6 ●● Added Channels: ...Shows all favorite channels, arranged in up to Favorites. ▶ English ■■ Channel List The Channel List contains the channels your remote. a 11 Air ▶ ●● Favorites 1-5: Shows all added 33 TV#6 32 TV#6 a9 Air (memorized) channels. OO When you...
... group Air a Antenna { Program View L CH Mode E Watch k Page ●● The displayed image may differ depending on the Channel List remote control, the Channel List screen is Added Channels 6-1 TV#6 displayed at once. 7 a3 TV#7 Air 23 TV#6 ●● Added Channels: ...Shows all favorite channels, arranged in up to Favorites. ▶ English ■■ Channel List The Channel List contains the channels your remote. a 11 Air ▶ ●● Favorites 1-5: Shows all added 33 TV#6 32 TV#6 a9 Air (memorized) channels. OO When you...
User Guide
Page 13
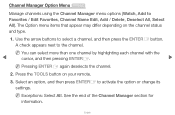
... appears next to activate the option or change its settings. NN Exceptions: Select All. The Option menu items that appear may differ depending on your remote. 3. Press the TOOLS button on the channel status and type. 1. See the end of the Channel Manager section for information. ▶ English Select an option...
... appears next to activate the option or change its settings. NN Exceptions: Select All. The Option menu items that appear may differ depending on your remote. 3. Press the TOOLS button on the channel status and type. 1. See the end of the Channel Manager section for information. ▶ English Select an option...
User Guide
Page 14
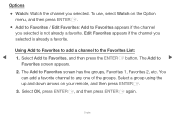
... menu, and then press ENTERE. ●● Add to Favorites / Edit Favorites: Add to any one of the groups. To use, select Watch on your remote, and then press ENTERE. 3. Select Add to ▶ Favorites screen appears. 2. You can add a favorite channel to Favorites appears if the channel you selected. English...
... menu, and then press ENTERE. ●● Add to Favorites / Edit Favorites: Add to any one of the groups. To use, select Watch on your remote, and then press ENTERE. 3. Select Add to ▶ Favorites screen appears. 2. You can add a favorite channel to Favorites appears if the channel you selected. English...
User Guide
Page 16
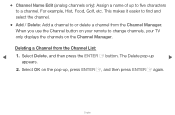
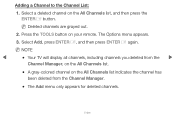
... select the channel. ●● Add / Delete: Add a channel to or delete a channel from the Channel List: 1. When you use the Channel button on your remote to a channel. Deleting a Channel from the Channel Manager. The Delete pop-up to five characters to change channels, your TV only displays the channels on...
... select the channel. ●● Add / Delete: Add a channel to or delete a channel from the Channel List: 1. When you use the Channel button on your remote to a channel. Deleting a Channel from the Channel Manager. The Delete pop-up to five characters to change channels, your TV only displays the channels on...
User Guide
Page 17
... Channels list indicates the channel has been deleted from the ▶ Channel Manager, on the All Channels list. ●● A gray-colored channel on your remote. English The Options menu appears. 3. NN NOTE ●● Your TV will display all channels, including channels you deleted from the Channel Manager. ●●...
... Channels list indicates the channel has been deleted from the ▶ Channel Manager, on the All Channels list. ●● A gray-colored channel on your remote. English The Options menu appears. 3. NN NOTE ●● Your TV will display all channels, including channels you deleted from the Channel Manager. ●●...

User Guide
Page 20
Select Antenna, and then press ENTERE. 3. ▶ 1. Push MENUm → Channel → ENTERE on your TV signal, Air or Cable, and then press the RETURN button. ▶ English Select the source of your remote. 2.
Select Antenna, and then press ENTERE. 3. ▶ 1. Push MENUm → Channel → ENTERE on your TV signal, Air or Cable, and then press the RETURN button. ▶ English Select the source of your remote. 2.
User Guide
Page 21
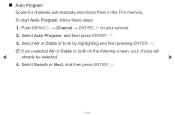
Push MENUm → Channel → ENTERE on the Antenna screen, your remote. 2. Select Auto Program, and then press ENTERE. 3. Select Air or Cable or both on your choice will already be selected. ▶ 4. To start Auto Program, follow these steps: 1. ■■ Auto Program Scans for channels automatically and stores them in the TV's memory. Select Search or Next, and then press ENTERE. ▶ English NN If you selected Air or Cable or both by highlighting and then pressing ENTERE.
Push MENUm → Channel → ENTERE on the Antenna screen, your remote. 2. Select Auto Program, and then press ENTERE. 3. Select Air or Cable or both on your choice will already be selected. ▶ 4. To start Auto Program, follow these steps: 1. ■■ Auto Program Scans for channels automatically and stores them in the TV's memory. Select Search or Next, and then press ENTERE. ▶ English NN If you selected Air or Cable or both by highlighting and then pressing ENTERE.

User Guide
Page 62
Press the right arrow button to go to Manual. 5. In the top entry field, press ENTERE, and then set IP Mode to the next field. ▶ English Enter the next portion of the IP Address (for example, 105) into the first entry field using the number keys on your remote. Enter the first portion of the IP Address. Press the right arrow button to go to the next field. 7. Press the d button on your remote to go to the IP Address entry field, and then press ENTERE. 6. ▶ 4.
Press the right arrow button to go to Manual. 5. In the top entry field, press ENTERE, and then set IP Mode to the next field. ▶ English Enter the next portion of the IP Address (for example, 105) into the first entry field using the number keys on your remote. Enter the first portion of the IP Address. Press the right arrow button to go to the next field. 7. Press the d button on your remote to go to the IP Address entry field, and then press ENTERE. 6. ▶ 4.
User Guide
Page 72
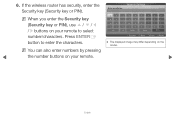
... has security, enter the Security key (Security key or PIN). NN When you enter the Security key (Security key or PIN), use u / d / l / r buttons on your remote to enter the characters. Press ENTERE button to select number/characters. Network Settings 0 entered a b g h m n s t a/A c d e i j k o p q u v w F Delete f 1 l 4 r 7 x y Space 2 3 5 6 8 9 z 0 Done a Previous n Move E Enter R Return ●● The displayed...
... has security, enter the Security key (Security key or PIN). NN When you enter the Security key (Security key or PIN), use u / d / l / r buttons on your remote to enter the characters. Press ENTERE button to select number/characters. Network Settings 0 entered a b g h m n s t a/A c d e i j k o p q u v w F Delete f 1 l 4 r 7 x y Space 2 3 5 6 8 9 z 0 Done a Previous n Move E Enter R Return ●● The displayed...

User Guide
Page 76
Press ENTER to step 8. 6. NN You should be able to find the Pass Phrase on your remote to select number/characters. If you used to step 6. Enter the Security key (Security key or PIN). English ▶ 5. NN When you enter the Security ... on one of the set up screens ▶ you selected an AP or wireless router that does not have security, go to set up your remote. NN You can also enter numbers by pressing the number buttons on your router or modem. If the Enter Security key screen appears, go to...
Press ENTER to step 8. 6. NN You should be able to find the Pass Phrase on your remote to select number/characters. If you used to step 6. Enter the Security key (Security key or PIN). English ▶ 5. NN When you enter the Security ... on one of the set up screens ▶ you selected an AP or wireless router that does not have security, go to set up your remote. NN You can also enter numbers by pressing the number buttons on your router or modem. If the Enter Security key screen appears, go to...

User Guide
Page 77
...the verification process starts. English ▶ 7. The IP Settings screen appears. 9. Press the r button to go to the next field. Select IP Settings on your remote. Press the d button on network test screen. Press the right arrow button to go to Manual. 10. Press ENTERE to Done, and then press the... button. 8. Enter the next portion of the IP Address (for example, 105) into the first entry ▶ field using the number keys on your remote to go to the next field. 12. Enter the first portion of the IP Address. When done, use the r button to move the cursor to...
...the verification process starts. English ▶ 7. The IP Settings screen appears. 9. Press the r button to go to the next field. Select IP Settings on your remote. Press the d button on network test screen. Press the right arrow button to go to Manual. 10. Press ENTERE to Done, and then press the... button. 8. Enter the next portion of the IP Address (for example, 105) into the first entry ▶ field using the number keys on your remote to go to the next field. 12. Enter the first portion of the IP Address. When done, use the r button to move the cursor to...

User Guide
Page 91
... ENTERE. ▶ NN Available only when Clock Mode is set the time manually. -- Select Date or Time, and then press ENTERE. NN Depending on the remote control. ▶ English Manual: Set the current time manually. NN You can set up and down arrow buttons.
... ENTERE. ▶ NN Available only when Clock Mode is set the time manually. -- Select Date or Time, and then press ENTERE. NN Depending on the remote control. ▶ English Manual: Set the current time manually. NN You can set up and down arrow buttons.
User Guide
Page 108
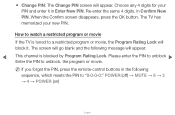
... program or movie, the Program Rating Lock will appear: This channel is blocked by Program Rating Lock. NN If you forget the PIN, press the remote-control buttons in Enter New PIN. How to watch a restricted program or movie If the TV is tuned to unblock. in Confirm New PIN. When...
... program or movie, the Program Rating Lock will appear: This channel is blocked by Program Rating Lock. NN If you forget the PIN, press the remote-control buttons in Enter New PIN. How to watch a restricted program or movie If the TV is tuned to unblock. in Confirm New PIN. When...

User Guide
Page 110
... function. ●● No Signal Power Off (Off / 15 min. / 30 min. / 60 min.): To avoid unnecessary energy consumption, you don't press a button on the remote or touch a button on TV's front panel within 4 hours to remain on the surrounding light intensity.
... function. ●● No Signal Power Off (Off / 15 min. / 30 min. / 60 min.): To avoid unnecessary energy consumption, you don't press a button on the remote or touch a button on TV's front panel within 4 hours to remain on the surrounding light intensity.

User Guide
Page 121
... Protection Time (Off / 10 min. / 20 min. / 40 min. / 1 hour): If the screen displays a still image for a long time. NN Press any key on the remote control to cancel this function when there are after you define, the TV activates the screen saver to prevent the formation of the screen by...
... Protection Time (Off / 10 min. / 20 min. / 40 min. / 1 hour): If the screen displays a still image for a long time. NN Press any key on the remote control to cancel this function when there are after you define, the TV activates the screen saver to prevent the formation of the screen by...
User Guide
Page 127
For more details, refer to connect with and control the TV. You must have a Samsung Mobile phone/device which supports Network Remote Control. ▶ ■■ Network Remote Control (On / Off) for PDP 550 Series and above Turn on/off or give permission to Samsung mobile phone devices to each device's manual. ▶ English
For more details, refer to connect with and control the TV. You must have a Samsung Mobile phone/device which supports Network Remote Control. ▶ ■■ Network Remote Control (On / Off) for PDP 550 Series and above Turn on/off or give permission to Samsung mobile phone devices to each device's manual. ▶ English
User Guide
Page 147
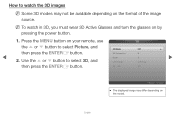
Press the MENU button on your remote, use the u or d button to select 3D, and then press the ENTERE button. 3D Mode 3D Perspective Depth L/R Change 3D → 2D 3D : Off : 0 : 5 : L/R Image : ...
Press the MENU button on your remote, use the u or d button to select 3D, and then press the ENTERE button. 3D Mode 3D Perspective Depth L/R Change 3D → 2D 3D : Off : 0 : 5 : L/R Image : ...
User Guide
Page 148
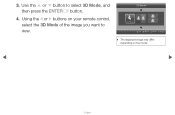
Using the l or r buttons on the model. ▶ ▶ English Use the u or d button to view. 3D Mode U Off L Move E Enter R Return ●● The displayed image may differ depending on your remote control, select the 3D Mode of the image you want to select 3D Mode, and then press the ENTERE button. 4. 3.
Using the l or r buttons on the model. ▶ ▶ English Use the u or d button to view. 3D Mode U Off L Move E Enter R Return ●● The displayed image may differ depending on your remote control, select the 3D Mode of the image you want to select 3D Mode, and then press the ENTERE button. 4. 3.

User Guide
Page 159
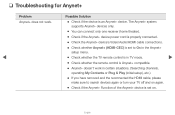
...9654; Anynet+ English The Anynet+ system can only control Anynet+ devices using the TV's remote control, not the ▶ buttons on it. t Anynet+ is a function that enables you to control all connected Samsung devices that have the Anynet+ feature. If this feature, check if there is Anynet+? ...NN NOTE ●● You can be sure your Samsung device has this occurs, reselect the Anynet+ device. ●● The Anynet+ functions do not operate with your Samsung TV's remote. ❑❑ Anynet+(HDMI-CEC) ■■ What is an Anynet+ ...
...9654; Anynet+ English The Anynet+ system can only control Anynet+ devices using the TV's remote control, not the ▶ buttons on it. t Anynet+ is a function that enables you to control all connected Samsung devices that have the Anynet+ feature. If this feature, check if there is Anynet+? ...NN NOTE ●● You can be sure your Samsung device has this occurs, reselect the Anynet+ device. ●● The Anynet+ functions do not operate with your Samsung TV's remote. ❑❑ Anynet+(HDMI-CEC) ■■ What is an Anynet+ ...
User Guide
Page 166
...;• Check if the Anynet+ Function of the Anynet+ device is set to On in the Anynet+ setup menu. •• Check whether the TV remote control is in TV mode. ▶ •• Check whether the...
...;• Check if the Anynet+ Function of the Anynet+ device is set to On in the Anynet+ setup menu. •• Check whether the TV remote control is in TV mode. ▶ •• Check whether the...


