
User Guide
Page 2
... • Memorizing Channels • Other Features Basic Features • Changing the Preset Picture Mode • Adjusting Picture Settings • Changing the Picture Size • Changing the Picture Options • Using the TV with Your PC • Changing the Preset Sound Modes • Adjusting Sound Settings Preference Features 1 • Wired Network Connection 17 • Wireless Network Connection...
... • Memorizing Channels • Other Features Basic Features • Changing the Preset Picture Mode • Adjusting Picture Settings • Changing the Picture Size • Changing the Picture Options • Using the TV with Your PC • Changing the Preset Sound Modes • Adjusting Sound Settings Preference Features 1 • Wired Network Connection 17 • Wireless Network Connection...

User Guide
Page 27
... (G/R), the OSD will be adjusted accordingly. English NN When you can adjust and store settings for adjusting picture quality. NN You can only make changes to Cell Light, Contrast, Brightness, and Sharpness. ▶ ❑❑ Adjusting Picture Settings OO MENUm → Picture → ENTERE ■■ Cell Light / Contrast / Brightness / Sharpness / Color / Tint (G/R) Your television...
... (G/R), the OSD will be adjusted accordingly. English NN When you can adjust and store settings for adjusting picture quality. NN You can only make changes to Cell Light, Contrast, Brightness, and Sharpness. ▶ ❑❑ Adjusting Picture Settings OO MENUm → Picture → ENTERE ■■ Cell Light / Contrast / Brightness / Sharpness / Color / Tint (G/R) Your television...
User Guide
Page 28
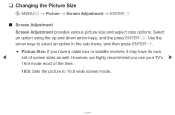
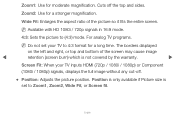
English ▶ ❑❑ Changing the Picture Size OO MENUm → Picture → Screen Adjustment → ENTERE ■■ Screen Adjustment Screen Adjustment provides various picture size and aspect ratio options. Select an option using the up and down arrow keys, and the press ENTERE. However, we ...highly recommend you have a cable box or satellite receiver, it may have its own set of the time. 16:9: Sets the picture to select an option in the sub-menu, and then press ENTERE. ●● Picture Size: If you use your TV's ▶ 16:9 mode most of screen sizes ...
English ▶ ❑❑ Changing the Picture Size OO MENUm → Picture → Screen Adjustment → ENTERE ■■ Screen Adjustment Screen Adjustment provides various picture size and aspect ratio options. Select an option using the up and down arrow keys, and the press ENTERE. However, we ...highly recommend you have a cable box or satellite receiver, it may have its own set of the time. 16:9: Sets the picture to select an option in the sub-menu, and then press ENTERE. ●● Picture Size: If you use your TV's ▶ 16:9 mode most of screen sizes ...
User Guide
Page 29
... your TV to 4:3 format for a long time. Cuts off . ●● Position: Adjusts the picture position. Wide Fit: Enlarges the aspect ratio of the screen may cause image retention (screen burn) which is set your TV inputs HDMI (720p / 1080i / 1080p) or Component (1080i / 1080p) signals, displays the... full image without any cut-off the top and sides. For analog TV programs. NN Do not set to (4:3) mode. NN Available with HD 1080i / 720p signals in 16:9 mode. 4:3: Sets the picture to Zoom1, Zoom2, Wide Fit, or Screen fit. ▶ English The borders displayed on the left...
... your TV to 4:3 format for a long time. Cuts off . ●● Position: Adjusts the picture position. Wide Fit: Enlarges the aspect ratio of the screen may cause image retention (screen burn) which is set your TV inputs HDMI (720p / 1080i / 1080p) or Component (1080i / 1080p) signals, displays the... full image without any cut-off the top and sides. For analog TV programs. NN Do not set to (4:3) mode. NN Available with HD 1080i / 720p signals in 16:9 mode. 4:3: Sets the picture to Zoom1, Zoom2, Wide Fit, or Screen fit. ▶ English The borders displayed on the left...

User Guide
Page 31
NN To use the Position function after selecting Screen Fit when connected to move the picture. 4. Press the u, d, l or r button to an HDMI (1080i/1080p) or Component (1080i/1080p) source, follow these steps: 1. Press the ENTERE button. 3. NN If you want to reset the pictures to its default position. ▶ English Press the ENTERE button. 5. Press the d button to its original position, select Reset in the ▶ Position screen. The picture will be set to select Position. 2. Select Close by pressing the d and r buttons sequentially.
NN To use the Position function after selecting Screen Fit when connected to move the picture. 4. Press the u, d, l or r button to an HDMI (1080i/1080p) or Component (1080i/1080p) source, follow these steps: 1. Press the ENTERE button. 3. NN If you want to reset the pictures to its default position. ▶ English Press the ENTERE button. 5. Press the d button to its original position, select Reset in the ▶ Position screen. The picture will be set to select Position. 2. Select Close by pressing the d and r buttons sequentially.
User Guide
Page 32
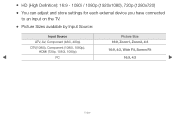
●● HD (High Definition): 16:9 - 1080i / 1080p (1920x1080), 720p (1280x720) ●● You can adjust and store settings for each external device you have connected to an input on the TV. ●● Picture Sizes available by Input Source: Input Source ATV, AV, Component (480i, 480p) DTV(1080i), Component (1080i, 1080p), HDMI (720p, 1080i, 1080p) PC Picture Size 16:9, Zoom1, Zoom2, 4:3 16:9, 4:3, Wide Fit, Screen Fit 16:9, 4:3 ▶ ▶ English
●● HD (High Definition): 16:9 - 1080i / 1080p (1920x1080), 720p (1280x720) ●● You can adjust and store settings for each external device you have connected to an input on the TV. ●● Picture Sizes available by Input Source: Input Source ATV, AV, Component (480i, 480p) DTV(1080i), Component (1080i, 1080p), HDMI (720p, 1080i, 1080p) PC Picture Size 16:9, Zoom1, Zoom2, 4:3 16:9, 4:3, Wide Fit, Screen Fit 16:9, 4:3 ▶ ▶ English
User Guide
Page 33
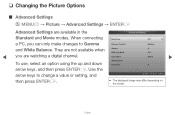
..., and then press ENTERE. They are not available when you can only make changes to change a value or setting, and then press ENTERE. Advanced Settings Black Tone Dynamic Contrast Gamma RGB Only Mode Color Space White Balance Flesh Tone : Off : Medium : 0...The displayed image may differ depending on the model. ▶ English ❑❑ Changing the Picture Options ■■ Advanced Settings OO MENUm → Picture → Advanced Settings → ENTERE Advanced Settings are watching a digital channel. When connecting a PC, you are available in the Standard and ...
..., and then press ENTERE. They are not available when you can only make changes to change a value or setting, and then press ENTERE. Advanced Settings Black Tone Dynamic Contrast Gamma RGB Only Mode Color Space White Balance Flesh Tone : Off : Medium : 0...The displayed image may differ depending on the model. ▶ English ❑❑ Changing the Picture Options ■■ Advanced Settings OO MENUm → Picture → Advanced Settings → ENTERE Advanced Settings are watching a digital channel. When connecting a PC, you are available in the Standard and ...
User Guide
Page 35
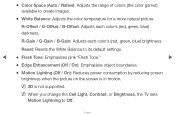
...in motion. R-Gain / G-Gain / B-Gain: Adjusts each color's (red, green, blue) darkness. Reset: Resets the White Balance to its default settings. ●● Flesh Tone: Emphasizes pink "Flesh Tone." ▶ ●● Edge Enhancement (Off / On): Emphasizes object boundaries. ●●...; Motion Lighting (Off / On): Reduces power consumption by reducing screen brightness when the picture on the screen is not supported. R-Offset / G-Offset / B-Offset: Adjusts each color's (red, green, blue) brightness. NN When you...
...in motion. R-Gain / G-Gain / B-Gain: Adjusts each color's (red, green, blue) darkness. Reset: Resets the White Balance to its default settings. ●● Flesh Tone: Emphasizes pink "Flesh Tone." ▶ ●● Edge Enhancement (Off / On): Emphasizes object boundaries. ●●...; Motion Lighting (Off / On): Reduces power consumption by reducing screen brightness when the picture on the screen is not supported. R-Offset / G-Offset / B-Offset: Adjusts each color's (red, green, blue) brightness. NN When you...
User Guide
Page 36
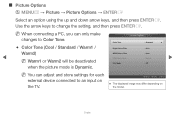
NN When connecting a PC, you can adjust and store settings for each external device connected to an input on the model. ▶ English Picture Options Color Tone Digital Noise Filter MPEG Noise Filter HDMI Black Level Film Mode : Standard : Auto : Auto : Normal : Off ► &#...9654; NN You can only make changes to change the setting, and then press ENTERE. ■■ Picture Options OO MENUm → Picture → Picture Options → ENTERE Select an option using the up and down arrow keys, and then press ENTERE. Use the ...
NN When connecting a PC, you can adjust and store settings for each external device connected to an input on the model. ▶ English Picture Options Color Tone Digital Noise Filter MPEG Noise Filter HDMI Black Level Film Mode : Standard : Auto : Auto : Normal : Off ► &#...9654; NN You can only make changes to change the setting, and then press ENTERE. ■■ Picture Options OO MENUm → Picture → Picture Options → ENTERE Select an option using the up and down arrow keys, and then press ENTERE. Use the ...
User Guide
Page 38
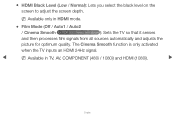
NN Available only in TV, AV, COMPONENT (480i / 1080i) and HDMI (1080i). ▶ ▶ English The Cinema Smooth function is only activated when the TV inputs an HDMI 24Hz signal. ●● HDMI Black Level (Low / Normal): Lets you select the black level on the screen to adjust the screen depth. NN Available in HDMI mode. ●● Film Mode (Off / Auto1 / Auto2 / Cinema Smooth for PDP 550 Series and above ): Sets the TV so that it senses and then processes film signals from all sources automatically and adjusts the picture for optimum quality.
NN Available only in TV, AV, COMPONENT (480i / 1080i) and HDMI (1080i). ▶ ▶ English The Cinema Smooth function is only activated when the TV inputs an HDMI 24Hz signal. ●● HDMI Black Level (Low / Normal): Lets you select the black level on the screen to adjust the screen depth. NN Available in HDMI mode. ●● Film Mode (Off / Auto1 / Auto2 / Cinema Smooth for PDP 550 Series and above ): Sets the TV so that it senses and then processes film signals from all sources automatically and adjusts the picture for optimum quality.
User Guide
Page 40
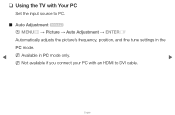
NN Available in the PC mode. ❑❑ Using the TV with Your PC Set the input source to PC. ■■ Auto Adjustment t OO MENUm → Picture → Auto Adjustment → ENTERE Automatically adjusts the picture's frequency, position, and fine tune settings in PC mode only. ▶ NN Not available if you connect your PC with an HDMI to DVI cable. ▶ English
NN Available in the PC mode. ❑❑ Using the TV with Your PC Set the input source to PC. ■■ Auto Adjustment t OO MENUm → Picture → Auto Adjustment → ENTERE Automatically adjusts the picture's frequency, position, and fine tune settings in PC mode only. ▶ NN Not available if you connect your PC with an HDMI to DVI cable. ▶ English

User Guide
Page 41
... the image to the center of screen. ●● Position: To adjust the PC's screen position if it is aligned to the default settings. If the noise is not centered or does not fit ▶ the TV screen. ▶ ■■ PC Screen Adjustment OO MENUm →...; Picture → Screen Adjustment → PC Screen Adjustment → ENTERE NN Available in PC mode only. ●● Coarse / Fine: Removes or reduces picture noise. Press the u or d button to adjust the frequency as best as possible (Coarse...
... the image to the center of screen. ●● Position: To adjust the PC's screen position if it is aligned to the default settings. If the noise is not centered or does not fit ▶ the TV screen. ▶ ■■ PC Screen Adjustment OO MENUm →...; Picture → Screen Adjustment → PC Screen Adjustment → ENTERE NN Available in PC mode only. ●● Coarse / Fine: Removes or reduces picture noise. Press the u or d button to adjust the frequency as best as possible (Coarse...

User Guide
Page 109
... sound remains on the screen. ●● Eco Sensor (Off / On): To enhance your power savings, the picture settings will ▶ automatically adapt to the light in the Picture menu, the Eco Sensor will be set to Off. Press any button except the volume button to reduce power consumption. NN If you adjust Cell...
... sound remains on the screen. ●● Eco Sensor (Off / On): To enhance your power savings, the picture settings will ▶ automatically adapt to the light in the Picture menu, the Eco Sensor will be set to Off. Press any button except the volume button to reduce power consumption. NN If you adjust Cell...

User Guide
Page 112
... available in 3D mode. ●● If you turn PIP on again to watch in the PIP mode. ●● You may notice that the picture in the PIP window becomes slightly unnatural when you use the main screen to off while watching in the PIP mode, the PIP function is... is on , you cannot use PIP. ●● PIP Settings The picture from the external video source will be in the main screen and the picture from the TV's tuner will be in the PIP sub-picture window. ▶ Main picture Component, HDMI, PC English Sub picture TV When you turn your TV on , you must...
... available in 3D mode. ●● If you turn PIP on again to watch in the PIP mode. ●● You may notice that the picture in the PIP window becomes slightly unnatural when you use the main screen to off while watching in the PIP mode, the PIP function is... is on , you cannot use PIP. ●● PIP Settings The picture from the external video source will be in the main screen and the picture from the TV's tuner will be in the PIP sub-picture window. ▶ Main picture Component, HDMI, PC English Sub picture TV When you turn your TV on , you must...

User Guide
Page 119
The Time function setting allows you to program the time between movement of screen burn, this unit is equipped with Pixel Shift screen burn prevention technology. ▶ ■■ Screen Burn Protection To reduce the possibility of the picture in minutes. Your TV also has the following additional screen burn protection functions: ●● Pixel Shift ●● Auto Protection Time ▶ ●● Scrolling ●● Side Gray English Pixel Shift moves the picture slightly on the screen.
The Time function setting allows you to program the time between movement of screen burn, this unit is equipped with Pixel Shift screen burn prevention technology. ▶ ■■ Screen Burn Protection To reduce the possibility of the picture in minutes. Your TV also has the following additional screen burn protection functions: ●● Pixel Shift ●● Auto Protection Time ▶ ●● Scrolling ●● Side Gray English Pixel Shift moves the picture slightly on the screen.

User Guide
Page 123
NN Set Game Mode to Movie. ▶ English Picture Mode is set to Standard and Sound Mode is set to TV or PC. ▶ NN Game Mode is not available when the input source is On: -- If you turn Game Mode on before you have attached the game console, you may notice reduced picture quality. NN If Game Mode is set to On only after connecting a game console.
NN Set Game Mode to Movie. ▶ English Picture Mode is set to Standard and Sound Mode is set to TV or PC. ▶ NN Game Mode is not available when the input source is On: -- If you turn Game Mode on before you have attached the game console, you may notice reduced picture quality. NN If Game Mode is set to On only after connecting a game console.

User Guide
Page 145
▶ ●● 3D Perspective (-5 ~ +5): Adjust the overall 3D perspective of on-screen image. ●● Depth (1~10): Adjust overall depth. ●● L/R Change (L/R Image / R/L Image): Swaps the left and right pictures. ●● 3D → 2D (Off / On): Displays the image for the left eye only. NN This function is deactivated when 3D Mode set to "2D → 3D" or Off. ▶ English
▶ ●● 3D Perspective (-5 ~ +5): Adjust the overall 3D perspective of on-screen image. ●● Depth (1~10): Adjust overall depth. ●● L/R Change (L/R Image / R/L Image): Swaps the left and right pictures. ●● 3D → 2D (Off / On): Displays the image for the left eye only. NN This function is deactivated when 3D Mode set to "2D → 3D" or Off. ▶ English

User Guide
Page 150
Read These Notes Before Using the 3D Function... NN NOTE ●● 3D Mode is set to Off automatically when you access My Contents or e-Manual functions. ●● 3D Mode is set to its memorized configuration value automatically when you change the input source. ●● Some Picture functions are disabled in 3D mode. ●● PIP is not supported in 3D mode. ▶ ▶ English
Read These Notes Before Using the 3D Function... NN NOTE ●● 3D Mode is set to Off automatically when you access My Contents or e-Manual functions. ●● 3D Mode is set to its memorized configuration value automatically when you change the input source. ●● Some Picture functions are disabled in 3D mode. ●● PIP is not supported in 3D mode. ▶ ▶ English
User Guide
Page 198
... cable (yellow) to the Green jack of Component input 1 on the TV. ▶ English Picture - Solutions and Explanations •• The compression of the screen. Energy Saving) •• Try resetting the picture to view the default picture settings (go to Picture Mode / Color / Brightness / Sharpness) ▶ •• Adjust the Energy Saving option in...
... cable (yellow) to the Green jack of Component input 1 on the TV. ▶ English Picture - Solutions and Explanations •• The compression of the screen. Energy Saving) •• Try resetting the picture to view the default picture settings (go to Picture Mode / Color / Brightness / Sharpness) ▶ •• Adjust the Energy Saving option in...

User Guide
Page 208
... and Explanations •• If the TV is only available when you look closely at the edge of the frame of the TV. Change the settings from Store Demo mode to a wall, we recommend using overly rigid or thick cables. For details, refer to MENU → System → Plug & Play →...; Select Home Use under Plug & Play mode. If mounting the TV to Home Use mode in the Store Demo mode, it will reset audio and picture settings every 30 minutes. Make sure the cables are flexible enough for long term use. POP (TV's internal banner ad) appears on the screen. You have...
... and Explanations •• If the TV is only available when you look closely at the edge of the frame of the TV. Change the settings from Store Demo mode to a wall, we recommend using overly rigid or thick cables. For details, refer to MENU → System → Plug & Play →...; Select Home Use under Plug & Play mode. If mounting the TV to Home Use mode in the Store Demo mode, it will reset audio and picture settings every 30 minutes. Make sure the cables are flexible enough for long term use. POP (TV's internal banner ad) appears on the screen. You have...


