Samsung PN50A460S4D Research

View Results Below
Free Samsung PN50A460S4D manuals!
Problems with Samsung PN50A460S4D?
Ask a Question
Free Samsung PN50A460S4D manuals!
Problems with Samsung PN50A460S4D?
Ask a Question
Related Manual Pages


Similar Questions

Does Samsung Plasma Model 50a5505 Have A Fire Wire Audio Output
(Posted by yatzeeking54 2 years ago)

I Want To Upgrade Firmware For Samsung Ps42c430 Model Tv
Firmware upgrade
Firmware upgrade
(Posted by Gabran 10 years ago)

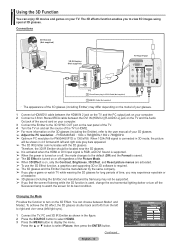
Looking For 3d Info. For Samsung Pn50a460s4d Model.
(Posted by ls1364 12 years ago)

What Could Cause My Tv To Shut Offand Not Come Back On
(Posted by lashonia 12 years ago)
Related Terms
The following terms were also used when searching for Samsung PN50A460S4D Research:- pn50a460s4d
- samsung pn50a460s4d
- pn50a460s4d plasma
- pn50a460s4d samsung
- samsung pn50a460s4d plasma
- pn50a460s4d specs
- pn50a460s4d plasma tv
- pn50a460s4d reviews
- samsung pn50a460s4d plasma tv
- pn50a460s4d weights
- samsung model pn50a460s4d
- samsung plasma pn50a460s4d
- samsung pn50a460s4d 3d
- samsung pn50a460s4d cost
- samsung pn50a460s4d manual
- samsung pn50a460s4d no picture
- samsung pn50a460s4d owners manual
- pn50a460s4d tv
- samsung pn50a460s4d plasma tv value
- samsung pn50a460s4d price
- samsung pn50a460s4d prices
- samsung pn50a460s4d replacement screen
- samsung pn50a460s4d review
- samsung pn50a460s4d reviews
- samsung pn50a460s4d service manual
- samsung pn50a460s4d specs
- samsung pn50a460s4d user manual
- samsung pn50a460s4d weight
- pn50a460s4d price
- plasma pn50a460s4d
- pn50a460s4d 3d
- pn50a460s4d comment
- pn50a460s4d cost
- pn50a460s4d firmware
- pn50a460s4d manual
- pn50a460s4d no picture
- pn50a460s4d owners manual
- pn50a460s4d parts
- pn50a460s4d plasma tv value
- pn50a460s4d weight
- pn50a460s4d prices
- pn50a460s4d replacement screen
- pn50a460s4d review
- pn50a460s4d samsung plasma
- pn50a460s4d samsung plasma tv
- pn50a460s4d service manual
- pn50a460s4d software download
- model pn50a460s4d
- pn50a460s4d upgrade
- pn50a460s4d user manual