Samsung PN42B400 Research
Related Manual Pages


Similar Questions

Tv Reset On A Samsung Plasma Model Number Hpt5054
My Samsung plasma tv model number HPT5054 has a black screen and won't turn on. I don't have a tv re...
My Samsung plasma tv model number HPT5054 has a black screen and won't turn on. I don't have a tv re...
(Posted by Anonymous-175018 4 months ago)

Does Samsung Plasma Model 50a5505 Have A Fire Wire Audio Output
(Posted by yatzeeking54 2 years ago)


I Want To Upgrade Firmware For Samsung Ps42c430 Model Tv
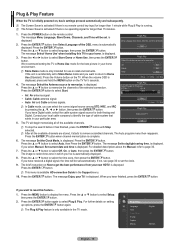
Firmware upgrade
Firmware upgrade
(Posted by Gabran 10 years ago)

Related Terms
The following terms were also used when searching for Samsung PN42B400 Research:- samsung 42 pn42b400
- samsung pn42b400 compared
- samsung pn42b400 calibration
- samsung pn42b400 audio out
- samsung pn42b400 42 plasma tv
- samsung pn42b400 42
- samsung pn42b400
- samsung plasma pn42b400
- samsung model pn42b400p3d
- samsung model pn42b400
- samsung pn42b400 info
- pn42b400p3d weight
- pn42b400p3d specifications
- pn42b400p3d samsung
- pn42b400p3d power supply
- pn42b400p3d
- pn42b400 vesa dimensions
- pn42b400 value
- pn42b400 user manual
- samsung pn42b400 screen resolution
- samsung pn42b400p3d weight
- samsung pn42b400p3d specifications
- samsung pn42b400p3d
- samsung pn42b400 value
- samsung pn42b400 user manual
- samsung pn42b400 specs
- samsung pn42b400 specifications
- samsung pn42b400 shuts off
- samsung pn42b400 settings
- pn42b400 specs
- samsung pn42b400 problems
- samsung pn42b400 price
- samsung pn42b400 plasma tv
- samsung pn42b400 plasma hdtv
- samsung pn42b400 plasma
- samsung pn42b400 parts
- samsung pn42b400 mounting screws
- samsung pn42b400 manual
- pn42b400 best buy
- pn42b400 parts
- pn42b400 mounting screws
- pn42b400 manual
- pn42b400 info
- pn42b400 firmware update
- pn42b400 firmware
- pn42b400 consumer reports
- pn42b400 compared
- pn42b400 calibration
- pn42b400 plasma
- pn42b400 audio out
- pn42b400 amazon
- pn42b400 42 plasma tv
- pn42b400 42
- pn42b400
- plasma pn42b400
- model pn42b400p3d
- model pn42b400
- pn42b400 samsung
- pn42b400 specifications
- pn42b400 shuts off
- pn42b400 settings
- pn42b400 service manual
- pn42b400 screen resolution
- pn42b400 samsung specs
- pn42b400 samsung plasma ratings
- pn42b400 samsung plasma
- 42 pn42b400
- pn42b400 review cnet
- pn42b400 resolution
- pn42b400 repair
- pn42b400 ratings
- pn42b400 problems
- pn42b400 price
- pn42b400 plasma tv
- pn42b400 plasma hdtv