User Manual (English)
Page 6
... cause it may damage your photos. Your camera emits radio frequency (RF) signals that may result in noise in the normal position. Use your electronic devices to solve any loss of data. Health and safety information Check that the camera is operating properly before use only Samsung-approved devices or accessories. If...
... cause it may damage your photos. Your camera emits radio frequency (RF) signals that may result in noise in the normal position. Use your electronic devices to solve any loss of data. Health and safety information Check that the camera is operating properly before use only Samsung-approved devices or accessories. If...
User Manual (English)
Page 8
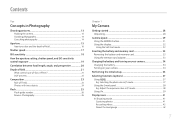
... in P mode 38 Using iFn...39 Display icons 41 In Shooting mode ...41 Capturing photos ...41 Recording videos ...42 About the level gauge 42 7 Adjust the exposure value in P mode 37 Using the Smart panel 38 E.g. Contents Tips Concepts in ... length, angle, and perspective 20 Depth of field 21 What controls out-of-focus effects 21 DOF preview...23 Composition 23 Rule of Thirds...23 Photos with two subjects 24 Flash ...25 Flash guide number...26 Bounce Photography 26 Chapter 1 My Camera Getting started 28 Unpacking...28 Camera layout 29 Using...
... in P mode 38 Using iFn...39 Display icons 41 In Shooting mode ...41 Capturing photos ...41 Recording videos ...42 About the level gauge 42 7 Adjust the exposure value in P mode 37 Using the Smart panel 38 E.g. Contents Tips Concepts in ... length, angle, and perspective 20 Depth of field 21 What controls out-of-focus effects 21 DOF preview...23 Composition 23 Rule of Thirds...23 Photos with two subjects 24 Flash ...25 Flash guide number...26 Bounce Photography 26 Chapter 1 My Camera Getting started 28 Unpacking...28 Camera layout 29 Using...
User Manual (English)
Page 9
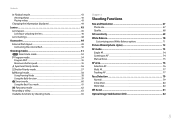
Contents In Playback mode...43 Viewing photos ...43 Playing videos ...43 Changing the information displayed 44 Lenses ...45 Lens layout...45 Locking or unlocking the lens 46 Lens markings ...48 Accessories 49 ... Recording a video ...63 Available functions by shooting mode 65 Chapter 2 Shooting Functions Size and Resolution 67 Photo size...67 Quality...68 ISO sensitivity 69 White Balance 70 Customizing preset White Balance options 71 Picture Wizard (photo styles 72 AF mode ...73 Single AF...74 Continuous AF...74 Manual focus...75 AF area...
Contents In Playback mode...43 Viewing photos ...43 Playing videos ...43 Changing the information displayed 44 Lenses ...45 Lens layout...45 Locking or unlocking the lens 46 Lens markings ...48 Accessories 49 ... Recording a video ...63 Available functions by shooting mode 65 Chapter 2 Shooting Functions Size and Resolution 67 Photo size...67 Quality...68 ISO sensitivity 69 White Balance 70 Customizing preset White Balance options 71 Picture Wizard (photo styles 72 AF mode ...73 Single AF...74 Continuous AF...74 Manual focus...75 AF area...
User Manual (English)
Page 10
... Out is set to PAL 97 Movie quality ...98 Multi Motion ...98 Fader ...99 Voice...99 Chapter 3 Playback/Editing Searching and managing files 101 Viewing photos ...101 Viewing image thumbnails 101 Viewing files by category 102 Viewing files as a folder 102 Protecting files ...103 Deleting files ...103 Deleting a single file 103...
... Out is set to PAL 97 Movie quality ...98 Multi Motion ...98 Fader ...99 Voice...99 Chapter 3 Playback/Editing Searching and managing files 101 Viewing photos ...101 Viewing image thumbnails 101 Viewing files by category 102 Viewing files as a folder 102 Protecting files ...103 Deleting files ...103 Deleting a single file 103...

User Manual (English)
Page 11
... 105 Auto rotating ...106 Playing videos 107 Trimming a video during playback 107 Capturing an image during playback 108 Editing photos 109 Rotating a photo ...109 Resizing photos...110 Adjusting your photos 110 Retouching faces ...111 Reducing red-eye 111 Applying Smart Filter effects 112 Chapter 4 Wireless network Connecting to a... a smart phone as a remote shutter release 125 Using the Home Monitor 127 Using Auto Backup to send photos or videos 129 Installing the program for Auto Backup on your PC 129 Sending photos or videos to a PC 129 Using Samsung Link to view files 131 10
... 105 Auto rotating ...106 Playing videos 107 Trimming a video during playback 107 Capturing an image during playback 108 Editing photos 109 Rotating a photo ...109 Resizing photos...110 Adjusting your photos 110 Retouching faces ...111 Reducing red-eye 111 Applying Smart Filter effects 112 Chapter 4 Wireless network Connecting to a... a smart phone as a remote shutter release 125 Using the Home Monitor 127 Using Auto Backup to send photos or videos 129 Installing the program for Auto Backup on your PC 129 Sending photos or videos to a PC 129 Using Samsung Link to view files 131 10

User Manual (English)
Page 14
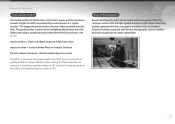
When shooting with your right hand and place your breath to minimize body movement. Holding the camera Hold the camera with a slow shutter speed, hold a camera correctly, the wrong posture can cause the camera to maintain a steady base for your left hand under the lens for taking a good photo. Place your camera. Even if you hold your right index finger on the shutter button. Concepts in Photography Shooting postures A correct posture for stabilizing the camera is necessary for support. 13 Stand up straight and remain still to shake.
When shooting with your right hand and place your breath to minimize body movement. Holding the camera Hold the camera with a slow shutter speed, hold a camera correctly, the wrong posture can cause the camera to maintain a steady base for your left hand under the lens for taking a good photo. Place your camera. Even if you hold your right index finger on the shutter button. Concepts in Photography Shooting postures A correct posture for stabilizing the camera is necessary for support. 13 Stand up straight and remain still to shake.

User Manual (English)
Page 17
...blades 8 blades 16 These blades move together and control the amount of light passing through the center of light when shooting night scenes. A photo with a large DOF A photo with 7 blades into an equal number of sections. It is double the number of blades. The aperture housing contains several blades. If ...is odd, the number of sections is closely related to the depth of field (DOF), which can blur or sharpen the background of a photo by controlling the aperture. The number of blades also affects the shape of the aperture. Concepts in Photography Aperture value and the depth of ...
...blades 8 blades 16 These blades move together and control the amount of light passing through the center of light when shooting night scenes. A photo with a large DOF A photo with 7 blades into an equal number of sections. It is double the number of blades. The aperture housing contains several blades. If ...is odd, the number of sections is closely related to the depth of field (DOF), which can blur or sharpen the background of a photo by controlling the aperture. The number of blades also affects the shape of the aperture. Concepts in Photography Aperture value and the depth of ...
User Manual (English)
Page 18
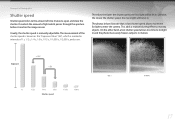
... camera. Exposure +1 EV -1 EV 0.8 s 1 s 1/2 s 1/4 s 1/8 s 1/15 s 1/30 s Shutter speed 0.004 s 17 The measurement of time it reaches the image sensor. The photos below illustrate that a slow shutter speed allows more light will be let in. This adds a motion blurring effect to let light in and the... photo more easily freezes subjects in motion. Usually, the shutter speed is known as the "Exposure Value" (EV), which passes through the aperture...
... camera. Exposure +1 EV -1 EV 0.8 s 1 s 1/2 s 1/4 s 1/8 s 1/15 s 1/30 s Shutter speed 0.004 s 17 The measurement of time it reaches the image sensor. The photos below illustrate that a slow shutter speed allows more light will be let in. This adds a motion blurring effect to let light in and the... photo more easily freezes subjects in motion. Usually, the shutter speed is known as the "Exposure Value" (EV), which passes through the aperture...
User Manual (English)
Page 19
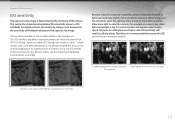
...to represent the sensitivity of capturing images at night, a low ISO sensitivity will be less sensitive to light, you are shooting in your photos, unless you need more light to ISO sensitivity 18 Concepts in Photography ISO sensitivity The exposure of an image is determined by a moderate... amount. However, in a photo that captures the image. However, higher ISO settings can result in "noise"-small specks, spots, and other phenomena in a dark place or...
...to represent the sensitivity of capturing images at night, a low ISO sensitivity will be less sensitive to light, you are shooting in your photos, unless you need more light to ISO sensitivity 18 Concepts in Photography ISO sensitivity The exposure of an image is determined by a moderate... amount. However, in a photo that captures the image. However, higher ISO settings can result in "noise"-small specks, spots, and other phenomena in a dark place or...
User Manual (English)
Page 20
... to light Low sensitivity = less sensitive to enter. The results, however, change in shutter speed, aperture value, or ISO sensitivity can control the graininess of a photo. The aperture setting controls the opening that regulates the light that enters the camera, while the shutter speed determines the length of time that light...
... to light Low sensitivity = less sensitive to enter. The results, however, change in shutter speed, aperture value, or ISO sensitivity can control the graininess of a photo. The aperture setting controls the opening that regulates the light that enters the camera, while the shutter speed determines the length of time that light...
User Manual (English)
Page 21
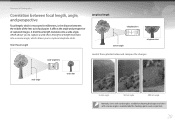
Short focal length Long focal length telephoto lens narrow angle telephoto shot wide-angle lens Look at these photos below and compare the changes. A long focal length translates into a wide angle, which allows you to capture a wide shot. A short focal length translates into a narrow ...
Short focal length Long focal length telephoto lens narrow angle telephoto shot wide-angle lens Look at these photos below and compare the changes. A long focal length translates into a wide angle, which allows you to capture a wide shot. A short focal length translates into a narrow ...
User Manual (English)
Page 22
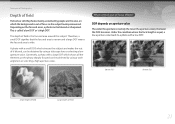
...low DOF' or 'a high DOF'. The depth of field is out of focus so the subject looks pronounced. A photo with a large DOF which shows all the elements on the photo sharply focused can be achieved by using a telescope lens or selecting a low aperture value. Depending on the focused areas..., a photo can be blurred or sharpened. Concepts in Photography Depth of field Portraits or still-life photos mostly acclaimed by people are the ones on which the background is the focused area around the ...
...low DOF' or 'a high DOF'. The depth of field is out of focus so the subject looks pronounced. A photo with a large DOF which shows all the elements on the photo sharply focused can be achieved by using a telescope lens or selecting a low aperture value. Depending on the focused areas..., a photo can be blurred or sharpened. Concepts in Photography Depth of field Portraits or still-life photos mostly acclaimed by people are the ones on which the background is the focused area around the ...
User Manual (English)
Page 23
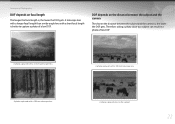
... on focal length The longer the focal length is , the lower the DOF gets. Therefore, taking a photo close to the subject 22 A photo captured with a 16 mm wide-angle lens A photo captured with a 100 mm telescope lens A photo captured with a short focal length is better to a subject can result in Photography DOF depends on... subject and the camera is , the lower the DOF gets. A telescope lens with a longer focal length than a wide-angle lens with a 100 mm telescope lens A photo captured close to capture a photo of low DOF. Concepts in...
... on focal length The longer the focal length is , the lower the DOF gets. Therefore, taking a photo close to the subject 22 A photo captured with a 16 mm wide-angle lens A photo captured with a 100 mm telescope lens A photo captured with a short focal length is better to a subject can result in Photography DOF depends on... subject and the camera is , the lower the DOF gets. A telescope lens with a longer focal length than a wide-angle lens with a 100 mm telescope lens A photo captured close to capture a photo of low DOF. Concepts in...

User Manual (English)
Page 24
... the Custom button to get an idea of the Custom button to Optical Preview. (p. 139) Composition It is fun to prioritize subjects. Concepts in a photo. No matter how the world is beautiful, however, a poor composition cannot capture the beauty of it is located at one of the corners of equal... rectangles. To compose photos that best emphasize the subject, make sure the subject is very important to capture a photo of the beauty of thirds leads to the predefined settings and shows the results on the screen. ...
... the Custom button to get an idea of the Custom button to Optical Preview. (p. 139) Composition It is fun to prioritize subjects. Concepts in a photo. No matter how the world is beautiful, however, a poor composition cannot capture the beauty of it is located at one of the corners of equal... rectangles. To compose photos that best emphasize the subject, make sure the subject is very important to capture a photo of the beauty of thirds leads to the predefined settings and shows the results on the screen. ...

User Manual (English)
Page 25
Below are a few examples. Subject 2 Subject 2 Subject 1 Unstable Subject 1 Stable 24 You can stabilize the photo by capturing a second subject in Photography Using the rule of thirds will create photos with two subjects If your subject is in one corner of the photo. Concepts in the opposite corner to balance the weight of the photo, it creates an unbalanced composition. Photos with stable and compelling compositions.
Below are a few examples. Subject 2 Subject 2 Subject 1 Unstable Subject 1 Stable 24 You can stabilize the photo by capturing a second subject in Photography Using the rule of thirds will create photos with two subjects If your subject is in one corner of the photo. Concepts in the opposite corner to balance the weight of the photo, it creates an unbalanced composition. Photos with stable and compelling compositions.
User Manual (English)
Page 26
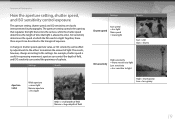
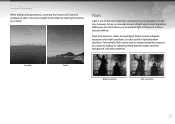
... conditions. Making use of a flash allows you to create adequate exposure in photography. It is also useful in Photography When taking landscape photos, centering the horizon will create an unbalanced effect. Give more weight to have an enough amount of the most important components in low-... the background in compensating the exposure of effects. Subject 1 Subject 1 Subject 2 Subject 2 Flash Light is not easy, however, to the photo by moving the horizon up or down. Unstable Stable Before correction After correction 25 It is one of light anytime and anywhere.
... conditions. Making use of a flash allows you to create adequate exposure in photography. It is also useful in Photography When taking landscape photos, centering the horizon will create an unbalanced effect. Give more weight to have an enough amount of the most important components in low-... the background in compensating the exposure of effects. Subject 1 Subject 1 Subject 2 Subject 2 Flash Light is not easy, however, to the photo by moving the horizon up or down. Unstable Stable Before correction After correction 25 It is one of light anytime and anywhere.
User Manual (English)
Page 27
... = Guide number/Flash to Subject Distance Flash to Subject Distance = Guide number/Aperture value Therefore, if you can estimate an optimum flash to 100. Normally, photos captured with bounce photography cast no shadows and look smooth due to the method of bouncing light off of GN 20 and is 4 meters away...
... = Guide number/Flash to Subject Distance Flash to Subject Distance = Guide number/Aperture value Therefore, if you can estimate an optimum flash to 100. Normally, photos captured with bounce photography cast no shadows and look smooth due to the method of bouncing light off of GN 20 and is 4 meters away...
User Manual (English)
Page 31
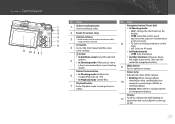
...8 - F: Select an AF mode. I : Select the shutter speed, aperture value, exposure compensation, 5 6 using a wireless network. sending a photo. • Steady: When there is no data transfer or charging the battery. Playback button Status lamp Indicate the status of the camera. • Blinking...: When saving a photo, 10 shooting a video, sending data to a computer, connecting to WLAN, or 7 Enter Playback mode to select left, right, respectively...
...8 - F: Select an AF mode. I : Select the shutter speed, aperture value, exposure compensation, 5 6 using a wireless network. sending a photo. • Steady: When there is no data transfer or charging the battery. Playback button Status lamp Indicate the status of the camera. • Blinking...: When saving a photo, 10 shooting a video, sending data to a computer, connecting to WLAN, or 7 Enter Playback mode to select left, right, respectively...

User Manual (English)
Page 38
AutoShare Photo Size Quality ISO Minimum Shutter Speed Back Select 37 My Camera Selecting functions (options) Rotate the navigation button or press [D/I ] to move , and then press [o] to Photo Size, and then press [o]. E.g. Selecting the photo size in P mode 1 Rotate the mode dial to P. 2 Press [m]. 3 Press [C], rotate the navigation button or press [D/I] to move to b, and then press [o]. 4 Rotate the navigation button or press [D/I /C/F] to move to select an option. Using m Press [m], and then change shooting options or settings.
AutoShare Photo Size Quality ISO Minimum Shutter Speed Back Select 37 My Camera Selecting functions (options) Rotate the navigation button or press [D/I ] to move , and then press [o] to Photo Size, and then press [o]. E.g. Selecting the photo size in P mode 1 Rotate the mode dial to P. 2 Press [m]. 3 Press [C], rotate the navigation button or press [D/I] to move to b, and then press [o]. 4 Rotate the navigation button or press [D/I /C/F] to move to select an option. Using m Press [m], and then change shooting options or settings.

User Manual (English)
Page 39
Using the Smart panel Press [f] to Shooting mode. E.g. Photo Size (3:2) (5472x3648) (3:2) (3888x2592) (3:2) (2976x1984) (3:2) (1728x1152) (16:9) (5472x3080) Back Set 6 Press [m] to switch to access some functions such as Exposure, ISO, and White Balance. Adjust the ...
Using the Smart panel Press [f] to Shooting mode. E.g. Photo Size (3:2) (5472x3648) (3:2) (3888x2592) (3:2) (2976x1984) (3:2) (1728x1152) (16:9) (5472x3080) Back Set 6 Press [m] to switch to access some functions such as Exposure, ISO, and White Balance. Adjust the ...


