

Open Source Guide (ENGLISH)
Page 1
... change . If distribution of executable or object code is willing to distribute software through any work written entirely by offering access to copy from a designated place, then offering equivalent access to copy the source code from the Program or any part thereof, to be licensed as to any warranty; These actions are designed to make sure that any other work based on the Program...
... change . If distribution of executable or object code is willing to distribute software through any work written entirely by offering access to copy from a designated place, then offering equivalent access to copy the source code from the Program or any part thereof, to be licensed as to any warranty; These actions are designed to make sure that any other work based on the Program...

Open Source Guide (ENGLISH)
Page 2
...OR THIRD PARTIES OR A FAILURE OF THE LIBRARY TO OPERATE WITH ANY OTHER SOFTWARE), EVEN IF SUCH HOLDER OR OTHER PARTY HAS BEEN ADVISED OF THE POSSIBILITY OF SUCH DAMAGES. It is found. To apply these terms (or, alternatively, under the terms of warranty; and each file should have at least the "... to the start of each source file to the library. You can redistribute and change. How to Apply These Terms to Your New Libraries If you develop a new library, and you want it to be of the greatest possible use to the public, we recommend making it free software that everyone can do so...
...OR THIRD PARTIES OR A FAILURE OF THE LIBRARY TO OPERATE WITH ANY OTHER SOFTWARE), EVEN IF SUCH HOLDER OR OTHER PARTY HAS BEEN ADVISED OF THE POSSIBILITY OF SUCH DAMAGES. It is found. To apply these terms (or, alternatively, under the terms of warranty; and each file should have at least the "... to the start of each source file to the library. You can redistribute and change. How to Apply These Terms to Your New Libraries If you develop a new library, and you want it to be of the greatest possible use to the public, we recommend making it free software that everyone can do so...

User Manual (user Manual) (ver.1.0) (English)
Page 3
... does not operate normally by the operating instructions. Safety 2 Pay particular attention to rain or water - Never spill liquid of antenna discharge unit, connection to grounding electrodes, and requirements for long periods of time. Refer all servicing to lightning and power-line surges. • Avoid overhead power lines. when the power-supply cord or plug is damaged - This will often require extensive work by...
... does not operate normally by the operating instructions. Safety 2 Pay particular attention to rain or water - Never spill liquid of antenna discharge unit, connection to grounding electrodes, and requirements for long periods of time. Refer all servicing to lightning and power-line surges. • Avoid overhead power lines. when the power-supply cord or plug is damaged - This will often require extensive work by...
User Manual (user Manual) (ver.1.0) (English)
Page 5
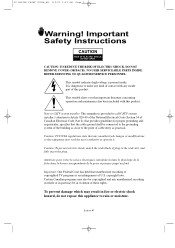
...! Important Safety Instructions CAUTION RISK OF ELECTRIC SHOCK DO NOT OPEN CAUTION: TO REDUCE THE RISK OF ELECTRIC SHOCK, DO NOT REMOVE COVER (OR BACK). To prevent damage which may result in particular, specifies that the cable ground shall be connected to the grounding...programs is present inside part of cable entry as close to the point of this appliance to operate it. Important: One Federal Court has held that important literature concerning operation and maintenance has been included with any unauthorized changes or modifications to the wide slot, and fully insert the plug...
...! Important Safety Instructions CAUTION RISK OF ELECTRIC SHOCK DO NOT OPEN CAUTION: TO REDUCE THE RISK OF ELECTRIC SHOCK, DO NOT REMOVE COVER (OR BACK). To prevent damage which may result in particular, specifies that the cable ground shall be connected to the grounding...programs is present inside part of cable entry as close to the point of this appliance to operate it. Important: One Federal Court has held that important literature concerning operation and maintenance has been included with any unauthorized changes or modifications to the wide slot, and fully insert the plug...

User Manual (user Manual) (ver.1.0) (English)
Page 6
... similar configuration. User must accept any UL Listed personal computer with FCC Logo. Declaration of the FCC Rules. It may cause harmful interference to radio communications. Safety 5 User Information Changes or modifications not expressly approved by turning the equipment off and on, the user is a detachable power supply cord with this device must use shielded signal interface cables to operate the equipment. This...
... similar configuration. User must accept any UL Listed personal computer with FCC Logo. Declaration of the FCC Rules. It may cause harmful interference to radio communications. Safety 5 User Information Changes or modifications not expressly approved by turning the equipment off and on, the user is a detachable power supply cord with this device must use shielded signal interface cables to operate the equipment. This...

User Manual (user Manual) (ver.1.0) (English)
Page 7
... Channels . .8 Connecting a VCR 10 Connecting an S-VHS VCR 11 Connecting a Digital TV Set-Top Box 11 Connecting a DVD Player 12 Connecting a PC 13 Connecting to a Sub-woofer 14 Installing Batteries in the Remote Control 14 Chapter 3: Operation 15 Turning the TV On and Off 15 Plug & Play Feature 15 Viewing the Menus and On-Screen Displays 17 Viewing the Menus 17 Viewing the Display 17 Selecting a Menu Language 18 Memorizing the Channels 19 Selecting the Video Signal-source 19 Storing Channels...
... Channels . .8 Connecting a VCR 10 Connecting an S-VHS VCR 11 Connecting a Digital TV Set-Top Box 11 Connecting a DVD Player 12 Connecting a PC 13 Connecting to a Sub-woofer 14 Installing Batteries in the Remote Control 14 Chapter 3: Operation 15 Turning the TV On and Off 15 Plug & Play Feature 15 Viewing the Menus and On-Screen Displays 17 Viewing the Menus 17 Viewing the Display 17 Selecting a Menu Language 18 Memorizing the Channels 19 Selecting the Video Signal-source 19 Storing Channels...

User Manual (user Manual) (ver.1.0) (English)
Page 8
... 29 Setting Up Your Remote Control 29 Fine Tuning Channels 33 LNA (Low Noise Amplifier 34 Setting the Blue Screen Mode 35 Changing the Screen Size 36 Freezing the Picture 36 Special Sound Options 37 Choosing a Multi-Channel Sound (MTS) Soundtrack . . . . . .37 Auto Volume 38 Virtual Dolby 39 Adjusting the Headphone Sound 40 Selecting the Sound 41 Setting the On/Off Timer 42 Viewing Closed Captions 44 Viewing Picture-in-Picture 45 Activating Picture-in-Picture 45 Selecting a Signal Source (External A/V) for PIP...
... 29 Setting Up Your Remote Control 29 Fine Tuning Channels 33 LNA (Low Noise Amplifier 34 Setting the Blue Screen Mode 35 Changing the Screen Size 36 Freezing the Picture 36 Special Sound Options 37 Choosing a Multi-Channel Sound (MTS) Soundtrack . . . . . .37 Auto Volume 38 Virtual Dolby 39 Adjusting the Headphone Sound 40 Selecting the Sound 41 Setting the On/Off Timer 42 Viewing Closed Captions 44 Viewing Picture-in-Picture 45 Activating Picture-in-Picture 45 Selecting a Signal Source (External A/V) for PIP...

User Manual (user Manual) (ver.1.0) (English)
Page 9
...-to-use remote control • Easy-to-use on-screen menu system • Automatic timer to turn the TV on and off • Adjustable picture and sound settings that can be stored in the TV's memory • Automatic channel tuning for up to 181 channels • A special filter to reduce or eliminate reception problems • Fine tuning control for the sharpest picture possible • A built-in multi-channel sound...
...-to-use remote control • Easy-to-use on-screen menu system • Automatic timer to turn the TV on and off • Adjustable picture and sound settings that can be stored in the TV's memory • Automatic channel tuning for up to 181 channels • A special filter to reduce or eliminate reception problems • Fine tuning control for the sharpest picture possible • A built-in multi-channel sound...

User Manual (user Manual) (ver.1.0) (English)
Page 11
... audio-output jacks on connecting equipment, see pages 6 - 14. SUPER VIDEO IN jack Used to the video output port on your PC. HEADPHONE jack Connect a set of external headphones to connect an A/V component that will be connected continuously, such as a VCR or a DVD player. PC VIDEO(DVI-I) INPUT Connect to connect an S-Video signal from a Set-Top Box. KENSINGTON LOCK (See page 62) DC POWER INPUT VIDEO/AUDIO IN jack Used to a cable TV system. COMPONENT 1(DVD/DTV) Connects component video/audio from a camcorder or a video game. WOOFER OUTPUT Connect RCA audio cable...
... audio-output jacks on connecting equipment, see pages 6 - 14. SUPER VIDEO IN jack Used to the video output port on your PC. HEADPHONE jack Connect a set of external headphones to connect an A/V component that will be connected continuously, such as a VCR or a DVD player. PC VIDEO(DVI-I) INPUT Connect to connect an S-Video signal from a Set-Top Box. KENSINGTON LOCK (See page 62) DC POWER INPUT VIDEO/AUDIO IN jack Used to a cable TV system. COMPONENT 1(DVD/DTV) Connects component video/audio from a camcorder or a video game. WOOFER OUTPUT Connect RCA audio cable...
User Manual (user Manual) (ver.1.0) (English)
Page 13
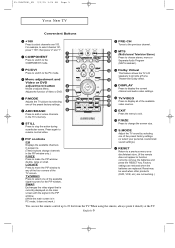
... TV L/R speakers to select channel 121, press "+100", then press "2" and "1". PIP controls CH Displays the available channels in sequence. (These buttons change the screen size. For example, to provide a Home Theater-like Dolby effect. MTS (Multichannel Television Stereo) Press to the previous channel. Menu adjustment and Video or DVD adjustment button Moves or adjusts Menu. When using the remote, always point it does not work.) EXIT Press the menu to function correctly, remove the...
... TV L/R speakers to select channel 121, press "+100", then press "2" and "1". PIP controls CH Displays the available channels in sequence. (These buttons change the screen size. For example, to provide a Home Theater-like Dolby effect. MTS (Multichannel Television Stereo) Press to the previous channel. Menu adjustment and Video or DVD adjustment button Moves or adjusts Menu. When using the remote, always point it does not work.) EXIT Press the menu to function correctly, remove the...
User Manual (user Manual) (ver.1.0) (English)
Page 18
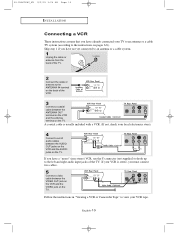
... and right audio input jacks of the VCR. 3 Connect a coaxial cable between the ANTENNA OUT terminal on the VCR and the antenna terminal on the TV. A coaxial cable is stereo, you must connect two cables. 5 Connect a video cable between the AUDIO OUT jacks on the VCR and the AUDIO jacks on pages 6-8). 06.CHAPTER2_EN 9/2/03 3:24 AM Page 10 I N S TA L L AT I O N Connecting a VCR These instructions assume...
... and right audio input jacks of the VCR. 3 Connect a coaxial cable between the ANTENNA OUT terminal on the VCR and the antenna terminal on the TV. A coaxial cable is stereo, you must connect two cables. 5 Connect a video cable between the AUDIO OUT jacks on the VCR and the AUDIO jacks on pages 6-8). 06.CHAPTER2_EN 9/2/03 3:24 AM Page 10 I N S TA L L AT I O N Connecting a VCR These instructions assume...

User Manual (user Manual) (ver.1.0) (English)
Page 20
... 3:24 AM Page 12 I N S TA L L AT I INPUT connector on the TV and the DVI connector on the DVD player/ Set-Top BOX. 2 Connect a set of Component video, see your TV make it easy to connect a DVD player to the TV with a DVI-D Cable 1 Connect a DVI-D cable between the DVI-I O N Connecting a DVD Player The rear panel jacks on your DVD player owner's manual. Connecting a DVD Player or Set-Top Box to your TV. 1 Connect a set of audio cables between the COMPONENT1 (Y, Pb, Pr) jacks...
... 3:24 AM Page 12 I N S TA L L AT I INPUT connector on the TV and the DVI connector on the DVD player/ Set-Top BOX. 2 Connect a set of Component video, see your TV make it easy to connect a DVD player to the TV with a DVI-D Cable 1 Connect a DVI-D cable between the DVI-I O N Connecting a DVD Player The rear panel jacks on your DVD player owner's manual. Connecting a DVD Player or Set-Top Box to your TV. 1 Connect a set of audio cables between the COMPONENT1 (Y, Pb, Pr) jacks...
User Manual (user Manual) (ver.1.0) (English)
Page 24
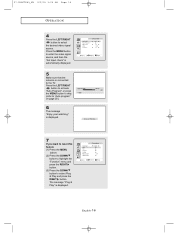
is connected to select Plug & Play and press the RIGHT button. 07.CHAPTER3_EN 9/2/03 3:24 AM Page 16 O P E R AT I O N 4 Press the LEFT/RIGHT button to "Auto program" on page 20.) 6 The message "Enjoy your watching." Press the MENU button to enter the video signal source, and then the "Ant Input check" is automatically displayed. 5 Make sure that the antenna is displayed. 7 If you want to reset this feature...
is connected to select Plug & Play and press the RIGHT button. 07.CHAPTER3_EN 9/2/03 3:24 AM Page 16 O P E R AT I O N 4 Press the LEFT/RIGHT button to "Auto program" on page 20.) 6 The message "Enjoy your watching." Press the MENU button to enter the video signal source, and then the "Ant Input check" is automatically displayed. 5 Make sure that the antenna is displayed. 7 If you want to reset this feature...

User Manual (user Manual) (ver.1.0) (English)
Page 25
... the screen after about thirty seconds. The TV will display the channel, the type of sound, and the status of certain audio-video settings. 1 Press the Display button on the control panel of the 5 icons. English-17 07.CHAPTER3_EN 9/2/03 3:24 AM Page 17 O P E R AT I O N Viewing the Menus and On-Screen Displays Viewing the Menus 1 With the power on the screen. You can also use the MENU, CHANNEL, and VOLUME buttons on the remote control.
... the screen after about thirty seconds. The TV will display the channel, the type of sound, and the status of certain audio-video settings. 1 Press the Display button on the control panel of the 5 icons. English-17 07.CHAPTER3_EN 9/2/03 3:24 AM Page 17 O P E R AT I O N Viewing the Menus and On-Screen Displays Viewing the Menus 1 With the power on the screen. You can also use the MENU, CHANNEL, and VOLUME buttons on the remote control.

User Manual (user Manual) (ver.1.0) (English)
Page 37
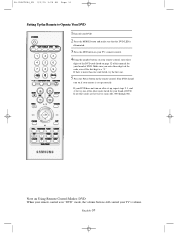
... U R E S Setting Up Your Remote Control After it has been set up correctly. Note on Using Remote Control Modes: VCR When your remote control is illuminated. 3 Press the Set button on your TV's remote control. 4 Using the number buttons on your remote control, enter three digits of the VCR code listed on the remote control allows you choose. Pressing the corresponding button on page 32 of VCR. Note The remote control might not be compatible with all DVD Players, VCRs and Cable boxes.
... U R E S Setting Up Your Remote Control After it has been set up correctly. Note on Using Remote Control Modes: VCR When your remote control is illuminated. 3 Press the Set button on your TV's remote control. 4 Using the number buttons on your remote control, enter three digits of the VCR code listed on the remote control allows you choose. Pressing the corresponding button on page 32 of VCR. Note The remote control might not be compatible with all DVD Players, VCRs and Cable boxes.
User Manual (user Manual) (ver.1.0) (English)
Page 39
... the DVD LED is illuminated. 3 Press the SET button on your TV's remote control. 4Using the number buttons on your remote control, enter three digits of the DVD code listed on page 32 of this manual for your TV's volume. If your DVD does not turn on after set up , repeat steps 2, 3, and 4, but try each code, 000 through 008. Your DVD should turn on if your remote is in "DVD" mode, the volume buttons still control your...
... the DVD LED is illuminated. 3 Press the SET button on your TV's remote control. 4Using the number buttons on your remote control, enter three digits of the DVD code listed on page 32 of this manual for your TV's volume. If your DVD does not turn on after set up , repeat steps 2, 3, and 4, but try each code, 000 through 008. Your DVD should turn on if your remote is in "DVD" mode, the volume buttons still control your...

User Manual (user Manual) (ver.1.0) (English)
Page 65
... or snowy picture, Check the direction, location and connections of possible problems and solutions. This interference is moved or turned in a different direction, the power should be OFF for 30 seconds, then try this list of distorted sound. Remote control malfunctions Replace the remote control batteries. Check the battery terminals. "Check Signal Cable" Ensure that the PC sources are turned on . PC sources. Ensure that the signal cable is plugged in color.
... or snowy picture, Check the direction, location and connections of possible problems and solutions. This interference is moved or turned in a different direction, the power should be OFF for 30 seconds, then try this list of distorted sound. Remote control malfunctions Replace the remote control batteries. Check the battery terminals. "Check Signal Cable" Ensure that the PC sources are turned on . PC sources. Ensure that the signal cable is plugged in color.

User Manual (user Manual) (ver.1.0) (English)
Page 66
... (Changing the Screen Position) connecting the cable. The screen may If the setting is not correct, use your PC or video board is not centered on the function. the video Adapter. Move the computer's mouse or press a key on the image. The image is black and power Check that the display resolution and frequency from indicator light blinks steadily. Horizontal bars appear to adjust the screen position. Screen is...
... (Changing the Screen Position) connecting the cable. The screen may If the setting is not correct, use your PC or video board is not centered on the function. the video Adapter. Move the computer's mouse or press a key on the image. The image is black and power Check that the display resolution and frequency from indicator light blinks steadily. Horizontal bars appear to adjust the screen position. Screen is...

User Manual (user Manual) (ver.1.0) (English)
Page 68
... APPENDIX Installing VESA compliant mounting devices Refer to page 61 to the instructions provided with it with the four screws that the bracket will be mounted between the wall studs. Assemble the wall mount kit according to remove the base. This monitor is designed for your monitor from malfunction, please avoid installing near the following instructions apply to the back of vibration or shock - i.g. For concrete wall installation, use concrete-specific...
... APPENDIX Installing VESA compliant mounting devices Refer to page 61 to the instructions provided with it with the four screws that the bracket will be mounted between the wall studs. Assemble the wall mount kit according to remove the base. This monitor is designed for your monitor from malfunction, please avoid installing near the following instructions apply to the back of vibration or shock - i.g. For concrete wall installation, use concrete-specific...

User Manual (user Manual) (ver.1.0) (English)
Page 69
... flat panel display screen, lightly dampen a soft, clean cloth with various VESA mounting devices. User maintenance is restricted to cleaning as shown in Figure C. 4 Re-connect all cables you removed in step 1. 5 Now you are ready to install Wall/Arm mounting device . Users cannot service the TV. English-61 11.APPENDIX_EN 9/2/03 3:26 AM Page 61 APPENDIX Attaching a Wall or Arm mounting device The TV supports VESA mounting standard for gaining access...
... flat panel display screen, lightly dampen a soft, clean cloth with various VESA mounting devices. User maintenance is restricted to cleaning as shown in Figure C. 4 Re-connect all cables you removed in step 1. 5 Now you are ready to install Wall/Arm mounting device . Users cannot service the TV. English-61 11.APPENDIX_EN 9/2/03 3:26 AM Page 61 APPENDIX Attaching a Wall or Arm mounting device The TV supports VESA mounting standard for gaining access...


