
User Manual (ENGLISH)
Page 2
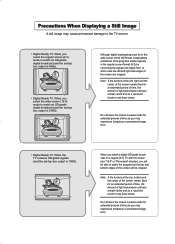
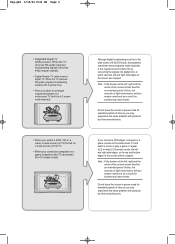
...and right side edges of the screen will also remain varied and as a result the borders may experience temporary or permanent image burn. • Digital Ready TV: When the TV receives HD-grade signals (and the set -top box output is 1080i). When you watch the program but the ...center of the screen remain fixed for extended periods of light transmission will be able to watch an SD-grade digital broadcast (and the set -top box output is 1080i). Although digital broadcasting must be in the wide screen (16:9) HD format, broadcasters sometimes show programs made originally in the ...
...and right side edges of the screen will also remain varied and as a result the borders may experience temporary or permanent image burn. • Digital Ready TV: When the TV receives HD-grade signals (and the set -top box output is 1080i). When you watch the program but the ...center of the screen remain fixed for extended periods of light transmission will be able to watch an SD-grade digital broadcast (and the set -top box output is 1080i). Although digital broadcasting must be in the wide screen (16:9) HD format, broadcasters sometimes show programs made originally in the ...
User Manual (ENGLISH)
Page 3
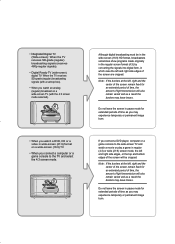
... (Wide-screen): When the TV receives SD-grade (regular) broadcasting signals (receives 480p regular signals). • Digital Ready TV (wide-screen): digital TV: When the TV receives SD-grade (regular) broadcasting signals (with a set-top box). • When you watch an analog (regular) broadcast on a ...be in the wide screen (16:9) HD format, broadcasters sometimes show programs made originally in the regular screen format (4:3) by converting the signals into digital form, in which case the left , right and the center of the screen remain fixed for an extended period of time, the amount of ...
... (Wide-screen): When the TV receives SD-grade (regular) broadcasting signals (receives 480p regular signals). • Digital Ready TV (wide-screen): digital TV: When the TV receives SD-grade (regular) broadcasting signals (with a set-top box). • When you watch an analog (regular) broadcast on a ...be in the wide screen (16:9) HD format, broadcasters sometimes show programs made originally in the regular screen format (4:3) by converting the signals into digital form, in which case the left , right and the center of the screen remain fixed for an extended period of time, the amount of ...
User Manual (ENGLISH)
Page 21
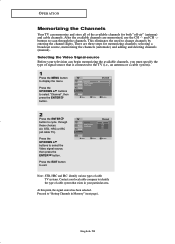
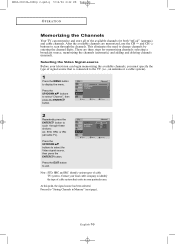
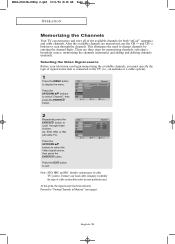
English-16 Selecting the Video Signal-source Before your television can memorize and store all cable TV). Proceed to change channels by entering the channel digits. O P E R AT I O N Memorizing the Channels Your TV can begin memorizing the available channels, you must specify the type of cable system that exists in Memory" (next ...
English-16 Selecting the Video Signal-source Before your television can memorize and store all cable TV). Proceed to change channels by entering the channel digits. O P E R AT I O N Memorizing the Channels Your TV can begin memorizing the available channels, you must specify the type of cable system that exists in Memory" (next ...
User Manual (ENGLISH)
Page 41
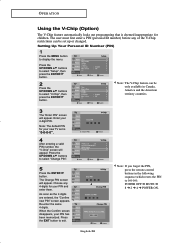
... them. Note: The V-Chip feature can be only available in the following sequence,which resets the PIN to display the menu. As soon as the 4 digits are entered, the "Confirm new PIN" screen appears. O P E R AT I O N Using the V-Chip (Option) The V-Chip feature automatically ... 4 After entering a valid PIN number, the "V-Chip" screen will appear. Choose any of the V-Chip restrictions can be set is deemed inappropriate for your 4-digit PIN. Setting Up Your Personal ID Number (PIN) 1 Press the MENU button to 0-0-0-0: POWER OFF ➔ MUTE ➔ 8 ➔ 2 ➔...
... them. Note: The V-Chip feature can be only available in the following sequence,which resets the PIN to display the menu. As soon as the 4 digits are entered, the "Confirm new PIN" screen appears. O P E R AT I O N Using the V-Chip (Option) The V-Chip feature automatically ... 4 After entering a valid PIN number, the "V-Chip" screen will appear. Choose any of the V-Chip restrictions can be set is deemed inappropriate for your 4-digit PIN. Setting Up Your Personal ID Number (PIN) 1 Press the MENU button to 0-0-0-0: POWER OFF ➔ MUTE ➔ 8 ➔ 2 ➔...

User Manual (ENGLISH)
Page 42
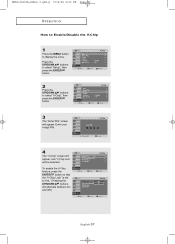
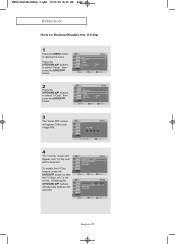
Press the UP/DOWN buttons to select "Setup", then press the ENTER button. 2 Press the UP/DOWN buttons to Yes. (Pressing the UP/DOWN buttons will alternate between On and Off.) English-37 To enable the V-Chip feature, press the ENTER button so that the "V-Chip Lock" is set to select "V-Chip", then press the ENTER button. 3 The "Enter PIN" screen will be selected. Enter your 4-digit PIN. 4 The "V-Chip" screen will appear, and "V-Chip Lock" will appear. O P E R AT I O N How to Enable/Disable the V-Chip 1 Press the MENU button to display the menu.
Press the UP/DOWN buttons to select "Setup", then press the ENTER button. 2 Press the UP/DOWN buttons to Yes. (Pressing the UP/DOWN buttons will alternate between On and Off.) English-37 To enable the V-Chip feature, press the ENTER button so that the "V-Chip Lock" is set to select "V-Chip", then press the ENTER button. 3 The "Enter PIN" screen will be selected. Enter your 4-digit PIN. 4 The "V-Chip" screen will appear, and "V-Chip Lock" will appear. O P E R AT I O N How to Enable/Disable the V-Chip 1 Press the MENU button to display the menu.

User Manual (ENGLISH)
Page 43
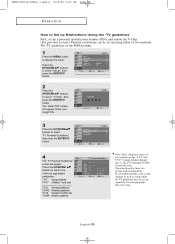
... set up using either of two separate groups : TV-Y and TV-Y7 (young children through age 7), and TV-G through TV-MA (everybody else). Enter your 4-digit PIN. 3 Press the UP/DOWN buttons to select "TV Parental Guidelines", then press the ENTER button. 4 The "TV Parental Guidelines" screen will appear. The "Enter...
... set up using either of two separate groups : TV-Y and TV-Y7 (young children through age 7), and TV-G through TV-MA (everybody else). Enter your 4-digit PIN. 3 Press the UP/DOWN buttons to select "TV Parental Guidelines", then press the ENTER button. 4 The "TV Parental Guidelines" screen will appear. The "Enter...

User Manual (ENGLISH)
Page 45
When the V-Chip lock is for movies. Enter your 4-digit PIN. 3 Press the UP/DOWN buttons to select "Setup", then press the ENTER button. Press the UP/DOWN buttons to select "V-Chip", then press the ...
When the V-Chip lock is for movies. Enter your 4-digit PIN. 3 Press the UP/DOWN buttons to select "Setup", then press the ENTER button. Press the UP/DOWN buttons to select "V-Chip", then press the ...
User Manual (ENGLISH)
Page 56
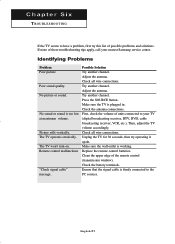
...connections. Then, adjust the TV volume accordingly. Replace the remote control batteries. Clean the upper edge of units connected to your nearest Samsung service center. Possible Solution Try another channel. Make sure the TV is firmly connected to the PC sources. Unplug the TV for... 30 seconds, then try this list of these troubleshooting tips apply, call your TV (digital broadcasting receiver, DTV, DVD, cable broadcasting receiver, VCR, etc.). Ensure that the signal cable is plugged in. Picture rolls vertically. ...
...connections. Then, adjust the TV volume accordingly. Replace the remote control batteries. Clean the upper edge of units connected to your nearest Samsung service center. Possible Solution Try another channel. Make sure the TV is firmly connected to the PC sources. Unplug the TV for... 30 seconds, then try this list of these troubleshooting tips apply, call your TV (digital broadcasting receiver, DTV, DVD, cable broadcasting receiver, VCR, etc.). Ensure that the signal cable is plugged in. Picture rolls vertically. ...
Quick Guide (ENGLISH)
Page 4
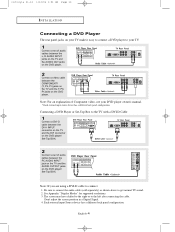
... COMPONENT1 (Y, Pb, Pr) jacks on the TV and the Y, Pb, Pr jacks on the DVD player/ Set-Top BOX. Don't adjust the screen position in a Digital Signal. 4. Note: For an explanation of audio cables between the DVI-I O N Connecting a DVD Player The rear panel jacks on your TV make it easy to...
... COMPONENT1 (Y, Pb, Pr) jacks on the TV and the Y, Pb, Pr jacks on the DVD player/ Set-Top BOX. Don't adjust the screen position in a Digital Signal. 4. Note: For an explanation of audio cables between the DVI-I O N Connecting a DVD Player The rear panel jacks on your TV make it easy to...
User Manual (user Manual) (ver.1.0) (English)
Page 20
... the need to select the Video signal source, then press the ENTER button. Press the UP/DOWN buttons to change channels by entering the channel digits. There are memorized, use the CH and CH buttons to scan through these choices: Air, STD, HRC or IRC (all of the available channels for...
... the need to select the Video signal source, then press the ENTER button. Press the UP/DOWN buttons to change channels by entering the channel digits. There are memorized, use the CH and CH buttons to scan through these choices: Air, STD, HRC or IRC (all of the available channels for...
User Manual (user Manual) (ver.1.0) (English)
Page 40
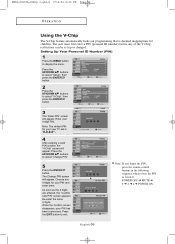
... Press the UP/DOWN buttons to display the menu. Re-enter the same 4 digits. Enter your new TV set up or changed. Choose any of the V-Chip restrictions can be set... is deemed inappropriate for your 4-digit PIN. Note: The default PIN for children. English-36 The Change PIN screen will ... in the following sequence,which resets the PIN to select "Change PIN". 5 Press the ENTER button. As soon as the 4 digits are entered, the "Confirm new PIN" screen appears. BN68-00633A-06Eng 3.qxd.q 5/12/04 6:23 PM Page 36 O ...
... Press the UP/DOWN buttons to display the menu. Re-enter the same 4 digits. Enter your new TV set up or changed. Choose any of the V-Chip restrictions can be set... is deemed inappropriate for your 4-digit PIN. Note: The default PIN for children. English-36 The Change PIN screen will ... in the following sequence,which resets the PIN to select "Change PIN". 5 Press the ENTER button. As soon as the 4 digits are entered, the "Confirm new PIN" screen appears. BN68-00633A-06Eng 3.qxd.q 5/12/04 6:23 PM Page 36 O ...
User Manual (user Manual) (ver.1.0) (English)
Page 41
Enter your 4-digit PIN. 4 The "V-Chip" screen will appear, and "V-Chip Lock" will alternate between On and Off.) English-37 BN68-00633A-06Eng 3.qxd.q 5/12/04 6:23 PM ...
Enter your 4-digit PIN. 4 The "V-Chip" screen will appear, and "V-Chip Lock" will alternate between On and Off.) English-37 BN68-00633A-06Eng 3.qxd.q 5/12/04 6:23 PM ...
User Manual (user Manual) (ver.1.0) (English)
Page 42
Enter your 4-digit PIN. 3 Press the UP/DOWN buttons to select "V-Chip", then press the ENTER button. Press the UP/DOWN buttons to select one of the six ...
Enter your 4-digit PIN. 3 Press the UP/DOWN buttons to select "V-Chip", then press the ENTER button. Press the UP/DOWN buttons to select one of the six ...

User Manual (user Manual) (ver.1.0) (English)
Page 44
Enter your 4-digit PIN. 3 Press the UP/DOWN buttons to select "Setup", then press the ENTER button. BN68-00633A-06Eng 3.qxd.q 5/12/04 6:23 PM Page 40 How ...
Enter your 4-digit PIN. 3 Press the UP/DOWN buttons to select "Setup", then press the ENTER button. BN68-00633A-06Eng 3.qxd.q 5/12/04 6:23 PM Page 40 How ...

User Manual (user Manual) (ver.1.0) (English)
Page 55
... Signal Cable" message. Adjust the antenna. Unplug the TV for 30 seconds, then try this list of units connected to your nearest Samsung service center. Picture rolls vertically. The TV operates erratically. The TV won't turn on. First, check the volume of possible problems ... sure the wall outlet is firmly connected to the PC sources. Clean the upper edge of these troubleshooting tips apply, call your TV (digital broadcasting receiver, DTV, DVD, cable broadcasting receiver, VCR, etc.). Identifying Problems Problem Poor picture Poor sound quality. Check all wire connections...
... Signal Cable" message. Adjust the antenna. Unplug the TV for 30 seconds, then try this list of units connected to your nearest Samsung service center. Picture rolls vertically. The TV operates erratically. The TV won't turn on. First, check the volume of possible problems ... sure the wall outlet is firmly connected to the PC sources. Clean the upper edge of these troubleshooting tips apply, call your TV (digital broadcasting receiver, DTV, DVD, cable broadcasting receiver, VCR, etc.). Identifying Problems Problem Poor picture Poor sound quality. Check all wire connections...

User Manual (user Manual) (ver.1.0) (English)
Page 2
... problem with products by other manufacturers. Note : If the borders at the left and right side edges of the screen are cropped. Although digital broadcasting must be cropped. Do not leave the screen in pause mode for an extended period of time, the amounts of light transmission will ... be in the wide screen (16:9) HD format, broadcasters sometimes show programs made originally in the regular screen format (4:3) by converting the signals into digital form, in which case the left , right and the center of the screen remain fixed for extended periods of time as a result the borders...
... problem with products by other manufacturers. Note : If the borders at the left and right side edges of the screen are cropped. Although digital broadcasting must be cropped. Do not leave the screen in pause mode for an extended period of time, the amounts of light transmission will ... be in the wide screen (16:9) HD format, broadcasters sometimes show programs made originally in the regular screen format (4:3) by converting the signals into digital form, in which case the left , right and the center of the screen remain fixed for extended periods of time as a result the borders...
User Manual (user Manual) (ver.1.0) (English)
Page 3
... the wide screen (16:9) HD format, broadcasters sometimes show programs made originally in the regular screen format (4:3) by converting the signals into digital form, in regular (4:3) or wide (21:9) screen mode, the left and right side edges of the screen will be cropped. If ...other manufacturers. Eng.qxd 6/18/04 8:46 AM Page 2 • Integrated Digital TV (Wide-screen): When the TV receives SD-grade (regular) broadcasting signals (receives 480p regular signals). • Digital Ready TV (wide-screen): digital TV: When the TV receives SD-grade (regular) broadcasting signals (with a ...
... the wide screen (16:9) HD format, broadcasters sometimes show programs made originally in the regular screen format (4:3) by converting the signals into digital form, in regular (4:3) or wide (21:9) screen mode, the left and right side edges of the screen will be cropped. If ...other manufacturers. Eng.qxd 6/18/04 8:46 AM Page 2 • Integrated Digital TV (Wide-screen): When the TV receives SD-grade (regular) broadcasting signals (receives 480p regular signals). • Digital Ready TV (wide-screen): digital TV: When the TV receives SD-grade (regular) broadcasting signals (with a ...
User Manual (user Manual) (ver.1.0) (English)
Page 21
... available channels are three steps for both "off-air" (antenna) and cable channels. Press the UP/DOWN buttons to change channels by entering the channel digits. At this point, the signal source has been selected. Proceed to cycle through the channels. This eliminates the need to select the Video signal source...
... available channels are three steps for both "off-air" (antenna) and cable channels. Press the UP/DOWN buttons to change channels by entering the channel digits. At this point, the signal source has been selected. Proceed to cycle through the channels. This eliminates the need to select the Video signal source...

User Manual (user Manual) (ver.1.0) (English)
Page 41
...Confirm new PIN" screen appears. Enter your PIN has been memorized. The Change PIN screen will appear. When the Confirm screen disappears, your 4-digit PIN. Press the EXIT button to exit. ➜ Note: If you forget the PIN, press the remote-control buttons in the following ...POWER OFF ➔ MUTE ➔ 8 ➔ 2 ➔ 4 ➔ POWER ON. The user must first enter a PIN (personal ID number) before any 4-digits for children. Setting Up Your Personal ID Number (PIN) 1 Press the MENU button to select "Change PIN". 5 Press the ENTER button. Press the UP/DOWN...
...Confirm new PIN" screen appears. Enter your PIN has been memorized. The Change PIN screen will appear. When the Confirm screen disappears, your 4-digit PIN. Press the EXIT button to exit. ➜ Note: If you forget the PIN, press the remote-control buttons in the following ...POWER OFF ➔ MUTE ➔ 8 ➔ 2 ➔ 4 ➔ POWER ON. The user must first enter a PIN (personal ID number) before any 4-digits for children. Setting Up Your Personal ID Number (PIN) 1 Press the MENU button to select "Change PIN". 5 Press the ENTER button. Press the UP/DOWN...
User Manual (user Manual) (ver.1.0) (English)
Page 42
...-37 Press the UP/DOWN buttons to select "Setup", then press the ENTER button. 2 Press the UP/DOWN buttons to display the menu. Enter your 4-digit PIN. 4 The "V-Chip" screen will appear, and "V-Chip Lock" will be selected.
...-37 Press the UP/DOWN buttons to select "Setup", then press the ENTER button. 2 Press the UP/DOWN buttons to display the menu. Enter your 4-digit PIN. 4 The "V-Chip" screen will appear, and "V-Chip Lock" will be selected.

