

Open Source Guide (ENGLISH)
Page 2
...source file to most effectively convey the exclusion of the ordinary General Public License). You can redistribute and change. To apply these terms (or, alternatively, under these terms, attach the following notices to the public, we recommend making it free software that everyone can do so by permitting redistribution under the terms of warranty...OUT OF THE USE OR INABILITY TO USE THE LIBRARY (INCLUDING BUT NOT LIMITED TO LOSS OF DATA OR DATA BEING RENDERED INACCURATE OR LOSSES SUSTAINED BY YOU OR THIRD PARTIES OR A FAILURE OF THE LIBRARY TO OPERATE WITH ANY OTHER SOFTWARE), EVEN IF ...
...source file to most effectively convey the exclusion of the ordinary General Public License). You can redistribute and change. To apply these terms (or, alternatively, under these terms, attach the following notices to the public, we recommend making it free software that everyone can do so by permitting redistribution under the terms of warranty...OUT OF THE USE OR INABILITY TO USE THE LIBRARY (INCLUDING BUT NOT LIMITED TO LOSS OF DATA OR DATA BEING RENDERED INACCURATE OR LOSSES SUSTAINED BY YOU OR THIRD PARTIES OR A FAILURE OF THE LIBRARY TO OPERATE WITH ANY OTHER SOFTWARE), EVEN IF ...

User Manual (ENGLISH)
Page 4
... All Channels . .8 Connecting to a Cable Box that Descrambles Some Channels . .8 Connecting a PC 9 Connecting a VCR 10 Connecting an S-VHS VCR 11 Connecting a DVD Player 12 Chapter 3: Special Features Turning the TV On and Off 13 Changing Channels 13 Using the Channel Buttons 13 Using the PRE-CH Button to select the Previous Channel . .13 Adjusting the Volume 13 Using Mute 13 Viewing the Display 14 Viewing the Menus 14 Chapter 4: Operation Plug & Play Feature 15 Memorizing the Channels 16 Selecting the Video Signal-source...
... All Channels . .8 Connecting to a Cable Box that Descrambles Some Channels . .8 Connecting a PC 9 Connecting a VCR 10 Connecting an S-VHS VCR 11 Connecting a DVD Player 12 Chapter 3: Special Features Turning the TV On and Off 13 Changing Channels 13 Using the Channel Buttons 13 Using the PRE-CH Button to select the Previous Channel . .13 Adjusting the Volume 13 Using Mute 13 Viewing the Display 14 Viewing the Menus 14 Chapter 4: Operation Plug & Play Feature 15 Memorizing the Channels 16 Selecting the Video Signal-source...
User Manual (ENGLISH)
Page 5
... Adjusting the Screen Quality 43 Changing the Screen Position 44 To Initialize the Screen Position or Color Settings 45 How to Auto Adjust 46 Using Automatic Picture Settings 47 Customizing the Picture 48 Adjusting the Color Tone 49 Customizing the Color 50 Chapter 6: Troubleshooting Identifying Problems 51 Appendix Using the Anti-Theft Kensington Lock 53 Retractable Stand 54 Installing VESA compliant mounting devices 55 Installing the Wall Mount Kit (LT-P1545, LT-P1745, LT-P1745U) . .56 Installing the Wall Mount Kit (LT-P2045, LT-2045U 58 Display Mode...
... Adjusting the Screen Quality 43 Changing the Screen Position 44 To Initialize the Screen Position or Color Settings 45 How to Auto Adjust 46 Using Automatic Picture Settings 47 Customizing the Picture 48 Adjusting the Color Tone 49 Customizing the Color 50 Chapter 6: Troubleshooting Identifying Problems 51 Appendix Using the Anti-Theft Kensington Lock 53 Retractable Stand 54 Installing VESA compliant mounting devices 55 Installing the Wall Mount Kit (LT-P1545, LT-P1745, LT-P1745U) . .56 Installing the Wall Mount Kit (LT-P2045, LT-2045U 58 Display Mode...

User Manual (ENGLISH)
Page 9
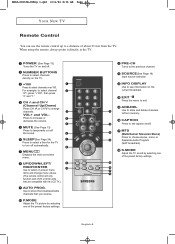
... off . S.MODE Adjust the TV sound by selecting one of the preset factory settings. POWER (See Page 13) Turns the TV on /off the sound. MUTE (See Page 13) Press to increase or decrease the volume. CAPTION Press to set caption on and off automatically. MTS (Multichannel Television Stereo) Press to select channel 121, press "+100", then press "2" and "1." NUMBER BUTTONS Press to select on -screen menu. UP...
... off . S.MODE Adjust the TV sound by selecting one of the preset factory settings. POWER (See Page 13) Turns the TV on /off the sound. MUTE (See Page 13) Press to increase or decrease the volume. CAPTION Press to set caption on and off automatically. MTS (Multichannel Television Stereo) Press to select channel 121, press "+100", then press "2" and "1." NUMBER BUTTONS Press to select on -screen menu. UP...
User Manual (ENGLISH)
Page 17
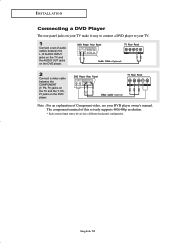
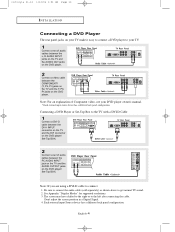
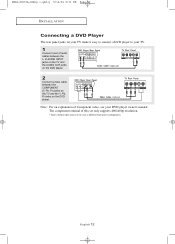
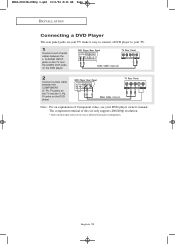
... component terminal of this set of Component video, see your TV. 1 Connect a set only supports 480i/480p resolution. * Each external input source device has a different back panel configuration. English-12 I N S TA L L AT I O N Connecting a DVD Player The rear panel jacks on your TV make it easy to connect a DVD player to your DVD player owner's manual. Note : For an explanation of audio cables between the L, R AUDIO INPUT jacks on the TV and the AUDIO OUT jacks on the DVD player. 2 Connect a video cable between the COMPONENT...
... component terminal of this set of Component video, see your TV. 1 Connect a set only supports 480i/480p resolution. * Each external input source device has a different back panel configuration. English-12 I N S TA L L AT I O N Connecting a DVD Player The rear panel jacks on your TV make it easy to connect a DVD player to your DVD player owner's manual. Note : For an explanation of audio cables between the L, R AUDIO INPUT jacks on the TV and the AUDIO OUT jacks on the DVD player. 2 Connect a video cable between the COMPONENT...
User Manual (ENGLISH)
Page 57
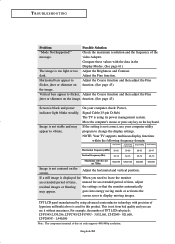
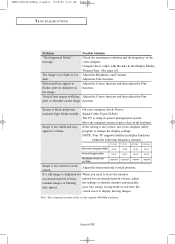
... is displayed for this set only supports 480i/480p resolution. dark. Image is black and power indicator light blinks steadily. Check the maximum resolution and the frequency of time, adjust residual images or blurring the settings so that the monitor automatically may appear to change the display settings. This is not correct, use it without uneasiness. Adjust the Fine function. screen. TROUBLESHOOTING Problem Possible Solution "Mode Not Supported!" video Adapter. function. (See page 43) Screen is...
... is displayed for this set only supports 480i/480p resolution. dark. Image is black and power indicator light blinks steadily. Check the maximum resolution and the frequency of time, adjust residual images or blurring the settings so that the monitor automatically may appear to change the display settings. This is not correct, use it without uneasiness. Adjust the Fine function. screen. TROUBLESHOOTING Problem Possible Solution "Mode Not Supported!" video Adapter. function. (See page 43) Screen is...
User Manual (ENGLISH)
Page 60
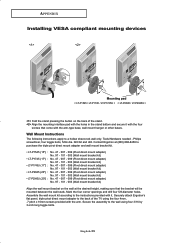
... arm-type base, wall mount hanger or other bases. Align the mounting interface pad with the holes in the stand bottom and secure it . APPENDIX Installing VESA compliant mounting devices SCART SCART SCART Mounting pad < LT-P1545 / LT-P1745 / LT-P1745U > < LT-P2045 / LT-P2045U > Fold the stand pressing the button on the wall at (800) 888-8458 to purchase the triple pivot direct mount adapter and wall mount bracket kit. • LT-P1545 (15") : • LT-P1745...
... arm-type base, wall mount hanger or other bases. Align the mounting interface pad with the holes in the stand bottom and secure it . APPENDIX Installing VESA compliant mounting devices SCART SCART SCART Mounting pad < LT-P1545 / LT-P1745 / LT-P1745U > < LT-P2045 / LT-P2045U > Fold the stand pressing the button on the wall at (800) 888-8458 to purchase the triple pivot direct mount adapter and wall mount bracket kit. • LT-P1545 (15") : • LT-P1745...
User Manual (ENGLISH)
Page 61
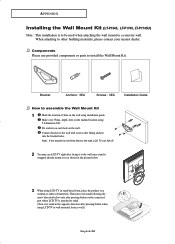
... (LT-P1545, LT-P1745, LT-P1745U) Note : This installation is attached to stand. (Turn over stand in the opposite direction after pressing button when using LCD TV in stand-based form, place the product on a cushion or other building materials, please contact your nearest dealer. Fix anchors on each hole on the marked location using installation guide. Components Please use LCD TV right after fixing it to install the Wall Mount Kit. Note : If the bracket...
... (LT-P1545, LT-P1745, LT-P1745U) Note : This installation is attached to stand. (Turn over stand in the opposite direction after pressing button when using LCD TV in stand-based form, place the product on a cushion or other building materials, please contact your nearest dealer. Fix anchors on each hole on the marked location using installation guide. Components Please use LCD TV right after fixing it to install the Wall Mount Kit. Note : If the bracket...

Quick Guide (ENGLISH)
Page 4
The component terminal of this set of Component video, see your TV. 1 Connect a set only supports 480i/480p resolution. * Each external input source device has a different back panel configuration. English-4 BN68-00633A-06Eng 1.qxd.q 5/12/04 6:31 PM Page 12 I N S TA L L AT I O N Connecting a DVD Player The rear panel jacks on your TV make it easy to connect a DVD player to your DVD player owner's manual. Note : For an explanation of audio cables between the L, R AUDIO INPUT jacks on the...
The component terminal of this set of Component video, see your TV. 1 Connect a set only supports 480i/480p resolution. * Each external input source device has a different back panel configuration. English-4 BN68-00633A-06Eng 1.qxd.q 5/12/04 6:31 PM Page 12 I N S TA L L AT I O N Connecting a DVD Player The rear panel jacks on your TV make it easy to connect a DVD player to your DVD player owner's manual. Note : For an explanation of audio cables between the L, R AUDIO INPUT jacks on the...
Quick Guide (ENGLISH)
Page 4
... the DVD player. Be sure to connect the audio cable (sold separately) as shown above to connect 1. See Appendix "Display Modes" for supported resolutions. 3. The screen may have shifted to the right or to your DVD player owner's manual. * Each external input source device has a different back panel configuration. Connecting a DVD Player or Set-Top Box to the TV with a DVI-D Cable 1 Connect a DVI-D cable between the DVI-I O N Connecting a DVD Player The rear panel jacks on your TV make it easy to connect a DVD player...
... the DVD player. Be sure to connect the audio cable (sold separately) as shown above to connect 1. See Appendix "Display Modes" for supported resolutions. 3. The screen may have shifted to the right or to your DVD player owner's manual. * Each external input source device has a different back panel configuration. Connecting a DVD Player or Set-Top Box to the TV with a DVI-D Cable 1 Connect a DVI-D cable between the DVI-I O N Connecting a DVD Player The rear panel jacks on your TV make it easy to connect a DVD player...

Quick Guide (easy Manual) (English)
Page 4
... AUDIO OUT jacks on the DVD player. 2 Connect a video cable between the COMPONENT (Y, Pb, Pr) jacks on the TV and the Y, Pb, Pr jacks on the DVD player. The component terminal of this set of Component video, see your TV. 1 Connect a set only supports 480i/480p resolution. * Each external input source device has a different back panel configuration. English-4 BN68-00633A-06Eng 1.qxd.q 5/12/04 6:31 PM Page 12 I N S TA L L AT I O N Connecting a DVD Player The rear panel...
... AUDIO OUT jacks on the DVD player. 2 Connect a video cable between the COMPONENT (Y, Pb, Pr) jacks on the TV and the Y, Pb, Pr jacks on the DVD player. The component terminal of this set of Component video, see your TV. 1 Connect a set only supports 480i/480p resolution. * Each external input source device has a different back panel configuration. English-4 BN68-00633A-06Eng 1.qxd.q 5/12/04 6:31 PM Page 12 I N S TA L L AT I O N Connecting a DVD Player The rear panel...
User Manual (user Manual) (ver.1.0) (English)
Page 3
... Channels . . .8 Connecting to a Cable Box that Descrambles Some Channels . .8 Connecting a VCR 10 Connecting an S-VHS VCR 11 Connecting a DVD Player 12 Chapter 3: Special Features Turning the TV On and Off 13 Changing Channels 13 Using the Channel Buttons 13 Using the PRE-CH Button to select the Previous Channel . .13 Adjusting the Volume 13 Using Mute 13 Viewing the Display 14 Viewing the Menus 14 Chapter 4: Operation Plug & Play Feature 15 Memorizing the Channels 16 Selecting the Video Signal-source 16 Storing Channels...
... Channels . . .8 Connecting to a Cable Box that Descrambles Some Channels . .8 Connecting a VCR 10 Connecting an S-VHS VCR 11 Connecting a DVD Player 12 Chapter 3: Special Features Turning the TV On and Off 13 Changing Channels 13 Using the Channel Buttons 13 Using the PRE-CH Button to select the Previous Channel . .13 Adjusting the Volume 13 Using Mute 13 Viewing the Display 14 Viewing the Menus 14 Chapter 4: Operation Plug & Play Feature 15 Memorizing the Channels 16 Selecting the Video Signal-source 16 Storing Channels...
User Manual (user Manual) (ver.1.0) (English)
Page 4
...) Display 42 How to Set up Your PC Software (Windows only 42 Adjusting the Screen Quality 43 Changing the Screen Position 44 To Initialize the Screen Position or Color Settings 45 How to Auto Adjust 46 Using Automatic Picture Settings 47 Customizing the Picture 48 Adjusting the Color Tone 49 Customizing the color 50 Chapter 6: Troubleshooting Identifying Problems 51 Appendix Using the Anti-Theft Kensington Lock 53 Retractable Stand 54 Installing VESA compliant mounting devices 55 Installing the Wall Mount...
...) Display 42 How to Set up Your PC Software (Windows only 42 Adjusting the Screen Quality 43 Changing the Screen Position 44 To Initialize the Screen Position or Color Settings 45 How to Auto Adjust 46 Using Automatic Picture Settings 47 Customizing the Picture 48 Adjusting the Color Tone 49 Customizing the color 50 Chapter 6: Troubleshooting Identifying Problems 51 Appendix Using the Anti-Theft Kensington Lock 53 Retractable Stand 54 Installing VESA compliant mounting devices 55 Installing the Wall Mount...

User Manual (user Manual) (ver.1.0) (English)
Page 8
... volume. MENU Displays the main on -screen menu items and change channels. Use to store the broadcast/cable channels that are compatible with the LCD TV.) AUTO PROG. ADD/DEL Use to store and delete channels to/from the TV. POWER (See Page 13) Turns the TV on /off automatically. MUTE (See Page 13) Press to temporarily cut off . S.MODE Adjust the TV sound by selecting one of the preset factory settings...
... volume. MENU Displays the main on -screen menu items and change channels. Use to store the broadcast/cable channels that are compatible with the LCD TV.) AUTO PROG. ADD/DEL Use to store and delete channels to/from the TV. POWER (See Page 13) Turns the TV on /off automatically. MUTE (See Page 13) Press to temporarily cut off . S.MODE Adjust the TV sound by selecting one of the preset factory settings...
User Manual (user Manual) (ver.1.0) (English)
Page 16
... this set of audio cables between the L, R AUDIO INPUT jacks on the TV and the AUDIO OUT jacks on the DVD player. 2 Connect a video cable between the COMPONENT (Y, Pb, Pr) jacks on the TV and the Y, Pb, Pr jacks on your TV make it easy to connect a DVD player to your DVD player owner's manual. The component terminal of Component video, see your TV. 1 Connect a set only supports 480i/480p resolution. * Each external input source device has a different back panel...
... this set of audio cables between the L, R AUDIO INPUT jacks on the TV and the AUDIO OUT jacks on the DVD player. 2 Connect a video cable between the COMPONENT (Y, Pb, Pr) jacks on the TV and the Y, Pb, Pr jacks on your TV make it easy to connect a DVD player to your DVD player owner's manual. The component terminal of Component video, see your TV. 1 Connect a set only supports 480i/480p resolution. * Each external input source device has a different back panel...
User Manual (user Manual) (ver.1.0) (English)
Page 56
... with the data in the Display Modes Timing Chart. (See page 61) The image is black and power indicator light blinks steadily. function. goes into energy saving mode or activates the screen saver to change the display settings. Check the maximum resolution and the frequency of this set only supports 480i/480p resolution. Horizontal bars appear to Adjust the Coarse function and then adjust the Fine flicker, jitter...
... with the data in the Display Modes Timing Chart. (See page 61) The image is black and power indicator light blinks steadily. function. goes into energy saving mode or activates the screen saver to change the display settings. Check the maximum resolution and the frequency of this set only supports 480i/480p resolution. Horizontal bars appear to Adjust the Coarse function and then adjust the Fine flicker, jitter...

User Manual (user Manual) (ver.1.0) (English)
Page 5
... Adjusting the Screen Quality 43 Changing the Screen Position 44 To Initialize the Screen Position or Color Settings 45 How to Auto Adjust 46 Using Automatic Picture Settings 47 Customizing the Picture 48 Adjusting the Color Tone 49 Customizing the color 50 Chapter 6: Troubleshooting Identifying Problems 51 Appendix Using the Anti-Theft Kensington Lock 53 Retractable Stand 54 Installing VESA compliant mounting devices 55 Installing the Wall Mount Kit (LT-P1545, LT-P1745 56 Installing the Wall Mount Kit (LT-P2045, LT-2045U 58 Display Mode 60 Using...
... Adjusting the Screen Quality 43 Changing the Screen Position 44 To Initialize the Screen Position or Color Settings 45 How to Auto Adjust 46 Using Automatic Picture Settings 47 Customizing the Picture 48 Adjusting the Color Tone 49 Customizing the color 50 Chapter 6: Troubleshooting Identifying Problems 51 Appendix Using the Anti-Theft Kensington Lock 53 Retractable Stand 54 Installing VESA compliant mounting devices 55 Installing the Wall Mount Kit (LT-P1545, LT-P1745 56 Installing the Wall Mount Kit (LT-P2045, LT-2045U 58 Display Mode 60 Using...
User Manual (user Manual) (ver.1.0) (English)
Page 9
... volume. VOL+ and VOLPress to select channel 121, press "+100", then press "2" and "1." UP/DOWN/LEFT/ RIGHT/ENTER Use to select on-screen menu items and change channels. EXIT Press the menu to set caption on the current broadcast. CAPTION Press to exit. SOURCE(See Page 19) Input source selection INFO DISPLAY Use to select channels over 100. When using the remote, always point it directly at the TV. NUMBER BUTTONS...
... volume. VOL+ and VOLPress to select channel 121, press "+100", then press "2" and "1." UP/DOWN/LEFT/ RIGHT/ENTER Use to select on-screen menu items and change channels. EXIT Press the menu to set caption on the current broadcast. CAPTION Press to exit. SOURCE(See Page 19) Input source selection INFO DISPLAY Use to select channels over 100. When using the remote, always point it directly at the TV. NUMBER BUTTONS...
User Manual (user Manual) (ver.1.0) (English)
Page 17
... audio cables between the L, R AUDIO INPUT jacks on the TV and the AUDIO OUT jacks on the DVD player. 2 Connect a video cable between the COMPONENT (Y, Pb, Pr) jacks on the TV and the Y, Pb, Pr jacks on your TV make it easy to connect a DVD player to your DVD player owner's manual. The component terminal of this set of Component video, see your TV. 1 Connect a set only supports 480i/480p resolution. * Each external input source device has a different back panel...
... audio cables between the L, R AUDIO INPUT jacks on the TV and the AUDIO OUT jacks on the DVD player. 2 Connect a video cable between the COMPONENT (Y, Pb, Pr) jacks on the TV and the Y, Pb, Pr jacks on your TV make it easy to connect a DVD player to your DVD player owner's manual. The component terminal of this set of Component video, see your TV. 1 Connect a set only supports 480i/480p resolution. * Each external input source device has a different back panel...

User Manual (user Manual) (ver.1.0) (English)
Page 57
... page 43) Screen is not correct, use your computer check: Power, Signal Cable(15-pin D-Sub) The TV is displayed for an extended period of time, adjust residual images or blurring the settings so that the monitor automatically may appear to change the display settings. If the setting is black and power indicator light blinks steadily. goes into energy saving mode or activates the screen saver to Adjust the Coarse function...
... page 43) Screen is not correct, use your computer check: Power, Signal Cable(15-pin D-Sub) The TV is displayed for an extended period of time, adjust residual images or blurring the settings so that the monitor automatically may appear to change the display settings. If the setting is black and power indicator light blinks steadily. goes into energy saving mode or activates the screen saver to Adjust the Coarse function...


