

Open Source Guide (ENGLISH)
Page 1
..., a complete machine-readable copy of the corresponding source code, to be guided by software patents. You are different, write to the author to control compilation and installation of the following: a) Accompany it with a work as to satisfy simultaneously your rights to work based on the Program), the recipient automatically receives a license from you changed the files and the date of this License...
..., a complete machine-readable copy of the corresponding source code, to be guided by software patents. You are different, write to the author to control compilation and installation of the following: a) Accompany it with a work as to satisfy simultaneously your rights to work based on the Program), the recipient automatically receives a license from you changed the files and the date of this License...

Open Source Guide (ENGLISH)
Page 2
You can redistribute and change. and each file should have at least the "copyright" line and a pointer to where the full notice is safest to attach them to the start of each source file to most effectively convey the exclusion of the ordinary General Public License). To apply...OPERATE WITH ANY OTHER SOFTWARE), EVEN IF SUCH HOLDER OR OTHER PARTY HAS BEEN ADVISED OF THE POSSIBILITY OF SUCH DAMAGES. How to Apply These Terms to Your New Libraries If you develop a new library, and you want it free software that everyone can do so by permitting redistribution under the terms of warranty...
You can redistribute and change. and each file should have at least the "copyright" line and a pointer to where the full notice is safest to attach them to the start of each source file to most effectively convey the exclusion of the ordinary General Public License). To apply...OPERATE WITH ANY OTHER SOFTWARE), EVEN IF SUCH HOLDER OR OTHER PARTY HAS BEEN ADVISED OF THE POSSIBILITY OF SUCH DAMAGES. How to Apply These Terms to Your New Libraries If you develop a new library, and you want it free software that everyone can do so by permitting redistribution under the terms of warranty...
Quick Guide (easy Manual) (ver.1.0) (English)
Page 4
... All Channels . .8 Connecting to a Cable Box that Descrambles Some Channels . .8 Connecting a PC 9 Connecting a VCR 10 Connecting an S-VHS VCR 11 Connecting a DVD Player 12 Chapter 3: Special Features Turning the TV On and Off 13 Changing Channels 13 Using the Channel Buttons 13 Using the PRE-CH Button to select the Previous Channel . .13 Adjusting the Volume 13 Using Mute 13 Viewing the Display 14 Viewing the Menus 14 Chapter 4: Operation Plug & Play Feature 15 Memorizing the Channels 16 Selecting the Video Signal-source...
... All Channels . .8 Connecting to a Cable Box that Descrambles Some Channels . .8 Connecting a PC 9 Connecting a VCR 10 Connecting an S-VHS VCR 11 Connecting a DVD Player 12 Chapter 3: Special Features Turning the TV On and Off 13 Changing Channels 13 Using the Channel Buttons 13 Using the PRE-CH Button to select the Previous Channel . .13 Adjusting the Volume 13 Using Mute 13 Viewing the Display 14 Viewing the Menus 14 Chapter 4: Operation Plug & Play Feature 15 Memorizing the Channels 16 Selecting the Video Signal-source...

Quick Guide (easy Manual) (ver.1.0) (English)
Page 5
... Screen Quality 45 Changing the Screen Position 46 To Initialize the Screen Position or Color Settings 47 How to Auto Adjust 48 Using Automatic Picture Settings 49 Customizing the Picture 50 Adjusting the Color Tone 51 Customizing the Color 52 Chapter 6: Troubleshooting Identifying Problems 53 Appendix Using the Anti-Theft Kensington Lock 55 Retractable Stand 56 Installing VESA compliant mounting devices 57 Installing the Wall Mount Kit (LT-P1545/LT-P1745/LT-P1745U 58 Installing the Wall Mount Kit (LT-P2045/LT-P2045U 60 Display Mode...
... Screen Quality 45 Changing the Screen Position 46 To Initialize the Screen Position or Color Settings 47 How to Auto Adjust 48 Using Automatic Picture Settings 49 Customizing the Picture 50 Adjusting the Color Tone 51 Customizing the Color 52 Chapter 6: Troubleshooting Identifying Problems 53 Appendix Using the Anti-Theft Kensington Lock 55 Retractable Stand 56 Installing VESA compliant mounting devices 57 Installing the Wall Mount Kit (LT-P1545/LT-P1745/LT-P1745U 58 Installing the Wall Mount Kit (LT-P2045/LT-P2045U 60 Display Mode...
Quick Guide (easy Manual) (ver.1.0) (English)
Page 6
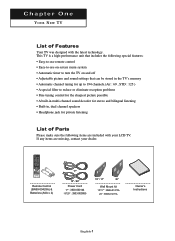
...List of Parts Please make sure the following special features: • Easy-to-use remote control • Easy-to-use on-screen menu system • Automatic timer to turn the TV on and off • Adjustable picture and sound settings that can be stored in the TV's memory • Automatic channel tuning for up to 194 channels... are missing, contact your LCD TV. Remote Control (BN59-00429A) & Batteries (AAA x 2) 17" 15" / 20" Power Cord 17" : 3903-000144 15"/20" : 3903-000085 15" / 17" 20" Wall Mount kit 15"/17" : BN96-01270A 20" : BN96-01271A Owner's Instructions English-1
...List of Parts Please make sure the following special features: • Easy-to-use remote control • Easy-to-use on-screen menu system • Automatic timer to turn the TV on and off • Adjustable picture and sound settings that can be stored in the TV's memory • Automatic channel tuning for up to 194 channels... are missing, contact your LCD TV. Remote Control (BN59-00429A) & Batteries (AAA x 2) 17" 15" / 20" Power Cord 17" : 3903-000144 15"/20" : 3903-000085 15" / 17" 20" Wall Mount kit 15"/17" : BN96-01270A 20" : BN96-01271A Owner's Instructions English-1

Quick Guide (easy Manual) (ver.1.0) (English)
Page 7
... on-screen menu. VOL + Press to change channels. HEADPHONE JACK Connect a set Timer on or off . YOUR NEW TV Familiarizing Yourself with Your New TV Front Panel Buttons The buttons on the front panel control your TV's features. - These keys can also use the remote control. SOURCE Displays a menu of all of external headphones to select in stand-by mode, Red shows when you turn the power on . POWER INDICATOR Lights up when you turn the power off...
... on-screen menu. VOL + Press to change channels. HEADPHONE JACK Connect a set Timer on or off . YOUR NEW TV Familiarizing Yourself with Your New TV Front Panel Buttons The buttons on the front panel control your TV's features. - These keys can also use the remote control. SOURCE Displays a menu of all of external headphones to select in stand-by mode, Red shows when you turn the power on . POWER INDICATOR Lights up when you turn the power off...
Quick Guide (easy Manual) (ver.1.0) (English)
Page 8
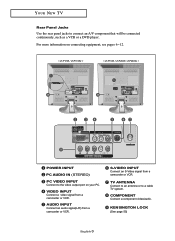
... LOCK (See page 55) English-3 TV ANTENNA Connect to an antenna or to connect an A/V component that will be connected continuously, such as a VCR or a DVD player. YOUR NEW TV Rear Panel Jacks Use the rear panel jacks to a cable TV system. COMPONENT Connect a component video/audio. For more information on connecting equipment, see pages 6~12. < LT-P1745 / LT-P1745U > < LT-P1545 / LT-P2045 / LT-P2045U > POWER INPUT PC AUDIO IN (STEREO) PC VIDEO INPUT Connect to the video output port on your PC. VIDEO INPUT Connect a video signal from...
... LOCK (See page 55) English-3 TV ANTENNA Connect to an antenna or to connect an A/V component that will be connected continuously, such as a VCR or a DVD player. YOUR NEW TV Rear Panel Jacks Use the rear panel jacks to a cable TV system. COMPONENT Connect a component video/audio. For more information on connecting equipment, see pages 6~12. < LT-P1745 / LT-P1745U > < LT-P1545 / LT-P2045 / LT-P2045U > POWER INPUT PC AUDIO IN (STEREO) PC VIDEO INPUT Connect to the video output port on your PC. VIDEO INPUT Connect a video signal from...
Quick Guide (easy Manual) (ver.1.0) (English)
Page 9
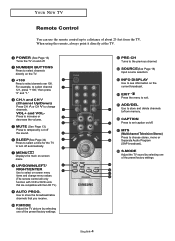
... channel. PRE-CH Turns to choose stereo, mono or Separate Audio Program (SAP broadcast). CAPTION Press to set caption on the current broadcast. YOUR NEW TV Remote Control You can use the remote control up to a distance of about 23 feet from memory. NUMBER BUTTONS Press to select channels directly on -screen menu items and change channels. CH and CH (Channel Up/Down) Press CH or CH to turn off the sound...
... channel. PRE-CH Turns to choose stereo, mono or Separate Audio Program (SAP broadcast). CAPTION Press to set caption on the current broadcast. YOUR NEW TV Remote Control You can use the remote control up to a distance of about 23 feet from memory. NUMBER BUTTONS Press to select channels directly on -screen menu items and change channels. CH and CH (Channel Up/Down) Press CH or CH to turn off the sound...
Quick Guide (easy Manual) (ver.1.0) (English)
Page 14
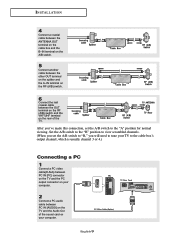
... (A/B) switch. 6 Connect the last coaxial cable between PC IN [AUDIO] on the TV and the Audio Out of the sound card on the rear of the TV. After you will need to tune your computer. Set the A/B switch to the "B" position to view scrambled channels. (When you set the A/B switch to "B," you 've made this connection, set the A/B switch to the cable box's output channel, which is usually channel 3 or 4.) Connecting a PC 1 Connect a PC video cable...
... (A/B) switch. 6 Connect the last coaxial cable between PC IN [AUDIO] on the TV and the Audio Out of the sound card on the rear of the TV. After you will need to tune your computer. Set the A/B switch to the "B" position to view scrambled channels. (When you set the A/B switch to "B," you 've made this connection, set the A/B switch to the cable box's output channel, which is usually channel 3 or 4.) Connecting a PC 1 Connect a PC video cable...

Quick Guide (easy Manual) (ver.1.0) (English)
Page 15
... your VCR tape. * Each external input source device has a different back panel configuration. English-10 Skip step 1 if you have not yet connected to an antenna or a cable system. 1 Unplug the cable or antenna from the back of the TV. 2 Connect the cable or antenna to the instructions on pages 6-9). A coaxial cable is stereo, you must connect two cables. 5 Connect a video cable between the VIDEO OUT jack on the VCR...
... your VCR tape. * Each external input source device has a different back panel configuration. English-10 Skip step 1 if you have not yet connected to an antenna or a cable system. 1 Unplug the cable or antenna from the back of the TV. 2 Connect the cable or antenna to the instructions on pages 6-9). A coaxial cable is stereo, you must connect two cables. 5 Connect a video cable between the VIDEO OUT jack on the VCR...
Quick Guide (easy Manual) (ver.1.0) (English)
Page 17
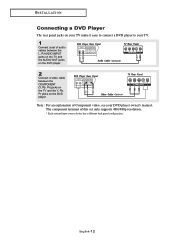
... the DVD player. 2 Connect a video cable between the COMPONENT (Y, Pb, Pr) jacks on the TV and the Y, Pb, Pr jacks on the DVD player. I N S TA L L AT I O N Connecting a DVD Player The rear panel jacks on your TV make it easy to connect a DVD player to your DVD player owner's manual. English-12 Note : For an explanation of Component video, see your TV. 1 Connect a set of this set only supports 480i/480p resolution. * Each external input source device has a different back panel configuration...
... the DVD player. 2 Connect a video cable between the COMPONENT (Y, Pb, Pr) jacks on the TV and the Y, Pb, Pr jacks on the DVD player. I N S TA L L AT I O N Connecting a DVD Player The rear panel jacks on your TV make it easy to connect a DVD player to your DVD player owner's manual. English-12 Note : For an explanation of Component video, see your TV. 1 Connect a set of this set only supports 480i/480p resolution. * Each external input source device has a different back panel configuration...
Quick Guide (easy Manual) (ver.1.0) (English)
Page 19
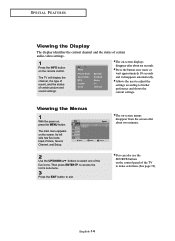
... display the channel, the type of sound, and the status of certain audio-video settings. 1 Press the INFO button on the control panel of the TV to select one of the five icons. The on -screen menus disappear from the screen after about two minutes. The on -screen displays disappear after about ten seconds. Its left side has five icons: Input, Picture, Sound, Channel, and Setup. 2 Use the UP/DOWN buttons...
... display the channel, the type of sound, and the status of certain audio-video settings. 1 Press the INFO button on the control panel of the TV to select one of the five icons. The on -screen menus disappear from the screen after about two minutes. The on -screen displays disappear after about ten seconds. Its left side has five icons: Input, Picture, Sound, Channel, and Setup. 2 Use the UP/DOWN buttons...
Quick Guide (easy Manual) (ver.1.0) (English)
Page 41
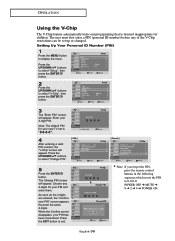
... buttons to display the menu. The user must first enter a PIN (personal ID number) before any 4-digits for children. O P E R AT I O N Using the V-Chip The V-Chip feature automatically locks out programming that is "0-0-0-0". 4 After entering a valid PIN number, the "V-Chip" screen will appear. English-36 [ Canada ] Note: If you forget the PIN, press the remote-control buttons in the following sequence,which resets the PIN to 0-0-0-0: POWER...
... buttons to display the menu. The user must first enter a PIN (personal ID number) before any 4-digits for children. O P E R AT I O N Using the V-Chip The V-Chip feature automatically locks out programming that is "0-0-0-0". 4 After entering a valid PIN number, the "V-Chip" screen will appear. English-36 [ Canada ] Note: If you forget the PIN, press the remote-control buttons in the following sequence,which resets the PIN to 0-0-0-0: POWER...
Quick Guide (easy Manual) (ver.1.0) (English)
Page 58
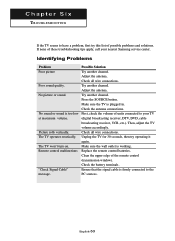
...remote control (transmission window). Ensure that the signal cable is working. Remote control malfunctions "Check Signal Cable" message. Adjust the antenna. Make sure the wall outlet is firmly connected to the PC sources. Try another channel. Check the antenna connections. Check all wire connections. Replace the remote control batteries. Clean the upper edge of units connected to your nearest Samsung service center. Check the battery terminals. Identifying Problems Problem Poor picture Poor sound quality. Try another channel. Chapter Six TROUBLESHOOTING...
...remote control (transmission window). Ensure that the signal cable is working. Remote control malfunctions "Check Signal Cable" message. Adjust the antenna. Make sure the wall outlet is firmly connected to the PC sources. Try another channel. Check the antenna connections. Check all wire connections. Replace the remote control batteries. Clean the upper edge of units connected to your nearest Samsung service center. Check the battery terminals. Identifying Problems Problem Poor picture Poor sound quality. Try another channel. Chapter Six TROUBLESHOOTING...

Quick Guide (easy Manual) (ver.1.0) (English)
Page 59
... correct, use your computer check: Power, Signal Cable(15-pin D-Sub) The TV is not centered on the screen. screen. The TFT LCD panel uses a panel consisting of the product. dark. On your computer utility program to produce. However, there may be few bright or dark pixels on the Adjust the horizontal and vertical position. TROUBLESHOOTING Problem Possible Solution "Mode Not Supported!" Check the maximum resolution and...
... correct, use your computer check: Power, Signal Cable(15-pin D-Sub) The TV is not centered on the screen. screen. The TFT LCD panel uses a panel consisting of the product. dark. On your computer utility program to produce. However, there may be few bright or dark pixels on the Adjust the horizontal and vertical position. TROUBLESHOOTING Problem Possible Solution "Mode Not Supported!" Check the maximum resolution and...

Quick Guide (easy Manual) (ver.1.0) (English)
Page 62
... direct mount adapter) No. 97 - 101 - 003 (Wall mount bracket kit) Align the wall mount bracket on the back of the TV using four 3/16 by 3-inch long toggle bolts. Wall Mount Instructions The following instructions apply to the wall using the four 4mm, 0.7 pitch x 10mm screws provided with the arm-type base, wall mount hanger or other bases. Tools/Hardware needed - APPENDIX Installing VESA compliant mounting devices SCART SCART SCART Mounting pad < LT-P1545 / LT-P1745 / LT-P1745U > < LT-P2045 / LT-P2045U...
... direct mount adapter) No. 97 - 101 - 003 (Wall mount bracket kit) Align the wall mount bracket on the back of the TV using four 3/16 by 3-inch long toggle bolts. Wall Mount Instructions The following instructions apply to the wall using the four 4mm, 0.7 pitch x 10mm screws provided with the arm-type base, wall mount hanger or other bases. Tools/Hardware needed - APPENDIX Installing VESA compliant mounting devices SCART SCART SCART Mounting pad < LT-P1545 / LT-P1745 / LT-P1745U > < LT-P2045 / LT-P2045U...
Quick Guide (easy Manual) (ver.1.0) (English)
Page 63
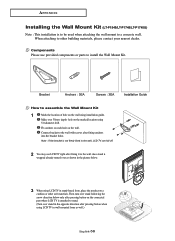
... marked location using installation guide. hole on the wall using 5.0-diameter drill. Connect bracket to install the Wall Mount Kit. APPENDIX Installing the Wall Mount Kit (LT-P1545/LT-P1745/LT-P1745U) Note : This installation is to be used when attaching the wall mount to other soft materials. Make over as well.) English-58 When attaching to a concrete wall. Then turn over stand in the opposite direction after pressing button when using LCD TV in the picture below...
... marked location using installation guide. hole on the wall using 5.0-diameter drill. Connect bracket to install the Wall Mount Kit. APPENDIX Installing the Wall Mount Kit (LT-P1545/LT-P1745/LT-P1745U) Note : This installation is to be used when attaching the wall mount to other soft materials. Make over as well.) English-58 When attaching to a concrete wall. Then turn over stand in the opposite direction after pressing button when using LCD TV in the picture below...
Quick Guide (easy Manual) (ver.1.0) (English)
Page 64
... turn LCD TV over which might cause damage to the bracket. pletely fixed to LCD TV. Excessive tilting can be com- Picture (3) shows the adjustment angle (0°~ 10°) when you convert stand-based LCD TV into wall-mounted one or vice versa. - Note : Picture (2) shows the angle adjustment section while LCD TV is completed 5 Remove Installation Guide after fixing it from bracket. Click" sound indicates section change from stand-based one to wall-mounted one . Picture...
... turn LCD TV over which might cause damage to the bracket. pletely fixed to LCD TV. Excessive tilting can be com- Picture (3) shows the adjustment angle (0°~ 10°) when you convert stand-based LCD TV into wall-mounted one or vice versa. - Note : Picture (2) shows the angle adjustment section while LCD TV is completed 5 Remove Installation Guide after fixing it from bracket. Click" sound indicates section change from stand-based one to wall-mounted one . Picture...

Quick Guide (easy Manual) (ver.1.0) (English)
Page 65
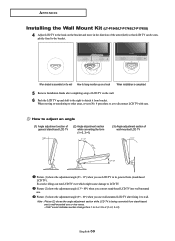
.... Connect bracket to the wall with screws after pressing button when using LCD TV in wall-mounted form as shown in the picture below only after pressing button on the marked location using installation guide. When attaching to install the Wall Mount Kit. depth- Then turn over stand following the arrow direction below . 3 When using LCD TV in stand-based form, place the product on the wall. Note : If the bracket is attached to a concrete wall. Components Please use LCD...
.... Connect bracket to the wall with screws after pressing button when using LCD TV in wall-mounted form as shown in the picture below only after pressing button on the marked location using installation guide. When attaching to install the Wall Mount Kit. depth- Then turn over stand following the arrow direction below . 3 When using LCD TV in stand-based form, place the product on the wall. Note : If the bracket is attached to a concrete wall. Components Please use LCD...

Quick Guide (easy Manual) (ver.1.0) (English)
Page 66
... APPENDIX Installing the Wall Mount Kit (LT-P2045/LT-P2045U) 4 Adjust LCD TV to the hook on the bracket and move in its general form (stand-based LCD TV). When bracket is assembled on the wall How to hang monitor up on the wall. 6 Push the LCD TV up and shift to the right to wall. Picture (2) shows the adjustment angle (13°~ 80°) when you convert stand-based LCD TV into wall-mounted one...
... APPENDIX Installing the Wall Mount Kit (LT-P2045/LT-P2045U) 4 Adjust LCD TV to the hook on the bracket and move in its general form (stand-based LCD TV). When bracket is assembled on the wall How to hang monitor up on the wall. 6 Push the LCD TV up and shift to the right to wall. Picture (2) shows the adjustment angle (13°~ 80°) when you convert stand-based LCD TV into wall-mounted one...


