
Owner Instructions
Page 3
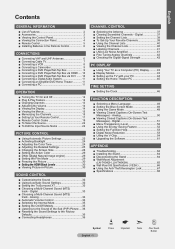
...Channel Control Selecting the Antenna 37 Clearing Scrambled Channels - English Contents General Information List of the Sub (PIP) Picture.....36 Resetting the Sound Settings to the Sound of Features 2 Accessories 2 Viewing the Control Panel 3 Viewing the Connection Panel 4 ...Remote Control 5 Installing Batteries in the Remote Control 6 Connections Connecting VHF and UHF Antennas 6 Connecting Cable TV 7 Connecting a VCR 8 Connecting a Camcorder 9 Connecting a DVD Player/Set-Top Box 9 Connecting a DVD Player/Set-Top Box via HDMI.........
...Channel Control Selecting the Antenna 37 Clearing Scrambled Channels - English Contents General Information List of the Sub (PIP) Picture.....36 Resetting the Sound Settings to the Sound of Features 2 Accessories 2 Viewing the Control Panel 3 Viewing the Connection Panel 4 ...Remote Control 5 Installing Batteries in the Remote Control 6 Connections Connecting VHF and UHF Antennas 6 Connecting Cable TV 7 Connecting a VCR 8 Connecting a Camcorder 9 Connecting a DVD Player/Set-Top Box 9 Connecting a DVD Player/Set-Top Box via HDMI.........
Owner Instructions
Page 7
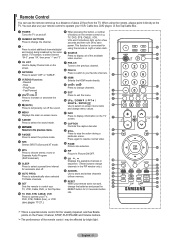
... save power. l CH / Displays the available channels in sequence. (These buttons change channels. n RESET When your remote does not work, change the batteries and press the RESET button for 2-3 seconds before use your remote control to operate your TV, DVD, STB, CABLE (box), or VCR (see pages 17-21.) ( When pressing this button...
... save power. l CH / Displays the available channels in sequence. (These buttons change channels. n RESET When your remote does not work, change the batteries and press the RESET button for 2-3 seconds before use your remote control to operate your TV, DVD, STB, CABLE (box), or VCR (see pages 17-21.) ( When pressing this button...

Owner Instructions
Page 15
... PRE-CH button to quickly alternate between two channels that are far apart, tune to one channel, then use the number button to reset this feature... 1. The message "Select the time zone in sequence. Press the PRE-CH button. 7. If you have memorized at ...time will be set ." is displayed. 8. If not, see all the channels that were either erased or not memorized. You will be set the clock. 9. TV Setup Plug & Play ► Language : English ► Time ► Game Mode : Off ► V-Chip ► Caption ► Menu Transparency : ...
... PRE-CH button to quickly alternate between two channels that are far apart, tune to one channel, then use the number button to reset this feature... 1. The message "Select the time zone in sequence. Press the PRE-CH button. 7. If you have memorized at ...time will be set ." is displayed. 8. If not, see all the channels that were either erased or not memorized. You will be set the clock. 9. TV Setup Plug & Play ► Language : English ► Time ► Game Mode : Off ► V-Chip ► Caption ► Menu Transparency : ...

Owner Instructions
Page 26
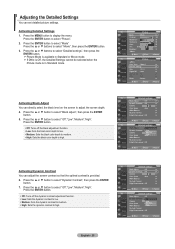
...You can be selected. Activating Backlight You can adjust the screen brightness by adjusting the LCD backlight brightness. (0~10) 1. Press the ENTER button to exit. When the picture mode is set to your preference. 1. TV Picture ▲More Color Tone : Cool1 ► Detailed settings ► Size ...Tone : Cool1 Detailed settings Size : 16 : 9 Digital NR : Auto Active Color : On DNIe OK Reset : CCananceclel Move Enter Return Return English - 24 Press the ENTER button. TV Press the ▲ or ▼ button to display the menu. Press the ▲ or ▼ ...
...You can be selected. Activating Backlight You can adjust the screen brightness by adjusting the LCD backlight brightness. (0~10) 1. Press the ENTER button to exit. When the picture mode is set to your preference. 1. TV Picture ▲More Color Tone : Cool1 ► Detailed settings ► Size ...Tone : Cool1 Detailed settings Size : 16 : 9 Digital NR : Auto Active Color : On DNIe OK Reset : CCananceclel Move Enter Return Return English - 24 Press the ENTER button. TV Press the ▲ or ▼ button to display the menu. Press the ▲ or ▼ ...
Owner Instructions
Page 27
... Size : 16 : 9 ► Digital NR : Auto ► Active Color : On ► DNIe : Off ► Reset :Cancel ► Move Enter Return TV Detailed Settings Black Adjust : Off ► Dynamic Contrast : Off ► Gamma 0 Color Space : Auto ► White Balance ...► My Color Control ► Edge Enhancement : Off ► Move Enter Return TV Detailed Settings Black Adjust : OOffff Dynamic Contrast : OLffow Gamma Medium Color Space : AuHtiogh White Balance My Color Control Edge Enhancement...
... Size : 16 : 9 ► Digital NR : Auto ► Active Color : On ► DNIe : Off ► Reset :Cancel ► Move Enter Return TV Detailed Settings Black Adjust : Off ► Dynamic Contrast : Off ► Gamma 0 Color Space : Auto ► White Balance ...► My Color Control ► Edge Enhancement : Off ► Move Enter Return TV Detailed Settings Black Adjust : OOffff Dynamic Contrast : OLffow Gamma Medium Color Space : AuHtiogh White Balance My Color Control Edge Enhancement...
Owner Instructions
Page 28
...the red color brightness. G gain: Adjusts the green color brightness. B gain: Adjusts the blue color brightness. Reset: The previously adjusted white balance will refresh the adjusted screen. Press the ▲ or ▼ button to select "Gamma", then press the...Edge Enhancement : Off ► Move Enter Return TV White Balance R offset 15 G offset 15 B offset 15 R gain 15 G gain 15 B gain 15 Reset Move Enter Return ▲ R offset ▼ Move Adjust 15 Return English - 26 Press the ENTER button. Wide : ...
...the red color brightness. G gain: Adjusts the green color brightness. B gain: Adjusts the blue color brightness. Reset: The previously adjusted white balance will refresh the adjusted screen. Press the ▲ or ▼ button to select "Gamma", then press the...Edge Enhancement : Off ► Move Enter Return TV White Balance R offset 15 G offset 15 B offset 15 R gain 15 G gain 15 B gain 15 Reset Move Enter Return ▲ R offset ▼ Move Adjust 15 Return English - 26 Press the ENTER button. Wide : ...
Owner Instructions
Page 29
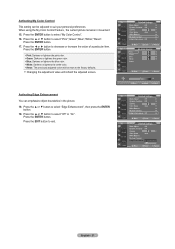
... Auto ► White Balance ► My Color Control ► Edge Enhancement : Off ► Move Enter Return TV My Color Control Pink 15 Green 15 Blue 15 White 15 Reset Move Enter Return ▲ Pink 15 ▼ Move Adjust Return Activating Edge Enhancement You can be...button to decrease or increase the value of a particular item. Press the ◄ or ► button to select "Pink","Green","Blue","White","Reset". Press the ENTER button. Pink: Darkens or lightens the pink color. Green: Darkens or lightens the green color. ...
... Auto ► White Balance ► My Color Control ► Edge Enhancement : Off ► Move Enter Return TV My Color Control Pink 15 Green 15 Blue 15 White 15 Reset Move Enter Return ▲ Pink 15 ▼ Move Adjust Return Activating Edge Enhancement You can be...button to decrease or increase the value of a particular item. Press the ◄ or ► button to select "Pink","Green","Blue","White","Reset". Press the ENTER button. Pink: Darkens or lightens the pink color. Green: Darkens or lightens the green color. ...
Owner Instructions
Page 30
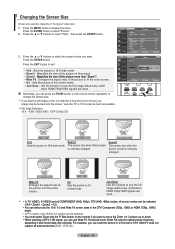
...▼ Just Scan Reset Move Enter Return 16:9 Sets the picture to select "Picture". Zoom2 The screen size when the Zoom1 screen is vertically enlarged. Just Scan Use the function to see the full image without any cutoff when HDMI 720p/1080i signals are input. • In TV, VIDEO, S-VIDEO,...480p), DTV (480i, 480p) modes, all external devices (DVD, VCR etc.). Press the ENTER button to 16:9 wide mode. TV Press the ENTER button. If you can reset the picture in 4:3 format to select "Size", then press the ENTER button. 3. Zoom1 The screen size when Wide screen is ...
...▼ Just Scan Reset Move Enter Return 16:9 Sets the picture to select "Picture". Zoom2 The screen size when the Zoom1 screen is vertically enlarged. Just Scan Use the function to see the full image without any cutoff when HDMI 720p/1080i signals are input. • In TV, VIDEO, S-VIDEO,...480p), DTV (480i, 480p) modes, all external devices (DVD, VCR etc.). Press the ENTER button to 16:9 wide mode. TV Press the ENTER button. If you can reset the picture in 4:3 format to select "Size", then press the ENTER button. 3. Zoom1 The screen size when Wide screen is ...
Owner Instructions
Page 31
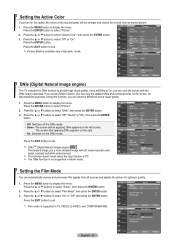
...Cool1 Detailed settings Size : 16 : 9 Digital NR : Auto Active Color : OOn ff DNIe : ODffemo Reset On Move Enter Return Setting the Film Mode You can view the difference in Movie mode. TV Setup ▲More Film Mode : Off ► PIP ► Function Help : On ► SW... : Cool1 Detailed settings Size : 16 : 9 Digital NR : Auto Active Color : OOn ff DNIe : OOffn Reset : Cancel Move Enter Return Return DNIe (Digital Natural Image engine) This TV includes the DNIe function to select "On" or "Off", then press the ENTER button. Press the ▲ or...
...Cool1 Detailed settings Size : 16 : 9 Digital NR : Auto Active Color : OOn ff DNIe : ODffemo Reset On Move Enter Return Setting the Film Mode You can view the difference in Movie mode. TV Setup ▲More Film Mode : Off ► PIP ► Function Help : On ► SW... : Cool1 Detailed settings Size : 16 : 9 Digital NR : Auto Active Color : OOn ff DNIe : OOffn Reset : Cancel Move Enter Return Return DNIe (Digital Natural Image engine) This TV includes the DNIe function to select "On" or "Off", then press the ENTER button. Press the ▲ or...
Owner Instructions
Page 34
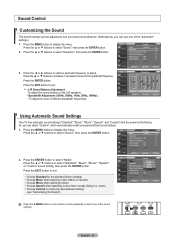
...select one of the "automatic" settings.) 1. TV Sound Mode : CusStotamndard Equalizer Music SRS TruSurround XT : Off Movie Multi-Track Options Speech Custom Auto Volume : Off Internal Mute : Off Sound Select : Main Reset Move Enter Return Press the S.MODE button on... news). • Choose Custom to adjust. TV Sound Mode : Custom ► Equalizer ► SRS TruSurround XT : Off ► Multi-Track Options ► Auto Volume : Off ► Internal Mute : Off ► Sound Select : Main ► Reset Move Enter Return 2. Press the ENTER button to...
...select one of the "automatic" settings.) 1. TV Sound Mode : CusStotamndard Equalizer Music SRS TruSurround XT : Off Movie Multi-Track Options Speech Custom Auto Volume : Off Internal Mute : Off Sound Select : Main Reset Move Enter Return Press the S.MODE button on... news). • Choose Custom to adjust. TV Sound Mode : Custom ► Equalizer ► SRS TruSurround XT : Off ► Multi-Track Options ► Auto Volume : Off ► Internal Mute : Off ► Sound Select : Main ► Reset Move Enter Return 2. Press the ENTER button to...
Owner Instructions
Page 35
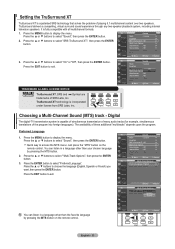
...Multi-Track Options ► Auto Volume : Off ► Internal Mute : Off ► Sound Select : Main ► Reset Move Enter Return 3. TruSurround XT technology is fully compatible with all multichannel formats. 1. Press the MENU button to exit. Quick ... ► Internal Mute : Off ► Sound Select : Main ► Reset Move Enter Return TV Multi-Track Options Preferred Language : English ► Multi-Track Sound : Stereo ► Enter Return TV Multi-Track Options Preferred Language : EngliEsnhglish Multi-Track Sound : StereSopanish French You ...
...Multi-Track Options ► Auto Volume : Off ► Internal Mute : Off ► Sound Select : Main ► Reset Move Enter Return 3. TruSurround XT technology is fully compatible with all multichannel formats. 1. Press the MENU button to exit. Quick ... ► Internal Mute : Off ► Sound Select : Main ► Reset Move Enter Return TV Multi-Track Options Preferred Language : English ► Multi-Track Sound : Stereo ► Enter Return TV Multi-Track Options Preferred Language : EngliEsnhglish Multi-Track Sound : StereSopanish French You ...

Owner Instructions
Page 36
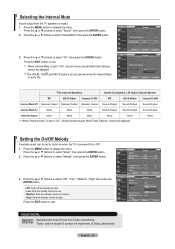
... ► Multi-Track Options ► Auto Volume : Off ► Internal Mute : Off ► Sound Select : Main ► Reset Move Enter Return TV Sound Mode : Custom Equalizer SRS TruSurround XT : Off Multi-Track Options Auto Volume Internal Mute : OfOf ff : OfOf n Sound Select : ...Main Reset Move Enter Return English - 34 Automatic Volume Control Reduces the differences in stereo. •...
... ► Multi-Track Options ► Auto Volume : Off ► Internal Mute : Off ► Sound Select : Main ► Reset Move Enter Return TV Sound Mode : Custom Equalizer SRS TruSurround XT : Off Multi-Track Options Auto Volume Internal Mute : OfOf ff : OfOf n Sound Select : ...Main Reset Move Enter Return English - 34 Automatic Volume Control Reduces the differences in stereo. •...
Owner Instructions
Page 37
...: Off ► Multi-Track Options ► Auto Volume : Off ► Internal Mute : Off ► Sound Select : Main ► Reset Move Enter Return TV Sound Mode : Custom Equalizer SRS TruSurround XT : Off Multi-Track Options Auto Volume : Off Internal Mute Sound Select : OfOf ff : MOainn... Reset Move Enter Return TV's Internal Speakers Audio Out (Optical, L/R Out) to Sound System RF AV, S-Video Component, PC, HDMI RF AV, S-...
...: Off ► Multi-Track Options ► Auto Volume : Off ► Internal Mute : Off ► Sound Select : Main ► Reset Move Enter Return TV Sound Mode : Custom Equalizer SRS TruSurround XT : Off Multi-Track Options Auto Volume : Off Internal Mute Sound Select : OfOf ff : MOainn... Reset Move Enter Return TV's Internal Speakers Audio Out (Optical, L/R Out) to Sound System RF AV, S-Video Component, PC, HDMI RF AV, S-...
Owner Instructions
Page 38
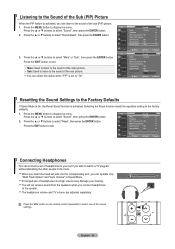
... : Off ► Multi-Track Options ► Auto Volume : Off ► Internal Mute : Off ► Sound Select : Main ► Reset Move Enter Return TV Sound 3. You can operate only "Multi Track Option" and "Auto Volume" in the room. Press the EXIT button to the system. You will not...menu. Auto Volume Internal Mute Sound Select Reset Move : Off : Off : MMaianin Sub Enter Return Resetting the Sound Settings to the Factory Defaults If Game Mode is On, the Reset Sound function is set to "On". The headphone volume and TV volume are adjusted separately. Press the MENU...
... : Off ► Multi-Track Options ► Auto Volume : Off ► Internal Mute : Off ► Sound Select : Main ► Reset Move Enter Return TV Sound 3. You can operate only "Multi Track Option" and "Auto Volume" in the room. Press the EXIT button to the system. You will not...menu. Auto Volume Internal Mute Sound Select Reset Move : Off : Off : MMaianin Sub Enter Return Resetting the Sound Settings to the Factory Defaults If Game Mode is On, the Reset Sound function is set to "On". The headphone volume and TV volume are adjusted separately. Press the MENU...
Owner Instructions
Page 44
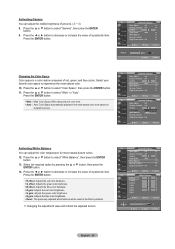
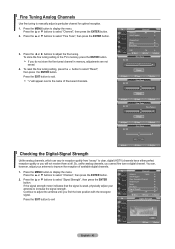
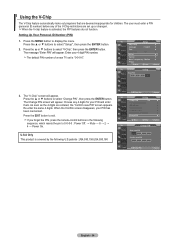
...; buttons to select "Signal Strength", then press the ENTER button. TV Channel Antenna : Air Auto Program Clear Scrambled Channel Channel List Name Fine Tune Signal Strength LNA : On Move Enter Air 24 Fine Tune Return 0 Reset Adjust Air 24 Save Fine Tune Return +3 Reset Adjust Air 24 * Save Return Fine Tune Fine Tuned...
...; buttons to select "Signal Strength", then press the ENTER button. TV Channel Antenna : Air Auto Program Clear Scrambled Channel Channel List Name Fine Tune Signal Strength LNA : On Move Enter Air 24 Fine Tune Return 0 Reset Adjust Air 24 Save Fine Tune Return +3 Reset Adjust Air 24 * Save Return Fine Tune Fine Tuned...
Owner Instructions
Page 46
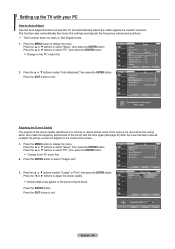
...exit. Press the ▲ or ▼ buttons to select "Setup", then press the ENTER button. TV PC Image Lock ► Position ► Auto Adjustment ► Image Reset ► Resolution :1360X768 @60Hz Move Enter Return Auto Adjustment in DVI-Digital mode. 1. Press the &#... does not work in Progress. Press the ENTER button to remove or reduce picture noise. TV PC Image Lock ► Position ► Auto Adjustment ► Image Reset ► Resolution :1360X768 @60Hz 3. Please Wait Adjusting the Screen Quality The purpose of the...
...exit. Press the ▲ or ▼ buttons to select "Setup", then press the ENTER button. TV PC Image Lock ► Position ► Auto Adjustment ► Image Reset ► Resolution :1360X768 @60Hz Move Enter Return Auto Adjustment in DVI-Digital mode. 1. Press the &#... does not work in Progress. Press the ENTER button to remove or reduce picture noise. TV PC Image Lock ► Position ► Auto Adjustment ► Image Reset ► Resolution :1360X768 @60Hz 3. Please Wait Adjusting the Screen Quality The purpose of the...
Owner Instructions
Page 47
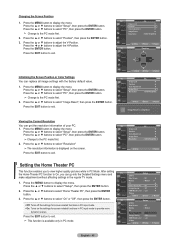
...the V-Position. Change to select "On" or "Off", then press the ENTER button. TV PC Image Lock ► Position ► Auto Adjustment ► Image Reset ► Resolution :1360X768 @60Hz Move Return Setting the Home Theater PC This function enables you.... Press the ◄ or ► buttons to display the menu. TV PC Image Lock ► Position ► Auto Adjustment ► Image Reset ► Resolution :1360X768 @60Hz Move Enter Return TV Position ▲ ▲ ▲ ▲ Initializing the Screen Position ...
...the V-Position. Change to select "On" or "Off", then press the ENTER button. TV PC Image Lock ► Position ► Auto Adjustment ► Image Reset ► Resolution :1360X768 @60Hz Move Return Setting the Home Theater PC This function enables you.... Press the ◄ or ► buttons to display the menu. TV PC Image Lock ► Position ► Auto Adjustment ► Image Reset ► Resolution :1360X768 @60Hz Move Enter Return TV Position ▲ ▲ ▲ ▲ Initializing the Screen Position ...
Owner Instructions
Page 55
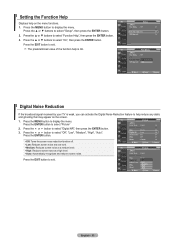
... button. Reset : Cancel Move Enter ► Return Medium: Reduces screen noise at a high level. ▲More Auto: Automatically recognizes and reduces screen noise. TV Picture High: Reduces screen noise at a medium level. TV ▲More Setup 1. TV Film Mode... Off: Turns the screen noise reduction function off. Low: Reduces screen noise at a low level. Size Digital NR Active Color DNIe Reset : 16 : 9 : LoOwff : OLnow : OMHffiegdhium Auto Move Enter Return English - 53 Film Mode : Off ► PIP ► Function Help...
... button. Reset : Cancel Move Enter ► Return Medium: Reduces screen noise at a high level. ▲More Auto: Automatically recognizes and reduces screen noise. TV Picture High: Reduces screen noise at a medium level. TV ▲More Setup 1. TV Film Mode... Off: Turns the screen noise reduction function off. Low: Reduces screen noise at a low level. Size Digital NR Active Color DNIe Reset : 16 : 9 : LoOwff : OLnow : OMHffiegdhium Auto Move Enter Return English - 53 Film Mode : Off ► PIP ► Function Help...
Owner Instructions
Page 56
... English ► Time ► Game Mode : Off ► V-Chip ► Caption ► Menu Transparency : Medium ► ▼More Move Enter Return TV V-Chip Enter PIN * * * * 3. Press the ▲ or ▼ buttons to display the menu. Press the EXIT button to select "Setup", then press... them. Setting Up Your Personal ID Number (PIN) 1. Choose any of a new TV set up or changed. When the V-chip feature is covered by the following sequence, which resets the pin to select "V-Chip", then press the ENTER button. When the Confirm screen ...
... English ► Time ► Game Mode : Off ► V-Chip ► Caption ► Menu Transparency : Medium ► ▼More Move Enter Return TV V-Chip Enter PIN * * * * 3. Press the ▲ or ▼ buttons to display the menu. Press the EXIT button to select "Setup", then press... them. Setting Up Your Personal ID Number (PIN) 1. Choose any of a new TV set up or changed. When the V-chip feature is covered by the following sequence, which resets the pin to select "V-Chip", then press the ENTER button. When the Confirm screen ...
Owner Instructions
Page 67
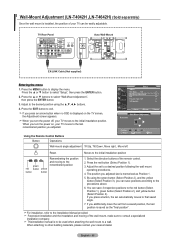
...", then press the ENTER button. 3. Press the ▲ or ▼ buttons to display the menu. Using the Remote Control Buttons Button Operations Setup TV ▲More Film Mode : Off ► Wall-Mount Adjustment ► PIP ► Function Help : Off ► SW Upgrade ► Move ...Exit Wall-mount angle adjustment Tilt Up, Tilt Down, Move right, Move left Reset Moves to the initial installation position green red button yellow button button Remembering the position and moving of your TV can be used when attaching the wall mount to a wall. If you ...
...", then press the ENTER button. 3. Press the ▲ or ▼ buttons to display the menu. Using the Remote Control Buttons Button Operations Setup TV ▲More Film Mode : Off ► Wall-Mount Adjustment ► PIP ► Function Help : Off ► SW Upgrade ► Move ...Exit Wall-mount angle adjustment Tilt Up, Tilt Down, Move right, Move left Reset Moves to the initial installation position green red button yellow button button Remembering the position and moving of your TV can be used when attaching the wall mount to a wall. If you ...


