User Manual (ENGLISH)
Page 3
... Connecting a PC 14 OPERATION Turning the TV On and Off 15 Plug & Play Feature 15 Dynamic Menus and On-Screen Displays 17 Navigating Menus by Using the Menu Map 18 Selecting a Menu Language 19 Memorizing Channels 20 Changing Channels 22 Setting Up Your Remote Control 23 Remote Control Codes 25 Setting the Clock 28 Setting the On/Off Timer 30 Setting the Sleep Timer 31 Viewing an External Signal Source 32 Assigning Names to External Input Mode 33 CHANNEL CONTROL Selecting Your Favorite Channels 34 Viewing...
... Connecting a PC 14 OPERATION Turning the TV On and Off 15 Plug & Play Feature 15 Dynamic Menus and On-Screen Displays 17 Navigating Menus by Using the Menu Map 18 Selecting a Menu Language 19 Memorizing Channels 20 Changing Channels 22 Setting Up Your Remote Control 23 Remote Control Codes 25 Setting the Clock 28 Setting the On/Off Timer 30 Setting the Sleep Timer 31 Viewing an External Signal Source 32 Assigning Names to External Input Mode 33 CHANNEL CONTROL Selecting Your Favorite Channels 34 Viewing...
User Manual (ENGLISH)
Page 4
... Software (Windows Only 76 Display Modes 76 Adjusting the Picture Quality 77 Changing the Picture Position 78 Adjusting the Picture Quality and Position Automatically 79 Changing the Picture Size (PC Mode 80 Viewing the Current Resolution 81 Initializing the Picture Settings 82 APPENDIX Identifying Problems 83 Installing the Stand 84 Disconnecting the Stand 84 Stand Swivel Function 84 Installing the Wall Mount Kit (LN-S4095D 85 Installing the Wall Mount Kit (LN-S4695D 86 Using the Anti-Theft Kensington Lock...
... Software (Windows Only 76 Display Modes 76 Adjusting the Picture Quality 77 Changing the Picture Position 78 Adjusting the Picture Quality and Position Automatically 79 Changing the Picture Size (PC Mode 80 Viewing the Current Resolution 81 Initializing the Picture Settings 82 APPENDIX Identifying Problems 83 Installing the Stand 84 Disconnecting the Stand 84 Stand Swivel Function 84 Installing the Wall Mount Kit (LN-S4095D 85 Installing the Wall Mount Kit (LN-S4695D 86 Using the Anti-Theft Kensington Lock...
User Manual (ENGLISH)
Page 5
... Easy-to-operate remote control Navigating Menus by Using the Menu Map Automatic timer to turn the TV on and off at any items are included with adjustable image size Life-like clear images provided by DNle technology Color Weakness mode Digital Input (HDMI/DVI IN) jack Digital Audio Output (OPTICAL) jack Game mode Easy-to reduce or eliminate reception problems Fine tuning control for the sharpest picture possible A built-in multi-channel sound decoder...
... Easy-to-operate remote control Navigating Menus by Using the Menu Map Automatic timer to turn the TV on and off at any items are included with adjustable image size Life-like clear images provided by DNle technology Color Weakness mode Digital Input (HDMI/DVI IN) jack Digital Audio Output (OPTICAL) jack Game mode Easy-to reduce or eliminate reception problems Fine tuning control for the sharpest picture possible A built-in multi-channel sound decoder...
User Manual (ENGLISH)
Page 6
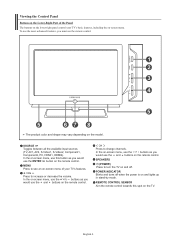
... on and lights up in stand-by mode. SPEAKERS (POWER) Press to see an on the TV. Press to change channels. In the on-screen menu, use the buttons as you would use the and buttons on -screen menu. Viewing the Control Panel Buttons on the Lower-Right Part of your TV's basic features, including the on the remote control. Press to increase or decrease the volume. REMOTE CONTROL SENSOR Aim the remote control towards this button as you...
... on and lights up in stand-by mode. SPEAKERS (POWER) Press to see an on the TV. Press to change channels. In the on-screen menu, use the buttons as you would use the and buttons on -screen menu. Viewing the Control Panel Buttons on the Lower-Right Part of your TV's basic features, including the on the remote control. Press to increase or decrease the volume. REMOTE CONTROL SENSOR Aim the remote control towards this button as you...
User Manual (ENGLISH)
Page 7
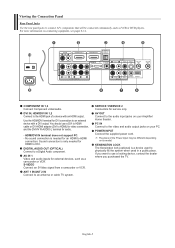
... 2 IN Connect to the video and audio output jacks on your PC. PC IN Connect to an antenna or cable TV system. KENSINGTON LOCK The Kensington lock (optional) is a device used in a public place. For more information on its model. No sound connection is only needed for an HDMI to physically fix the system when used to HDMI connection. POWER INPUT Connect the supplied power cord. The place of a device with a DVI output. S-VIDEO Connect an S-Video signal from a camcorder...
... 2 IN Connect to the video and audio output jacks on your PC. PC IN Connect to an antenna or cable TV system. KENSINGTON LOCK The Kensington lock (optional) is a device used in a public place. For more information on its model. No sound connection is only needed for an HDMI to physically fix the system when used to HDMI connection. POWER INPUT Connect the supplied power cord. The place of a device with a DVI output. S-VIDEO Connect an S-Video signal from a camcorder...
User Manual (ENGLISH)
Page 9
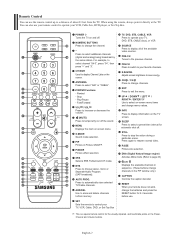
... analog) being broadcast by the same station. FAV.CH Press to switch to your VCR, Cable box, DVD player, or Set-Top Box. INFO Press to display information on the screen. P.SIZE Picture size selection. RESET When your TV, DVD, STB, CABLE (box), or VCR SOURCE Press to display all of about 23 feet from memory. English-7 NUMERIC BUTTONS Press to change channels in the PIP window only.) CAPTION Controls the caption decoder. CH MGR Used to display Channel Lists...
... analog) being broadcast by the same station. FAV.CH Press to switch to your VCR, Cable box, DVD player, or Set-Top Box. INFO Press to display information on the screen. P.SIZE Picture size selection. RESET When your TV, DVD, STB, CABLE (box), or VCR SOURCE Press to display all of about 23 feet from memory. English-7 NUMERIC BUTTONS Press to change channels in the PIP window only.) CAPTION Controls the caption decoder. CH MGR Used to display Channel Lists...
User Manual (ENGLISH)
Page 10
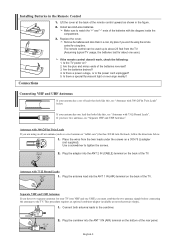
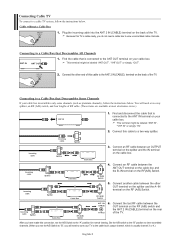
....) Connections If the remote control doesn't work, check the following: 1. Make sure to about 23 feet from the twin leads under the screws on the back of the TV. Connecting VHF and UHF Antennas If your antenna has a set of the rear panel. Use a screwdriver to the combiner. ANT 2 IN (CABLE) 2. Plug the antenna lead into the ANT 1 IN (AIR) terminal on a 300-75 Ω adapter...
....) Connections If the remote control doesn't work, check the following: 1. Make sure to about 23 feet from the twin leads under the screws on the back of the TV. Connecting VHF and UHF Antennas If your antenna has a set of the rear panel. Use a screwdriver to the combiner. ANT 2 IN (CABLE) 2. Plug the antenna lead into the ANT 1 IN (AIR) terminal on a 300-75 Ω adapter...
User Manual (ENGLISH)
Page 11
... (A/B) Switch Incoming cable Splitter Cable Box RF (A/B) Switch ANT 2 IN (CABLE) TV Rear 6. Set the A/B switch to the "B" position to view scrambled channels. (When you will need to tune your cable box. Connecting Cable TV To connect to view unscrambled cable channels. Because this connection, set the A/B Switch to "B", you set the A/B Switch to the ANT 2 IN (CABLE) terminal on your TV to the ANT IN terminal on the back of the TV. Plug the incoming cable into...
... (A/B) Switch Incoming cable Splitter Cable Box RF (A/B) Switch ANT 2 IN (CABLE) TV Rear 6. Set the A/B switch to the "B" position to view scrambled channels. (When you will need to tune your cable box. Connecting Cable TV To connect to view unscrambled cable channels. Because this connection, set the A/B Switch to "B", you set the A/B Switch to the ANT 2 IN (CABLE) terminal on your TV to the ANT IN terminal on the back of the TV. Plug the incoming cable into...
User Manual (ENGLISH)
Page 12
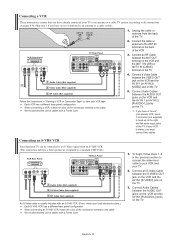
Unplug the cable or antenna from an S-VHS VCR. (This connection delivers a better picture as compared to a standard VHS VCR.) VCR Rear Panel TV Rear Panel 3 Audio Cable (Not supplied) 2 S-Video Cable (Not supplied) 1 RF Cable (Not supplied) An S-Video cable is stereo, you have a "mono" (non-stereo) VCR, use a Y-connector (not supplied) to hook up to the right and left audio input jacks of the VCR. 3. Connect an RF Cable between the ANT OUT terminal...
Unplug the cable or antenna from an S-VHS VCR. (This connection delivers a better picture as compared to a standard VHS VCR.) VCR Rear Panel TV Rear Panel 3 Audio Cable (Not supplied) 2 S-Video Cable (Not supplied) 1 RF Cable (Not supplied) An S-Video cable is stereo, you have a "mono" (non-stereo) VCR, use a Y-connector (not supplied) to hook up to the right and left audio input jacks of the VCR. 3. Connect an RF Cable between the ANT OUT terminal...
User Manual (ENGLISH)
Page 13
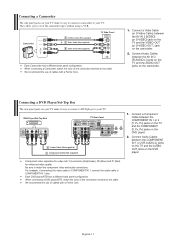
... connection terminal to the cable. When connecting a DVD player/STB, match the color of the connection terminal to the cable. We recommend the use of cables with a Ferrite Core. Connecting a DVD Player/Set-Top Box The rear panel jacks on the camcorder. Component video separates the video into Y (Luminance (brightness)), Pb (Blue) and Pr (Red) for enhanced video quality. Be sure to view the camcorder tapes without using a VCR. Camcorder 1 S-Video Cable (Not supplied) or 1 Video Cable (Not supplied) 2 Audio Cable (Not supplied...
... connection terminal to the cable. When connecting a DVD player/STB, match the color of the connection terminal to the cable. We recommend the use of cables with a Ferrite Core. Connecting a DVD Player/Set-Top Box The rear panel jacks on the camcorder. Component video separates the video into Y (Luminance (brightness)), Pb (Blue) and Pr (Red) for enhanced video quality. Be sure to view the camcorder tapes without using a VCR. Camcorder 1 S-Video Cable (Not supplied) or 1 Video Cable (Not supplied) 2 Audio Cable (Not supplied...
User Manual (ENGLISH)
Page 14
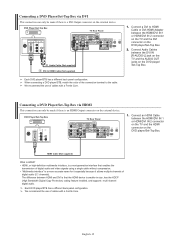
... that the HDMI device is smaller in size, has the HDCP (High Bandwidth Digital Copy Protection) coding feature installed, and supports multi-channel digital audio. Connect a DVI to HDMI Cable or DVI-HDMI Adapter between the HDMI/DVI IN 1 or HDMI/DVI IN 2 connector on the TV and the HDMI connector on the DVD player/Set-Top Box. Connect Audio Cables between HDMI and DVI is that enables the transmission of digital audio and video signals using a single cable without compression...
... that the HDMI device is smaller in size, has the HDCP (High Bandwidth Digital Copy Protection) coding feature installed, and supports multi-channel digital audio. Connect a DVI to HDMI Cable or DVI-HDMI Adapter between the HDMI/DVI IN 1 or HDMI/DVI IN 2 connector on the TV and the HDMI connector on the DVD player/Set-Top Box. Connect Audio Cables between HDMI and DVI is that enables the transmission of digital audio and video signals using a single cable without compression...
User Manual (ENGLISH)
Page 17
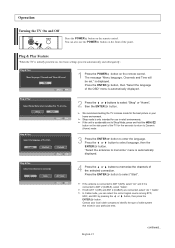
... the POWER button on the front of the panel. is only intended for use the POWER button on the remote control. Shop mode is displayed. In Cable mode, you can also use in retail environments. The message "Menu language, Channels and Time will be set to select "Shop" or "Home", then the ENTER button. Press the ENTER button to select language, then the ENTER button. If the antenna is connected to ANT...
... the POWER button on the front of the panel. is only intended for use the POWER button on the remote control. Shop mode is displayed. In Cable mode, you can also use in retail environments. The message "Menu language, Channels and Time will be set to select "Shop" or "Home", then the ENTER button. Press the ENTER button to select language, then the ENTER button. If the antenna is connected to ANT...
User Manual (ENGLISH)
Page 19
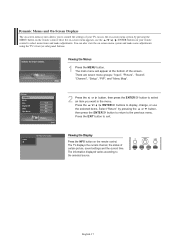
... source. ```````` English-17 Viewing the Display Press the INFO button on the remote control. Viewing the Menus 1 Press the MENU button. There are seven menu groups: "Input", "Picture", "Sound", "Channel", "Setup", "PIP", and "Menu Map". 2 Press the or button, then press the ENTER an item you to control the settings of the screen. The TV displays the current channel, the status of certain picture, sound settings and the current time. Access the on your TV. Once the on-screen menu...
... source. ```````` English-17 Viewing the Display Press the INFO button on the remote control. Viewing the Menus 1 Press the MENU button. There are seven menu groups: "Input", "Picture", "Sound", "Channel", "Setup", "PIP", and "Menu Map". 2 Press the or button, then press the ENTER an item you to control the settings of the screen. The TV displays the current channel, the status of certain picture, sound settings and the current time. Access the on your TV. Once the on-screen menu...

User Manual (ENGLISH)
Page 25
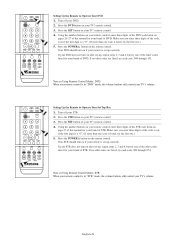
... be compatible with all DVD Players, VCRs, Cable boxes, and Set-Top Boxes. Turn off your VCR. 2. Your VCR should turn on page 25 of this manual for your remote control can operate in five different modes: TV, VCR, Cable, DVD, or Set-Top Box. Turn off your cable box. 2. Make sure you enter three digits of the code, even if the first digit is a "0". (If more than one code is set up correctly. Press the POWER button...
... be compatible with all DVD Players, VCRs, Cable boxes, and Set-Top Boxes. Turn off your VCR. 2. Your VCR should turn on page 25 of this manual for your remote control can operate in five different modes: TV, VCR, Cable, DVD, or Set-Top Box. Turn off your cable box. 2. Make sure you enter three digits of the code, even if the first digit is a "0". (If more than one code is set up correctly. Press the POWER button...
User Manual (ENGLISH)
Page 26
...'s remote control. 3. Using the number buttons on your remote control, enter three digits of DVD. Your DVD should turn on your TV's remote control. 4. Press the STB button on after set up correctly. Press the POWER button on the remote control. If no other codes are listed, try the first one of the other codes listed for your brand of the code, even if the first digit is a "0". (If more than one code is in "STB" mode...
...'s remote control. 3. Using the number buttons on your remote control, enter three digits of DVD. Your DVD should turn on your TV's remote control. 4. Press the STB button on after set up correctly. Press the POWER button on the remote control. If no other codes are listed, try the first one of the other codes listed for your brand of the code, even if the first digit is a "0". (If more than one code is in "STB" mode...
User Manual (ENGLISH)
Page 34
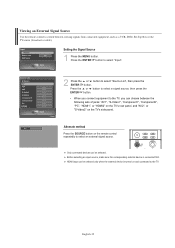
Alternate method Press the SOURCE button on the remote control repeatedly to select "Source List", then press the ENTER button. Before selecting an input source, make sure the corresponding external device is turned on and connected to the TV. English-32 HDMI input can choose between viewing signals from connected equipment, such as a VCR, DVD, Set-Top Box or the TVsource (broadcast or cable). Press the or button to select a signal source, then press the...
Alternate method Press the SOURCE button on the remote control repeatedly to select "Source List", then press the ENTER button. Before selecting an input source, make sure the corresponding external device is turned on and connected to the TV. English-32 HDMI input can choose between viewing signals from connected equipment, such as a VCR, DVD, Set-Top Box or the TVsource (broadcast or cable). Press the or button to select a signal source, then press the...
User Manual (ENGLISH)
Page 45
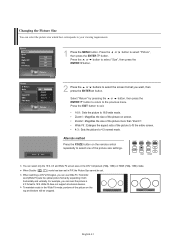
Alternate method Press the P.SIZE button on the remote control repeatedly to 4:3 normal mode. When watching a DTV's HD signal, you can reset the picture in 4:3 format to your viewing requirements. 1 Press the MENU button. For example, you want, then press the ENTER button. Press the then press the ENTER button. You can select the picture size which best corresponds to 16:9. Select "Return" by expanding it both horizontally...
Alternate method Press the P.SIZE button on the remote control repeatedly to 4:3 normal mode. When watching a DTV's HD signal, you can reset the picture in 4:3 format to your viewing requirements. 1 Press the MENU button. For example, you want, then press the ENTER button. Press the then press the ENTER button. You can select the picture size which best corresponds to 16:9. Select "Return" by expanding it both horizontally...
User Manual (ENGLISH)
Page 66
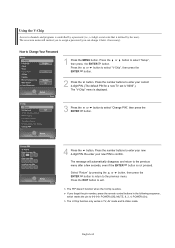
... the pin number, press the remote control buttons in TV, AV mode and S-Video mode. Re-enter your new 4-digit PIN. The PIP doesn't function when the V-Chip is displayed. 3 Press the or button to 0-0-0-0: POWER (Off), MUTE, 8, 2, 4, POWER (On). Using the V-Chip Access to select "V-Chip", then press the ENTER button. 2 Press the button. or button to select "Setup", Press the or button to channels and programs is controlled by a password (i.e., a 4-digit secret code that...
... the pin number, press the remote control buttons in TV, AV mode and S-Video mode. Re-enter your new 4-digit PIN. The PIP doesn't function when the V-Chip is displayed. 3 Press the or button to 0-0-0-0: POWER (Off), MUTE, 8, 2, 4, POWER (On). Using the V-Chip Access to select "V-Chip", then press the ENTER button. 2 Press the button. or button to select "Setup", Press the or button to channels and programs is controlled by a password (i.e., a 4-digit secret code that...
User Manual (ENGLISH)
Page 85
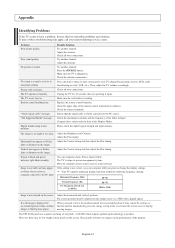
... screen problem. First, check the volume of units connected to your computer utility program to change the display settings. Replace the remote control batteries. Check the maximum resolution and the frequency of the remote control (transmission window). Horizontal bars appear to flicker, jitter or shimmer on . Picture rolls vertically. The TV won't turn on the image. Adjust the antenna. Adjust the antenna. Press the SOURCE button. Make sure the wall outlet is too light...
... screen problem. First, check the volume of units connected to your computer utility program to change the display settings. Replace the remote control batteries. Check the maximum resolution and the frequency of the remote control (transmission window). Horizontal bars appear to flicker, jitter or shimmer on . Picture rolls vertically. The TV won't turn on the image. Adjust the antenna. Adjust the antenna. Press the SOURCE button. Make sure the wall outlet is too light...
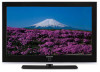
Brochure
Page 2
... your wall, you can easily remove the stand and use ), backed by enhancing the contrast, detail, white balance and reduces noise. HDMI allows for the special needs of gaming systems at the touch of the National Football League. ©2006 Samsung Electronics America, Inc. Connections R/F input: 2 (air/cable) Component video input (Y,Pb,Pr) (480i/480p/720p/1080i/1080p): 2 Side A/V Inputs S-Video inputs: 1-side, 1-rear Composite video input: 1-side, 1-rear HDMI: 2 PC (RGB) input: 1 Sound monitor out: 1 Optical sound...
... your wall, you can easily remove the stand and use ), backed by enhancing the contrast, detail, white balance and reduces noise. HDMI allows for the special needs of gaming systems at the touch of the National Football League. ©2006 Samsung Electronics America, Inc. Connections R/F input: 2 (air/cable) Component video input (Y,Pb,Pr) (480i/480p/720p/1080i/1080p): 2 Side A/V Inputs S-Video inputs: 1-side, 1-rear Composite video input: 1-side, 1-rear HDMI: 2 PC (RGB) input: 1 Sound monitor out: 1 Optical sound...


