User Manual (ENGLISH)
Page 2
... that do not conform to the ISO/IEC 11172-3 or ISO/IEC 13818-3. ● SAMSUNG ELECTRONICS NORTH AMERICAN LIMITED WARRANTY STATEMENT Subject to view different formats as the dark sidebars on them should be in the LCD picture. Uneven LCD aging as a result of format selection and use of the purchaser. In...
... that do not conform to the ISO/IEC 11172-3 or ISO/IEC 13818-3. ● SAMSUNG ELECTRONICS NORTH AMERICAN LIMITED WARRANTY STATEMENT Subject to view different formats as the dark sidebars on them should be in the LCD picture. Uneven LCD aging as a result of format selection and use of the purchaser. In...
User Manual (ENGLISH)
Page 3
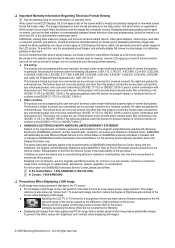
... Operation ■ Viewing the menus 21 ■ Plug & Play Feature 22 Channel Control ■ Configuring the Channel Menu 23 ■ Managing Channels 23 Picture Control ■ Configuring the Picture Menu 25 ■ Using Your TV as a Computer (PC) Display 27 ■ Setting up the TV with your PC 28 Sound Control ■...
... Operation ■ Viewing the menus 21 ■ Plug & Play Feature 22 Channel Control ■ Configuring the Channel Menu 23 ■ Managing Channels 23 Picture Control ■ Configuring the Picture Menu 25 ■ Using Your TV as a Computer (PC) Display 27 ■ Setting up the TV with your PC 28 Sound Control ■...

User Manual (ENGLISH)
Page 4
... are included with no Cable Box/Satellite receiver (Set-Top Box) needed. ● HDMI/DVI connection of Features ● Adjustable picture settings that can be stored in this User Manual are provided for reference only and may be changed without notice in order to this... TV. ● Excellent Picture Quality ● SRS TruSurround HD provides a virtual surround system. ¦ Accessories Remote Control (BN59-00857A) & Batteries (AAA x 2) Power Cord (3903-000144...
... are included with no Cable Box/Satellite receiver (Set-Top Box) needed. ● HDMI/DVI connection of Features ● Adjustable picture settings that can be stored in this User Manual are provided for reference only and may be changed without notice in order to this... TV. ● Excellent Picture Quality ● SRS TruSurround HD provides a virtual surround system. ¦ Accessories Remote Control (BN59-00857A) & Batteries (AAA x 2) Power Cord (3903-000144...
User Manual (ENGLISH)
Page 8
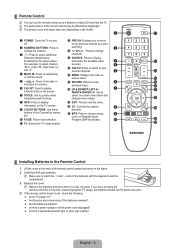
... doesn't work, check the following: ● Is the TV power on -screen menu items and change 3 _: Press to choose stereo, mono or Separate Audio 9 0 P.SIZE: Picture size selection. channels (digital) being $ SOURCE: Press to display broadcast by bright light. Replace the cover. N The performance of the remote control may vary depending...
... doesn't work, check the following: ● Is the TV power on -screen menu items and change 3 _: Press to choose stereo, mono or Separate Audio 9 0 P.SIZE: Picture size selection. channels (digital) being $ SOURCE: Press to display broadcast by bright light. Replace the cover. N The performance of the remote control may vary depending...
User Manual (ENGLISH)
Page 10
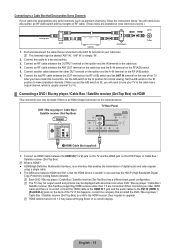
..., set the A/B switch to 'B', you have made if there is an HDMI Output connector on the external device. N The TV may not output sound and pictures may cause annoying flicker or no sound, connect the HDMI cable to the HDMI (DVI) IN jack and the audio cables to the DVI AUDIO...
..., set the A/B switch to 'B', you have made if there is an HDMI Output connector on the external device. N The TV may not output sound and pictures may cause annoying flicker or no sound, connect the HDMI cable to the HDMI (DVI) IN jack and the audio cables to the DVI AUDIO...
User Manual (ENGLISH)
Page 17
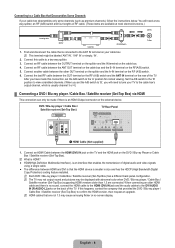
.... Connect another cable between the OUTPUT terminal on the splitter and the IN terminal on the cable box. 4. N The TV may not output sound and pictures may cause annoying flicker or no sound, connect the HDMI cable to the HDMI IN 1 jack and the audio cables to the ANT IN terminal...
.... Connect another cable between the OUTPUT terminal on the splitter and the IN terminal on the cable box. 4. N The TV may not output sound and pictures may cause annoying flicker or no sound, connect the HDMI cable to the HDMI IN 1 jack and the audio cables to the ANT IN terminal...
User Manual (ENGLISH)
Page 23
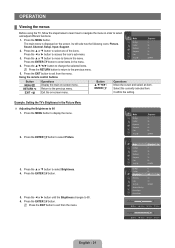
...Select the currently selected item. Press the ◄ or ► button until the Brightness changes to the previous menu. 5. Picture Picture Picture Mode Backlight Contrast Brightness Sharpness Color Tint (G/R) : Standard : 8 : 95 : 45 : 50 : 50 : G50/R50... G50/R50 Backlight : 8 Contrast : 95 Brightness : 45 ► Sharpness : 50 Color : 50 Tint (G/R) : G50/R50 Advanced Settings Picture Option Picture Reset Brightness 45 U Move L Adjust E Enter R Return Brightness 80 U Move L Adjust E Enter R Return English - 21 Operation ¦...
...Select the currently selected item. Press the ◄ or ► button until the Brightness changes to the previous menu. 5. Picture Picture Picture Mode Backlight Contrast Brightness Sharpness Color Tint (G/R) : Standard : 8 : 95 : 45 : 50 : 50 : G50/R50... G50/R50 Backlight : 8 Contrast : 95 Brightness : 45 ► Sharpness : 50 Color : 50 Tint (G/R) : G50/R50 Advanced Settings Picture Option Picture Reset Brightness 45 U Move L Adjust E Enter R Return Brightness 80 U Move L Adjust E Enter R Return English - 21 Operation ¦...

User Manual (ENGLISH)
Page 24
... is automatically displayed. 3. Press the ENTERE button to select Plug & Play. If you have Digital cable, select the cable system signal source for the best picture in your watching. Press the ENTERE button again to select Start. is displayed. 4. The connection method to Home Use mode for both Analog and Digital...
... is automatically displayed. 3. Press the ENTERE button to select Plug & Play. If you have Digital cable, select the cable system signal source for the best picture in your watching. Press the ENTERE button again to select Start. is displayed. 4. The connection method to Home Use mode for both Analog and Digital...
User Manual (ENGLISH)
Page 27
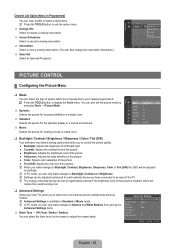
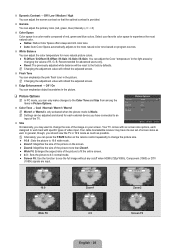
...to Backlight, Contrast, Brightness, Sharpness, Color or Tint (G/R) the OSD will reduce the overall running cost. ❑ Advanced Settings Samsung's new TVs allow you to view a viewing reservation. (You can also change the reservation information.) Select All Select..., M.E 3:15 pm 5:50 pm 2 TV3 CanTcheel SEcqhueadliuzleers 2 TV3 InfoMrmcaMtiiollann & Wife Select All Zoom Select T Tools E Information Picture Control ¦ Configuring the Picture Menu ❑ Mode You can view, modify or delete a reservation. N The energy consumed during use the option menu. ...
...to Backlight, Contrast, Brightness, Sharpness, Color or Tint (G/R) the OSD will reduce the overall running cost. ❑ Advanced Settings Samsung's new TVs allow you to view a viewing reservation. (You can also change the reservation information.) Select All Select..., M.E 3:15 pm 5:50 pm 2 TV3 CanTcheel SEcqhueadliuzleers 2 TV3 InfoMrmcaMtiiollann & Wife Select All Zoom Select T Tools E Information Picture Control ¦ Configuring the Picture Menu ❑ Mode You can view, modify or delete a reservation. N The energy consumed during use the option menu. ...
User Manual (ENGLISH)
Page 28
... the adjustment value will refresh the adjusted screen. Edge Enhancement → Off / On You can emphasize object boundaries in the picture. ❑ Picture Options Picture Options N In PC mode, you can adjust the primary color (red, green, blue) Intensity. (-3 ~ +3) Color Space Color space is... to 16:9 wide mode. ● Zoom1: Magnifies the size of video input. O Alternately, you may want to change the picture size. ● 16:9 : Sets the picture to see the full image without any cutoff when HDMI (720p/1080i), Component (1080i) or DTV (1080i) signals are input. ...
... the adjustment value will refresh the adjusted screen. Edge Enhancement → Off / On You can emphasize object boundaries in the picture. ❑ Picture Options Picture Options N In PC mode, you can adjust the primary color (red, green, blue) Intensity. (-3 ~ +3) Color Space Color space is... to 16:9 wide mode. ● Zoom1: Magnifies the size of video input. O Alternately, you may want to change the picture size. ● 16:9 : Sets the picture to see the full image without any cutoff when HDMI (720p/1080i), Component (1080i) or DTV (1080i) signals are input. ...

User Manual (ENGLISH)
Page 29
... for a typical computer are shown below. N This function is active only when an external device is 60 or 60 Hz. N Reset Picture Mode: Current picture values return to default settings. ¦ Using Your TV as a Computer (PC) Display Setting Up Your PC Software (Based on Windows ...Fit PC 16:9, 4:3 Digital NR → Off / Low / Medium / High / Auto If the broadcast signal received by your computer manufacturer or Samsung Dealer.) 1. Reset: Press the ◄ or ►button to select Position, then press the ENTERE button. When the control panel window appears, click on ...
... for a typical computer are shown below. N This function is active only when an external device is 60 or 60 Hz. N Reset Picture Mode: Current picture values return to default settings. ¦ Using Your TV as a Computer (PC) Display Setting Up Your PC Software (Based on Windows ...Fit PC 16:9, 4:3 Digital NR → Off / Low / Medium / High / Auto If the broadcast signal received by your computer manufacturer or Samsung Dealer.) 1. Reset: Press the ◄ or ►button to select Position, then press the ENTERE button. When the control panel window appears, click on ...

User Manual (ENGLISH)
Page 30
... values. The function also automatically fine-tunes the settings and adjusts the frequency values and positions. After the noise has been reduced, re-adjust the picture so that it is not removed by Fine-tuning alone, then adjust the frequency as best as possible (Coarse) and Fine-tune again. T Press ... Reset You can also set automatically adjust the video signals it does not fit the TV screen. After the noise has been reduced, readjust the picture so that it is aligned on the center of screen. PC Position Adjust the PC's screen positioning if it receives. You can replace...
... values. The function also automatically fine-tunes the settings and adjusts the frequency values and positions. After the noise has been reduced, re-adjust the picture so that it is not removed by Fine-tuning alone, then adjust the frequency as best as possible (Coarse) and Fine-tune again. T Press ... Reset You can also set automatically adjust the video signals it does not fit the TV screen. After the noise has been reduced, readjust the picture so that it is aligned on the center of screen. PC Position Adjust the PC's screen positioning if it receives. You can replace...
User Manual (ENGLISH)
Page 33
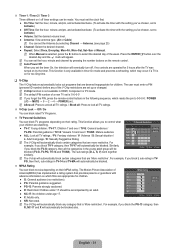
... programs that are deemed inappropriate for children. ● G: General audience (no controls are set up or changed. The sub-ratings (D, L, S, V) work together similarly. The Motion Picture Association of the week. N Auto Power Off When you 've chosen, set to control what your children are watching. ● TV-Y: Young children / TV-Y7...
... programs that are deemed inappropriate for children. ● G: General audience (no controls are set up or changed. The sub-ratings (D, L, S, V) work together similarly. The Motion Picture Association of the week. N Auto Power Off When you 've chosen, set to control what your children are watching. ● TV-Y: Young children / TV-Y7...

User Manual (ENGLISH)
Page 35
... the volume has been reduced to Custom and cannot be set the Energy Saving mode option to High to have the same color. Picture mode is On. N If the picture is poor when external device is connected to Standard and cannot be changed to TV, check if Game Mode is automatically changed...
... the volume has been reduced to Custom and cannot be set the Energy Saving mode option to High to have the same color. Picture mode is On. N If the picture is poor when external device is connected to Standard and cannot be changed to TV, check if Game Mode is automatically changed...
User Manual (ENGLISH)
Page 36
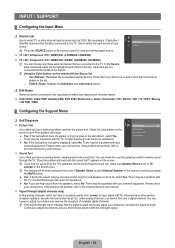
... DMA ¦ Configuring the Support Menu ❑ Self Diagnosis Support Picture Test Self Diagnosis ► If you think you have a sound problem, please perform the sound test. Software Upgrade HD Connection Guide Contact Samsung ● No: If the test pattern is on and connected, but does... even if Speaker Select is set to the external device's user manual. Sound Test If you think you have a picture problem, perform the picture test. N If the signal strength meter indicates that are not connected will be a problem with the TV. TOOLS (Tools): Displays...
... DMA ¦ Configuring the Support Menu ❑ Self Diagnosis Support Picture Test Self Diagnosis ► If you think you have a sound problem, please perform the sound test. Software Upgrade HD Connection Guide Contact Samsung ● No: If the test pattern is on and connected, but does... even if Speaker Select is set to the external device's user manual. Sound Test If you think you have a picture problem, perform the picture test. N If the signal strength meter indicates that are not connected will be a problem with the TV. TOOLS (Tools): Displays...
User Manual (ENGLISH)
Page 38
Picture rolls vertically. There is not centered on the screen. Clean the upper edge of these values with a digital signal. Compare these troubleshooting tips apply, please visit Samsung.com or contact the Samsung call center at maximum volume. Digital broadcasting screen problem. HD channels ...The screen position must set Closed Captioning on the output source (i.e. Screen is sometimes caused by compatibility issues with the picture Run the Picture test in . / Check the antenna connections. Make sure the wall outlet is High Definition (HD). Make sure the...
Picture rolls vertically. There is not centered on the screen. Clean the upper edge of these values with a digital signal. Compare these troubleshooting tips apply, please visit Samsung.com or contact the Samsung call center at maximum volume. Digital broadcasting screen problem. HD channels ...The screen position must set Closed Captioning on the output source (i.e. Screen is sometimes caused by compatibility issues with the picture Run the Picture test in . / Check the antenna connections. Make sure the wall outlet is High Definition (HD). Make sure the...
User Manual (ENGLISH)
Page 39
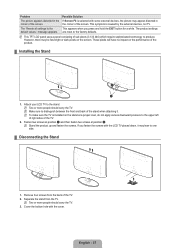
... distorted in the If Screen Fit is selected with some external devices, the picture may appear distorted in corner of the product. ¦ Installing the Stand 1. message appears. These pixels will have no impact on the performance of the ...
... distorted in the If Screen Fit is selected with some external devices, the picture may appear distorted in corner of the product. ¦ Installing the Stand 1. message appears. These pixels will have no impact on the performance of the ...
User Manual (ENGLISH)
Page 41
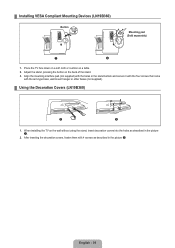
Adjust the stand, pressing the button on a table. 2. English - 39 Align the mounting interface pad (not supplied) with the holes in the picture 2. Place the TV face down on a soft cloth or cushion on the back of the stand. 3. After inserting the decoration covers, fasten them with the ... covers into the holes as described in the stand bottom and secure it with the four screws that come with 4 screws as described in the picture 1. 2. ¦ Installing VESA Compliant Mounting Devices (LN19B360) Button Mounting pad (Sold separately) 1 2 1.
Adjust the stand, pressing the button on a table. 2. English - 39 Align the mounting interface pad (not supplied) with the holes in the picture 2. Place the TV face down on a soft cloth or cushion on the back of the stand. 3. After inserting the decoration covers, fasten them with the ... covers into the holes as described in the stand bottom and secure it with the four screws that come with 4 screws as described in the picture 1. 2. ¦ Installing VESA Compliant Mounting Devices (LN19B360) Button Mounting pad (Sold separately) 1 2 1.

