
Quick Guide (easy Manual) (ver.1.0) (English)
Page 3
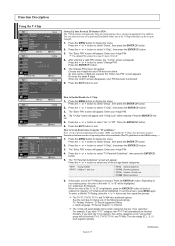
...Control Panel 3 Viewing the Connection Panel 4 Viewing the Remote Control 5 Installing Batteries in the Remote Control 6 CONNECTIONS Connecting VHF and UHF Antennas 6 Connecting Cable TV 7 Connecting a VCR 8 Connecting an S-VHS VCR 8 Connecting a DVD Player 9 Connecting a DVD Player/Set-Top Box via DVI 9 Connecting a DVD ...Player/Set-Top Box via HDMI 10 Connecting a PC 10 OPERATION Turning the TV On and Off 11 Plug and Play Feature 11 Changing Channels 12 Adjusting the Volume 12 Viewing the Display 12 Selecting the Video Signal-...
...Control Panel 3 Viewing the Connection Panel 4 Viewing the Remote Control 5 Installing Batteries in the Remote Control 6 CONNECTIONS Connecting VHF and UHF Antennas 6 Connecting Cable TV 7 Connecting a VCR 8 Connecting an S-VHS VCR 8 Connecting a DVD Player 9 Connecting a DVD Player/Set-Top Box via DVI 9 Connecting a DVD ...Player/Set-Top Box via HDMI 10 Connecting a PC 10 OPERATION Turning the TV On and Off 11 Plug and Play Feature 11 Changing Channels 12 Adjusting the Volume 12 Viewing the Display 12 Selecting the Video Signal-...
Quick Guide (easy Manual) (ver.1.0) (English)
Page 4
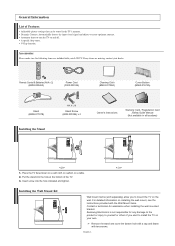
...Instructions Warranty Card / Registration Card /Safety Guide Manual (Not available in the TV's memory. Insert screw into the hole at the bottom of Features Adjustable picture settings that can be stored in all locations) < 2 > 1. Samsung Electronics is not responsible for assistance when installing the wall mounted bracket. Remove ... the wall. If any damage to the product or injury to yourself or others if you to install the TV on your own. Place the TV faced down on a soft cloth or cushion on installing the wall mount, see the instructions provided with two screws. For ...
...Instructions Warranty Card / Registration Card /Safety Guide Manual (Not available in the TV's memory. Insert screw into the hole at the bottom of Features Adjustable picture settings that can be stored in all locations) < 2 > 1. Samsung Electronics is not responsible for assistance when installing the wall mounted bracket. Remove ... the wall. If any damage to the product or injury to yourself or others if you to install the TV on your own. Place the TV faced down on a soft cloth or cushion on installing the wall mount, see the instructions provided with two screws. For ...
Quick Guide (easy Manual) (ver.1.0) (English)
Page 5
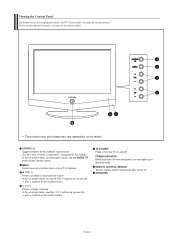
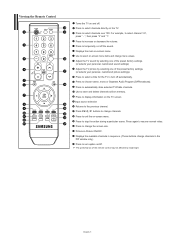
SOURCE Toggles between all the available input sources (TV, AV1, AV2, S-Video, Component1, Component2, PC, HDMI). In the on-screen menu, use this ... must use the and buttons on the remote control. (POWER) Press to see an on-screen menu of your TV's basic features, including the on-screen menu. REMOTE CONTROL SENSOR Aim the remote control towards this button as you ... buttons on the lower-right panel control your TV's features. POWER INDICATOR Blinks and turns off . The product color and shape may vary depending on the TV. MENU Press to turn the TV on and off when the power is on ...
SOURCE Toggles between all the available input sources (TV, AV1, AV2, S-Video, Component1, Component2, PC, HDMI). In the on-screen menu, use this ... must use the and buttons on the remote control. (POWER) Press to see an on-screen menu of your TV's basic features, including the on-screen menu. REMOTE CONTROL SENSOR Aim the remote control towards this button as you ... buttons on the lower-right panel control your TV's features. POWER INDICATOR Blinks and turns off . The product color and shape may vary depending on the TV. MENU Press to turn the TV on and off when the power is on ...
Quick Guide (easy Manual) (ver.1.0) (English)
Page 6
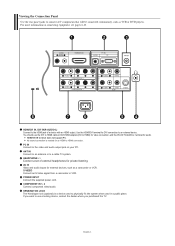
HDMI/DVI IN terminal does not support PC. If you purchased the TV. You should use the DVI to HDMI cable or DVI-HDMI adapter (DVI to use a locking device, contact the dealer where you want to HDMI) ... audio output jack on connecting equipment, see pages 6-10. POWER INPUT Connect the supplied power cord. HDMI/DVI IN, DVI IN(R-AUDIO-L) Connect to a cable TV system. No sound connection is a device used in a public place. English-4 For more information on your PC. AV IN Video and audio inputs for an...
HDMI/DVI IN terminal does not support PC. If you purchased the TV. You should use the DVI to HDMI cable or DVI-HDMI adapter (DVI to use a locking device, contact the dealer where you want to HDMI) ... audio output jack on connecting equipment, see pages 6-10. POWER INPUT Connect the supplied power cord. HDMI/DVI IN, DVI IN(R-AUDIO-L) Connect to a cable TV system. No sound connection is a device used in a public place. English-4 For more information on your PC. AV IN Video and audio inputs for an...
Quick Guide (easy Manual) (ver.1.0) (English)
Page 7
... video. For example, to change menu values. Press CH / buttons to select channel 121, press " - Press to turn off . Viewing the Remote Control Turns the TV on and off automatically. Press to set caption on/off the sound. Picture-in the PIP window only.) Press to exit the on the... TV screen. Press to choose stereo, mono or Separate Audio Program (SAPbroadcast). Press to increase or decrease the volume. Press to display information on -screen menu....
... video. For example, to change menu values. Press CH / buttons to select channel 121, press " - Press to turn off . Viewing the Remote Control Turns the TV on and off automatically. Press to set caption on/off the sound. Picture-in the PIP window only.) Press to exit the on the... TV screen. Press to choose stereo, mono or Separate Audio Program (SAPbroadcast). Press to increase or decrease the volume. Press to display information on -screen menu....

Quick Guide (easy Manual) (ver.1.0) (English)
Page 8
... has a set of the batteries with the diagram inside the compartment. 3. This procedure requires an optional combiner-adaptor (available at the back of the TV. UHF VHF ANT IN English-6 Is there a power outage, or is the power cord unplugged? 5. Make sure to match the "+" and "-" ...Ω adapter (not supplied). Antennas with 300 Ω Flat Twin Leads" below . 1. Connect both antenna leads to tighten the screws. 2. If your TV (one VHF and one lead that has 300 Ω twin flat leads, follow the directions below . ANT IN Antennas with 75 Ω Round Leads". Install...
... has a set of the batteries with the diagram inside the compartment. 3. This procedure requires an optional combiner-adaptor (available at the back of the TV. UHF VHF ANT IN English-6 Is there a power outage, or is the power cord unplugged? 5. Make sure to match the "+" and "-" ...Ω adapter (not supplied). Antennas with 300 Ω Flat Twin Leads" below . 1. Connect both antenna leads to tighten the screws. 2. If your TV (one VHF and one lead that has 300 Ω twin flat leads, follow the directions below . ANT IN Antennas with 75 Ω Round Leads". Install...
Quick Guide (easy Manual) (ver.1.0) (English)
Page 9
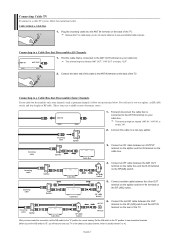
...Set the A/B switch to the "B" position to view scrambled channels. (When you set the A/B switch to the ANT IN terminal on the rear of the TV. Find the cable that Descrambles Some Channels If your cable box. RF (A/B) Switch Incoming cable Splitter Cable Box 5. After you will need to tune your... of RF cable. (These items are available at most electronics stores.) ANT IN 1. RF (A/B) Switch Incoming cable Splitter Cable Box RF (A/B) Switch ANT IN TV Rear 6. Connect the last RF cable between the ANT OUT terminal on the cable box and the B-IN terminal on the back of the...
...Set the A/B switch to the "B" position to view scrambled channels. (When you set the A/B switch to the ANT IN terminal on the rear of the TV. Find the cable that Descrambles Some Channels If your cable box. RF (A/B) Switch Incoming cable Splitter Cable Box 5. After you will need to tune your... of RF cable. (These items are available at most electronics stores.) ANT IN 1. RF (A/B) Switch Incoming cable Splitter Cable Box RF (A/B) Switch ANT IN TV Rear 6. Connect the last RF cable between the ANT OUT terminal on the cable box and the B-IN terminal on the back of the...
Quick Guide (easy Manual) (ver.1.0) (English)
Page 10
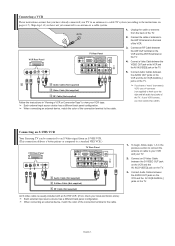
..."mono" (non-stereo) VCR, use a Y-connector (not supplied) to hook up to the instructions on the TV. 4. English-8 Unplug the cable or antenna from an S-VHS VCR. (This connection delivers a better picture as...OUT jack on the VCR and the AV IN [VIDEO] jack on the TV. Connecting an S-VHS VCR Your Samsung TV can be connected to an S-Video signal from the back of the connection ...terminal to an antenna or a cable system. VCR Rear Panel TV Rear Panel 3. Skip step 1 if you have already connected your TV...
..."mono" (non-stereo) VCR, use a Y-connector (not supplied) to hook up to the instructions on the TV. 4. English-8 Unplug the cable or antenna from an S-VHS VCR. (This connection delivers a better picture as...OUT jack on the VCR and the AV IN [VIDEO] jack on the TV. Connecting an S-VHS VCR Your Samsung TV can be connected to an S-Video signal from the back of the connection ...terminal to an antenna or a cable system. VCR Rear Panel TV Rear Panel 3. Skip step 1 if you have already connected your TV...
Quick Guide (easy Manual) (ver.1.0) (English)
Page 11
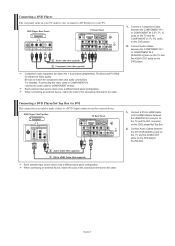
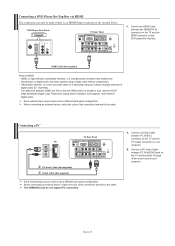
... color of the connection terminal to the cable. 1. Connect a DVI to HDMI Cable or DVI-HDMI Adapter between the DVI IN [R-AUDIO-L] jack on the TV and the AUDIO OUT jacks on the DVD player. Connect a Component Cable between the COMPONENT IN 1 or COMPONENT IN 2 [R-AUDIO-L] jacks on the... TV and the AUDIO OUT jacks on the DVD player/ Set-Top Box. When connecting an external device, match the color of the connection terminal to ...
... color of the connection terminal to the cable. 1. Connect a DVI to HDMI Cable or DVI-HDMI Adapter between the DVI IN [R-AUDIO-L] jack on the TV and the AUDIO OUT jacks on the DVD player. Connect a Component Cable between the COMPONENT IN 1 or COMPONENT IN 2 [R-AUDIO-L] jacks on the... TV and the AUDIO OUT jacks on the DVD player/ Set-Top Box. When connecting an external device, match the color of the connection terminal to ...
Quick Guide (easy Manual) (ver.1.0) (English)
Page 12
... coding feature installed, and supports multi-channel digital audio. Each external input source device has a different back panel configuration. Connecting a PC PC TV Rear Panel 2 PC Audio Cable (Not supplied) 1 D-Sub Cable (Not supplied) Each external input source device has a different back panel ...configuration. Connect an HDMI Cable between PC IN [AUDIO] jack on the TV and the Audio Out jack of digital audio (5.1 channels). When connecting an external device, match the color of the connection terminal to the...
... coding feature installed, and supports multi-channel digital audio. Each external input source device has a different back panel configuration. Connecting a PC PC TV Rear Panel 2 PC Audio Cable (Not supplied) 1 D-Sub Cable (Not supplied) Each external input source device has a different back panel ...configuration. Connect an HDMI Cable between PC IN [AUDIO] jack on the TV and the Audio Out jack of digital audio (5.1 channels). When connecting an external device, match the color of the connection terminal to the...
Quick Guide (easy Manual) (ver.1.0) (English)
Page 13
..., the "Clock Set" menu appears. The message "Check antenna input." is displayed. 2. The message "Enjoy your choice. 3. The TV automatically cycles through all the available channels are available. 1. This takes about one to interrupt the memorization process. 6. Press the or button...Please check that the antenna cable is displayed. • Language: Select your language. • Air/Cable: Select your local cable company TV system. • Auto Program: Selects between terrestrial antenna connection or your setting. If you want to select "Setup", then press the ...
..., the "Clock Set" menu appears. The message "Check antenna input." is displayed. 2. The message "Enjoy your choice. 3. The TV automatically cycles through all the available channels are available. 1. This takes about one to interrupt the memorization process. 6. Press the or button...Please check that the antenna cable is displayed. • Language: Select your language. • Air/Cable: Select your local cable company TV system. • Auto Program: Selects between terrestrial antenna connection or your setting. If you want to select "Setup", then press the ...
Quick Guide (easy Manual) (ver.1.0) (English)
Page 14
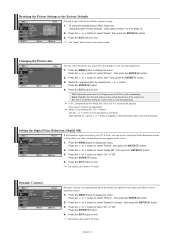
... apart, tune to one channel, then use the PRE-CH button to quickly alternate between two channels that were either erased or not memorized. The TV will appear in sequence. Press the PRE-CH button. Adjusting the Volume 1. Using MUTE button: At any time, you press the CH or CH ...button, the TV changes channels in the lower-left corner of certain audio-video settings. To turn mute off . When you can temporarily cut off the sound using...
... apart, tune to one channel, then use the PRE-CH button to quickly alternate between two channels that were either erased or not memorized. The TV will appear in sequence. Press the PRE-CH button. Adjusting the Volume 1. Using MUTE button: At any time, you press the CH or CH ...button, the TV changes channels in the lower-left corner of certain audio-video settings. To turn mute off . When you can temporarily cut off the sound using...
Quick Guide (easy Manual) (ver.1.0) (English)
Page 15
...stores them in your particular area. Press the AUTO PROG. Use the number buttons to directly select the channel that is connected to the TV (i.e. English-13 an antenna or a cable system). 1. Press the or button to two minutes. 1. STD, HRC and IRC identify various types... of cable TV systems. Contact your local cable company to the "Channel" menu. 4. Storing Channels Automatically The TV automatically cycles through all the available channels are stored, the "Channel" menu reappears. 5. This takes about one...
...stores them in your particular area. Press the AUTO PROG. Use the number buttons to directly select the channel that is connected to the TV (i.e. English-13 an antenna or a cable system). 1. Press the or button to two minutes. 1. STD, HRC and IRC identify various types... of cable TV systems. Contact your local cable company to the "Channel" menu. 4. Storing Channels Automatically The TV automatically cycles through all the available channels are stored, the "Channel" menu reappears. 5. This takes about one...
Quick Guide (easy Manual) (ver.1.0) (English)
Page 16
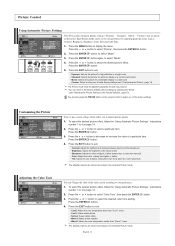
... allow you to select "Mode". 4. Press the ENTER button. 4. Press the or button to the selected Picture mode. Picture Control Using Automatic Picture Settings Your TV has four automatic picture settings ("Dynamic", "Standard", "Movie", "Custom") that are stored according to select the desired color tone setting. You can also press the...
... allow you to select "Mode". 4. Press the ENTER button. 4. Press the or button to the selected Picture mode. Picture Control Using Automatic Picture Settings Your TV has four automatic picture settings ("Dynamic", "Standard", "Movie", "Custom") that are stored according to select the desired color tone setting. You can also press the...
Quick Guide (easy Manual) (ver.1.0) (English)
Page 17
... exit. Resetting the Picture Settings to the Factory Defaults You can be set for a video movie or normal broadcasting. Select the required option by your TV is the default setting for each picture mode. Setting the Digital Noise Reduction (Digital NR) If the broadcast signal received by pressing the or button...
... exit. Resetting the Picture Settings to the Factory Defaults You can be set for a video movie or normal broadcasting. Select the required option by your TV is the default setting for each picture mode. Setting the Digital Noise Reduction (Digital NR) If the broadcast signal received by pressing the or button...
Quick Guide (easy Manual) (ver.1.0) (English)
Page 18
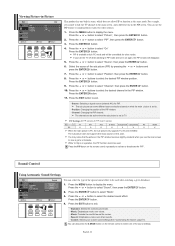
... Press the or button to select "Sound", then press the ENTER button. 2. Select the source of the special sound effect to simultaneously watch one TV channel in the main screen, and a different one in PC mode and will disappear. 5. Press the ENTER button. 9. PIP Settings (O: PIP ...operates, X: PIP doesn't operate) Main Sub TV PC O AV1 AV2 S-Video Component1 Component2 PC O O O X X X HDMI X When the main picture is set to select "On" Press the ENTER button....
... Press the or button to select "Sound", then press the ENTER button. 2. Select the source of the special sound effect to simultaneously watch one TV channel in the main screen, and a different one in PC mode and will disappear. 5. Press the ENTER button. 9. PIP Settings (O: PIP ...operates, X: PIP doesn't operate) Main Sub TV PC O AV1 AV2 S-Video Component1 Component2 PC O O O X X X HDMI X When the main picture is set to select "On" Press the ENTER button....
Quick Guide (easy Manual) (ver.1.0) (English)
Page 20
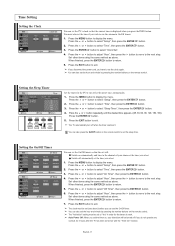
... , your choice at the time you select. The "Activation" setting must be set (see above . You must be set to "Yes" in order for the TV to turn off if you select. 1. Press the ENTER button to select "Sleep Timer", then press the ENTER button. 4. You can also set the hour... can also set the hour and minute by pressing the number buttons on the remote control. Time Setting Setting the Clock You can set the TV's clock so that the set will: Switch on automatically and tune to the channel of your television will be turned off when the timer reaches...
... , your choice at the time you select. The "Activation" setting must be set (see above . You must be set to "Yes" in order for the TV to turn off if you select. 1. Press the ENTER button to select "Sleep Timer", then press the ENTER button. 4. You can also set the hour... can also set the hour and minute by pressing the number buttons on the remote control. Time Setting Setting the Clock You can set the TV's clock so that the set will: Switch on automatically and tune to the channel of your television will be turned off when the timer reaches...
Quick Guide (easy Manual) (ver.1.0) (English)
Page 21
...will appear, and "V-Chip Lock" will appear. Press the MENU button to display the menu. The TV-Y7, TV-PG, TV-14, and TV-MA have additional options. Similarly, if you block "TV-Y" category, then TV-Y7 will be highlighted. (U= Unblocked, B= Blocked) When the color of the "U" or "B" ...ratings: FV: Fantasy Violence / D: Sexual suggestive Dialog L: Adult Language / S: Sexual situation / V: Violence The V-Chip will be blocked (TV-G, TV-PG, TV-14, and TV-MA). Press the or button to exit. Enter your PIN has been memorized. 6. After entering a valid PIN number, the "V-Chip" screen...
...will appear, and "V-Chip Lock" will appear. Press the MENU button to display the menu. The TV-Y7, TV-PG, TV-14, and TV-MA have additional options. Similarly, if you block "TV-Y" category, then TV-Y7 will be highlighted. (U= Unblocked, B= Blocked) When the color of the "U" or "B" ...ratings: FV: Fantasy Violence / D: Sexual suggestive Dialog L: Adult Language / S: Sexual situation / V: Violence The V-Chip will be blocked (TV-G, TV-PG, TV-14, and TV-MA). Press the or button to exit. Enter your PIN has been memorized. 6. After entering a valid PIN number, the "V-Chip" screen...
Quick Guide (easy Manual) (ver.1.0) (English)
Page 22
...-13, R, NC-17, X, NR The MPAA rating system uses the Motion Picture Association of these TV-Ratings: TV-Y7, TV-PG, TV-14, or TV-MA (See Step 4, on the Menu. A TV-Rating will be selected, and no restrictions). For example, if you block the "PG-13" category... X: • NR: General audience (no letters "U" or "B" will automatically block any category that are coded with objectionable ratings (either MPAA or TV-Ratings). 1. A highlighted letter ("U" or "B") will automatically block certain categories that is for all screens. The V-chip will be blocked also. How ...
...-13, R, NC-17, X, NR The MPAA rating system uses the Motion Picture Association of these TV-Ratings: TV-Y7, TV-PG, TV-14, or TV-MA (See Step 4, on the Menu. A TV-Rating will be selected, and no restrictions). For example, if you block the "PG-13" category... X: • NR: General audience (no letters "U" or "B" will automatically block any category that are coded with objectionable ratings (either MPAA or TV-Ratings). 1. A highlighted letter ("U" or "B") will automatically block certain categories that is for all screens. The V-chip will be blocked also. How ...
Quick Guide (easy Manual) (ver.1.0) (English)
Page 23
... the screen shakes slightly. Check for young children. • 13 ans+: Programming may have subtitles in English, while Channel 2 has subtitles in TV mode. Press the or button to select "On" or "Off", then press the ENTER button. 4. Press the EXIT button to a game .../ Text • Channel: 1 / 2 • Field: 1 / 2 The Caption feature does not work with certain TV shows. Your TV decodes and displays the closed captions as PlayStationTM or XboxTM, you display the TV menu in your 4-digit PIN. 4. These captions are broadcast with DVD or Set-top box signals. English-21...
... the screen shakes slightly. Check for young children. • 13 ans+: Programming may have subtitles in English, while Channel 2 has subtitles in TV mode. Press the or button to select "On" or "Off", then press the ENTER button. 4. Press the EXIT button to a game .../ Text • Channel: 1 / 2 • Field: 1 / 2 The Caption feature does not work with certain TV shows. Your TV decodes and displays the closed captions as PlayStationTM or XboxTM, you display the TV menu in your 4-digit PIN. 4. These captions are broadcast with DVD or Set-top box signals. English-21...


