User Manual (ENGLISH)
Page 2
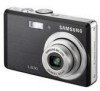
... a Samsung Digital Camera. Specifications are subject to use it on. Please note that may result from camera malfunction. Install the camera driver that is turned off, preset the camera button to change without prior notice. Keep this manual in Application software CD-ROM. (p.96) Take a picture. (p.20) Insert the USB cable Insert the supplied USB cable into the PC's USB port and the camera's USB connection terminal. (p.99) Check the camera's power Check the camera's power. When transferring the images taken...
... a Samsung Digital Camera. Specifications are subject to use it on. Please note that may result from camera malfunction. Install the camera driver that is turned off, preset the camera button to change without prior notice. Keep this manual in Application software CD-ROM. (p.96) Take a picture. (p.20) Insert the USB cable Insert the supplied USB cable into the PC's USB port and the camera's USB connection terminal. (p.99) Check the camera's power Check the camera's power. When transferring the images taken...
User Manual (ENGLISH)
Page 4
... 008 Front & Top 009 Back 010 Bottom 010 5 Function button 012 Connecting to use the MOVIE CLIP mode 023 Recording the movie clip without sound > It may leak corrosive electrolyte and permanently damage the camera's components. Then make sure that any cables or AC adapter, check the directions and do so may cause breakage of time. Otherwise the battery may cause burns. Do not move the...
... 008 Front & Top 009 Back 010 Bottom 010 5 Function button 012 Connecting to use the MOVIE CLIP mode 023 Recording the movie clip without sound > It may leak corrosive electrolyte and permanently damage the camera's components. Then make sure that any cables or AC adapter, check the directions and do so may cause breakage of time. Otherwise the battery may cause burns. Do not move the...

User Manual (ENGLISH)
Page 5
... ZOOM W / T button 027 Info / Up button 027 Macro / Down button 029 Focus lock 029 Flash / Left button 031 Self-timer / Right button 032 MENU / OK button 033 Face recognition(FR) button 034 E (Effect) button 035 E (Effect) button : Colour 036 E (Effect) button : Saturation 037 E (Effect) button : FUN 037 Pre-set focus frame 038 Composite shooting 040 Photo Frame 041 Fn button 042 Size 042 Quality / Frame rate 043 Metering 043 Drive mode 044 ISO 045 White balance 046 Exposure compensation 046 Movie...
... ZOOM W / T button 027 Info / Up button 027 Macro / Down button 029 Focus lock 029 Flash / Left button 031 Self-timer / Right button 032 MENU / OK button 033 Face recognition(FR) button 034 E (Effect) button 035 E (Effect) button : Colour 036 E (Effect) button : Saturation 037 E (Effect) button : FUN 037 Pre-set focus frame 038 Composite shooting 040 Photo Frame 041 Fn button 042 Size 042 Quality / Frame rate 043 Metering 043 Drive mode 044 ISO 045 White balance 046 Exposure compensation 046 Movie...

User Manual (ENGLISH)
Page 6
... LANGUAGE 054 Setting up the Date / Time / Date type 055 Imprinting the recording date 055 LCD brightness 055 Auto Focus lamp 055 Start up image 056 Setup menu 2 056 Quick view 056 Auto power off 056 LCD save 057 Selecting Video out type 058 Formatting a memory 058 Initialisation PLAY 059 Starting play mode 059 Playing back a still image 059 Playing back a movie clip 060 Movie clip capture function 060 On camera movie trimming 061 Playing back a recorded voice 061 Playing back a voice memo 062 LCD monitor Indicator 062 Using the camera buttons to set...
... LANGUAGE 054 Setting up the Date / Time / Date type 055 Imprinting the recording date 055 LCD brightness 055 Auto Focus lamp 055 Start up image 056 Setup menu 2 056 Quick view 056 Auto power off 056 LCD save 057 Selecting Video out type 058 Formatting a memory 058 Initialisation PLAY 059 Starting play mode 059 Playing back a still image 059 Playing back a movie clip 060 Movie clip capture function 060 On camera movie trimming 061 Playing back a recorded voice 061 Playing back a voice memo 062 LCD monitor Indicator 062 Using the camera buttons to set...
User Manual (ENGLISH)
Page 21
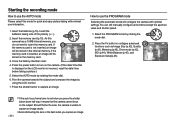
... advanced functions such as Image Size (p.42), Quality (p.42), Metering (p.43), Drive mode (p.43), ISO (p.44), White Balance (p.45), and Exposure Value(p.46). > If the auto focus frame turns to insert the memory card. Should this be the case, the camera is incorrect, reset the date/ time before taking a picture.) 5. Starting the recording mode How to use the PROGRAM mode Selecting the automatic mode will configure the camera with minimal user interaction. 1. Insert the batteries taking with optimal settings.You...
... advanced functions such as Image Size (p.42), Quality (p.42), Metering (p.43), Drive mode (p.43), ISO (p.44), White Balance (p.45), and Exposure Value(p.46). > If the auto focus frame turns to insert the memory card. Should this be the case, the camera is incorrect, reset the date/ time before taking a picture.) 5. Starting the recording mode How to use the PROGRAM mode Selecting the automatic mode will configure the camera with minimal user interaction. 1. Insert the batteries taking with optimal settings.You...

User Manual (ENGLISH)
Page 25
... is strong reflected light, or when the background is moving at high speed. - To take pictures against the light, please use a tripod, support the camera on shooting conditions and camera settings. Compose the image by using the LCD monitor. > When the surroundings are dark. If the subject is very narrow (such as expected. - Lightly press the shutter button to flash shot mode. Shooting against the light : Please do not take a picture against the sun...
... is strong reflected light, or when the background is moving at high speed. - To take pictures against the light, please use a tripod, support the camera on shooting conditions and camera settings. Compose the image by using the LCD monitor. > When the surroundings are dark. If the subject is very narrow (such as expected. - Lightly press the shutter button to flash shot mode. Shooting against the light : Please do not take a picture against the sun...

User Manual (ENGLISH)
Page 31
... poor lighting conditions the camera shake warning indicator ( ) will be longer. When a shot with a slow shutter speed to suit the prevailing conditions. Do not move the camera until the second flash fires. The intensity of the available light. Slow synchro The flash operates with "red eye" is caused by using the red-eye reduction function. Flash ( ) / Left button If you press the shutter button after selecting the Auto, Fill-in the ASR mode) Take...
... poor lighting conditions the camera shake warning indicator ( ) will be longer. When a shot with a slow shutter speed to suit the prevailing conditions. Do not move the camera until the second flash fires. The intensity of the available light. Slow synchro The flash operates with "red eye" is caused by using the red-eye reduction function. Flash ( ) / Left button If you press the shutter button after selecting the Auto, Fill-in the ASR mode) Take...

User Manual (ENGLISH)
Page 39
... Compose EOK Set 1. The previously captured images will be deleted. Composite Composite Composite Composite Compose OEK Set [Composite 1] Compose OEK Set [Composite 2] Compose OEK Set [Composite 3] Compose OEK Set [Composite 4] 2. Press the E button in a still image. If you press the Play mode, MENU, E button or turn Mode button dial during the composite shooting. E (Effect) button : FUN Composite shooting You can use the flash, self-timer, macro focus and the Zoom W / T button during the composite shots, each camera working mode is executed...
... Compose EOK Set 1. The previously captured images will be deleted. Composite Composite Composite Composite Compose OEK Set [Composite 1] Compose OEK Set [Composite 2] Compose OEK Set [Composite 3] Compose OEK Set [Composite 4] 2. Press the E button in a still image. If you press the Play mode, MENU, E button or turn Mode button dial during the composite shooting. E (Effect) button : FUN Composite shooting You can use the flash, self-timer, macro focus and the Zoom W / T button during the composite shots, each camera working mode is executed...
User Manual (ENGLISH)
Page 55
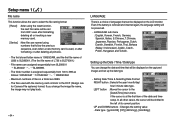
... 101SSCAM ~ 999SSCAM. - The files used , or after formatting, or after formatting, deleting all or inserting a new SETUP 1 File Language Date&Time Series Reset memory card. : New files are 9999. - Setting Date/ Time & Selecting Date Format RIGHT button : Selects the year/ month/day/ hour/ minute date type. UP and DOWN buttons : Changes the setting value - If you change the image file name, the image may not play back. > LANGUAGE There is a choice of languages that can change the date and time that follow the previous...
... 101SSCAM ~ 999SSCAM. - The files used , or after formatting, or after formatting, deleting all or inserting a new SETUP 1 File Language Date&Time Series Reset memory card. : New files are 9999. - Setting Date/ Time & Selecting Date Format RIGHT button : Selects the year/ month/day/ hour/ minute date type. UP and DOWN buttons : Changes the setting value - If you change the image file name, the image may not play back. > LANGUAGE There is a choice of languages that can change the date and time that follow the previous...

User Manual (ENGLISH)
Page 57
... / Printer mode, slide show, playing back a voice recording and playing back a movie clip. Sub menus [Off] : The power off function will not operate. [1, 3, 5, 10 min] : The power will turn off function will be turned off automatically. - SETUP 2 Quick View Power Off LCD Save Video Out Format Reset Back 2 Off 1 min 3 min 5 min 10 min OK Set - Setup menu 2 ( ) Quick view If you enable Quick View before capturing an image, you can 't set the [LCD save ] to prevent unnecessary battery drainage. - After replacing the battery, the power off...
... / Printer mode, slide show, playing back a voice recording and playing back a movie clip. Sub menus [Off] : The power off function will not operate. [1, 3, 5, 10 min] : The power will turn off function will be turned off automatically. - SETUP 2 Quick View Power Off LCD Save Video Out Format Reset Back 2 Off 1 min 3 min 5 min 10 min OK Set - Setup menu 2 ( ) Quick view If you enable Quick View before capturing an image, you can 't set the [LCD save ] to prevent unnecessary battery drainage. - After replacing the battery, the power off...

User Manual (ENGLISH)
Page 71
... OK Set Noise Effect You can be displayed and the image is saved as a new file name. The [Proccessing!] message be removed from the captured image. 1. Select ( ) by pressing the Up/Down button and a bar for selecting the brightness will be displayed. 2. Select ( ) by pressing the Up/Down button and press the OK button. 2. Change the saturation by pressing the Left/Right button. 3. Red Eye Fix Brightness control...
... OK Set Noise Effect You can be displayed and the image is saved as a new file name. The [Proccessing!] message be removed from the captured image. 1. Select ( ) by pressing the Up/Down button and a bar for selecting the brightness will be displayed. 2. Select ( ) by pressing the Up/Down button and press the OK button. 2. Change the saturation by pressing the Left/Right button. 3. Red Eye Fix Brightness control...
User Manual (ENGLISH)
Page 82
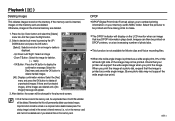
... plays back. Check that the image is inserted, images on the memory card. If the memory card is printed as a wide angle print, 8% of the left and right side of photo labs. PLAYBACK Voice Memo Protect Delete DPOF Copy To Card Back Select All OK Set - When you print the image. Zoom T Button : Select the image for Movie clips and Voice recording files. Select the [Yes] menu and press the OK button to display the confirmation message. Images can support...
... plays back. Check that the image is inserted, images on the memory card. If the memory card is printed as a wide angle print, 8% of the left and right side of photo labs. PLAYBACK Voice Memo Protect Delete DPOF Copy To Card Back Select All OK Set - When you print the image. Zoom T Button : Select the image for Movie clips and Voice recording files. Select the [Yes] menu and press the OK button to display the confirmation message. Images can support...

User Manual (ENGLISH)
Page 83
...] menu tab. Zoom W / T Button : Select the number of prints. W 00 Images T OK Set 4. PLAYBACK Standard Index Size Back Select All Cancel OK Set [Select] : Selection window for movie clips and voice file) are printed as index type. 1. PLAYBACK Standard Index Size Back No Yes OK Set If [No] is selected : The image will display. 3. Press the Right button again and [Standard] sub menu will be printed in index format. 4. Press the OK button to print...
...] menu tab. Zoom W / T Button : Select the number of prints. W 00 Images T OK Set 4. PLAYBACK Standard Index Size Back Select All Cancel OK Set [Select] : Selection window for movie clips and voice file) are printed as index type. 1. PLAYBACK Standard Index Size Back No Yes OK Set If [No] is selected : The image will display. 3. Press the Right button again and [Standard] sub menu will be printed in index format. 4. Press the OK button to print...
User Manual (ENGLISH)
Page 88
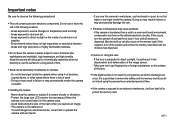
... to get inside of time Sand can form on the delicate electronic circuitry. Areas with silica gel in a hermetically sealed box when not planning to use or store this happens, turn the camera off the camera and remove the memory card. Doing so may result in failure or may permanently damage the unit. Protect the large size LCD monitor from a cold...
... to get inside of time Sand can form on the delicate electronic circuitry. Areas with silica gel in a hermetically sealed box when not planning to use or store this happens, turn the camera off the camera and remove the memory card. Doing so may result in failure or may permanently damage the unit. Protect the large size LCD monitor from a cold...
User Manual (ENGLISH)
Page 91
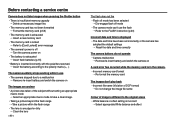
... default settings → Reset the date and time correctly The camera buttons do not operate Camera malfunction → Remove/re-insert battery and switch the camera on The images are unclear A picture was taken of image is different to a malfunction → Remove /re-insert battery and switch the camera on A card error has occurred while the memory card is in use The camera stopped due to the original scene White balance or effect setting is incorrect → Select appropriate White balance...
... default settings → Reset the date and time correctly The camera buttons do not operate Camera malfunction → Remove/re-insert battery and switch the camera on The images are unclear A picture was taken of image is different to a malfunction → Remove /re-insert battery and switch the camera on A card error has occurred while the memory card is in use The camera stopped due to the original scene White balance or effect setting is incorrect → Select appropriate White balance...

User Manual (ENGLISH)
Page 93
Metering : Multi, Spot, Face Recognition - Modes : Auto, Auto & Red-eye reduction, Fill-in Still Image (max. 10 sec.) Date Imprinting - Normal, B&W, Sepia, Red, Blue, Green, Negative, Custom Color White Balance - Range : Wide : 0.2m ~ 4.6m, Tele : 0.5m ~ 2.6m(ISO AUTO) - Soft+, Soft, Normal, Vivid, Vivid+ Color Effect - Voice Recording (max. 10 hours) - Voice Memo in flash, Slow sync, Flash off, Red-eye Fix - Date, Date & Time, Off (user selectable) Shooting > - Control : Program AE - File Format ·Still Image : JPEG (DCF), EXIF 2.2, DPOF...
Metering : Multi, Spot, Face Recognition - Modes : Auto, Auto & Red-eye reduction, Fill-in Still Image (max. 10 sec.) Date Imprinting - Normal, B&W, Sepia, Red, Blue, Green, Negative, Custom Color White Balance - Range : Wide : 0.2m ~ 4.6m, Tele : 0.5m ~ 2.6m(ISO AUTO) - Soft+, Soft, Normal, Vivid, Vivid+ Color Effect - Voice Recording (max. 10 hours) - Voice Memo in flash, Slow sync, Flash off, Red-eye Fix - Date, Date & Time, Off (user selectable) Shooting > - Control : Program AE - File Format ·Still Image : JPEG (DCF), EXIF 2.2, DPOF...
User Manual (ENGLISH)
Page 96
... . A USB Driver for MAC is only compatible with the Application CD. A USB Storage Driver is the all-in the CD-ROM Drive root directory. You can download, view, edit and save your digital images and movie clips with this camera to the capability of your computer. After installing the driver and connecting this software. You can use the camera as the camera driver. This software is not included with Windows. > Before connecting the camera to...
... . A USB Driver for MAC is only compatible with the Application CD. A USB Storage Driver is the all-in the CD-ROM Drive root directory. You can download, view, edit and save your digital images and movie clips with this camera to the capability of your computer. After installing the driver and connecting this software. You can use the camera as the camera driver. This software is not included with Windows. > Before connecting the camera to...
User Manual (ENGLISH)
Page 99
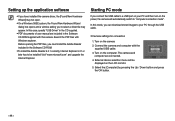
... dialog box opens and a window asking you to select a driver file may not open. Before opening the PDF files, you must install the Adobe Reader included in the CD supplied. The camera and computer are included in the Software CD-ROM supplied with this camera. In this mode, you can download stored images to be displayed on the LCD monitor. PDF documents of user manual are connected. 4. Select USB Computer Printer OK Confirm...
... dialog box opens and a window asking you to select a driver file may not open. Before opening the PDF files, you must install the Adobe Reader included in the CD supplied. The camera and computer are included in the Software CD-ROM supplied with this camera. In this mode, you can download stored images to be displayed on the LCD monitor. PDF documents of user manual are connected. 4. Select USB Computer Printer OK Confirm...
User Manual (ENGLISH)
Page 107
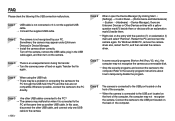
... then turn on again. Transfer the file again. When the camera is not the supplied USB cable. Refer to the security program instructions about how to the computer. Turn the camera power off the camera, remove the USB cable, plug in Device Manager. Restart the PC and connect the camera again. There may not recognise the camera. Install the camera driver correctly. Stop the security programs and connect the camera to temporarily disable the...
... then turn on again. Transfer the file again. When the camera is not the supplied USB cable. Refer to the security program instructions about how to the computer. Turn the camera power off the camera, remove the USB cable, plug in Device Manager. Restart the PC and connect the camera again. There may not recognise the camera. Install the camera driver correctly. Stop the security programs and connect the camera to temporarily disable the...

User Manual (ENGLISH)
Page 108
... the problem happens continuously, set the Legacy USB Support to download the file and save it on a desired folder. 4) Run the downloaded file and the codec for downloading the codec. (http://www.divx.com/divx/mac) 2) Click the [Free Download] menu on the PC. In this case, re-start the PC. If the movie file is not installed Install the DirectX 9.0 or later 1) Insert the CD provided with the camera 2) Run the windows...
... the problem happens continuously, set the Legacy USB Support to download the file and save it on a desired folder. 4) Run the downloaded file and the codec for downloading the codec. (http://www.divx.com/divx/mac) 2) Click the [Free Download] menu on the PC. In this case, re-start the PC. If the movie file is not installed Install the DirectX 9.0 or later 1) Insert the CD provided with the camera 2) Run the windows...


