User Manual (ENGLISH)
Page 2
... reader. > Keep this camera in the following order. Samsung takes no responsibility for buying a Samsung Digital Camera. Instructions Use this manual in a safe place. When transferring the images taken with the camera to your camera Thank you require After Sales service, please bring the camera and the cause of this.... Prior to avoid disappointment. for [Removable Disk]. (p.99) If you will need to use the supplied USB cable to connect the camera to the A/S centre. Check [Removable Disk] Open Windows's EXPLORER and search for a trip or an important event) to using this...
... reader. > Keep this camera in the following order. Samsung takes no responsibility for buying a Samsung Digital Camera. Instructions Use this manual in a safe place. When transferring the images taken with the camera to your camera Thank you require After Sales service, please bring the camera and the cause of this.... Prior to avoid disappointment. for [Removable Disk]. (p.99) If you will need to use the supplied USB cable to connect the camera to the A/S centre. Check [Removable Disk] Open Windows's EXPLORER and search for a trip or an important event) to using this...
User Manual (ENGLISH)
Page 3
...When in use the flash in close proximity to you or your dealer or Samsung Camera Service centre. Do not use , do so may adversely affect the camera's internal components and could cause a fire. Battery and camera may cause a fire or electric shock. Always use and it may cause heat... to your dealer or Samsung Camera Service centre. Do not continue to use the camera as this camera in places subject to extremely high temperatures, such as this product and accessories out of reach of explosion. Should ...
...When in use the flash in close proximity to you or your dealer or Samsung Camera Service centre. Do not use , do so may adversely affect the camera's internal components and could cause a fire. Battery and camera may cause a fire or electric shock. Always use and it may cause heat... to your dealer or Samsung Camera Service centre. Do not continue to use the camera as this camera in places subject to extremely high temperatures, such as this product and accessories out of reach of explosion. Should ...
User Manual (ENGLISH)
Page 4
...hands or objects. After use the SCENE modes 022 Portrait, Night scene mode 023 How to avoid taking an unclear image and possibly causing camera malfunction. Failure to use the MOVIE CLIP mode 023 Recording the movie clip without sound > It may cause breakage of time. It ...may leak corrosive electrolyte and permanently damage the camera's components. Avoid obstructing the lens or the flash when you are disconnected before unplugging the cable from the wall socket. Otherwise the battery ...
...hands or objects. After use the SCENE modes 022 Portrait, Night scene mode 023 How to avoid taking an unclear image and possibly causing camera malfunction. Failure to use the MOVIE CLIP mode 023 Recording the movie clip without sound > It may cause breakage of time. It ...may leak corrosive electrolyte and permanently damage the camera's components. Avoid obstructing the lens or the flash when you are disconnected before unplugging the cable from the wall socket. Otherwise the battery ...

User Manual (ENGLISH)
Page 5
Contents > 023 Pausing while recording a movie clip (Successive Recording) 024 Things to Watch Out for When Taking Pictures 025 Using the camera buttons to set the camera 025 POWER button 025 SHUTTER button 025 ZOOM W / T button 027 Info / Up button 027 Macro / Down button 029 Focus lock 029 Flash / Left button... 043 Drive mode 044 ISO 045 White balance 046 Exposure compensation 046 Movie Clip frame stabilizer 047 Using the LCD monitor to adjust the camera settings 047 How to use the menu 048 Sharpness 048 Contrast 048 Focus Area 049 Voice Memo 049 Voice Recording 050 Recording the movie ...
Contents > 023 Pausing while recording a movie clip (Successive Recording) 024 Things to Watch Out for When Taking Pictures 025 Using the camera buttons to set the camera 025 POWER button 025 SHUTTER button 025 ZOOM W / T button 027 Info / Up button 027 Macro / Down button 029 Focus lock 029 Flash / Left button... 043 Drive mode 044 ISO 045 White balance 046 Exposure compensation 046 Movie Clip frame stabilizer 047 Using the LCD monitor to adjust the camera settings 047 How to use the menu 048 Sharpness 048 Contrast 048 Focus Area 049 Voice Memo 049 Voice Recording 050 Recording the movie ...

User Manual (ENGLISH)
Page 6
... a memory 058 Initialisation PLAY 059 Starting play mode 059 Playing back a still image 059 Playing back a movie clip 060 Movie clip capture function 060 On camera movie trimming 061 Playing back a recorded voice 061 Playing back a voice memo 062 LCD monitor Indicator 062 Using the... camera buttons to set the camera 062 Thumbnail / Enlargement button 064 Info / Up button 064 Play & Pause / Down button 065 Left / Right / Menu / OK button 065 Printer button 065 Delete button ...
... a memory 058 Initialisation PLAY 059 Starting play mode 059 Playing back a still image 059 Playing back a movie clip 060 Movie clip capture function 060 On camera movie trimming 061 Playing back a recorded voice 061 Playing back a voice memo 062 LCD monitor Indicator 062 Using the... camera buttons to set the camera 062 Thumbnail / Enlargement button 064 Info / Up button 064 Play & Pause / Down button 065 Left / Right / Menu / OK button 065 Printer button 065 Delete button ...
User Manual (ENGLISH)
Page 8
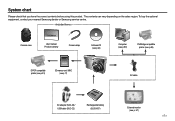
To buy the optional equipment, contact your nearest Samsung dealer or Samsung service centre. Camera case User manual, Product warranty Camera strap Software CD (see p.94) Computer (see p.99) PictBridge compatible printer (see p.84) DPOF compatible printer (see p.81) SD memory card / MMC (see p.17) AV cable AC adapter (SAC-46) / USB cable (SUC-C2) Rechargeable battery (SLB-0937) External monitor (see p. 57) > The contents can vary depending on the sales region. System chart Please check that you have the correct contents before using this product.
To buy the optional equipment, contact your nearest Samsung dealer or Samsung service centre. Camera case User manual, Product warranty Camera strap Software CD (see p.94) Computer (see p.99) PictBridge compatible printer (see p.84) DPOF compatible printer (see p.81) SD memory card / MMC (see p.17) AV cable AC adapter (SAC-46) / USB cable (SUC-C2) Rechargeable battery (SLB-0937) External monitor (see p. 57) > The contents can vary depending on the sales region. System chart Please check that you have the correct contents before using this product.
User Manual (ENGLISH)
Page 10
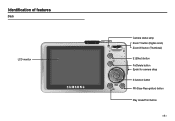
Identification of features Back LCD monitor Camera status lamp Zoom T button (Digital zoom) Zoom W button (Thumbnail) E (Effect) button Fn/Delete button Eyelet for camera strap 5-function button FR (Face Recognition) button Play mode/Print button >
Identification of features Back LCD monitor Camera status lamp Zoom T button (Digital zoom) Zoom W button (Thumbnail) E (Effect) button Fn/Delete button Eyelet for camera strap 5-function button FR (Face Recognition) button Play mode/Print button >
User Manual (ENGLISH)
Page 12
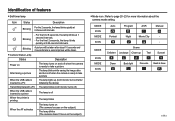
... MODE ICON MODE ICON Auto Program ASR Manual Portrait Night Movie Clip Scene Children Landscape Close-up (LCD monitor turns off after about the camera mode setting. Sunset Dawn Back light Fire works Beach & Snow > For the first 8 seconds, the lamp blinks at 0.25-second ...intervals. Identification of features Self-timer lamp Icon Status Description Blinking For the 2 seconds, the lamp blinks quickly at 1 second intervals. - Camera Status Lamp Status Power on After taking a picture When the USB cable is inserted to a PC Transmitting Data with a PC When the USB...
... MODE ICON MODE ICON Auto Program ASR Manual Portrait Night Movie Clip Scene Children Landscape Close-up (LCD monitor turns off after about the camera mode setting. Sunset Dawn Back light Fire works Beach & Snow > For the first 8 seconds, the lamp blinks at 0.25-second ...intervals. Identification of features Self-timer lamp Icon Status Description Blinking For the 2 seconds, the lamp blinks quickly at 1 second intervals. - Camera Status Lamp Status Power on After taking a picture When the USB cable is inserted to a PC Transmitting Data with a PC When the USB...
User Manual (ENGLISH)
Page 13
...Model SLB-0937 Type Lithium Ion Capacity 900mAh Voltage 3.7V Charging time(When the camera is turned off) Approx. 180 MIN Number of images and battery life : Using the SLB-0937 L830 L730 Still image Battery life Number of the battery and you may vary depending ... about battery usage. Low temperatures (below 0°C) can lose power over time and are measured under Samsung's standard conditions and shooting conditions and may experience reduced battery life. When the camera is perfectly normal. Batteries will not be used , turn off for long periods. During extended use ...
...Model SLB-0937 Type Lithium Ion Capacity 900mAh Voltage 3.7V Charging time(When the camera is turned off) Approx. 180 MIN Number of images and battery life : Using the SLB-0937 L830 L730 Still image Battery life Number of the battery and you may vary depending ... about battery usage. Low temperatures (below 0°C) can lose power over time and are measured under Samsung's standard conditions and shooting conditions and may experience reduced battery life. When the camera is perfectly normal. Batteries will not be used , turn off for long periods. During extended use ...

User Manual (ENGLISH)
Page 14
... USB cable (SUC-C2) with the correct specification. It can be charged. > If the camera is connected to a port located on the front of the PC : remove the cable and connect it to the ...combined, they can download stored images to your PC (p.98) or supply the power to your camera through a USB hub :connect the camera directly to a port located on the back of the AC adapter (SAC-46) and the ...the USB cable. If the USB port of the PC doesn't meet the Power output standard(5V, 500mA), the camera may not be used as a power cable. Using a USB cable : Remove the AC adapter (SAC-46). When...
... USB cable (SUC-C2) with the correct specification. It can be charged. > If the camera is connected to a port located on the front of the PC : remove the cable and connect it to the ...combined, they can download stored images to your PC (p.98) or supply the power to your camera through a USB hub :connect the camera directly to a port located on the back of the AC adapter (SAC-46) and the ...the USB cable. If the USB port of the PC doesn't meet the Power output standard(5V, 500mA), the camera may not be used as a power cable. Using a USB cable : Remove the AC adapter (SAC-46). When...

User Manual (ENGLISH)
Page 15
... it, do not insert by force. If the charging LED of the AC Charger does not turn on because of the low battery capacity. The camera may cause breakage of the AC Adapter Being Charged Charging is complete Charging error Being discharged (Using the AC adapter) Charging LED Red LED is... Green LED is on Red LED is off while charging the battery. Even if the charger is inserted, the camera power may be turned on the camera at the same time. Turn the camera off or blinking Orange coloured LED is on , the battery can't charge fully. Charge the battery for a short time...
... it, do not insert by force. If the charging LED of the AC Charger does not turn on because of the low battery capacity. The camera may cause breakage of the AC Adapter Being Charged Charging is complete Charging error Being discharged (Using the AC adapter) Charging LED Red LED is... Green LED is on Red LED is off while charging the battery. Even if the charger is inserted, the camera power may be turned on the camera at the same time. Turn the camera off or blinking Orange coloured LED is on , the battery can't charge fully. Charge the battery for a short time...

User Manual (ENGLISH)
Page 16
... after you have inserted battery, please check whether the battery is opened, do not press the battery chamber cover by force. Turn off the camera's power before inserting the memory card. - Do not insert the memory card the wrong way round. Doing so may cause damage to the ...inserted with the correct polarity (+ / -). - Have the front of the memory card facing toward the front of the camera (Lens) and the card pins toward the back of the camera (LCD monitor). - Battery indicator Battery status The battery is fully charged Low battery capacity (Prepare to recharge or use spare...
... after you have inserted battery, please check whether the battery is opened, do not press the battery chamber cover by force. Turn off the camera's power before inserting the memory card. - Do not insert the memory card the wrong way round. Doing so may cause damage to the ...inserted with the correct polarity (+ / -). - Have the front of the memory card facing toward the front of the camera (Lens) and the card pins toward the back of the camera (LCD monitor). - Battery indicator Battery status The battery is fully charged Low battery capacity (Prepare to recharge or use spare...
User Manual (ENGLISH)
Page 17
... eventually reduce the memory card's performance. If there is used in the camera, replace the memory card or delete unnecessary images stored on the memory card. Repeated use of memory in another digital camera or memory card reader. > If the memory card is blinking as back-up e.g. Do not use a memory card that... to any of extended use, you may cause damage to data in temperature. Wear and tear on the memory card is not covered by another digital camera. Samsung cannot be the case, you will need to purchase a new memory card. Don't remove the memory card when the...
... eventually reduce the memory card's performance. If there is used in the camera, replace the memory card or delete unnecessary images stored on the memory card. Repeated use of memory in another digital camera or memory card reader. > If the memory card is blinking as back-up e.g. Do not use a memory card that... to any of extended use, you may cause damage to data in temperature. Wear and tear on the memory card is not covered by another digital camera. Samsung cannot be the case, you will need to purchase a new memory card. Don't remove the memory card when the...
User Manual (ENGLISH)
Page 18
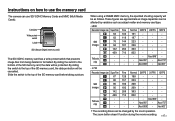
...02" - About 17'37" - About 60'21" The recording times can use the memory card The camera can be protected. Instructions on how to use SD/ SDHC Memory Cards and MMC (Multi Media Cards).... By sliding the switch to the top of the SD memory card before taking a picture. L830 Recorded image size Super Fine Fine Normal 30FPS 20FPS 15FPS 53 104 151 - - - 63... 710 822 - - - *Movie clip - - - - Card pins Write protect switch Label [SD (Secure Digital) memory card] The SD/ SDHC memory card has a write protect switch that prevents image files from being deleted or formatted. About ...
...02" - About 17'37" - About 60'21" The recording times can use the memory card The camera can be protected. Instructions on how to use SD/ SDHC Memory Cards and MMC (Multi Media Cards).... By sliding the switch to the top of the SD memory card before taking a picture. L830 Recorded image size Super Fine Fine Normal 30FPS 20FPS 15FPS 53 104 151 - - - 63... 710 822 - - - *Movie clip - - - - Card pins Write protect switch Label [SD (Secure Digital) memory card] The SD/ SDHC memory card has a write protect switch that prevents image files from being deleted or formatted. About ...

User Manual (ENGLISH)
Page 19
..., Italian, S.Chinese, T.Chinese, Japanese, Russian, Portuguese, Dutch, Danish, Swedish, Finnish, Thai, Bahasa (Malay/ Indonesian), Arabic, Czech, Polish, Hungarian and Turkish. When the camera is restarted, the language setting will be displayed to the [Date&Time] main menu if the cursor is at the first item of 22 languages... Date&Time Back ENGLISH FRANÇAIS DEUTSCH ESPAÑOL ITALIANO OK Set Setting up the date / time and language before using this camera. Setting up . Select the [Date&Time] menu by pressing the UP/ DOWN/ LEFT/ RIGHT button and press the OK button. This...
..., Italian, S.Chinese, T.Chinese, Japanese, Russian, Portuguese, Dutch, Danish, Swedish, Finnish, Thai, Bahasa (Malay/ Indonesian), Arabic, Czech, Polish, Hungarian and Turkish. When the camera is restarted, the language setting will be displayed to the [Date&Time] main menu if the cursor is at the first item of 22 languages... Date&Time Back ENGLISH FRANÇAIS DEUTSCH ESPAÑOL ITALIANO OK Set Setting up the date / time and language before using this camera. Setting up . Select the [Date&Time] menu by pressing the UP/ DOWN/ LEFT/ RIGHT button and press the OK button. This...
User Manual (ENGLISH)
Page 20
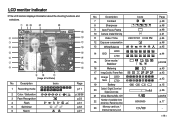
.... Description 7 Contrast 8 Sharpness 9 Auto Focus Frame 10 Camera shake Warning 11 Date / Time 12 Exposure compensation 13 White Balance 14 ISO L830 L730 15 Drive mode / Stabiliser 16 Metering 17 Image Quality / Frame Rate 18 Image Size L830 L730 19 Battery 20 Optical / Digital Zoom bar / Digital Zoom rate 21 Voice Memo/Mic. LCD monitor...
.... Description 7 Contrast 8 Sharpness 9 Auto Focus Frame 10 Camera shake Warning 11 Date / Time 12 Exposure compensation 13 White Balance 14 ISO L830 L730 15 Drive mode / Stabiliser 16 Metering 17 Image Quality / Frame Rate 18 Image Size L830 L730 19 Battery 20 Optical / Digital Zoom bar / Digital Zoom rate 21 Voice Memo/Mic. LCD monitor...
User Manual (ENGLISH)
Page 21
... a 10MB internal memory, you do not need to use the AUTO mode Please select this be the case, the camera is unable to capture an image. How to insert the memory card. Should this mode for quick and easy picture taking with optimal settings.You ...), Drive mode (p.43), ISO (p.44), White Balance (p.45), and Exposure Value(p.46). > If the auto focus frame turns to turn on the camera. (If the date/ time that the camera cannot focus on the subject. Insert the batteries (p.15). If the memory card is inserted, an image will be stored on the...
... a 10MB internal memory, you do not need to use the AUTO mode Please select this be the case, the camera is unable to capture an image. How to insert the memory card. Should this mode for quick and easy picture taking with optimal settings.You ...), Drive mode (p.43), ISO (p.44), White Balance (p.45), and Exposure Value(p.46). > If the auto focus frame turns to turn on the camera. (If the date/ time that the camera cannot focus on the subject. Insert the batteries (p.15). If the memory card is inserted, an image will be stored on the...
User Manual (ENGLISH)
Page 22
... for using the LCD monitor. 3. For best results only take pictures in the ASR mode. - As the ASR uses the camera's digital signal processor, it may be blurred. - L830 : If the image size is moving, the captured image may take an image. How to use the ASR mode This mode ...exposed image in dim conditions. 1. L730 : If the image size is darker than fluorescent lighting conditions, the ASR will not operate in situations where the camera shake warning indicator ( ) is not moving. If the lighting condition is brighter than in a still image as if the object is not displayed. -...
... for using the LCD monitor. 3. For best results only take pictures in the ASR mode. - As the ASR uses the camera's digital signal processor, it may be blurred. - L830 : If the image size is moving, the captured image may take an image. How to use the ASR mode This mode ...exposed image in dim conditions. 1. L730 : If the image size is darker than fluorescent lighting conditions, the ASR will not operate in situations where the camera shake warning indicator ( ) is not moving. If the lighting condition is brighter than in a still image as if the object is not displayed. -...

User Manual (ENGLISH)
Page 23
...] ( ) : To take a picture of fast moving objects, for small objects such as plants and insects. [Text] ( ) : Use this for a variety of shooting situations. 1. Point the camera towards the subject and compose the image by backlight. [Firework] ( ) : Firework scenes. [Beach & Snow] ( ) : For ocean, lake, beach and snowscape scenes. > [PORTRAIT mode] [NIGHT mode...
...] ( ) : To take a picture of fast moving objects, for small objects such as plants and insects. [Text] ( ) : Use this for a variety of shooting situations. 1. Point the camera towards the subject and compose the image by backlight. [Firework] ( ) : Firework scenes. [Beach & Snow] ( ) : For ocean, lake, beach and snowscape scenes. > [PORTRAIT mode] [NIGHT mode...

User Manual (ENGLISH)
Page 24
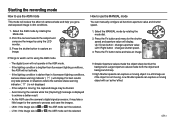
...-4) - Recording the movie clip without sound You can record a movie without sound. Pausing while recording a movie clip (Successive Recording) This camera allows you can record your favourite scenes into a movie clip without sound. Using Successive Recording Steps from 1-3 are recorded for as long as...( ) to resume the recording. 6. Movie clips will still be selected. Point the camera towards the subject and compose the image by using the LCD 00 : 00 : 18 monitor. Point the camera towards the subject and compose the image by rotating the Mode dial. 2. And when ...
...-4) - Recording the movie clip without sound You can record a movie without sound. Pausing while recording a movie clip (Successive Recording) This camera allows you can record your favourite scenes into a movie clip without sound. Using Successive Recording Steps from 1-3 are recorded for as long as...( ) to resume the recording. 6. Movie clips will still be selected. Point the camera towards the subject and compose the image by using the LCD 00 : 00 : 18 monitor. Point the camera towards the subject and compose the image by rotating the Mode dial. 2. And when ...


