User Manual (ENGLISH)
Page 4
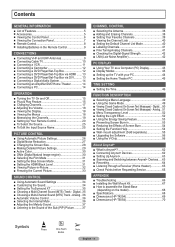
... Panel 7 ■ Remote Control 8 ■ Installing Batteries in the Remote Control 9 CONNECTIONS ■ Connecting VHF and UHF Antennas 9 ■ Connecting Cable TV 10 ■ Connecting a VCR 11 ■ Connecting a Camcorder 12 ■ Connecting a DVD Player/Set-Top Box 12 ■ Connecting a DVD Player/...Analog Channels 41 ■ Checking the Digital-Signal Strength 42 ■ LNA (Low Noise Amplifier 42 PC DISPLAY ■ Using Your TV as a Computer (PC) Display 43 ■ Display Modes 43 ■ Setting up the TV with your PC 44 ■ Setting the Home ...
... Panel 7 ■ Remote Control 8 ■ Installing Batteries in the Remote Control 9 CONNECTIONS ■ Connecting VHF and UHF Antennas 9 ■ Connecting Cable TV 10 ■ Connecting a VCR 11 ■ Connecting a Camcorder 12 ■ Connecting a DVD Player/Set-Top Box 12 ■ Connecting a DVD Player/...Analog Channels 41 ■ Checking the Digital-Signal Strength 42 ■ LNA (Low Noise Amplifier 42 PC DISPLAY ■ Using Your TV as a Computer (PC) Display 43 ■ Display Modes 43 ■ Setting up the TV with your PC 44 ■ Setting the Home ...
User Manual (ENGLISH)
Page 42
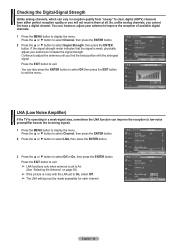
... T V Channel Antenna : Air Auto Program Clear Scrambled Channel Channel List Name Fine Tune Signal Strength Off LNA : OOnn Move Enter Return English - 42 So, unlike analog channels, you find the best position with the LNA set to Air. (See "Selecting the Antenna" on page 38) ➢...List Name Fine Tune Signal Strength LNA : On Move Enter Return T V Signal Strength OK Enter Return LNA (Low Noise Amplifier) If the TV is operating in reception quality from "snowy" to select Signal Strength, then press the ENTER button. You can also press the ENTER button ...
... T V Channel Antenna : Air Auto Program Clear Scrambled Channel Channel List Name Fine Tune Signal Strength Off LNA : OOnn Move Enter Return English - 42 So, unlike analog channels, you find the best position with the LNA set to Air. (See "Selecting the Antenna" on page 38) ➢...List Name Fine Tune Signal Strength LNA : On Move Enter Return T V Signal Strength OK Enter Return LNA (Low Noise Amplifier) If the TV is operating in reception quality from "snowy" to select Signal Strength, then press the ENTER button. You can also press the ENTER button ...
User Manual (ENGLISH)
Page 67
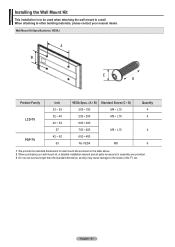
... This installation is to be used when attaching the wall mount to the inside of the TV set. Wall Mount Kit Specifications ( VESA ) Product Family LCD-TV PDP-TV inch 23 ~ 26 32 ~ 40 46 ~ 52 57 42 ~ 50 63 VESA Spec. (A * B) Standard Screw (C * D) 200 * 100 M4 * L10 200 * 200 M6 * L10 600 * 400...
... This installation is to be used when attaching the wall mount to the inside of the TV set. Wall Mount Kit Specifications ( VESA ) Product Family LCD-TV PDP-TV inch 23 ~ 26 32 ~ 40 46 ~ 52 57 42 ~ 50 63 VESA Spec. (A * B) Standard Screw (C * D) 200 * 100 M4 * L10 200 * 200 M6 * L10 600 * 400...
User Manual (ENGLISH)
Page 68
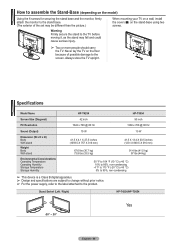
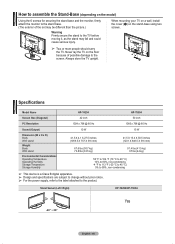
... may be different than the picture.) Warning Firmly secure the stand to the TV before moving it, as the stand may fall and could cause serious injury. Specifications Model Name HP-T4254 HP-T5054 Screen Size (Diagonal) PC Resolution 42 inch 1024 x 768 @ 60 Hz 50 inch 1360 x 768 @ 60 Hz Sound... the stand base and the monitor, firmly attach the monitor to the stand base. (The exterior of possible damage to the screen. Never lay the TV on the stand-base using two screws. ➢ Two or more people should carry the...
... may be different than the picture.) Warning Firmly secure the stand to the TV before moving it, as the stand may fall and could cause serious injury. Specifications Model Name HP-T4254 HP-T5054 Screen Size (Diagonal) PC Resolution 42 inch 1024 x 768 @ 60 Hz 50 inch 1360 x 768 @ 60 Hz Sound... the stand base and the monitor, firmly attach the monitor to the stand base. (The exterior of possible damage to the screen. Never lay the TV on the stand-base using two screws. ➢ Two or more people should carry the...
User Manual (ENGLISH)
Page 4
...Analog Channels 41 ■ Checking the Digital-Signal Strength 42 ■ LNA (Low Noise Amplifier 42 PC DISPLAY ■ Using Your TV as a Computer (PC) Display 43 ■ Display Modes 43 ■ Setting up the TV with your PC 44 ■ Setting the Home ...Connection Panel 7 ■ Remote Control 8 ■ Installing Batteries in the Remote Control 9 CONNECTIONS ■ Connecting VHF and UHF Antennas 9 ■ Connecting Cable TV 10 ■ Connecting a VCR 11 ■ Connecting an S-VHS VCR 11 ■ Connecting a Camcorder 12 ■ Connecting a DVD Player/Set-Top Box...
...Analog Channels 41 ■ Checking the Digital-Signal Strength 42 ■ LNA (Low Noise Amplifier 42 PC DISPLAY ■ Using Your TV as a Computer (PC) Display 43 ■ Display Modes 43 ■ Setting up the TV with your PC 44 ■ Setting the Home ...Connection Panel 7 ■ Remote Control 8 ■ Installing Batteries in the Remote Control 9 CONNECTIONS ■ Connecting VHF and UHF Antennas 9 ■ Connecting Cable TV 10 ■ Connecting a VCR 11 ■ Connecting an S-VHS VCR 11 ■ Connecting a Camcorder 12 ■ Connecting a DVD Player/Set-Top Box...

User Manual (ENGLISH)
Page 42
...Channel Antenna : Air Auto Program Clear Scrambled Channel Channel List Name Fine Tune Signal Strength Off LNA : OOnn Move Enter Return English - 42 Checking the Digital-Signal Strength Unlike analog channels, which can vary in a weak-signal area, sometimes the LNA function can improve the ...Fine Tune Signal Strength LNA : On Move Enter Return T V Signal Strength OK Enter Return LNA (Low Noise Amplifier) If the TV is weak, physically adjust your antenna to improve the reception of available digital channels. 1 Press the MENU button to select Signal Strength...
...Channel Antenna : Air Auto Program Clear Scrambled Channel Channel List Name Fine Tune Signal Strength Off LNA : OOnn Move Enter Return English - 42 Checking the Digital-Signal Strength Unlike analog channels, which can vary in a weak-signal area, sometimes the LNA function can improve the ...Fine Tune Signal Strength LNA : On Move Enter Return T V Signal Strength OK Enter Return LNA (Low Noise Amplifier) If the TV is weak, physically adjust your antenna to improve the reception of available digital channels. 1 Press the MENU button to select Signal Strength...

User Manual (ENGLISH)
Page 67
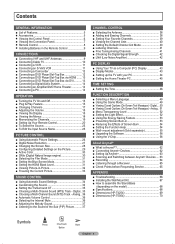
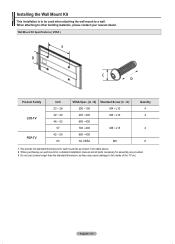
Wall Mount Kit Specifications ( VESA ) Product Family LCD-TV PDP-TV inch 23 ~ 26 32 ~ 40 46 ~ 52 57 42 ~ 50 63 VESA Spec. (A * B) Standard Screw (C * D) 200 * 100 M4 * L10 200 * 200 M6 * L10 600 * 400 700 * 400 M8 * L15 600 * 400 No VESA M8 ... cause damage to a wall. Installing the Wall Mount Kit This installation is to be used when attaching the wall mount to the inside of the TV set. When attaching to other building materials, please contact your nearest dealer. English - 67
Wall Mount Kit Specifications ( VESA ) Product Family LCD-TV PDP-TV inch 23 ~ 26 32 ~ 40 46 ~ 52 57 42 ~ 50 63 VESA Spec. (A * B) Standard Screw (C * D) 200 * 100 M4 * L10 200 * 200 M6 * L10 600 * 400 700 * 400 M8 * L15 600 * 400 No VESA M8 ... cause damage to a wall. Installing the Wall Mount Kit This installation is to be used when attaching the wall mount to the inside of the TV set. When attaching to other building materials, please contact your nearest dealer. English - 67

User Manual (ENGLISH)
Page 68
... the stand-base using two screws. ➢ Two or more people should carry the TV. Specifications Model Name HP-T4254 HP-T5054 Screen Size (Diagonal) PC Resolution 42 inch 1024 x 768 @ 60 Hz 50 inch 1360 x 768 @ 60 Hz Sound (Output) 10 W 15 W Dimension (W x H x D) Body With stand .... ➢ Design and specifications are subject to change without prior notice. ➢ For the power supply, refer to the label attached to the TV before moving it, as the stand may be different than the picture.) Warning Firmly secure the stand to the product. Stand Swivel (Left / Right...
... the stand-base using two screws. ➢ Two or more people should carry the TV. Specifications Model Name HP-T4254 HP-T5054 Screen Size (Diagonal) PC Resolution 42 inch 1024 x 768 @ 60 Hz 50 inch 1360 x 768 @ 60 Hz Sound (Output) 10 W 15 W Dimension (W x H x D) Body With stand .... ➢ Design and specifications are subject to change without prior notice. ➢ For the power supply, refer to the label attached to the TV before moving it, as the stand may be different than the picture.) Warning Firmly secure the stand to the product. Stand Swivel (Left / Right...
User Manual (ENGLISH)
Page 4
...Analog Channels 41 ■ Checking the Digital-Signal Strength 42 ■ LNA (Low Noise Amplifier 42 PC DISPLAY ■ Using Your TV as a Computer (PC) Display 43 ■ Display Modes 43 ■ Setting up the TV with your PC 44 ■ Setting the Home ...Connection Panel 7 ■ Remote Control 8 ■ Installing Batteries in the Remote Control 9 CONNECTIONS ■ Connecting VHF and UHF Antennas 9 ■ Connecting Cable TV 10 ■ Connecting a VCR 11 ■ Connecting an S-VHS VCR 11 ■ Connecting a Camcorder 12 ■ Connecting a DVD Player/Set-Top Box...
...Analog Channels 41 ■ Checking the Digital-Signal Strength 42 ■ LNA (Low Noise Amplifier 42 PC DISPLAY ■ Using Your TV as a Computer (PC) Display 43 ■ Display Modes 43 ■ Setting up the TV with your PC 44 ■ Setting the Home ...Connection Panel 7 ■ Remote Control 8 ■ Installing Batteries in the Remote Control 9 CONNECTIONS ■ Connecting VHF and UHF Antennas 9 ■ Connecting Cable TV 10 ■ Connecting a VCR 11 ■ Connecting an S-VHS VCR 11 ■ Connecting a Camcorder 12 ■ Connecting a DVD Player/Set-Top Box...

User Manual (ENGLISH)
Page 42
...Return T V Channel Antenna : Air Auto Program Clear Scrambled Channel Channel List Name Fine Tune Signal Strength Off LNA : OOnn Move Enter Return English - 42 Press the ▲ or ▼ button to select Channel, then press the ENTER button. 2 Press the ▲ or ▼ button to select ...List Name Fine Tune Signal Strength LNA : On Move Enter Return T V Signal Strength OK Enter Return LNA (Low Noise Amplifier) If the TV is noisy with the strongest signal. So, unlike analog channels, you find the best position with the LNA set to Air. (See "...
...Return T V Channel Antenna : Air Auto Program Clear Scrambled Channel Channel List Name Fine Tune Signal Strength Off LNA : OOnn Move Enter Return English - 42 Press the ▲ or ▼ button to select Channel, then press the ENTER button. 2 Press the ▲ or ▼ button to select ...List Name Fine Tune Signal Strength LNA : On Move Enter Return T V Signal Strength OK Enter Return LNA (Low Noise Amplifier) If the TV is noisy with the strongest signal. So, unlike analog channels, you find the best position with the LNA set to Air. (See "...
User Manual (ENGLISH)
Page 67
English - 67 Wall Mount Kit Specifications ( VESA ) Product Family LCD-TV PDP-TV inch 23 ~ 26 32 ~ 40 46 ~ 52 57 42 ~ 50 63 VESA Spec. (A * B) Standard Screw (C * D) 200 * 100 M4 * L10 200 * 200 M6 * L10 600 * 400 700 * 400 M8 * L15 600 * 400 No VESA M8 ... cause damage to a wall. Installing the Wall Mount Kit This installation is to be used when attaching the wall mount to the inside of the TV set. When attaching to other building materials, please contact your nearest dealer.
English - 67 Wall Mount Kit Specifications ( VESA ) Product Family LCD-TV PDP-TV inch 23 ~ 26 32 ~ 40 46 ~ 52 57 42 ~ 50 63 VESA Spec. (A * B) Standard Screw (C * D) 200 * 100 M4 * L10 200 * 200 M6 * L10 600 * 400 700 * 400 M8 * L15 600 * 400 No VESA M8 ... cause damage to a wall. Installing the Wall Mount Kit This installation is to be used when attaching the wall mount to the inside of the TV set. When attaching to other building materials, please contact your nearest dealer.
User Manual (ENGLISH)
Page 68
... the stand-base using two screws. ➢ Two or more people should carry the TV. Specifications Model Name Screen Size (Diagonal) PC Resolution HP-T4254 42 inch 1024 x 768 @ 60 Hz HP-T5054 50 inch 1360 x 768 @ 60 Hz Sound (Output) Dimension (W x H x D) Body With stand Weight Body With stand...subject to change without prior notice. ➢ For the power supply, refer to the label attached to the product. Always store the TV upright. When mounting your TV on a wall, install the cover (1) on the floor because of the set may be different than the picture.) Warning Firmly secure ...
... the stand-base using two screws. ➢ Two or more people should carry the TV. Specifications Model Name Screen Size (Diagonal) PC Resolution HP-T4254 42 inch 1024 x 768 @ 60 Hz HP-T5054 50 inch 1360 x 768 @ 60 Hz Sound (Output) Dimension (W x H x D) Body With stand Weight Body With stand...subject to change without prior notice. ➢ For the power supply, refer to the label attached to the product. Always store the TV upright. When mounting your TV on a wall, install the cover (1) on the floor because of the set may be different than the picture.) Warning Firmly secure ...


