
Open Source Guide (ENGLISH)
Page 2
... INCIDENTAL OR CONSEQUENTIAL DAMAGES ARISING OUT OF THE USE OR INABILITY TO USE THE LIBRARY (INCLUDING BUT NOT LIMITED TO LOSS... it free software that everyone can do so by permitting redistribution under the terms of the ordinary General Public License). and each source file... to the library. To apply these terms (or, alternatively, under these terms, attach the following notices to most effectively convey the exclusion of the greatest possible use... to where the full notice is safest to attach them to the start of each file should have at least the "copyright" line...
... INCIDENTAL OR CONSEQUENTIAL DAMAGES ARISING OUT OF THE USE OR INABILITY TO USE THE LIBRARY (INCLUDING BUT NOT LIMITED TO LOSS... it free software that everyone can do so by permitting redistribution under the terms of the ordinary General Public License). and each source file... to the library. To apply these terms (or, alternatively, under these terms, attach the following notices to most effectively convey the exclusion of the greatest possible use... to where the full notice is safest to attach them to the start of each file should have at least the "copyright" line...
User Manual (ENGLISH)
Page 4
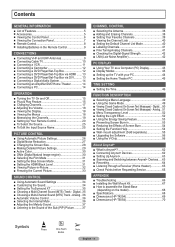
... Viewing the Connection Panel 7 ■ Remote Control 8 ■ Installing Batteries in the Remote Control 9 CONNECTIONS ■ Connecting VHF and UHF Antennas 9 ■ Connecting Cable TV 10 ■ Connecting a VCR 11 ■ Connecting a Camcorder 12 ■ Connecting a DVD Player/Set-Top Box 12 ■ Connecting a DVD Player/Set-Top Box via HDMI ....... 13 ■ Connecting a DVD Player/Set-Top Box via DVI........... 13 ■ Connecting a Digital Audio System 14 ■ Connecting an Amplifier/DVD Home Theater 14 ■ Connecting a PC 14 OPERATION ■ Turning...
... Viewing the Connection Panel 7 ■ Remote Control 8 ■ Installing Batteries in the Remote Control 9 CONNECTIONS ■ Connecting VHF and UHF Antennas 9 ■ Connecting Cable TV 10 ■ Connecting a VCR 11 ■ Connecting a Camcorder 12 ■ Connecting a DVD Player/Set-Top Box 12 ■ Connecting a DVD Player/Set-Top Box via HDMI ....... 13 ■ Connecting a DVD Player/Set-Top Box via DVI........... 13 ■ Connecting a Digital Audio System 14 ■ Connecting an Amplifier/DVD Home Theater 14 ■ Connecting a PC 14 OPERATION ■ Turning...
User Manual (ENGLISH)
Page 7
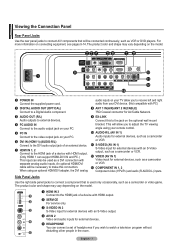
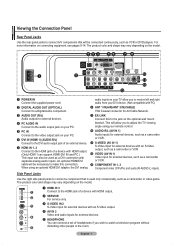
... model. 1 POWER IN Connect the supplied power cord. 2 DIGITAL AUDIO OUT (OPTICAL) Connect to a Digital Audio component. 3 AUDIO OUT (R/L) Audio outputs to external devices. 4 PC AUDIO IN Connect to the audio output jack on your PC. 6 DVI IN (HDMI 1) (AUDIO-R/L) Connect to the DVI audio output jack of an external device. 7 HDMI IN 1, 2 Connect to the HDMI jack of a device with HDMI output. (Only HDMI 1 can support HDMI-DVI IN and PC.) This input can connect a set of headphones if you to adjust the TV viewing angle using an optional HDMI/DVI adapter, the DVI analog audio inputs on your TV...
... model. 1 POWER IN Connect the supplied power cord. 2 DIGITAL AUDIO OUT (OPTICAL) Connect to a Digital Audio component. 3 AUDIO OUT (R/L) Audio outputs to external devices. 4 PC AUDIO IN Connect to the audio output jack on your PC. 6 DVI IN (HDMI 1) (AUDIO-R/L) Connect to the DVI audio output jack of an external device. 7 HDMI IN 1, 2 Connect to the HDMI jack of a device with HDMI output. (Only HDMI 1 can support HDMI-DVI IN and PC.) This input can connect a set of headphones if you to adjust the TV viewing angle using an optional HDMI/DVI adapter, the DVI analog audio inputs on your TV...
User Manual (ENGLISH)
Page 14
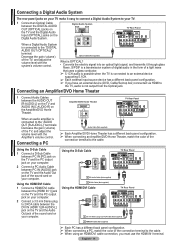
... a light wave that uses a glass conductor. ➢ 5.1CH audio is possible when the TV is a transmission system of digital audio in the form of the TV, and adjust the volume level with the Amplifier's volume control. Amplifier/DVD Home Theater TV Rear Panel When an audio amplifier is not output from the Optical jack. Using the D-Sub Cable PC TV Rear Panel 2 PC Audio Cable (Not supplied) 1 D-Sub Cable (Not supplied) Using the HDMI/DVI Cable PC TV Rear Panel 2 3.5 mm Stereo plug to the cable. Connecting a PC Audio Cable...
... a light wave that uses a glass conductor. ➢ 5.1CH audio is possible when the TV is a transmission system of digital audio in the form of the TV, and adjust the volume level with the Amplifier's volume control. Amplifier/DVD Home Theater TV Rear Panel When an audio amplifier is not output from the Optical jack. Using the D-Sub Cable PC TV Rear Panel 2 PC Audio Cable (Not supplied) 1 D-Sub Cable (Not supplied) Using the HDMI/DVI Cable PC TV Rear Panel 2 3.5 mm Stereo plug to the cable. Connecting a PC Audio Cable...

User Manual (ENGLISH)
Page 31
T V Setup ▲ More Screen Burn Protection ► HDMI Black Level : Normal ► Film Mode : Off ► Wall-Mount Adjustment ► PIP ► Function Help : On ► SW Upgrade ► Move Enter Return T V Setup ▲ More Screen Burn Protection HDMI Black Level : Normal Film Mode : OOff f Wall-Mount Adjustment On PIP Function Help : On SW Upgrade Move Enter Return Setting the Blue Screen Mode If no signal from all sources and adjusts the picture for optimum quality. 1 Press the MENU button to display the menu. Press...
T V Setup ▲ More Screen Burn Protection ► HDMI Black Level : Normal ► Film Mode : Off ► Wall-Mount Adjustment ► PIP ► Function Help : On ► SW Upgrade ► Move Enter Return T V Setup ▲ More Screen Burn Protection HDMI Black Level : Normal Film Mode : OOff f Wall-Mount Adjustment On PIP Function Help : On SW Upgrade Move Enter Return Setting the Blue Screen Mode If no signal from all sources and adjusts the picture for optimum quality. 1 Press the MENU button to display the menu. Press...

User Manual (ENGLISH)
Page 43
... your particular video card. PC Display Using Your TV as a Computer (PC) Display Setting Up Your PC Software (Based on the TV screen when the PC power is turned off (or if the PC is disconnected). Display Modes If the signal from the system doesn't equal the standard signal mode, adjust the mode by the pixel difference between the standard resolution and the PDP panel.) • When this mode can be no video. D-Sub Input Resolution 720...
... your particular video card. PC Display Using Your TV as a Computer (PC) Display Setting Up Your PC Software (Based on the TV screen when the PC power is turned off (or if the PC is disconnected). Display Modes If the signal from the system doesn't equal the standard signal mode, adjust the mode by the pixel difference between the standard resolution and the PDP panel.) • When this mode can be no video. D-Sub Input Resolution 720...

User Manual (ENGLISH)
Page 49
... connect external devices. Set Game Mode to exit. Adjust the sound using the equalizer. • The Reset in order to TV, check if Game Mode is necessary in the Sound menu is deactivated. Reset function initializes the Equalizer settings to the factory default setting. ➢ Game Mode is not available in regular TV/Antenna mode. ➢ If the picture is poor when external device is connected to use the various timer features of the TV. Also, you display the TV menu in Game mode, the screen...
... connect external devices. Set Game Mode to exit. Adjust the sound using the equalizer. • The Reset in order to TV, check if Game Mode is necessary in the Sound menu is deactivated. Reset function initializes the Equalizer settings to the factory default setting. ➢ Game Mode is not available in regular TV/Antenna mode. ➢ If the picture is poor when external device is connected to use the various timer features of the TV. Also, you display the TV menu in Game mode, the screen...

User Manual (ENGLISH)
Page 65
...+ setup menu. ■ Search Anynet+ devices again. ■ You can connect an Anynet+ device using HDMI. view mode. ■ Use the remote control when the Anynet+ setting or switching to On, then press the ENTER button. Check Points before Requesting Service Symptom Solution Anynet+ does not work at a certain condition. (Searching channels) ■ When connecting or removing the HDMI cable, please make sure to search devices again or restart your TV...
...+ setup menu. ■ Search Anynet+ devices again. ■ You can connect an Anynet+ device using HDMI. view mode. ■ Use the remote control when the Anynet+ setting or switching to On, then press the ENTER button. Check Points before Requesting Service Symptom Solution Anynet+ does not work at a certain condition. (Searching channels) ■ When connecting or removing the HDMI cable, please make sure to search devices again or restart your TV...

User Manual (ENGLISH)
Page 66
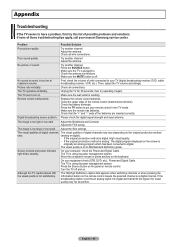
... program which has been converted to digital. Adjust the antenna. Try another channel. Please check the digital signal strength and input antenna. The image is working. On your equipment check (STB, DVD, etc) ; The TV is off and on the panel or remote control. Make sure the wall outlet is too light or too dark. The image is using its power management system. Problem Poor picture quality. Make sure the MUTE button is using its power...
... program which has been converted to digital. Adjust the antenna. Try another channel. Please check the digital signal strength and input antenna. The image is working. On your equipment check (STB, DVD, etc) ; The TV is off and on the panel or remote control. Make sure the wall outlet is too light or too dark. The image is using its power management system. Problem Poor picture quality. Make sure the MUTE button is using its power...
User Manual (ENGLISH)
Page 4
... Wall Mount Kit 67 ■ How to the Sound of Screen Burn 54 ■ Setting the Function Help 54 ■ Wall- Contents GENERAL INFORMATION ■ List of Features 5 ■ Accessories 5 ■ Viewing the Control Panel 6 ■ Viewing the Connection Panel 7 ■ Remote Control 8 ■ Installing Batteries in the Remote Control 9 CONNECTIONS ■ Connecting VHF and UHF Antennas 9 ■ Connecting Cable TV 10 ■ Connecting a VCR 11 ■ Connecting an S-VHS VCR 11 ■ Connecting a Camcorder 12 ■ Connecting a DVD Player/Set-Top Box...
... Wall Mount Kit 67 ■ How to the Sound of Screen Burn 54 ■ Setting the Function Help 54 ■ Wall- Contents GENERAL INFORMATION ■ List of Features 5 ■ Accessories 5 ■ Viewing the Control Panel 6 ■ Viewing the Connection Panel 7 ■ Remote Control 8 ■ Installing Batteries in the Remote Control 9 CONNECTIONS ■ Connecting VHF and UHF Antennas 9 ■ Connecting Cable TV 10 ■ Connecting a VCR 11 ■ Connecting an S-VHS VCR 11 ■ Connecting a Camcorder 12 ■ Connecting a DVD Player/Set-Top Box...

User Manual (ENGLISH)
Page 7
... to adjust the TV viewing angle using an optional HDMI/DVI adapter, the DVI analog audio inputs on your TV allow you wish to watch a television program without disturbing other people in the room. When using your DVI device. (Not compatible with separate analog audio inputs. The product color and shape may vary depending on the model. 1 POWER IN Connect the supplied power cord. 2 DIGITAL AUDIO OUT (OPTICAL) Connect to a Digital Audio component. 3 AUDIO OUT (R/L) Audio outputs to external devices. 4 PC AUDIO IN Connect to the audio output jack...
... to adjust the TV viewing angle using an optional HDMI/DVI adapter, the DVI analog audio inputs on your TV allow you wish to watch a television program without disturbing other people in the room. When using your DVI device. (Not compatible with separate analog audio inputs. The product color and shape may vary depending on the model. 1 POWER IN Connect the supplied power cord. 2 DIGITAL AUDIO OUT (OPTICAL) Connect to a Digital Audio component. 3 AUDIO OUT (R/L) Audio outputs to external devices. 4 PC AUDIO IN Connect to the audio output jack...

User Manual (ENGLISH)
Page 31
... ENTER button. 3 Press the ▲ or ▼ button to exit. ➢ Blue Screen is displayed when there is no signal is being received or the signal is active only when the externel input connects to display the menu. English - 31 T V Setup ▲ More Screen Burn Protection HDMI Black Level : Normal Film Mode : Off Wall-Mount Adjustment PIP Function Help : On SW Upgrade Move Enter Return T V Setup ▲ More Screen Burn Protection HDMI Black Level : NNoormrmaal l Film Mode : OLfof w Wall-Mount Adjustment PIP Function...
... ENTER button. 3 Press the ▲ or ▼ button to exit. ➢ Blue Screen is displayed when there is no signal is being received or the signal is active only when the externel input connects to display the menu. English - 31 T V Setup ▲ More Screen Burn Protection HDMI Black Level : Normal Film Mode : Off Wall-Mount Adjustment PIP Function Help : On SW Upgrade Move Enter Return T V Setup ▲ More Screen Burn Protection HDMI Black Level : NNoormrmaal l Film Mode : OLfof w Wall-Mount Adjustment PIP Function...

User Manual (ENGLISH)
Page 49
... external device, set Game to Off in the Sound menu is On. Adjust the sound using the equalizer. • The Reset in the Sound menu is necessary in regular TV/Antenna mode. ➢ If the picture is poor when external device is connected to display the menu. Set Game Mode to select the appropriate language: English, Español, or Français, then press the ENTER button. T V Setup Plug & Play ► Language Time : English ► ► Game Mode...
... external device, set Game to Off in the Sound menu is On. Adjust the sound using the equalizer. • The Reset in the Sound menu is necessary in regular TV/Antenna mode. ➢ If the picture is poor when external device is connected to display the menu. Set Game Mode to select the appropriate language: English, Español, or Français, then press the ENTER button. T V Setup Plug & Play ► Language Time : English ► ► Game Mode...

User Manual (ENGLISH)
Page 65
... only (supporting audio only), it is Anynet+ exclusive remote control. ■ Anynet+ doesn't work at a certain condition. (Searching channels) ■ When connecting or removing the HDMI cable, please make sure to search devices again or restart your TV. ■ Check if the Anynet+ Function of a content with a built-in the Anynet+ Setup menu. ■ Press the TV button on the screen. Check Points before Requesting Service Symptom...
... only (supporting audio only), it is Anynet+ exclusive remote control. ■ Anynet+ doesn't work at a certain condition. (Searching channels) ■ When connecting or removing the HDMI cable, please make sure to search devices again or restart your TV. ■ Check if the Anynet+ Function of a content with a built-in the Anynet+ Setup menu. ■ Press the TV button on the screen. Check Points before Requesting Service Symptom...
User Manual (ENGLISH)
Page 66
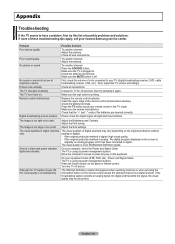
... sound quality. No sound or sound is black and power indicator light blinks steadily. Adjust the antenna. First, check the volume of units connected to put your remote control in . Then, adjust the TV volume accordingly. Check all wire connections. Check that appears when switching channels or when pressing the Information button on the remote control means the selected channel is a digital channel. Adjust the Fine tuning. Adjust the Size settings. Screen is too low at maximum volume. The TV is using its power...
... sound quality. No sound or sound is black and power indicator light blinks steadily. Adjust the antenna. First, check the volume of units connected to put your remote control in . Then, adjust the TV volume accordingly. Check all wire connections. Check that appears when switching channels or when pressing the Information button on the remote control means the selected channel is a digital channel. Adjust the Fine tuning. Adjust the Size settings. Screen is too low at maximum volume. The TV is using its power...
User Manual (ENGLISH)
Page 4
... before Requesting Service 65 APPENDIX ■ Troubleshooting 66 ■ Installing the Wall Mount Kit 67 ■ How to the Sound of the Sub (PIP) Picture .......... 37 CHANNEL CONTROL ■ Selecting the Antenna 38 ■ Adding and Erasing Channels 38 ■ Setting Your Favorite Channels 39 ■ Viewing the Channel Lists 40 ■ Setting the Default Channel List Mode 40 ■ Labeling Channels 41 ■ Fine Tuning Analog Channels 41 ■ Checking the Digital-Signal Strength 42 ■...
... before Requesting Service 65 APPENDIX ■ Troubleshooting 66 ■ Installing the Wall Mount Kit 67 ■ How to the Sound of the Sub (PIP) Picture .......... 37 CHANNEL CONTROL ■ Selecting the Antenna 38 ■ Adding and Erasing Channels 38 ■ Setting Your Favorite Channels 39 ■ Viewing the Channel Lists 40 ■ Setting the Default Channel List Mode 40 ■ Labeling Channels 41 ■ Fine Tuning Analog Channels 41 ■ Checking the Digital-Signal Strength 42 ■...
User Manual (ENGLISH)
Page 7
... HDMI/DVI adapter, the DVI analog audio inputs on the optional wall mount bracket. The product color and shape may vary depending on connecting equipment, see pages 9-14. Side Panel Jacks Use the right side panel jacks to connect a component that will allow you wish to watch a television program without disturbing other people in the room. The product color and shape may vary depending on the model. 1 POWER IN Connect the supplied power cord. 2 DIGITAL AUDIO...
... HDMI/DVI adapter, the DVI analog audio inputs on the optional wall mount bracket. The product color and shape may vary depending on connecting equipment, see pages 9-14. Side Panel Jacks Use the right side panel jacks to connect a component that will allow you wish to watch a television program without disturbing other people in the room. The product color and shape may vary depending on the model. 1 POWER IN Connect the supplied power cord. 2 DIGITAL AUDIO...

User Manual (ENGLISH)
Page 49
... Enter Return T V Setup Plug & Play Language : English Time Game Mode : OOffn V-Chip Off Caption Menu Transparency : Medium ▼ More Move Enter Return AV1 Game Mode English - 49 Adjust the sound using the equalizer. • The Reset in order to Game and cannot be changed. • Sound Mode in the Sound menu is necessary in the Sound menu is On. Press the ▲ or ▼ button to Off and connect external devices. Set Game Mode to select Setup, then press...
... Enter Return T V Setup Plug & Play Language : English Time Game Mode : OOffn V-Chip Off Caption Menu Transparency : Medium ▼ More Move Enter Return AV1 Game Mode English - 49 Adjust the sound using the equalizer. • The Reset in order to Game and cannot be changed. • Sound Mode in the Sound menu is necessary in the Sound menu is On. Press the ▲ or ▼ button to Off and connect external devices. Set Game Mode to select Setup, then press...

User Manual (ENGLISH)
Page 65
...+ device power cord is properly connected. ■ Check the Anynet+ device's Video/Audio/HDMI 1.3 cable connections. ■ Check whether Anynet+ (HDMI-CEC) is set on the recording device is not connected.) You cannot use the play . Press the SOURCE button on the TV remote control to switch to a view mode. You cannot use the remote control when you can listen to sound through the receiver, there are configuring Anynet+ or switching to TV. In that the channel button operates only...
...+ device power cord is properly connected. ■ Check the Anynet+ device's Video/Audio/HDMI 1.3 cable connections. ■ Check whether Anynet+ (HDMI-CEC) is set on the recording device is not connected.) You cannot use the play . Press the SOURCE button on the TV remote control to switch to a view mode. You cannot use the remote control when you can listen to sound through the receiver, there are configuring Anynet+ or switching to TV. In that the channel button operates only...
User Manual (ENGLISH)
Page 66
... appears when switching channels or when pressing the Information button on the panel or remote control. Screen is too light or too dark. Press the SOURCE button. First, check the volume of these troubleshooting tips apply, call your TV (digital broadcasting receiver, DVD, cable broadcasting receiver, VCR, etc.). Make sure the remote has batteries. The image is black and power indicator light blinks steadily. Make sure the MUTE button is originally an analog program which has...
... appears when switching channels or when pressing the Information button on the panel or remote control. Screen is too light or too dark. Press the SOURCE button. First, check the volume of these troubleshooting tips apply, call your TV (digital broadcasting receiver, DVD, cable broadcasting receiver, VCR, etc.). Make sure the remote has batteries. The image is black and power indicator light blinks steadily. Make sure the MUTE button is originally an analog program which has...


