
Quick Guide (easy Manual) (ver.1.0) (English)
Page 16
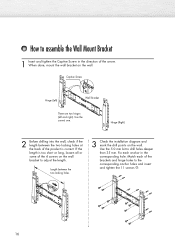
How to assemble the Wall Mount Bracket 1 Insert and tighten the Captive Screw in the corresponding hole. Use the correct one. Hinge (Right) 2 Before drilling into the wall, check if the length between the two locking holes 3 Check the installation diagram and mark the drill points on the wall. Use the 5.0 mm bit ...brackets and hinge holes to the corresponding anchor holes and insert and tighten the 11 screws . 16 Fix each of the 4 screws on the wall bracket to drill holes deeper than 35 mm. Length between the two locking holes at the back of the arrow. If the length is ...
How to assemble the Wall Mount Bracket 1 Insert and tighten the Captive Screw in the corresponding hole. Use the correct one. Hinge (Right) 2 Before drilling into the wall, check if the length between the two locking holes 3 Check the installation diagram and mark the drill points on the wall. Use the 5.0 mm bit ...brackets and hinge holes to the corresponding anchor holes and insert and tighten the 11 screws . 16 Fix each of the 4 screws on the wall bracket to drill holes deeper than 35 mm. Length between the two locking holes at the back of the arrow. If the length is ...

Quick Guide (easy Manual) (ver.1.0) (English)
Page 17
... holes of the product. 4 Remove safety pin (#) and insert the 4 product holders into the corresponding bracket holes (!). Fixing the TV panel to the wall attachment panel bracket The shape of the product may vary depending on the model. (The assemblies of the plastic hanger and the screw are the...on the back of the product. 2 Insert the screw into the plastic hanger. (See the figure below) • Mount the product on the wall bracket and make sure it is securely fixed to the wall, or the product may not stay in place after installation. 3 Tighten the 4 screws in the holes. •...
... holes of the product. 4 Remove safety pin (#) and insert the 4 product holders into the corresponding bracket holes (!). Fixing the TV panel to the wall attachment panel bracket The shape of the product may vary depending on the model. (The assemblies of the plastic hanger and the screw are the...on the back of the product. 2 Insert the screw into the plastic hanger. (See the figure below) • Mount the product on the wall bracket and make sure it is securely fixed to the wall, or the product may not stay in place after installation. 3 Tighten the 4 screws in the holes. •...

Quick Guide (easy Manual) (ver.1.0) (English)
Page 18
You can adjust the bracket angle between -2° and 15°. Fix the product to adjust the angle. 18 Make sure to use the top center, and not the left or the right side of the arrow) to adjust the angle. (See the figure to -2° before installing it on the wall. 1. How to Adjust Mounting Angle Note : Adjust the bracket angle to the right) 3. Hold the product at the top in the center and pull it forward (direction of the product to the wall bracket. 2.
You can adjust the bracket angle between -2° and 15°. Fix the product to adjust the angle. 18 Make sure to use the top center, and not the left or the right side of the arrow) to adjust the angle. (See the figure to -2° before installing it on the wall. 1. How to Adjust Mounting Angle Note : Adjust the bracket angle to the right) 3. Hold the product at the top in the center and pull it forward (direction of the product to the wall bracket. 2.


