

Quick Guide (easy Manual) (ver.1.0) (English)
Page 3
...Burn-in a location with heavy dust, high or low temperatures, high humidity, and chemical substances, or where it can cause screen image retention. Avoid operating the TV at altitudes above effect are not covered by the Warranty. To avoid such image retention, refer to a change of the product... should be few bright or dark pixels on the left, right and center of the screen caused by the warranty. Watching the PDP TV in the upper part of surrounding environment such as "screen burn". Playing a DVD or a game console may cause permanent damage to produce. Installation...
...Burn-in a location with heavy dust, high or low temperatures, high humidity, and chemical substances, or where it can cause screen image retention. Avoid operating the TV at altitudes above effect are not covered by the Warranty. To avoid such image retention, refer to a change of the product... should be few bright or dark pixels on the left, right and center of the screen caused by the warranty. Watching the PDP TV in the upper part of surrounding environment such as "screen burn". Playing a DVD or a game console may cause permanent damage to produce. Installation...

Quick Guide (easy Manual) (ver.1.0) (English)
Page 4
... to page 25 for more information on your service provider. In order to view the screen properly, you tune to acquire a CableCARD. When the CableCARD is inserted into the slot, the TV screen will show a message that copy protected content may not be viewable depending on your particular...cable service provider needs to help or give you further information. It should be noted that CableCARD is no screen or a still screen may display messages on the TV screen to be scrambled depending on the amount of data your digital cable service provider. It will be provided by...
... to page 25 for more information on your service provider. In order to view the screen properly, you tune to acquire a CableCARD. When the CableCARD is inserted into the slot, the TV screen will show a message that copy protected content may not be viewable depending on your particular...cable service provider needs to help or give you further information. It should be noted that CableCARD is no screen or a still screen may display messages on the TV screen to be scrambled depending on the amount of data your digital cable service provider. It will be provided by...
Quick Guide (easy Manual) (ver.1.0) (English)
Page 6
...13 Wall Installation Instructions 15 How to assemble the Stand-Base 19 Connections Connecting VHF and UHF Antennas 22 Connecting Cable TV 23 Connecting CableCARD 25 Connecting a VCR 26 Connecting a Camcorder 27 Connecting a DVD Player 28 Connecting a DTV Receiver...TV On and Off 36 Viewing the Menus and Displays 40 Memorizing the Channels 41 Adding and Erasing Channels 44 Setting Up Your Remote Control 47 Viewing an External Signal Source 49 Picture Control Changing the Picture Standard 52 Customizing the Picture Settings 53 Viewing the DNIe Demonstration 55 Changing the Screen...
...13 Wall Installation Instructions 15 How to assemble the Stand-Base 19 Connections Connecting VHF and UHF Antennas 22 Connecting Cable TV 23 Connecting CableCARD 25 Connecting a VCR 26 Connecting a Camcorder 27 Connecting a DVD Player 28 Connecting a DTV Receiver...TV On and Off 36 Viewing the Menus and Displays 40 Memorizing the Channels 41 Adding and Erasing Channels 44 Setting Up Your Remote Control 47 Viewing an External Signal Source 49 Picture Control Changing the Picture Standard 52 Customizing the Picture Settings 53 Viewing the DNIe Demonstration 55 Changing the Screen...
Quick Guide (easy Manual) (ver.1.0) (English)
Page 7
... Connecting a PC 90 Changing the Position of the TV's software and the regional conditions. 7 Digital 112 Menu Transparency Level 114 Using the Energy Saving feature 115 Preventing Screen Burn-in 116 Reducing the Effects of Screen Burn 117 Setting the Function Help 118 Using the... V-Chip 119 Electronic Program Guide 125 Reminder List 129 Using the CableCARD 131 Using the CableCARD Setup Function ..........132 Appendix Troubleshooting 136 Care and Maintenance 137 Specifications 138 Dimensions (HP-R4252 139 Dimensions (HP-...
... Connecting a PC 90 Changing the Position of the TV's software and the regional conditions. 7 Digital 112 Menu Transparency Level 114 Using the Energy Saving feature 115 Preventing Screen Burn-in 116 Reducing the Effects of Screen Burn 117 Setting the Function Help 118 Using the... V-Chip 119 Electronic Program Guide 125 Reminder List 129 Using the CableCARD 131 Using the CableCARD Setup Function ..........132 Appendix Troubleshooting 136 Care and Maintenance 137 Specifications 138 Dimensions (HP-R4252 139 Dimensions (HP-...
Quick Guide (easy Manual) (ver.1.0) (English)
Page 10
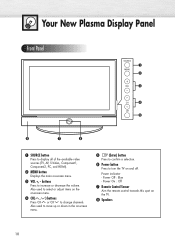
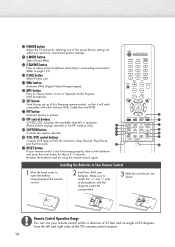
Also used to select or adjust items on the on-screen menu. ¨ CH( , ) buttons Press CH or CH to turn the TV on -screen menu. ˇ VOL +, - buttons Press to display all of the available video sources (TV, AV, S-Video, Component1, Component2, PC, and HDMI). ´ MENU button Displays the main ...Press to increase or decrease the volume. Also used to move up or down in the on the TV. " Speakers 10 Power On : Off ∏ Remote Control Sensor Aim the remote control towards this spot on -screen menu. ˆ (Enter) button Press to confirm a selection. Ø Power button Press to ...
Also used to select or adjust items on the on-screen menu. ¨ CH( , ) buttons Press CH or CH to turn the TV on -screen menu. ˇ VOL +, - buttons Press to display all of the available video sources (TV, AV, S-Video, Component1, Component2, PC, and HDMI). ´ MENU button Displays the main ...Press to increase or decrease the volume. Also used to move up or down in the on the TV. " Speakers 10 Power On : Off ∏ Remote Control Sensor Aim the remote control towards this spot on -screen menu. ˆ (Enter) button Press to confirm a selection. Ø Power button Press to ...
Quick Guide (easy Manual) (ver.1.0) (English)
Page 13
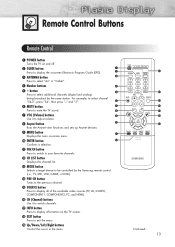
.... ˜ INFO button Press to display information on the TV screen. ¯ EXIT button Press to be controlled by the same station. button Press to select additional channels (digital and analog) being broadcast by the Samsung remote control (i.e., TV, STB, VCR, CABLE, or DVD). Ú PRE...-CH button Tunes to the previous channel. Æ SOURCE button Press to display all of the available video sources (TV, AV, S-VIDEO, COMPONENT1, COMPONENT2, PC, and HDMI...
.... ˜ INFO button Press to display information on the TV screen. ¯ EXIT button Press to be controlled by the same station. button Press to select additional channels (digital and analog) being broadcast by the Samsung remote control (i.e., TV, STB, VCR, CABLE, or DVD). Ú PRE...-CH button Tunes to the previous channel. Æ SOURCE button Press to display all of the available video sources (TV, AV, S-VIDEO, COMPONENT1, COMPONENT2, PC, and HDMI...
Quick Guide (easy Manual) (ver.1.0) (English)
Page 14
... customized picture settings). ¸ S.MODE button Select Sound effect. ˛ E.SAVING button Press to adjust screen brightness according to surrounding environment. (Refer to page 115) ◊ P.SIZE button Select Picture size. &#...of the remote control. 2 Install two AAA size batteries. ¿ P.MODE button Adjust the TV picture by selecting one of the preset factory settings (or select your remote control within a ... the back cover to match the "+" and "-" ends of this Samsung remote control, so that it will work compatibly with the diagram inside the compartment. 3 Slide the cover...
... customized picture settings). ¸ S.MODE button Select Sound effect. ˛ E.SAVING button Press to adjust screen brightness according to surrounding environment. (Refer to page 115) ◊ P.SIZE button Select Picture size. &#...of the remote control. 2 Install two AAA size batteries. ¿ P.MODE button Adjust the TV picture by selecting one of the preset factory settings (or select your remote control within a ... the back cover to match the "+" and "-" ends of this Samsung remote control, so that it will work compatibly with the diagram inside the compartment. 3 Slide the cover...
Quick Guide (easy Manual) (ver.1.0) (English)
Page 19
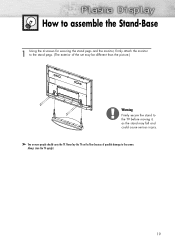
Never lay the TV on the floor because of the set may fall and could cause serious injury. ➤ Two or more people should carry the TV. How to assemble the Stand-Base 1 Using the 4 screws for securing the stand pegs and the monitor, firmly attach the monitor to the stand pegs. (The exterior of possible damage to the TV before moving it, as the stand may be different than the picture.) Warning Firmly secure the stand to the screen. Always store the TV upright. 19
Never lay the TV on the floor because of the set may fall and could cause serious injury. ➤ Two or more people should carry the TV. How to assemble the Stand-Base 1 Using the 4 screws for securing the stand pegs and the monitor, firmly attach the monitor to the stand pegs. (The exterior of possible damage to the TV before moving it, as the stand may be different than the picture.) Warning Firmly secure the stand to the screen. Always store the TV upright. 19
Quick Guide (easy Manual) (ver.1.0) (English)
Page 25
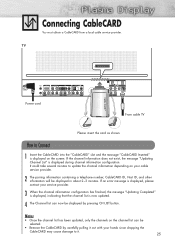
... provider. 3 When the channel information configuration has finished, the message "Updating Completed" is displayed, indicating that the channel list is displayed during channel information configuration. TV Power cord From cable TV Please insert the card as shown. Notes • Once the channel list has been updated, only the channels on the...
... provider. 3 When the channel information configuration has finished, the message "Updating Completed" is displayed, indicating that the channel list is displayed during channel information configuration. TV Power cord From cable TV Please insert the card as shown. Notes • Once the channel list has been updated, only the channels on the...
Quick Guide (easy Manual) (ver.1.0) (English)
Page 31
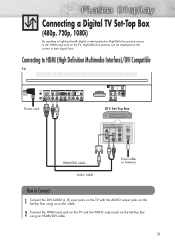
... source to Connect 1 Connect the DVI AUDIO (L, R) input jacks on the TV with the AUDIO output jacks on the Set-Top Box using an audio cable. 2 Connect the HDMI input jack on the TV and the VIDEO output jack on the screen in their digital form. Connecting to HDMI (High Definition Multimedia Interface...)/DVI Compatible TV Power cord DTV Set-Top Box HDMI/DVI cable Audio cable From cable or Antenna...
... source to Connect 1 Connect the DVI AUDIO (L, R) input jacks on the TV with the AUDIO output jacks on the Set-Top Box using an audio cable. 2 Connect the HDMI input jack on the TV and the VIDEO output jack on the screen in their digital form. Connecting to HDMI (High Definition Multimedia Interface...)/DVI Compatible TV Power cord DTV Set-Top Box HDMI/DVI cable Audio cable From cable or Antenna...
Quick Guide (easy Manual) (ver.1.0) (English)
Page 40
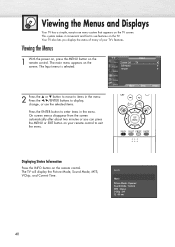
...Enter Return Displaying Status Information Press the INFO button on the remote control. TV Input Source List : TV √ Edit Name √ Anynet √ 2 Press the ▲ or ▼ button to move to use features on the TV screen. Press the œ/√/ENTER buttons to display, change, or use ...menu system that appears on the TV. The main menu appears on your TV's features. Your TV also lets you can press the MENU or EXIT button on the...
...Enter Return Displaying Status Information Press the INFO button on the remote control. TV Input Source List : TV √ Edit Name √ Anynet √ 2 Press the ▲ or ▼ button to move to use features on the TV screen. Press the œ/√/ENTER buttons to display, change, or use ...menu system that appears on the TV. The main menu appears on your TV's features. Your TV also lets you can press the MENU or EXIT button on the...
Quick Guide (easy Manual) (ver.1.0) (English)
Page 45
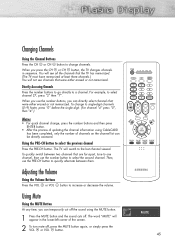
...press "2" then "7". The word "MUTE" will appear in sequence. Directly Accessing Channels Press the number buttons to go directly to the last channel viewed. The TV will not see channels that were either erased or not memorized. Then, use the PRE-CH button to quickly alternate between two channels that are... far apart, tune to one channel, then use the number buttons, you press the CH or CH button, the TV changes channels in the lower-left corner of the screen. 2 To turn mute off . MUTE 45 When you use the number button to select the second channel. To quickly switch...
...press "2" then "7". The word "MUTE" will appear in sequence. Directly Accessing Channels Press the number buttons to go directly to the last channel viewed. The TV will not see channels that were either erased or not memorized. Then, use the PRE-CH button to quickly alternate between two channels that are... far apart, tune to one channel, then use the number buttons, you press the CH or CH button, the TV changes channels in the lower-left corner of the screen. 2 To turn mute off . MUTE 45 When you use the number button to select the second channel. To quickly switch...
Quick Guide (easy Manual) (ver.1.0) (English)
Page 53
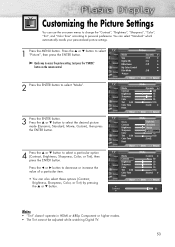
...on the remote control. 2 Press the ENTER button to select a particular option (Contrast, Brightness, Sharpness, Color, or Tint), then press the ENTER button. TV Picture Mode Size Digital NR DNIe Demo My Color Control Film Mode † More : Dynamic √ : 16:9 √ : On √ : Off... to select "Picture", then press the ENTER button. ➤ Quick way to access the picture setting: Just press the "P.MODE" button on -screen menus to change the "Contrast", "Brightness", "Sharpness", "Color", "Tint", and "Color Tone" according to personal preference. You can select "Standard...
...on the remote control. 2 Press the ENTER button to select a particular option (Contrast, Brightness, Sharpness, Color, or Tint), then press the ENTER button. TV Picture Mode Size Digital NR DNIe Demo My Color Control Film Mode † More : Dynamic √ : 16:9 √ : On √ : Off... to select "Picture", then press the ENTER button. ➤ Quick way to access the picture setting: Just press the "P.MODE" button on -screen menus to change the "Contrast", "Brightness", "Sharpness", "Color", "Tint", and "Color Tone" according to personal preference. You can select "Standard...

Quick Guide (easy Manual) (ver.1.0) (English)
Page 55
... select "Off" or "On", then press the ENTER button. • Off : Switches off the DNIe Demo mode. • On : Switches on the screen, for demonstration purposes. If you set DNIe Demo to On, you more a detailed image with 3D noise reduction and detail, contrast and white enhancement. 55... TV Picture Mode Size Digital NR DNIe Demo My Color Control Film Mode † More : Dynamic √ : 16:9 √ : On √ : Off √ √...
... select "Off" or "On", then press the ENTER button. • Off : Switches off the DNIe Demo mode. • On : Switches on the screen, for demonstration purposes. If you set DNIe Demo to On, you more a detailed image with 3D noise reduction and detail, contrast and white enhancement. 55... TV Picture Mode Size Digital NR DNIe Demo My Color Control Film Mode † More : Dynamic √ : 16:9 √ : On √ : Off √ √...
Quick Guide (easy Manual) (ver.1.0) (English)
Page 56
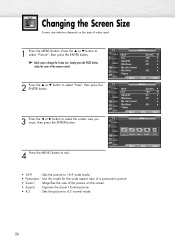
...button to select "Picture", then press the ENTER button. ➤ Quick way to change the Screen size: Simply press the P.SIZE button under the cover of video input. 1 Press the MENU button. TV Picture Mode Size Digital NR DNIe Demo My Color Control Film Mode † More : Dynamic... √ : 16:9 √ : On √ : Off √ √ : Off √ Move Enter Return TV Picture Mode Size Digital NR DNIe Demo My Color Control Film Mode † More : Dynamic √ : 16:9 √ : On √ : Off √ √...
...button to select "Picture", then press the ENTER button. ➤ Quick way to change the Screen size: Simply press the P.SIZE button under the cover of video input. 1 Press the MENU button. TV Picture Mode Size Digital NR DNIe Demo My Color Control Film Mode † More : Dynamic... √ : 16:9 √ : On √ : Off √ √ : Off √ Move Enter Return TV Picture Mode Size Digital NR DNIe Demo My Color Control Film Mode † More : Dynamic √ : 16:9 √ : On √ : Off √ √...
Quick Guide (easy Manual) (ver.1.0) (English)
Page 57
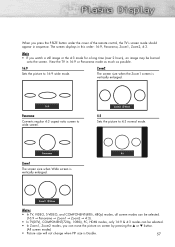
...Move 4:3 Sets the picture to 16:9 wide mode. Zoom1 Move Notes • In TV, VIDEO, S-VIDEO, and COMPONENT(480i, 480p) modes, all screen modes can be selected. (16:9 ➞ Panorama ➞ Zoom1 ➞ Zoom2 ➞ 4:3). • In TV(DTV), COMPONENT(720p, 1080i), PC, HDMI modes, only 16:9 & 4:3 modes can ...be burned onto the screen. Note • If you watch a still image or the 4:3 mode for a long time (over 2 hours), an image may be selected. • In Zoom1, Zoom2 modes, you press the P.SIZE button under the cover of the remote control, the TV's screen mode should appear ...
...Move 4:3 Sets the picture to 16:9 wide mode. Zoom1 Move Notes • In TV, VIDEO, S-VIDEO, and COMPONENT(480i, 480p) modes, all screen modes can be selected. (16:9 ➞ Panorama ➞ Zoom1 ➞ Zoom2 ➞ 4:3). • In TV(DTV), COMPONENT(720p, 1080i), PC, HDMI modes, only 16:9 & 4:3 modes can ...be burned onto the screen. Note • If you watch a still image or the 4:3 mode for a long time (over 2 hours), an image may be selected. • In Zoom1, Zoom2 modes, you press the P.SIZE button under the cover of the remote control, the TV's screen mode should appear ...
Quick Guide (easy Manual) (ver.1.0) (English)
Page 58
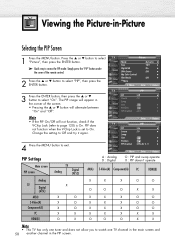
...PIP does not function when the V-Chip Lock is On. Enter Return TV PIP PIP : On √ Source : TV √ Swap Size : √ Position : √ PIP Channel : DTV Air 3 - 0 √ Move Enter Return PIP Settings Main screen PIP screen TV Analog Digital (ATSC) A : Analog D : Digital O : PIP...8730; : 16:9 √ ➤ Quick way to page 120) is set to watch one TV channel in the main screen and 58 another channel in the PIP screen. PIP : Off √ Source : TV √ Swap Size : √ Position : √ PIP Channel : Air 3 √ ...
...PIP does not function when the V-Chip Lock is On. Enter Return TV PIP PIP : On √ Source : TV √ Swap Size : √ Position : √ PIP Channel : DTV Air 3 - 0 √ Move Enter Return PIP Settings Main screen PIP screen TV Analog Digital (ATSC) A : Analog D : Digital O : PIP...8730; : 16:9 √ ➤ Quick way to page 120) is set to watch one TV channel in the main screen and 58 another channel in the PIP screen. PIP : Off √ Source : TV √ Swap Size : √ Position : √ PIP Channel : Air 3 √ ...
Quick Guide (easy Manual) (ver.1.0) (English)
Page 93
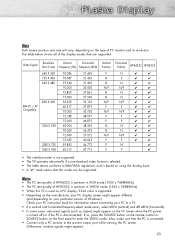
Notes • The PC text quality of HP-R4252 is optimum in XGA mode (1024 x 768@60Hz). • The PC text quality of Windows.) Check your PC instruction book for information about connecting your PC to the monitor output port while viewing the PC screen. (Otherwise, random signals might appear). 93 Also... In some cases, abnormal signals (such as a PC display, 32-bit color is supported. • Depending on the manufacturer, your PC display screen might appear on the TV screen when the PC power is turned off (or if the PC is disconnected). The table below shows all of PC monitor and its...
Notes • The PC text quality of HP-R4252 is optimum in XGA mode (1024 x 768@60Hz). • The PC text quality of Windows.) Check your PC instruction book for information about connecting your PC to the monitor output port while viewing the PC screen. (Otherwise, random signals might appear). 93 Also... In some cases, abnormal signals (such as a PC display, 32-bit color is supported. • Depending on the manufacturer, your PC display screen might appear on the TV screen when the PC power is turned off (or if the PC is disconnected). The table below shows all of PC monitor and its...
Quick Guide (easy Manual) (ver.1.0) (English)
Page 116
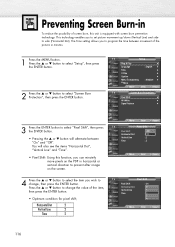
...Dot : 20 Vertical Line : 41 Time : 42 3 4 Move Enter Return 116 The Time setting allows you to prevent after image on the screen. Move Enter Return TV Pixel Shift Pixel Shift Horizontal Dot Vertical Line Time : OOnff : 2On : 2 : 2 Move Enter Return 4 Press the ▲ or ...Time V-Chip Caption Menu Transparency † More √ : English √ √ √ √ : Medium √ Move Enter Return TV Screen Burn Protection Pixel Shift √ All White √ Signal Pattern √ 3 Press the ENTER button to select "Pixel Shift", then press the ENTER...
...Dot : 20 Vertical Line : 41 Time : 42 3 4 Move Enter Return 116 The Time setting allows you to prevent after image on the screen. Move Enter Return TV Pixel Shift Pixel Shift Horizontal Dot Vertical Line Time : OOnff : 2On : 2 : 2 Move Enter Return 4 Press the ▲ or ...Time V-Chip Caption Menu Transparency † More √ : English √ √ √ √ : Medium √ Move Enter Return TV Screen Burn Protection Pixel Shift √ All White √ Signal Pattern √ 3 Press the ENTER button to select "Pixel Shift", then press the ENTER...

Quick Guide (easy Manual) (ver.1.0) (English)
Page 117
... Plug & Play Language Time V-Chip Caption Menu Transparency † More √ : English √ √ √ √ : Medium √ Move Enter Return TV Screen Burn Protection Pixel Shift √ All White √ Signal Pattern √ 3 Press the ▲ or ▼ button to select "All White" or "Signal Pattern", then ...
... Plug & Play Language Time V-Chip Caption Menu Transparency † More √ : English √ √ √ √ : Medium √ Move Enter Return TV Screen Burn Protection Pixel Shift √ All White √ Signal Pattern √ 3 Press the ▲ or ▼ button to select "All White" or "Signal Pattern", then ...


