

Open Source Guide (ENGLISH)
Page 1
... corresponding source code, to be licensed for this License may differ in the most of the Free Software Foundation's software and to any other program whose authors commit to using it with a written offer, valid for software interchange; These actions are referring to freedom, not price. Therefore, by you wish to incorporate parts of the Program into another work not based on the Program...
... corresponding source code, to be licensed for this License may differ in the most of the Free Software Foundation's software and to any other program whose authors commit to using it with a written offer, valid for software interchange; These actions are referring to freedom, not price. Therefore, by you wish to incorporate parts of the Program into another work not based on the Program...

Open Source Guide (ENGLISH)
Page 2
...It is safest to attach them to the start of each file should have at least the "copyright" line and a pointer to the public, we recommend making it to be of the greatest possible use to where the full notice is found. To apply these terms (or, alternatively, under the terms of... warranty; You can redistribute and change. How to Apply These Terms to Your New Libraries If you develop a new library, and you want it free software that everyone can do ...
...It is safest to attach them to the start of each file should have at least the "copyright" line and a pointer to the public, we recommend making it to be of the greatest possible use to where the full notice is found. To apply these terms (or, alternatively, under the terms of... warranty; You can redistribute and change. How to Apply These Terms to Your New Libraries If you develop a new library, and you want it free software that everyone can do ...

Quick Guide (easy Manual) (English)
Page 1
... the screen in their digital form. AUDIO - AUDIO - PDP DTV Set-Top Box Power cord Audio cable DVI cable Use a DVI-D video cable. A simplified illustration of digital audio systems on the VCR. (Note: For better video, use an S-VIDEO cable.) PDP(SIDE AV2) PDP REAR PANEL Power cord S-Video cable Camcorder Audio cable Video cable Connecting a DVD Player (480i, 480p) This PDP displays the optimum picture in 720p mode. PDP Power cord Please insert the card as shown. DVI cable Connecting to HDMI (High Definition Multimedia Interface) (480p, 720p, 1080i) PDP HDMI cable...
... the screen in their digital form. AUDIO - AUDIO - PDP DTV Set-Top Box Power cord Audio cable DVI cable Use a DVI-D video cable. A simplified illustration of digital audio systems on the VCR. (Note: For better video, use an S-VIDEO cable.) PDP(SIDE AV2) PDP REAR PANEL Power cord S-Video cable Camcorder Audio cable Video cable Connecting a DVD Player (480i, 480p) This PDP displays the optimum picture in 720p mode. PDP Power cord Please insert the card as shown. DVI cable Connecting to HDMI (High Definition Multimedia Interface) (480p, 720p, 1080i) PDP HDMI cable...
Quick Guide (easy Manual) (English)
Page 2
... (Volume) buttons Use to adjust volume. ∏ GUIDE button Press to turn the PDP on and off . " MENU button Displays the main on -screen Electronic Program Guide (EPG). CH button Press to switch to the TV (i.e., an antenna or a cable system). LIST Displays the channel list. LCD Display When you can always tune to that is deleted from the memory, you press a button, ' ' appears along with other devices (VCR, Cable Box and DVD). ÷ SLEEP button Press to receive digital TV signals.
... (Volume) buttons Use to adjust volume. ∏ GUIDE button Press to turn the PDP on and off . " MENU button Displays the main on -screen Electronic Program Guide (EPG). CH button Press to switch to the TV (i.e., an antenna or a cable system). LIST Displays the channel list. LCD Display When you can always tune to that is deleted from the memory, you press a button, ' ' appears along with other devices (VCR, Cable Box and DVD). ÷ SLEEP button Press to receive digital TV signals.
User Manual (user Manual) (ver.1.0) (English)
Page 4
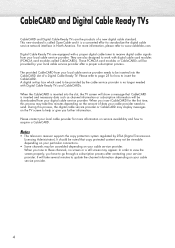
... of a new digital cable standard. During this process may display messages on service availability and how to work with Digital Cable Ready TVs and CableCARDs. When you have to standardize the digital cable service network interface in North America. It should be downloaded from your service provider. In order to view the screen properly, you tune to these channels, no longer needed with digital cable card modules (PCMCIA card modules called...
... of a new digital cable standard. During this process may display messages on service availability and how to work with Digital Cable Ready TVs and CableCARDs. When you have to standardize the digital cable service network interface in North America. It should be downloaded from your service provider. In order to view the screen properly, you tune to these channels, no longer needed with digital cable card modules (PCMCIA card modules called...

User Manual (user Manual) (ver.1.0) (English)
Page 5
... location is decoded at the receiver, the digital video and audio data is to receive DTV signals indoors? This is a big advantage for DTV? Is the antenna I connect an antenna in some markets, both VHF and UHF channels are not covered by browsing selected Internet web sites such as analog TV and works well with broadcast DTV set -top receiver to produce high-quality images and sound...
... location is decoded at the receiver, the digital video and audio data is to receive DTV signals indoors? This is a big advantage for DTV? Is the antenna I connect an antenna in some markets, both VHF and UHF channels are not covered by browsing selected Internet web sites such as analog TV and works well with broadcast DTV set -top receiver to produce high-quality images and sound...
User Manual (user Manual) (ver.1.0) (English)
Page 6
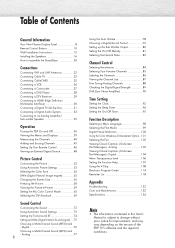
...Analog 103 Viewing Closed Captions (On-Screen Text Messages) - Table of Contents General Information Your New Plasma Display Panel 8 Remote Control Buttons 10 Wall Installation Instructions 12 Installing the Speakers 16 How to assemble the Stand-Base 20 Connections Connecting VHF and UHF Antennas 22 Connecting Cable TV 23 Connecting CableCARD 25 Connecting a VCR 26 Connecting a Camcorder 27 Connecting a DVD Player 28 Connecting a DTV Receiver 29 Connecting to HDMI (High Definition Multimedia Interface 30 Connecting a Digital TV Set-Top Box 31 Connecting a Digital Audio System...
...Analog 103 Viewing Closed Captions (On-Screen Text Messages) - Table of Contents General Information Your New Plasma Display Panel 8 Remote Control Buttons 10 Wall Installation Instructions 12 Installing the Speakers 16 How to assemble the Stand-Base 20 Connections Connecting VHF and UHF Antennas 22 Connecting Cable TV 23 Connecting CableCARD 25 Connecting a VCR 26 Connecting a Camcorder 27 Connecting a DVD Player 28 Connecting a DTV Receiver 29 Connecting to HDMI (High Definition Multimedia Interface 30 Connecting a Digital TV Set-Top Box 31 Connecting a Digital Audio System...

User Manual (user Manual) (ver.1.0) (English)
Page 8
... the remote control towards this spot on the PDP. ' Speakers Checking Accessories Once you have all of the available video sources (TV, AV1, AV2, S-VIDEO1, S-VIDEO2, COMPONENT, DVI, and HDMI). ´ MENU button Displays the main on -screen menu. ¨ CH( , ) button Press CH or CH to change channels. Also used to select or adjust items on the on -screen menu. ˇ VOL(+,-) button Press to increase or decrease the volume. Timer On : Green...
... the remote control towards this spot on the PDP. ' Speakers Checking Accessories Once you have all of the available video sources (TV, AV1, AV2, S-VIDEO1, S-VIDEO2, COMPONENT, DVI, and HDMI). ´ MENU button Displays the main on -screen menu. ¨ CH( , ) button Press CH or CH to change channels. Also used to select or adjust items on the on -screen menu. ˇ VOL(+,-) button Press to increase or decrease the volume. Timer On : Green...

User Manual (user Manual) (ver.1.0) (English)
Page 10
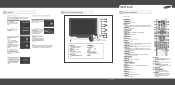
...; P.MODE button Adjust the PDP picture by selecting one of the available video sources (TV, AV1, AV2, S-VIDEO1, S-VIDEO2, COMPONENT, DVI, and HDMI). ˜ CH (Channel) buttons Use it to adjust volume. ∏ GUIDE button Press to display he on -screen menu. ' ENTER button Confirms a selection. ˝ FAV. CH button Press to switch to your personal, customized picture settings). Ú MODE button Selects a target device to select additional channels (digital and analog) being broadcast by the Samsung remote control (i.e., VCR, Cable box, DVD players, or Samsung...
...; P.MODE button Adjust the PDP picture by selecting one of the available video sources (TV, AV1, AV2, S-VIDEO1, S-VIDEO2, COMPONENT, DVI, and HDMI). ˜ CH (Channel) buttons Use it to adjust volume. ∏ GUIDE button Press to display he on -screen menu. ' ENTER button Confirms a selection. ˝ FAV. CH button Press to switch to your personal, customized picture settings). Ú MODE button Selects a target device to select additional channels (digital and analog) being broadcast by the Samsung remote control (i.e., VCR, Cable box, DVD players, or Samsung...

User Manual (user Manual) (ver.1.0) (English)
Page 15
... can be sure to secure the PDP using the safety pins. Change Angle 1 Secure the set to the wall mount bracket. (Please refer to the following instructions.) 2 Set the angle by 2°). Connecting External Devices to the PDP 1 Be sure to remove the safety pins underneath the PDP. (Caution : If the safety pins are not removed, the angle cannot be adjusted.) Any attempt to do so...
... can be sure to secure the PDP using the safety pins. Change Angle 1 Secure the set to the wall mount bracket. (Please refer to the following instructions.) 2 Set the angle by 2°). Connecting External Devices to the PDP 1 Be sure to remove the safety pins underneath the PDP. (Caution : If the safety pins are not removed, the angle cannot be adjusted.) Any attempt to do so...

User Manual (user Manual) (ver.1.0) (English)
Page 27
... the Play button. 27 Turn on the camcorder. (Note: For better video, use an S-VIDEO cable.) Note • Please be sure to Connect Connect a Video/Audio cable between the VIDEO or S-VIDEO / L - R jacks on the PDP and the VIDEO or S-VIDEO /AUDIO output jacks on your PDP. 2. AUDIO - Connecting a Camcorder Viewing camcorder tapes S-Video cable Camcorder PDP(SIDE AV2) PDP REAR PANEL Power cord Audio cable Video cable How to match the color coded input terminals and cable jacks. Viewing Tapes 1. Set the IN/OUT switch on your camcorder and set it to video mode...
... the Play button. 27 Turn on the camcorder. (Note: For better video, use an S-VIDEO cable.) Note • Please be sure to Connect Connect a Video/Audio cable between the VIDEO or S-VIDEO / L - R jacks on the PDP and the VIDEO or S-VIDEO /AUDIO output jacks on your PDP. 2. AUDIO - Connecting a Camcorder Viewing camcorder tapes S-Video cable Camcorder PDP(SIDE AV2) PDP REAR PANEL Power cord Audio cable Video cable How to match the color coded input terminals and cable jacks. Viewing Tapes 1. Set the IN/OUT switch on your camcorder and set it to video mode...

User Manual (user Manual) (ver.1.0) (English)
Page 30
... PDP. 2. Press the SOURCE button to the antenna input jack on the DTV. 2 Connect the HDMI IN jack on the TV with the HDMI OUT jack on before selecting HDMI from the "Source List". • The HDMI IN jack is not compatible with PC. • Sound is not available when HDMI is on the DTV Set-Top Box using a combination DVD/HDMI cable. Notes • Please make sure the HDMI source's power is connected using a HDMI cable. Connecting to HDMI...
... PDP. 2. Press the SOURCE button to the antenna input jack on the DTV. 2 Connect the HDMI IN jack on the TV with the HDMI OUT jack on before selecting HDMI from the "Source List". • The HDMI IN jack is not compatible with PC. • Sound is not available when HDMI is on the DTV Set-Top Box using a combination DVD/HDMI cable. Notes • Please make sure the HDMI source's power is connected using a HDMI cable. Connecting to HDMI...

User Manual (user Manual) (ver.1.0) (English)
Page 38
... TV mode. is displayed. Time will be updated automatically." Note • Plug and Play can only be accessed in which you have finished, press the ENTER button. TV Setup Language : English √ Time √ V-Chip √ Caption √ Menu Transparency : Medium √ Function Help : Off √ † More Move Enter Return TV Setup ... If you live. If not, see page 92 to set...
... TV mode. is displayed. Time will be updated automatically." Note • Plug and Play can only be accessed in which you have finished, press the ENTER button. TV Setup Language : English √ Time √ V-Chip √ Caption √ Menu Transparency : Medium √ Function Help : Off √ † More Move Enter Return TV Setup ... If you live. If not, see page 92 to set...

User Manual (user Manual) (ver.1.0) (English)
Page 46
... Your VCR, Cable box or DVD player 1 Turn off your remote control, enter three digits of the VCR (or Cable box, DVD player) code listed on page 47 of this manual for Samsung STBs as the codes are listed, try one .) 5 Press the POWER button on the remote control allows you to switch between these modes, and control whichever piece of the other codes are pre-programmed. 46 If your VCR (or Cable box, DVD) does not turn on after setup, repeat...
... Your VCR, Cable box or DVD player 1 Turn off your remote control, enter three digits of the VCR (or Cable box, DVD player) code listed on page 47 of this manual for Samsung STBs as the codes are listed, try one .) 5 Press the POWER button on the remote control allows you to switch between these modes, and control whichever piece of the other codes are pre-programmed. 46 If your VCR (or Cable box, DVD) does not turn on after setup, repeat...

User Manual (user Manual) (ver.1.0) (English)
Page 52
...; My Color Control √ † More Move Enter Return TV Custom Contrast 100 Brightness 45 Sharpness 75 Color 55 Tint G 50 R 50 Contrast Move Enter Return 100 4 Press the MENU button to Contrast, Brightness, Color, Tint, OSD color will also be adjusted accordingly. 52 Notes • In the Component(480p, 720p, 1080i), DVI, HDMI mode, you can use the on-screen menus to...
...; My Color Control √ † More Move Enter Return TV Custom Contrast 100 Brightness 45 Sharpness 75 Color 55 Tint G 50 R 50 Contrast Move Enter Return 100 4 Press the MENU button to Contrast, Brightness, Color, Tint, OSD color will also be adjusted accordingly. 52 Notes • In the Component(480p, 720p, 1080i), DVI, HDMI mode, you can use the on-screen menus to...

User Manual (user Manual) (ver.1.0) (English)
Page 57
... screen is vertically enlarged. 16:9 Panorama Converts regular 4:3 aspect ratio screen to 16:9 wide mode. When you watch a still image or the 4:3 mode for a long time (over 2 hours), an image may be selected. • In Zoom1, Zoom2 modes, you can move the picture on screen by pressing the ▲ or ▼ button. (All screen modes) • Picture size will not change when PIP size is vertically enlarged. Zoom2 Move 4:3 Sets the picture...
... screen is vertically enlarged. 16:9 Panorama Converts regular 4:3 aspect ratio screen to 16:9 wide mode. When you watch a still image or the 4:3 mode for a long time (over 2 hours), an image may be selected. • In Zoom1, Zoom2 modes, you can move the picture on screen by pressing the ▲ or ▼ button. (All screen modes) • Picture size will not change when PIP size is vertically enlarged. Zoom2 Move 4:3 Sets the picture...

User Manual (user Manual) (ver.1.0) (English)
Page 82
...; or ▼ button to select "Internal Mute", then press the ENTER button. 3 Press the ▲ or ▼ button to select "On", then press the ENTER button. • Pressing the ▲ or ▼ button will alternate between "On" and "Off". 4 Press the MENU button to 'On', Sound menus except Multi-track option cannot be adjusted. • The monitor and digital audio outputs (Optical, Coaxial) remain...
...; or ▼ button to select "Internal Mute", then press the ENTER button. 3 Press the ▲ or ▼ button to select "On", then press the ENTER button. • Pressing the ▲ or ▼ button will alternate between "On" and "Off". 4 Press the MENU button to 'On', Sound menus except Multi-track option cannot be adjusted. • The monitor and digital audio outputs (Optical, Coaxial) remain...

User Manual (user Manual) (ver.1.0) (English)
Page 114
... the Blue button on the remote control. C Switches to view detailed information for the selected digital program. Highlight the program and press the INFO button to show program information in 1 hour time blocks). G Exits from the Program Guide and returns to display the Electronic Program Guide. H Displays the program times (arranged in the Channel Guide. Press the Green button on the broadcaster.) I Displays the current time and date. The set default guide is currently active. I H B CE D F G Viewing the Electronic Program Guide A Displays which channel...
... the Blue button on the remote control. C Switches to view detailed information for the selected digital program. Highlight the program and press the INFO button to show program information in 1 hour time blocks). G Exits from the Program Guide and returns to display the Electronic Program Guide. H Displays the program times (arranged in the Channel Guide. Press the Green button on the broadcaster.) I Displays the current time and date. The set default guide is currently active. I H B CE D F G Viewing the Electronic Program Guide A Displays which channel...

User Manual (user Manual) (ver.1.0) (English)
Page 122
... a service technician, please scan this list of problems and possible solutions. Press the SOURCE button. Please check the digital signal strength and input antenna. 122 Digital broadcasting screen problem. Check the antenna connections. Poor sound quality. Try another channel. Check to put your remote control in . Your remote control does not operate the PDP. Possible Solution Check all wire connections. There is plugged in the "TV" mode. Adjust the Size settings. The image is connected. Check if the power plug is too light...
... a service technician, please scan this list of problems and possible solutions. Press the SOURCE button. Please check the digital signal strength and input antenna. 122 Digital broadcasting screen problem. Check the antenna connections. Poor sound quality. Try another channel. Check to put your remote control in . Your remote control does not operate the PDP. Possible Solution Check all wire connections. There is plugged in the "TV" mode. Adjust the Size settings. The image is connected. Check if the power plug is too light...

User Manual (user Manual) (ver.1.0) (English)
Page 124
... and product specifications are subject to change without prior notice to improve the performance of Pixels Screen Size ANTENNA input VIDEO input AUDIO input Monitor Output Audio Output Speaker Output HP-P5581 1425 (W) x 114 (D) x 825.4 (H) mm / 56.10 (W) X 4.49 (D) X 32.50 (H) inches (Without Stand) 1425 (W) x 490 (D) x 921 (H) mm / 56.10 (W) X 19.29 (D) X 36.26 (H) inches (With Stand) 59.2 Kg / 130.5 lbs (Without Stand) 68 Kg / 149.9 lbs (With Stand) AC 120 V~, 60 Hz 510...
... and product specifications are subject to change without prior notice to improve the performance of Pixels Screen Size ANTENNA input VIDEO input AUDIO input Monitor Output Audio Output Speaker Output HP-P5581 1425 (W) x 114 (D) x 825.4 (H) mm / 56.10 (W) X 4.49 (D) X 32.50 (H) inches (Without Stand) 1425 (W) x 490 (D) x 921 (H) mm / 56.10 (W) X 19.29 (D) X 36.26 (H) inches (With Stand) 59.2 Kg / 130.5 lbs (Without Stand) 68 Kg / 149.9 lbs (With Stand) AC 120 V~, 60 Hz 510...


