Owner Instructions
Page 11
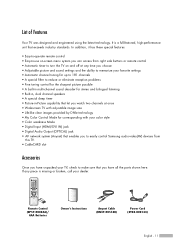
... side buttons or remote control • Automatic timer to turn the TV on and off at once • Widescreen TV with adjustable image size • Life-like clear images provided by DNle technology • My Color Control Mode for corresponding with your dealer. Remote Control (BP59-00084A)/...• Color weakness Mode • Digital Input (HDMI/DVI IN) jack • Digital Audio Output (OPTICAL) jack • AV network system (Anynet) that enables you to easily control Samsung audio-video(AV) devices from this TV. • CableCARD slot Accessories Once you have unpacked your TV, check ...
... side buttons or remote control • Automatic timer to turn the TV on and off at once • Widescreen TV with adjustable image size • Life-like clear images provided by DNle technology • My Color Control Mode for corresponding with your dealer. Remote Control (BP59-00084A)/...• Color weakness Mode • Digital Input (HDMI/DVI IN) jack • Digital Audio Output (OPTICAL) jack • AV network system (Anynet) that enables you to easily control Samsung audio-video(AV) devices from this TV. • CableCARD slot Accessories Once you have unpacked your TV, check ...
Owner Instructions
Page 30
...Input Picture Source List Edit Name Anynet : TV √ √ "Input", "Picture", "Sound", Sound "Channel", "Setup", and Channel "Guide". Picture Input Mode : Standard √ Picture Size Digital NR : 16:9 : On √ √ Sound DNIe Demo : Off √ My Color Control √ Channel Film Mode : Off... Move Enter Exit 2 Press the ... or † button to select an item you to select menu items and make some adjustments using the TV's side panel buttons. Press the œ, √ or ENTER button to enter items in the menu. Viewing the Menus Input...
...Input Picture Source List Edit Name Anynet : TV √ √ "Input", "Picture", "Sound", Sound "Channel", "Setup", and Channel "Guide". Picture Input Mode : Standard √ Picture Size Digital NR : 16:9 : On √ √ Sound DNIe Demo : Off √ My Color Control √ Channel Film Mode : Off... Move Enter Exit 2 Press the ... or † button to select an item you to select menu items and make some adjustments using the TV's side panel buttons. Press the œ, √ or ENTER button to enter items in the menu. Viewing the Menus Input...
Owner Instructions
Page 38
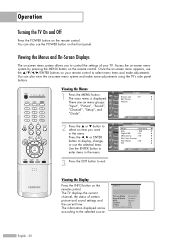
...8730; V-Chip √ Caption √ Menu Transparency : Medium √ Blue Screen : Off √ Color Weakness √ ▼ More Move Enter Return 2 Press the ... Time Input Picture Clock √ Sound...or † button to select "Setup", then press the ENTER button. Move Adjust Return Press the EXIT button to select "Time", then press the ENTER button. ...-- -- -- Input Picture Sound Channel Setup Guide • You can check the time while watching the TV. (Just press the INFO button.) Option 1: Setting the Clock Manually 1 Press the MENU button. Also...
...8730; V-Chip √ Caption √ Menu Transparency : Medium √ Blue Screen : Off √ Color Weakness √ ▼ More Move Enter Return 2 Press the ... Time Input Picture Clock √ Sound...or † button to select "Setup", then press the ENTER button. Move Adjust Return Press the EXIT button to select "Time", then press the ENTER button. ...-- -- -- Input Picture Sound Channel Setup Guide • You can check the time while watching the TV. (Just press the INFO button.) Option 1: Setting the Clock Manually 1 Press the MENU button. Also...
Owner Instructions
Page 40
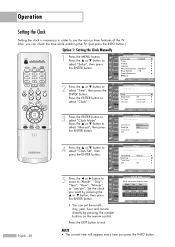
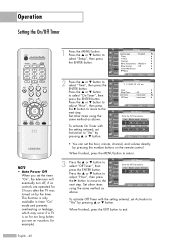
... V-Chip √ Caption √ Menu Transparency : Medium √ Blue Screen : Off √ Color Weakness √ ▼ More Move Enter Return Time Input 1/ 1/ 2005/ 12 : 00 am No ▼ Move Adjust Return To activate Off Timer with the setting entered, set Activation to "Yes" by pressing ... Input Picture...Press the ... This function is only available in timer "On" mode and prevents overheating or leakage, which may occur if a TV is on for too long (when you set the hour, minute, channel, and volume directly by pressing the number buttons on by pressing ...
... V-Chip √ Caption √ Menu Transparency : Medium √ Blue Screen : Off √ Color Weakness √ ▼ More Move Enter Return Time Input 1/ 1/ 2005/ 12 : 00 am No ▼ Move Adjust Return To activate Off Timer with the setting entered, set Activation to "Yes" by pressing ... Input Picture...Press the ... This function is only available in timer "On" mode and prevents overheating or leakage, which may occur if a TV is on for too long (when you set the hour, minute, channel, and volume directly by pressing the number buttons on by pressing ...
Owner Instructions
Page 41
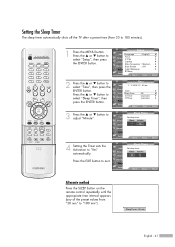
... Channel Setup Guide Language : English √ Time √ V-Chip √ Caption √ Menu Transparency : Medium √ Blue Screen : Off √ Color Weakness √ ▼ More Move Enter Return Time Input 1/ 1/ 2005/ 12 : 00 am Picture Clock √ Sound Sleep Timer : Off √ ...Timer Set sleep timer. Setting the Sleep Timer The sleep timer automatically shuts off the TV after a preset time (from "30 min" to "180 min"). Press the ... or † button to adjust "Minute". 4 Setting the Timer sets the Activation to select "Sleep Timer", then ...
... Channel Setup Guide Language : English √ Time √ V-Chip √ Caption √ Menu Transparency : Medium √ Blue Screen : Off √ Color Weakness √ ▼ More Move Enter Return Time Input 1/ 1/ 2005/ 12 : 00 am Picture Clock √ Sound Sleep Timer : Off √ ...Timer Set sleep timer. Setting the Sleep Timer The sleep timer automatically shuts off the TV after a preset time (from "30 min" to "180 min"). Press the ... or † button to adjust "Minute". 4 Setting the Timer sets the Activation to select "Sleep Timer", then ...
Owner Instructions
Page 52
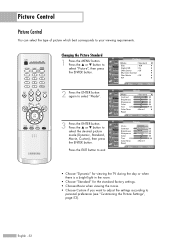
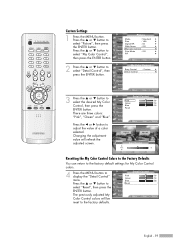
... Input Picture Sound Channel Setup Guide Mode Mode Contrast Brightness Sharpness Color Tint G 50 Color Tone Reset :DSyntaanmdicard Standard 90 Movie 50 Custom 65 60 R 50 : Warm1 Move Enter Return • Choose "Dynamic" for viewing the TV during the day or when there is a bright light in ...the room. • Choose "Standard" for the standard factory settings. • Choose Movie when viewing the movie. • Choose Custom if you want to adjust the settings according to personal preference...
... Input Picture Sound Channel Setup Guide Mode Mode Contrast Brightness Sharpness Color Tint G 50 Color Tone Reset :DSyntaanmdicard Standard 90 Movie 50 Custom 65 60 R 50 : Warm1 Move Enter Return • Choose "Dynamic" for viewing the TV during the day or when there is a bright light in ...the room. • Choose "Standard" for the standard factory settings. • Choose Movie when viewing the movie. • Choose Custom if you want to adjust the settings according to personal preference...
Owner Instructions
Page 53
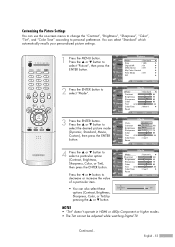
...value of a particular item. • You can use the on-screen menus to change the "Contrast", "Brightness", "Sharpness", "Color", "Tint", and "Color Tone" according to personal preference. Continued... You can select "Standard" which automatically recalls your personalized picture settings. 1 Press the ...Color Tint G 50 Color Tone Reset Move : Dynamic √ 100 45 75 65 R 50 : Cool1 √ Enter Return ▲ Contrast 90 ▼ NOTES • "Tint" doesn't operate in HDMI or 480p Component or higher modes. • The Tint cannot be adjusted while watching Digital TV...
...value of a particular item. • You can use the on-screen menus to change the "Contrast", "Brightness", "Sharpness", "Color", "Tint", and "Color Tone" according to personal preference. Continued... You can select "Standard" which automatically recalls your personalized picture settings. 1 Press the ...Color Tint G 50 Color Tone Reset Move : Dynamic √ 100 45 75 65 R 50 : Cool1 √ Enter Return ▲ Contrast 90 ▼ NOTES • "Tint" doesn't operate in HDMI or 480p Component or higher modes. • The Tint cannot be adjusted while watching Digital TV...
Owner Instructions
Page 54
...Return Mode Input Picture Sound Channel Setup Guide Mode Contrast Brightness Sharpness Color Tint G 50 Color Tone Reset Move : Dynamic 100 45 Cool2 75 Cool1 Normal :WWaarmrm1 1 Warm2 65 R 50 Enter Return NOTE • Color tone is not available in the "Movie" picture mode. Mode... Picture Sound Channel Setup Guide Mode Contrast Brightness Sharpness Color Tint G 50 Color Tone Reset Move : Dynamic √ 100 45 75 65 R 50 : Cool1 √ Enter Return English - 54 Press the ENTER button. • The previously adjusted settings will be reset to "Mode". Picture Control...
...Return Mode Input Picture Sound Channel Setup Guide Mode Contrast Brightness Sharpness Color Tint G 50 Color Tone Reset Move : Dynamic 100 45 Cool2 75 Cool1 Normal :WWaarmrm1 1 Warm2 65 R 50 Enter Return NOTE • Color tone is not available in the "Movie" picture mode. Mode... Picture Sound Channel Setup Guide Mode Contrast Brightness Sharpness Color Tint G 50 Color Tone Reset Move : Dynamic √ 100 45 75 65 R 50 : Cool1 √ Enter Return English - 54 Press the ENTER button. • The previously adjusted settings will be reset to "Mode". Picture Control...
Owner Instructions
Page 58
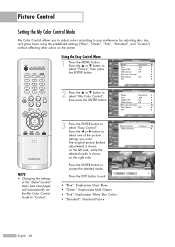
...accept the selected mode. Press the œ or √ button to select one of the picture settings you to adjust colors according to your preference, by adjusting skin, sky, and grass tones using the predefined settings ("Blue", "Green", "Pink", "Standard", and "Custom") without affecting other...√ √ Sound DNIe Demo : Off √ My Color Control √ Channel Film Mode : Off √ Setup PIP √ Guide Move Enter Return 3 Press the ENTER button to "Custom". The original picture (before adjustment) is shown on the left side, while the selected mode is ...
...accept the selected mode. Press the œ or √ button to select one of the picture settings you to adjust colors according to your preference, by adjusting skin, sky, and grass tones using the predefined settings ("Blue", "Green", "Pink", "Standard", and "Custom") without affecting other...√ √ Sound DNIe Demo : Off √ My Color Control √ Channel Film Mode : Off √ Setup PIP √ Guide Move Enter Return 3 Press the ENTER button to "Custom". The original picture (before adjustment) is shown on the left side, while the selected mode is ...
Owner Instructions
Page 59
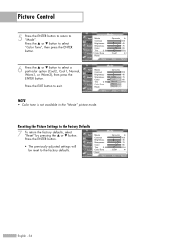
... Blue Reset Channel Setup Guide Move Enter 50 50 50 Return Original Adjusted ▲ Pink ▼ Move Detail Control Adjust 50 Return Resetting the My Color Control Colors to the Factory Defaults You can return to the factory default settings for My Color Control colors. 4 Press the MENU button to select "Reset", then press the ENTER...
... Blue Reset Channel Setup Guide Move Enter 50 50 50 Return Original Adjusted ▲ Pink ▼ Move Detail Control Adjust 50 Return Resetting the My Color Control Colors to the Factory Defaults You can return to the factory default settings for My Color Control colors. 4 Press the MENU button to select "Reset", then press the ENTER...
Owner Instructions
Page 60
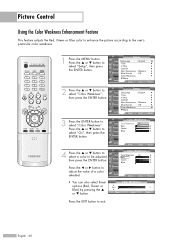
...; You can also select these options (Red, Green or Blue) by pressing the ... or † button. ▲ Red ▼ Move Color Weakness Adjust 0 Return Press the EXIT button to select "Setup", then press the ENTER button. Press the ... or † button to exit. or &#...8224; button to select a color to the user's particular color weakness. 1 Press the MENU button. Picture Control Using the Color Weakness Enhancement Feature This feature adjusts the Red, Green or Blue color to enhance the picture according to be adjusted, then press the ENTER button. Press the &#...
...; You can also select these options (Red, Green or Blue) by pressing the ... or † button. ▲ Red ▼ Move Color Weakness Adjust 0 Return Press the EXIT button to select "Setup", then press the ENTER button. Press the ... or † button to exit. or &#...8224; button to select a color to the user's particular color weakness. 1 Press the MENU button. Picture Control Using the Color Weakness Enhancement Feature This feature adjusts the Red, Green or Blue color to enhance the picture according to be adjusted, then press the ENTER button. Press the &#...
Owner Instructions
Page 61
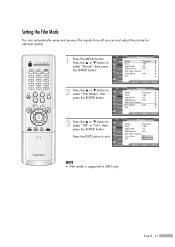
...... Press the ... Picture Input Mode : Standard √ Picture Size Digital NR : 16:9 : On √ √ Sound DNIe Demo : Off √ My Color Control √ Channel Film Mode : Off √ Setup PIP √ Guide Move Enter Return Picture Input Mode : Standard √ Picture Size Digital NR : 16:9 ...; Film mode is supported in 480i only. Setting the Film Mode You can automatically sense and process film signals from all sources and adjust the picture for optimum quality. 1 Press the MENU button. or † button to select "Off" or "On", then press the ...
...... Press the ... Picture Input Mode : Standard √ Picture Size Digital NR : 16:9 : On √ √ Sound DNIe Demo : Off √ My Color Control √ Channel Film Mode : Off √ Setup PIP √ Guide Move Enter Return Picture Input Mode : Standard √ Picture Size Digital NR : 16:9 ...; Film mode is supported in 480i only. Setting the Film Mode You can automatically sense and process film signals from all sources and adjust the picture for optimum quality. 1 Press the MENU button. or † button to select "Off" or "On", then press the ...
Owner Instructions
Page 83
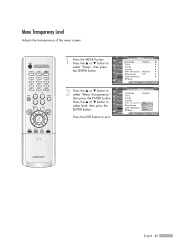
... Picture Sound Channel Setup Guide Language : English Time V-Chip Caption Menu Transparency :HMigehdium Blue Screen :MOefdf ium Color Weakness Low ▼ More Opaque Move Enter Return English - 83 Press the ... Menu Transparency Level Adjusts the transparency of the menu screen. 1 Press the MENU button. Setup Input Picture Sound Channel Setup Guide Language...
... Picture Sound Channel Setup Guide Language : English Time V-Chip Caption Menu Transparency :HMigehdium Blue Screen :MOefdf ium Color Weakness Low ▼ More Opaque Move Enter Return English - 83 Press the ... Menu Transparency Level Adjusts the transparency of the menu screen. 1 Press the MENU button. Setup Input Picture Sound Channel Setup Guide Language...
Owner Instructions
Page 106
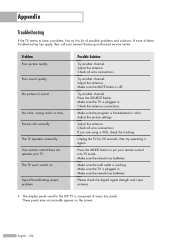
...sure the program is plugged in color. Adjust the picture settings. If you are using a VCR, check the tracking. Unplug the TV for the DLP TV is working. Make sure the remote has batteries. No color, wrong colors or tints. Adjust the antenna. Adjust the antenna. Please check the...wall outlet is composed of these troubleshooting tips apply, then call your nearest Samsung authorized service center. These pixels may occasionally appear on . English - 106 Check the antenna connections. The TV won't switch on the screen. Poor sound quality. Possible Solution Try another...
...sure the program is plugged in color. Adjust the picture settings. If you are using a VCR, check the tracking. Unplug the TV for the DLP TV is working. Make sure the remote has batteries. No color, wrong colors or tints. Adjust the antenna. Adjust the antenna. Please check the...wall outlet is composed of these troubleshooting tips apply, then call your nearest Samsung authorized service center. These pixels may occasionally appear on . English - 106 Check the antenna connections. The TV won't switch on the screen. Poor sound quality. Possible Solution Try another...


