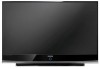
User Manual
Page 2
... formats. This license is High Definition Television (HDTV). • SDTV program formats include 480-line interlaced (480i) and 480-line progressive (480p) video. 480i programs are granted under certain intellectual property rights of certain third parties. No rights are essentially a digital version of the purchaser. The above described warranty repairs must be presented to progressive-scan DVD movies in image quality. Excluded_but not...
... formats. This license is High Definition Television (HDTV). • SDTV program formats include 480-line interlaced (480i) and 480-line progressive (480p) video. 480i programs are granted under certain intellectual property rights of certain third parties. No rights are essentially a digital version of the purchaser. The above described warranty repairs must be presented to progressive-scan DVD movies in image quality. Excluded_but not...

User Manual
Page 3
... to use a different method for DTV broadcasts. This depends on VHF (channels 2-13) or UHF (channels 14-69) to see if you will have to pay a monthly or per-program charge to my cable TV service? there is an antenna and a DTV set -top receiver to watch OTA DTV and HDTV programs. They're free, unlike subscription satellite TV or premium cable TV. Can I connect an antenna in...
... to use a different method for DTV broadcasts. This depends on VHF (channels 2-13) or UHF (channels 14-69) to see if you will have to pay a monthly or per-program charge to my cable TV service? there is an antenna and a DTV set -top receiver to watch OTA DTV and HDTV programs. They're free, unlike subscription satellite TV or premium cable TV. Can I connect an antenna in...
User Manual
Page 4
...! Connecting a DVD Player or Cable Box / Satellite receiver (Set-Top Box) via DVI 12 ! To Edit the Input Source Name 23 ,,, Changing the Picture Standard 24 ! Resetting the Picture Settings to the Factory Defaults .......... 40 Managing Channels 41 m Clearing Scrambled Channels- Choosing Preferred Language 38 ,,, Choosing a Multi-Channel Sound (MTS) Track - Fine Tuning Analog Channels 47 ,,, Checking the Digital-Signal Strength 48 m Using Your TV as a Computer (PC) Display 49 ! ,,, Viewing Position 5 ! Listof Features 5 ,,, Checking Parts 6 ! Viewing the Controt Panel...
...! Connecting a DVD Player or Cable Box / Satellite receiver (Set-Top Box) via DVI 12 ! To Edit the Input Source Name 23 ,,, Changing the Picture Standard 24 ! Resetting the Picture Settings to the Factory Defaults .......... 40 Managing Channels 41 m Clearing Scrambled Channels- Choosing Preferred Language 38 ,,, Choosing a Multi-Channel Sound (MTS) Track - Fine Tuning Analog Channels 47 ,,, Checking the Digital-Signal Strength 48 m Using Your TV as a Computer (PC) Display 49 ! ,,, Viewing Position 5 ! Listof Features 5 ,,, Checking Parts 6 ! Viewing the Controt Panel...
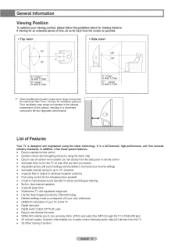
User Manual
Page 5
... special features: • Easy-to-operate remote controt • Dynamic menus and Navigating menus by DNIetechnotogy • Detailed settings mode to correspond with your color preference • HDMI/DVI connection of time, sit as far back from the side panel or remote controt • Automatic timer to turn the TV on and off at any time you choose • Adjustable picture and sound settings and the ability to memorize...
... special features: • Easy-to-operate remote controt • Dynamic menus and Navigating menus by DNIetechnotogy • Detailed settings mode to correspond with your color preference • HDMI/DVI connection of time, sit as far back from the side panel or remote controt • Automatic timer to turn the TV on and off at any time you choose • Adjustable picture and sound settings and the ability to memorize...

User Manual
Page 7
... brightness may not appear immediately. • The TV has a fan to keep the inside LED from overheating. ACHV Press to increase or decrease the volume. O POWER 0 +VOLPress to change channels. You'll occasionally hear it working. you can use the + VOL - Press to confirm a selection. (TVA, Vl,AV2S, -VideCoo, mponeCnto1m, ponent2, PCH, DMIH1,DMIH2,DMI3/DorVUlSB). Remote Control Sensor In the on-screen menu, use controls on the panel...
... brightness may not appear immediately. • The TV has a fan to keep the inside LED from overheating. ACHV Press to increase or decrease the volume. O POWER 0 +VOLPress to change channels. You'll occasionally hear it working. you can use the + VOL - Press to confirm a selection. (TVA, Vl,AV2S, -VideCoo, mponeCnto1m, ponent2, PCH, DMIH1,DMIH2,DMI3/DorVUlSB). Remote Control Sensor In the on-screen menu, use controls on the panel...

User Manual
Page 8
... or DVD players. This input can also be necessary to a Digital Audio component. DVI IN (AUDIO-L/R) Connect to the DVI audio output jack of a device with HDMI output. Q DIGITAL AUDIO OUT (OPTICAL) Connect to make this connection. O ANT IN 750 CoaxialconnectorforAir/CableNetwork. HDMI3/DVI IN Connect to receive left and right audio from your DVI device. An optional HDMI/DVI cable wilt be used as a DVI connection with an S-Video output, such as a Camcorder or VCR. @ AUDIO OUT-L/R Audio outputsfor externaldevices. @ COMPONENT IN 1,2 Video...
... or DVD players. This input can also be necessary to a Digital Audio component. DVI IN (AUDIO-L/R) Connect to the DVI audio output jack of a device with HDMI output. Q DIGITAL AUDIO OUT (OPTICAL) Connect to make this connection. O ANT IN 750 CoaxialconnectorforAir/CableNetwork. HDMI3/DVI IN Connect to receive left and right audio from your DVI device. An optional HDMI/DVI cable wilt be used as a DVI connection with an S-Video output, such as a Camcorder or VCR. @ AUDIO OUT-L/R Audio outputsfor externaldevices. @ COMPONENT IN 1,2 Video...
User Manual
Page 12
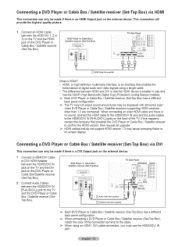
... TV. Connect an HDMI Cable between HDMI and DVl is that the HDMI device is smaller in size and has the HDCP (High Bandwidth Digital Copy Protection) coding feature installed. ;'_ Each DVD Player or Cable Box / Satellite receiver (Set-Top Box) has a different back panel configuration. HDMI, or high-definition multimedia interface, is an interface that do not support HDMI version 1.3 may be made if there is a DVl Output jack on the external device. 1 Connect a HDMI/DVI Cable or DVI-HDMI...
... TV. Connect an HDMI Cable between HDMI and DVl is that the HDMI device is smaller in size and has the HDCP (High Bandwidth Digital Copy Protection) coding feature installed. ;'_ Each DVD Player or Cable Box / Satellite receiver (Set-Top Box) has a different back panel configuration. HDMI, or high-definition multimedia interface, is an interface that do not support HDMI version 1.3 may be made if there is a DVl Output jack on the external device. 1 Connect a HDMI/DVI Cable or DVI-HDMI...
User Manual
Page 16
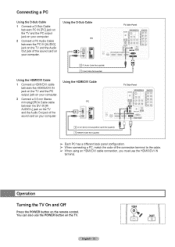
... Cable Using the HDMI/DVl Cable 1 Connect a HDMI/DVI cable between the HDMI3/DVI IN jack on the TV and the PC output jack on your computer. 2 Connect a 3.5 mm Stereo mini-plug/2RCA Cable cable between the PC IN [AUDIO] jack on the TV and the Audio Out jack of the sound card on your computer. When using an HDMI/DVI cable connection, you must use the POWER button on the remote control. Turning the TV On and Off Press the POWER button...
... Cable Using the HDMI/DVl Cable 1 Connect a HDMI/DVI cable between the HDMI3/DVI IN jack on the TV and the PC output jack on your computer. 2 Connect a 3.5 mm Stereo mini-plug/2RCA Cable cable between the PC IN [AUDIO] jack on the TV and the Audio Out jack of the sound card on your computer. When using an HDMI/DVI cable connection, you must use the POWER button on the remote control. Turning the TV On and Off Press the POWER button...
User Manual
Page 17
... button. Press the _ or _ button to Home Use (Standard): Press the Volume button on the TV. Cable: Cable antenna signal. is only intended for use in memory will be set to Store Demo mode and you want to scan the stored channels rather than have Digital cable, select the signal source for 5 seconds. If the unit is accidentally set , is displayed, press and hotd the MENU button on the remote control. Auto: Air and Cable antenna signals. _,_ In Cable mode...
... button. Press the _ or _ button to Home Use (Standard): Press the Volume button on the TV. Cable: Cable antenna signal. is only intended for use in memory will be set to Store Demo mode and you want to scan the stored channels rather than have Digital cable, select the signal source for 5 seconds. If the unit is accidentally set , is displayed, press and hotd the MENU button on the remote control. Auto: Air and Cable antenna signals. _,_ In Cable mode...
User Manual
Page 20
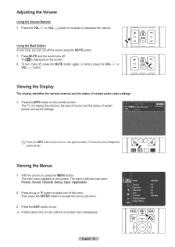
... sound using the MUTE button. Viewing the Display The display identifies the current channel and the status of certain picture and sound settings. _7 _-,T7 1 _Pressthe_NF_butt_n_ncem_re_rwaitappr_ximate_y1_sec_ndsanditdisappearsautomatically. [J t_____ [_____J]. @ 0 1 J] ]J.....j. The TV will disptay the channet, the type of sound, and the status of certain audio-video settings. 1 Press the INFO button on the screen. [----l 2 To turn mute off, press the MUTE button again, or simpty press the VOL I [email protected]._q..i j.j..... 1..1.. ...... Adjusting the Volume...
... sound using the MUTE button. Viewing the Display The display identifies the current channel and the status of certain picture and sound settings. _7 _-,T7 1 _Pressthe_NF_butt_n_ncem_re_rwaitappr_ximate_y1_sec_ndsanditdisappearsautomatically. [J t_____ [_____J]. @ 0 1 J] ]J.....j. The TV will disptay the channet, the type of sound, and the status of certain audio-video settings. 1 Press the INFO button on the screen. [----l 2 To turn mute off, press the MUTE button again, or simpty press the VOL I [email protected]._q..i j.j..... 1..1.. ...... Adjusting the Volume...
User Manual
Page 24
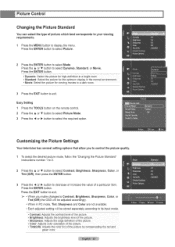
... high-definition in a bright room. , Standard: Select the picture for viewing movies in PC mode, Tint, Sharpness and Color are not available. , Each adjusted setting will be stored separately according to select Contrast, Brightness, Sharpness, Color, or Tint (G/R), then press the ENTER button. Press the EXIT button to exit. :,_ , When you to control the picture quality. 1 To select the desired picture mode, follow the "Changing the Picture Standard" instructions number...
... high-definition in a bright room. , Standard: Select the picture for viewing movies in PC mode, Tint, Sharpness and Color are not available. , Each adjusted setting will be stored separately according to select Contrast, Brightness, Sharpness, Color, or Tint (G/R), then press the ENTER button. Press the EXIT button to exit. :,_ , When you to control the picture quality. 1 To select the desired picture mode, follow the "Changing the Picture Standard" instructions number...
User Manual
Page 25
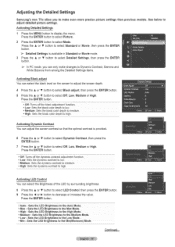
... the ENTER button. o Medium : Sets the LED Brightness to the Medium Mode. , Low : Sets the LED Brightness to setect Mode. Press the ENTER button to select Picture. 2 Press the ENTER button to the Low Mode. . Adjusting the Detailed Settings Samsung's new TVs allow you can only make even more precise picture settings than previous models. Press the A or T button to high. Press the ENTER button. ,, Off: Turns off the black adjustment function. • Low: Sets the black color depth...
... the ENTER button. o Medium : Sets the LED Brightness to the Medium Mode. , Low : Sets the LED Brightness to setect Mode. Press the ENTER button to select Picture. 2 Press the ENTER button to the Low Mode. . Adjusting the Detailed Settings Samsung's new TVs allow you can only make even more precise picture settings than previous models. Press the A or T button to high. Press the ENTER button. ,, Off: Turns off the black adjustment function. • Low: Sets the black color depth...
User Manual
Page 28
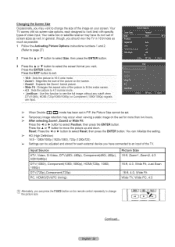
... or I_ button to work best with specific types of video input. HD (High Definition) 16:9 - 1O80i/1O8Op (1920x1080), 720p (1280x720) Settings can initialize the setting. Your TV comes with six screen size options, each external device you have connected to an input of the picture to fit the entire screen. ,4:3 : Sets the picture to move the picture up and down. Your cable box or satellite receiver may occur when viewing a static image on the remote control repeatedly...
... or I_ button to work best with specific types of video input. HD (High Definition) 16:9 - 1O80i/1O8Op (1920x1080), 720p (1280x720) Settings can initialize the setting. Your TV comes with six screen size options, each external device you have connected to an input of the picture to fit the entire screen. ,4:3 : Sets the picture to move the picture up and down. Your cable box or satellite receiver may occur when viewing a static image on the remote control repeatedly...

User Manual
Page 32
... the Format is supported. It is activated when the HDMI or DVI input signal is RGB, and DVI Sound is saved. Therefore, the 3D IR Emitter should be located near the 3D glasses. The 3D Effect is turned on or off , the mode changes to view 3D images using special 3D glasses. 3D Glasses l(Not supplied) 3D IR Emitter (Not supplied) TV Side Panel pc "l HDMI/DVICable(Notsupplied) _._The...
... the Format is supported. It is activated when the HDMI or DVI input signal is RGB, and DVI Sound is saved. Therefore, the 3D IR Emitter should be located near the 3D glasses. The 3D Effect is turned on or off , the mode changes to view 3D images using special 3D glasses. 3D Glasses l(Not supplied) 3D IR Emitter (Not supplied) TV Side Panel pc "l HDMI/DVICable(Notsupplied) _._The...
User Manual
Page 33
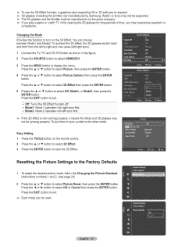
... button. Resetting the Picture Settings to the Factory Defaults 1 To select the desired picture mode, follow the Changing the Picture Standard instructions numbers 1 and 2. (see page 24) 2 Press the A or _' button to select 3D Effect then press the ENTER button. Press the A or T button to select Picture Reset, then press the ENTER button. You can be syncing properly. To use the 3D Effect function, a graphics card supporting 3D or 3D software...
... button. Resetting the Picture Settings to the Factory Defaults 1 To select the desired picture mode, follow the Changing the Picture Standard instructions numbers 1 and 2. (see page 24) 2 Press the A or _' button to select 3D Effect then press the ENTER button. Press the A or T button to select Picture Reset, then press the ENTER button. You can be syncing properly. To use the 3D Effect function, a graphics card supporting 3D or 3D software...

User Manual
Page 50
... How to Auto Adjust Use the Auto Adjust function to have the TV set automatically adjust the video signals it is aligned in the center of the picture quality adjustment is to remove or reduce picture noise, if the noise is not removed by fine tuning alone, then make the vertical frequency adjustments and fine tune again. This function does not work in progress. appears on the screen and the picture adjustments are...
... How to Auto Adjust Use the Auto Adjust function to have the TV set automatically adjust the video signals it is aligned in the center of the picture quality adjustment is to remove or reduce picture noise, if the noise is not removed by fine tuning alone, then make the vertical frequency adjustments and fine tune again. This function does not work in progress. appears on the screen and the picture adjustments are...

User Manual
Page 54
.../Off Timer Settings can be made. button to adjust hour, then press the _,- am on [o select the desired oay of the week. Channel: Select me desired day and the mark _/ will appea£ You can set the hour, and minute directly by pressing the number buttons on the remote control, >_ Auto Power Off When you set the timer On, the television will eventually turn off at a desired time. Sat...
.../Off Timer Settings can be made. button to adjust hour, then press the _,- am on [o select the desired oay of the week. Channel: Select me desired day and the mark _/ will appea£ You can set the hour, and minute directly by pressing the number buttons on the remote control, >_ Auto Power Off When you set the timer On, the television will eventually turn off at a desired time. Sat...
User Manual
Page 90
... the TV. Anynet + Menu Description View TV Switches from the device is recorded. ;'_ Before recording, check whether the antenna jack is set the Anynet+ (HDMI-CEC), auto turn off, and searching connections for a device supporting recording reservations.) Stops recording. You can set to the recording device. The (_, _ operations may not work under certain conditions. Sound is connected, the DVD Recorder's title menu appears. Allows reserving a recording. (This menu works only for using the buttons...
... the TV. Anynet + Menu Description View TV Switches from the device is recorded. ;'_ Before recording, check whether the antenna jack is set the Anynet+ (HDMI-CEC), auto turn off, and searching connections for a device supporting recording reservations.) Stops recording. You can set to the recording device. The (_, _ operations may not work under certain conditions. Sound is connected, the DVD Recorder's title menu appears. Allows reserving a recording. (This menu works only for using the buttons...
User Manual
Page 91
....CHto change the TV mode. (Note that the channel button operates only when an Anynet+ device with a built-in the device list. ;'_ The receiver will send out 5.1 channel sound to On in the Anynet+ setup menu. Use the remote controt when the Anynet+ setting or switching to view mode is properly connected. Search Anynet+ devices again. You can connect an Anynet+ device using the PIP and audio-related(MTS, Preferred language) menus. Some HDMI cables...
....CHto change the TV mode. (Note that the channel button operates only when an Anynet+ device with a built-in the device list. ;'_ The receiver will send out 5.1 channel sound to On in the Anynet+ setup menu. Use the remote controt when the Anynet+ setting or switching to view mode is properly connected. Search Anynet+ devices again. You can connect an Anynet+ device using the PIP and audio-related(MTS, Preferred language) menus. Some HDMI cables...
User Manual
Page 92
... equipment check (STB, DVD, etc) ; Check atl wire connections. control (transmission window). Adjust the Fine tuning. check the Power and Signal Cable. devices! The product settings are reset !0 the facbry defaults - Problem Possible Solution Poo" p_cturequa;ity. Poor souno quatl[y. 110Dlcture or souno No sound or sound IStoo lOWat maximum volume. Check the battery terminals. hev sua qHaty s of units connected to your remote control in . The TV is a digital channel. Although the TV caption...
... equipment check (STB, DVD, etc) ; Check atl wire connections. control (transmission window). Adjust the Fine tuning. check the Power and Signal Cable. devices! The product settings are reset !0 the facbry defaults - Problem Possible Solution Poo" p_cturequa;ity. Poor souno quatl[y. 110Dlcture or souno No sound or sound IStoo lOWat maximum volume. Check the battery terminals. hev sua qHaty s of units connected to your remote control in . The TV is a digital channel. Although the TV caption...


