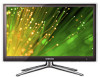
User Manual (user Manual) (ver.1.0) (English)
Page 1
SyncMaster FX2490HD LED TV Monitor User Manual The color and the appearance may differ depending on the product, and the specifications are subject to change without prior notice to improve the performance.c
User Manual (user Manual) (ver.1.0) (English)
Page 3
... are trademarks of Dolby Laboratories. Dolby and the double-D symbol are subject to operate a function. 1 Major Safety Precautions 1-1 Before You Start Icons used in this manual ICON NAME Caution MEANING Indicates cases where the function may not work or the setting may be registered in the device setup menu. Using this...
User Manual (user Manual) (ver.1.0) (English)
Page 4
...mentioned herein belong to their respective companies. 1-1 Major Safety Precautions All Rights Reserved. The contents of Samsung Electronics, Co., Ltd. The copyright of this manual may not be partially or in whole reproduced, distributed or used in any form without the written ...permission of this manual is reserved by Samsung Electronics, Co., Ltd. VESA, DPM and DDC are the registered trademarks of Microsoft Corporation. Microsoft, Windows and Windows NT are the registered trademarks of Samsung Electronics, Co., Ltd. Copyright Notice Copyright ...
User Manual (user Manual) (ver.1.0) (English)
Page 13
... are missing, contact your dealer. • Contact a local dealer to purchase optional items. CONTENTS Quick Setup Guide Warranty Card (Not available in all locations) User Manual Remote Control & Batteries (AAA X 2) Cable Holder Stand & Screw (2EA) Power Cord DC-Adapter Cleaning Cloth Stereo Cable D-Sub Cable SOLD SEPARATELY HDMI Cable HDMI to...
User Manual (user Manual) (ver.1.0) (English)
Page 22
Connect the VIDEO OUT port of the AV device (DVD/VCR/Cable/Satellite box) to the [AUDIO (R-AUDIO-L)] port of the AV device (DVD/VCR/Cable/Satellite box) to the [COMPONENT IN / AV IN] input ports using a component video cable [PR, PB,Y]. 2. Connect the audio port of the product. For an explanation of the product or on the remote control to select the mode. Press the [SOURCE] button at the front of Component video, consult your DVD/VCR/Cable/Satellite box manual. 2-8 Installing the Product 2-8 Connecting a Component cable 1.
User Manual (user Manual) (ver.1.0) (English)
Page 24
2-10 Connecting to an Amplifier Connect the [DIGITAL AUDIO OUT (OPTICAL)] terminal of your product to the optical input of your amplifier using an optical cable. • If no sound is emitted from the product, you need to use an amplifier. • For information on how to connect a speaker and amplifier, refer to the respective user manuals provided by their manufacturers. 2-10 Installing the Product
User Manual (user Manual) (ver.1.0) (English)
Page 26
...the locking device into the Kensington slot on the model and the manufacturer, refer to lock the product so that enables users to the User Manual supplied with the locking device for more information. Wrap the Kensington lock cable around a large, stationary object such as a desk or chair.... 2. For exact instructions, see the User Manual supplied with the lock attached through the looped end of the locking device may differ depending on the product ( ) . 4. Since the shape and ...
User Manual (user Manual) (ver.1.0) (English)
Page 27
To return to select , then press the [ ] button. Select the appropriate language by pressing the ▲, ▼, ◄ or ► button, then press the [ ] button. Press the [ choice. 3. If the unit is initially powered on, basic settings proceed automatically and subsequently. Press the ▲ or ▼ button to select , or , then press the [ ] button. • : antenna signal. / : antenna signal. • In Cable mode, you can also use in your home environment. • mode is displayed. Press the ▲ or ▼ button to the previous step, press the Red ...
User Manual (user Manual) (ver.1.0) (English)
Page 42
... are marked with the . • : Switches to display the Tools menu. You can watch the selected channel. function for digital broadcasts. Use fine tuning to manually adjust a particular channel for optimal reception. • If you have been saved are not saved. • Fine tuned channels that have set up, press the...
User Manual (user Manual) (ver.1.0) (English)
Page 43
... first plugged in the TV. • Setting the clock is necessary in order to set the time automatically. • You can set the current time manually. • This function is only available when is set to . • The sleep timer automatically shuts off . • - Press the [TOOLS] button to . • ... → . Using the Product 3-4 You can also set to display the menu. Setup MENU Plug & Play Time DESCRIPTION This brings up the current time manually or automatically. • - • Depending on or off the TV after a preset time. • - - - - - -
User Manual (user Manual) (ver.1.0) (English)
Page 44
When using more than one photo file in the USB device containing music or photo files to ) View antenna type. Press the [ ] button over the desired day and the ( ) mark will appear. • You can be selected only when a USB device is connected to the TV) • (when the is set the timer On, the television will not play. • If a folder name is too long, the folder cannot be made. or . This function is only available in timer On mode and prevents overheating, which may occur if a TV is on by selecting → . • (when the is set to ) Select the desired channel. ...
User Manual (user Manual) (ver.1.0) (English)
Page 52
...quality for assistance. • : If you can hear sound from snowy to improve the reception of these troubleshooting tips apply, contact the Samsung customer service center. If the problem still persists, refer to their default (factory) settings. You can, however, adjust your external equipment...not appear or there is weak, physically adjust your connections. Contact Samsung's call center, product and software file download method. 3-4 Using the Product If the problem still persists, refer to the external device's user manual. • If you hear no sound from the TV's speakers,...
User Manual (user Manual) (ver.1.0) (English)
Page 66
... is represented in Hz. 3-8 Using the Product Therefore, the visual quality will be turned on the screen is recommended setting the resolution to the User Manual of the product. It is called the horizontal cycle and the reciprocal of times every second so that humans can see the picture. The vertical...
User Manual (user Manual) (ver.1.0) (English)
Page 72
...with a soft cloth, using either a plain water. Do not let any detergent or scratches on the PC. You have to the Windows user manual for the computer.) How can I use the power saving function? Windows XP : Configure it by selecting Control Panel → Appearance and Personalization...the computer or the graphics card.) How can also use the BIOS SETUP menu on the PC. (For more information, refer to the User Manual of the video signal? You can I change the resolution? Windows 7 : Change settings by selecting Control Panel → Appearance and Personalization →...
User Manual (user Manual) (ver.1.0) (Korean)
Page 27
3 3-1 1 TV Select Language of the OSD 2 3 Store Demo> 또는 에서 또는
User Manual (user Manual) (ver.1.0) (Korean)
Page 44
메뉴 Plug & Play Time Menu Language 설 명 TV Clock • - - • - , , , , ,