Safety Guide (ENGLISH)
Page 1
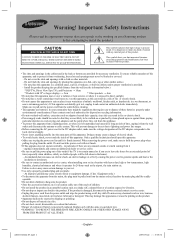
...Store the accessories (battery, etc.) in a location...power cord and contact a service center. • Unplug the power cord from the outlet. Please contact your set due to lightning and power line surges. • Before connecting the AC power cord to the DC adaptor outlet, make sure the voltage designation of time (especially when children, elderly or disabled people will prevent damage to the set . • Use only a properly grounded plug...removing the power cord, make any unusual sounds or smells coming from the wall outlet and disconnect the antenna or cable system. Install...
...Store the accessories (battery, etc.) in a location...power cord and contact a service center. • Unplug the power cord from the outlet. Please contact your set due to lightning and power line surges. • Before connecting the AC power cord to the DC adaptor outlet, make sure the voltage designation of time (especially when children, elderly or disabled people will prevent damage to the set . • Use only a properly grounded plug...removing the power cord, make any unusual sounds or smells coming from the wall outlet and disconnect the antenna or cable system. Install...

Safety Guide (ENGLISH)
Page 5
... Office. For 120 Volt applications, use only UL Listed detachable power cord with the limits for a Class A digital device, pursuant to comply with the instruction manual, may cause undesired operation. For 240 Volt applications use shielded signal interface cables to Part 15 of the FCC Rules. This television receiver provides display of television closed captioning in accordance with the limits for a Class B digital device, pursuant to maintain FCC...
... Office. For 120 Volt applications, use only UL Listed detachable power cord with the limits for a Class A digital device, pursuant to comply with the instruction manual, may cause undesired operation. For 240 Volt applications use shielded signal interface cables to Part 15 of the FCC Rules. This television receiver provides display of television closed captioning in accordance with the limits for a Class B digital device, pursuant to maintain FCC...
Open Source Guide (ENGLISH)
Page 2
...redistribution under these terms, attach the following notices to the start of warranty; and each source file to most effectively convey the exclusion of each file should have at least the "copyright" line and a pointer to where the full notice is safest to attach them to the library....terms (or, alternatively, under the terms of the greatest possible use to the public, we recommend making it to Your New Libraries If you develop a new library, and you want it free software that everyone can redistribute and change. 16. IN NO EVENT UNLESS REQUIRED BY APPLICABLE LAW OR AGREED...
...redistribution under these terms, attach the following notices to the start of warranty; and each source file to most effectively convey the exclusion of each file should have at least the "copyright" line and a pointer to where the full notice is safest to attach them to the library....terms (or, alternatively, under the terms of the greatest possible use to the public, we recommend making it to Your New Libraries If you develop a new library, and you want it free software that everyone can redistribute and change. 16. IN NO EVENT UNLESS REQUIRED BY APPLICABLE LAW OR AGREED...

User Manual (ENGLISH)
Page 3
... on the installation location of the Wireless Home AV Center and the Plasma TV, the Video signal may be distorted by interference from other connected devices in order to clear the wireless communication area. - Do not use of the product. Make sure to turn on more information on warranty terms. Notes on the screen may be performed by a SAMSUNG Authorized Service Center. Along...
... on the installation location of the Wireless Home AV Center and the Plasma TV, the Video signal may be distorted by interference from other connected devices in order to clear the wireless communication area. - Do not use of the product. Make sure to turn on more information on warranty terms. Notes on the screen may be performed by a SAMSUNG Authorized Service Center. Along...
User Manual (ENGLISH)
Page 6
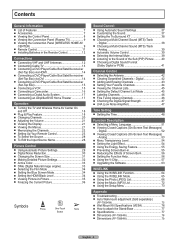
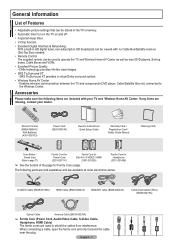
...; Troubleshooting 74 ■ Auto Wall-mount adjustment (Sold separately) (FP-T5094W 75 ■ Wall Mount Kit Specifications (VESA 76 ■ How to the Sound of Features 7 ■ Accessories 7 ■ Viewing the Control Panel 8 ■ Viewing the Connection Panel (Plasma TV 9 ■ Viewing the Connection Panel (WIRELESS HOME AV CENTER 9 ■ Remote Control 11 ■ Installing Batteries in the Remote Control 12 Connections ■ Connecting VHF and UHF Antennas 12 ■ Connecting Cable TV 13 ■ Connecting a DVD Player/Cable Box/Satellite receiver (Set...
...; Troubleshooting 74 ■ Auto Wall-mount adjustment (Sold separately) (FP-T5094W 75 ■ Wall Mount Kit Specifications (VESA 76 ■ How to the Sound of Features 7 ■ Accessories 7 ■ Viewing the Control Panel 8 ■ Viewing the Connection Panel (Plasma TV 9 ■ Viewing the Connection Panel (WIRELESS HOME AV CENTER 9 ■ Remote Control 11 ■ Installing Batteries in the Remote Control 12 Connections ■ Connecting VHF and UHF Antennas 12 ■ Connecting Cable TV 13 ■ Connecting a DVD Player/Cable Box/Satellite receiver (Set...
User Manual (ENGLISH)
Page 7
...sleep timer. • V-Chip function. • Excellent Digital Interface & Networking : With a built-in HD digital tuner, non-subscription HD broadcasts can be viewed with your dealer. S-VIDEO Cable (BN39-00149A) HDMI Cable (BN39-00641A) HDMI/DVI cable (BN39-00643A) Component Cables (RCA) (BN39-00279A) Optical Cable Antenna Cable (BN39-00333A) ➢ Ferrite Core (Power Cord, Audio/Video Cable, S-Video Cable, Headphone, HDMI Cable) The ferrite cores are included with no Cable Box/Satellite receiver (Set-Top Box) needed. • Remote Control The supplied remote can be used to...
...sleep timer. • V-Chip function. • Excellent Digital Interface & Networking : With a built-in HD digital tuner, non-subscription HD broadcasts can be viewed with your dealer. S-VIDEO Cable (BN39-00149A) HDMI Cable (BN39-00641A) HDMI/DVI cable (BN39-00643A) Component Cables (RCA) (BN39-00279A) Optical Cable Antenna Cable (BN39-00333A) ➢ Ferrite Core (Power Cord, Audio/Video Cable, S-Video Cable, Headphone, HDMI Cable) The ferrite cores are included with no Cable Box/Satellite receiver (Set-Top Box) needed. • Remote Control The supplied remote can be used to...

User Manual (ENGLISH)
Page 9
... files (JPEG) and play audio files (MP3). 5 HDMI IN 3 Connect to the HDMI jack of headphones if you to adjust the Wireless Home AV Center viewing angle using your remote control. ➢ The model FP-T5894 cannot be Auto wall mounted. This will allow you wish to watch a television program without disturbing other people in the room. 2 AV IN 2 Audio and video inputs for external devices. 3 S-VIDEO(AV IN 2) S-Video input for serial data signals connected between a DTE...
... files (JPEG) and play audio files (MP3). 5 HDMI IN 3 Connect to the HDMI jack of headphones if you to adjust the Wireless Home AV Center viewing angle using your remote control. ➢ The model FP-T5894 cannot be Auto wall mounted. This will allow you wish to watch a television program without disturbing other people in the room. 2 AV IN 2 Audio and video inputs for external devices. 3 S-VIDEO(AV IN 2) S-Video input for serial data signals connected between a DTE...
User Manual (ENGLISH)
Page 10
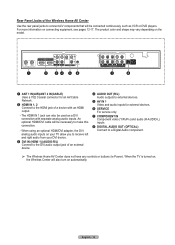
... controls or buttons (ie Power). When the TV is turned on, the Wireless Center will also turn on connecting equipment, see pages 12-17. Rear Panel Jacks of a device with separate analog audio inputs. The product color and shape may vary depending on your TV allow you to receive left and right audio from your DVI device. 3 DVI IN (HDMI 1) (AUDIO-R/L) Connect to the DVI audio output jack of an external device. 4 AUDIO OUT (R/L) Audio outputs...
... controls or buttons (ie Power). When the TV is turned on, the Wireless Center will also turn on connecting equipment, see pages 12-17. Rear Panel Jacks of a device with separate analog audio inputs. The product color and shape may vary depending on your TV allow you to receive left and right audio from your DVI device. 3 DVI IN (HDMI 1) (AUDIO-R/L) Connect to the DVI audio output jack of an external device. 4 AUDIO OUT (R/L) Audio outputs...
User Manual (ENGLISH)
Page 11
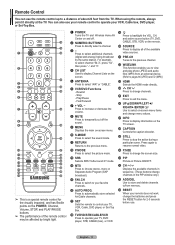
... the menu. k PIP Picture-in sequence. (These buttons change channels. English - 11 e EXIT Press to the previous channel. g INFO Press to display information on the screen. 5 ANTENNA Press to display Channel Lists on the TV screen. h CAPTION Controls the caption decoder. You can use . When using the remote, always point it directly at the TV. Play/Pause - Press to automatically store selected Air/Cable channels. & SET Sets the remote to control your TV, VCR, Cable, DVD player, or Set-Top Box. * TV/DVD/STB/CABLE...
... the menu. k PIP Picture-in sequence. (These buttons change channels. English - 11 e EXIT Press to the previous channel. g INFO Press to display information on the screen. 5 ANTENNA Press to display Channel Lists on the TV screen. h CAPTION Controls the caption decoder. You can use . When using the remote, always point it directly at the TV. Play/Pause - Press to automatically store selected Air/Cable channels. & SET Sets the remote to control your TV, VCR, Cable, DVD player, or Set-Top Box. * TV/DVD/STB/CABLE...
User Manual (ENGLISH)
Page 14
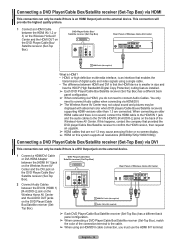
... the DVD player/Cable Box/Satellite receiver to the DVI IN (HDMI1) [R-AUDIO-L] jacks on the DVD Player/Cable Box/ Satellite receiver (Set-Top Box). DVD Player/Cable Box/ Satellite receiver (Set-Top Box) Rear Panel of digital audio and video signals using an HDMI/DVI cable connection, you do not need to connect Audio cables when connecting via HDMI/DVI. ➢ The Wireless Home AV Center may not output sound and pictures may cause annoying flicker or no screen display. ➢ HDMI on this happens, contact the company that the HDMI device is smaller in size and...
... the DVD player/Cable Box/Satellite receiver to the DVI IN (HDMI1) [R-AUDIO-L] jacks on the DVD Player/Cable Box/ Satellite receiver (Set-Top Box). DVD Player/Cable Box/ Satellite receiver (Set-Top Box) Rear Panel of digital audio and video signals using an HDMI/DVI cable connection, you do not need to connect Audio cables when connecting via HDMI/DVI. ➢ The Wireless Home AV Center may not output sound and pictures may cause annoying flicker or no screen display. ➢ HDMI on this happens, contact the company that the HDMI device is smaller in size and...

User Manual (ENGLISH)
Page 18
... Plug & Play Select Home Mode when installing this TV at home. You can also use the Power button on when the Power button is pressed: Press the TV button to use in retail environments. ➢ If the unit is automatically displayed. The message Connecting to ANT 2 IN(CABLE), select Cable. ➢ If both Analog and Digital. Press the ENTER button to select Start. ➢ If the antenna is connected...
... Plug & Play Select Home Mode when installing this TV at home. You can also use the Power button on when the Power button is pressed: Press the TV button to use in retail environments. ➢ If the unit is automatically displayed. The message Connecting to ANT 2 IN(CABLE), select Cable. ➢ If both Analog and Digital. Press the ENTER button to select Start. ➢ If the antenna is connected...
User Manual (ENGLISH)
Page 22
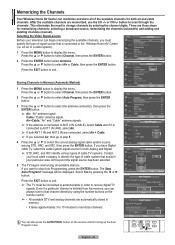
... ENTER button select Antenna. Storing Channels in order to receive digital TV signals. Air Start Cable Start Air + Cable Start 4 Press the ▲ or ▼ to select the antenna connection, then press the ENTER button. ➢ Air: "Air" antenna signal. Press the EXIT button to display the menu. Cable Channel 67 68 % Stop Enter Return Auto Program Stop Auto Program? Selecting the Video Signal-source T V Channel Before your television can begin memorizing the available channels, you must be displayed. Move...
... ENTER button select Antenna. Storing Channels in order to receive digital TV signals. Air Start Cable Start Air + Cable Start 4 Press the ▲ or ▼ to select the antenna connection, then press the ENTER button. ➢ Air: "Air" antenna signal. Press the EXIT button to display the menu. Cable Channel 67 68 % Stop Enter Return Auto Program Stop Auto Program? Selecting the Video Signal-source T V Channel Before your television can begin memorizing the available channels, you must be displayed. Move...
User Manual (ENGLISH)
Page 31
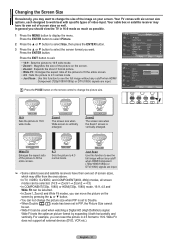
... and vertically. Just Scan Use this function to see the full image without any cutoff when HDMI/Component (720p/1080i/1080p) or DTV(1080i) signals are input. Changing the Screen Size Occasionally, you may differ from the ones above. • In TV, VIDEO, S-VIDEO, and COMPONENT(480i, 480p) modes, all external devices (DVD, VCR etc.). RETURN Move Adjust Return 16:9 Sets the picture to display the menu. T V Picture ▲ More Color Tone...
... and vertically. Just Scan Use this function to see the full image without any cutoff when HDMI/Component (720p/1080i/1080p) or DTV(1080i) signals are input. Changing the Screen Size Occasionally, you may differ from the ones above. • In TV, VIDEO, S-VIDEO, and COMPONENT(480i, 480p) modes, all external devices (DVD, VCR etc.). RETURN Move Adjust Return 16:9 Sets the picture to display the menu. T V Picture ▲ More Color Tone...
User Manual (ENGLISH)
Page 32
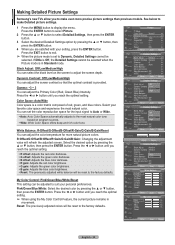
.../Reset You can adjust the Primary Color (Red, Green Blue) Intensity. Select the desired option by pressing the ▲ or ▼ button, then press the ENTER button. Press the ◄ or ► button until you reach the optimal setting. ➢ When using the My Color Control Feature, the current picture remains in Standard mode. My Color Control: Pink/Green/Blue/White/Reset This setting can select the black level on program sources. • Wide: Wide Color...
.../Reset You can adjust the Primary Color (Red, Green Blue) Intensity. Select the desired option by pressing the ▲ or ▼ button, then press the ENTER button. Press the ◄ or ► button until you reach the optimal setting. ➢ When using the My Color Control Feature, the current picture remains in Standard mode. My Color Control: Pink/Green/Blue/White/Reset This setting can select the black level on program sources. • Wide: Wide Color...
User Manual (ENGLISH)
Page 34
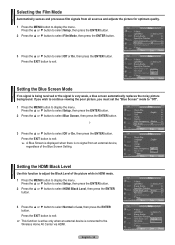
... Screen Burn Protection HDMI Black Level : Normal Film Mode : OOfff Wall-Mount Adjustment On ▼ More Move Enter Return Setting the Blue Screen Mode If no signal from all sources and adjusts the picture for optimum quality. 1 Press the MENU button to select Normal or Low, then press the ENTER button. Press the EXIT button to exit. ➢ A Blue Screen is displayed when there is no signal is being received or the signal is connected to display the menu...
... Screen Burn Protection HDMI Black Level : Normal Film Mode : OOfff Wall-Mount Adjustment On ▼ More Move Enter Return Setting the Blue Screen Mode If no signal from all sources and adjusts the picture for optimum quality. 1 Press the MENU button to select Normal or Low, then press the ENTER button. Press the EXIT button to exit. ➢ A Blue Screen is displayed when there is no signal is being received or the signal is connected to display the menu...
User Manual (ENGLISH)
Page 41
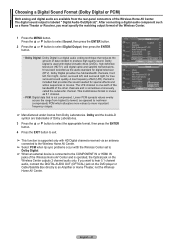
... the MENU button. The digital sound output is known as a Home Theater or Receiver, you want to hear 5.1 channel audio, connect the DIGITAL AUDIO OUT (OPTICAL) jack on the Wireless Center outputs 2 channel audio only. Linear PCM spreads values evenly across the range from Dolby Laboratories. If you must specify the matching output format of the Wireless Home AV Center and is supported only with digital versatile discs (DVDs), high definition television (HDTV), and digital cable...
... the MENU button. The digital sound output is known as a Home Theater or Receiver, you want to hear 5.1 channel audio, connect the DIGITAL AUDIO OUT (OPTICAL) jack on the Wireless Center outputs 2 channel audio only. Linear PCM spreads values evenly across the range from Dolby Laboratories. If you must specify the matching output format of the Wireless Home AV Center and is supported only with digital versatile discs (DVDs), high definition television (HDTV), and digital cable...
User Manual (ENGLISH)
Page 63
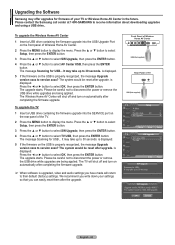
... the ENTER button. The message Scanning for USB... It may take up to their default (factory) settings. is upgraded, video and audio settings you have made will return to 30 seconds. The upgrade starts. Front Panel of Wireless Home AV Center USB (Not supplied) Rear Panel of TV USB (Not supplied) T V Setup ▲ More PIP ► Function Help : On ► SW Upgrade ► Move Enter Return T V SW Upgrade AV Center USB ► TV USB ►...
... the ENTER button. The message Scanning for USB... It may take up to their default (factory) settings. is upgraded, video and audio settings you have made will return to 30 seconds. The upgrade starts. Front Panel of Wireless Home AV Center USB (Not supplied) Rear Panel of TV USB (Not supplied) T V Setup ▲ More PIP ► Function Help : On ► SW Upgrade ► Move Enter Return T V SW Upgrade AV Center USB ► TV USB ►...
User Manual (ENGLISH)
Page 64
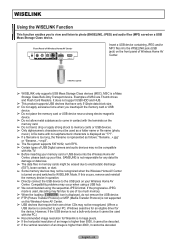
...; The file system supports FAT16/32, not NTFS. ➢ Certain types of USB Digital camera and audio devices may fail due to use of MSC are Thumb drives and Flash Card Readers. MSC is connected to your memory card or USB device into the WISELINK jack (USB jack) on the front panel of Wireless Home AV Center. Front Panel of an image is not a bulk...
...; The file system supports FAT16/32, not NTFS. ➢ Certain types of USB Digital camera and audio devices may fail due to use of MSC are Thumb drives and Flash Card Readers. MSC is connected to your memory card or USB device into the WISELINK jack (USB jack) on the front panel of Wireless Home AV Center. Front Panel of an image is not a bulk...
User Manual (ENGLISH)
Page 74
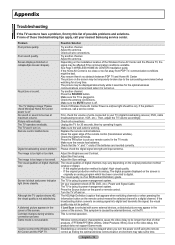
... not support Game mode. If the original production method is a digital channel. On your nearest Samsung service center. A distorted picture appears in the If Just Scan is on the panel or remote control. The TV displays image "Please check Wireless Home AV Center power is selected with some time. The TV won't turn the power on the screen is on(blue light should be on . Adjust the antenna. First, check the volume of units connected to digital...
... not support Game mode. If the original production method is a digital channel. On your nearest Samsung service center. A distorted picture appears in the If Just Scan is on the panel or remote control. The TV displays image "Please check Wireless Home AV Center power is selected with some time. The TV won't turn the power on the screen is on(blue light should be on . Adjust the antenna. First, check the volume of units connected to digital...
User Manual (ENGLISH)
Page 77
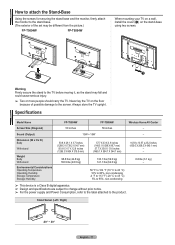
... the stand-base using two screws. Always store the TV upright. Specifications Model Name Screen Size (Diagonal) FP-T5094W 50 inches FP-T5894W 58 inches Wireless Home AV Center - Stand Swivel (Left / Right) -20° ~ 20° English - 77 Warning Firmly secure the stand to the screen. How to attach the Stand-Base Using the screws for securing the stand base and the monitor, firmly attach the monitor to the product. Sound (Output) Dimension (W x H x D) Body With stand Weight Body With stand Environmental...
... the stand-base using two screws. Always store the TV upright. Specifications Model Name Screen Size (Diagonal) FP-T5094W 50 inches FP-T5894W 58 inches Wireless Home AV Center - Stand Swivel (Left / Right) -20° ~ 20° English - 77 Warning Firmly secure the stand to the screen. How to attach the Stand-Base Using the screws for securing the stand base and the monitor, firmly attach the monitor to the product. Sound (Output) Dimension (W x H x D) Body With stand Weight Body With stand Environmental...


