
User Manual (ENGLISH)
Page 2
...Specifications are subject to change without prior notice. • Pictures used in any form of lenses or the shooting environment. for buying a Samsung Digital Camera. ■ Prior to using this camera, please read this user manual thoroughly. ■ When you require After Sales service, please bring... avoided, will result in close to sit idle for any loss or damages that your dealer or Samsung Camera Service centre. This may result in permanent damage to your dealer or Samsung Camera Service centre. ■ Please do not use this could result in death or serious injury....
...Specifications are subject to change without prior notice. • Pictures used in any form of lenses or the shooting environment. for buying a Samsung Digital Camera. ■ Prior to using this camera, please read this user manual thoroughly. ■ When you require After Sales service, please bring... avoided, will result in close to sit idle for any loss or damages that your dealer or Samsung Camera Service centre. This may result in permanent damage to your dealer or Samsung Camera Service centre. ■ Please do not use this could result in death or serious injury....
User Manual (ENGLISH)
Page 3
..., heat or dispose of eyesight. ■ If any connector cords or cables to avoid burns. The charger, SBC-L6 is reduced by your local SAMSUNG dealer. This may cause a fire or electric shock. ■ If the lightning flashes or thunder fills the air, disconnect..., always switch off the camera before moving the camera. Precautions for a long period of other devices are using it immediately and contact your dealer or Samsung Camera Service Centre. ■ Do not disassemble the battery. It may cause a fire or electric shock. ■ If water gets inside ...
..., heat or dispose of eyesight. ■ If any connector cords or cables to avoid burns. The charger, SBC-L6 is reduced by your local SAMSUNG dealer. This may cause a fire or electric shock. ■ If the lightning flashes or thunder fills the air, disconnect..., always switch off the camera before moving the camera. Precautions for a long period of other devices are using it immediately and contact your dealer or Samsung Camera Service Centre. ■ Do not disassemble the battery. It may cause a fire or electric shock. ■ If water gets inside ...
User Manual (ENGLISH)
Page 4
Contents Before Starting to Take a Picture Starting Basic Shooting (Auto mode) 012 Checking the Contents of the Package 012 What are included in the package 013 Names of Working Parts 013 Front & Top 014 Rear 015 Quick reference guide 016 Charging and Inserting the Battery 016 Charging the Battery 017 Inserting the Battery 018 Battery Level Indicator 018 Approximate Playback Time (Fully charged battery) 019 Inserting the Memory Card 020 Precautions When Using the Memory Card 021 Turning the Camera On and Off 021 Using the Vertical Battery Grip (SBG-D1V) (Sold ...
Contents Before Starting to Take a Picture Starting Basic Shooting (Auto mode) 012 Checking the Contents of the Package 012 What are included in the package 013 Names of Working Parts 013 Front & Top 014 Rear 015 Quick reference guide 016 Charging and Inserting the Battery 016 Charging the Battery 017 Inserting the Battery 018 Battery Level Indicator 018 Approximate Playback Time (Fully charged battery) 019 Inserting the Memory Card 020 Precautions When Using the Memory Card 021 Turning the Camera On and Off 021 Using the Vertical Battery Grip (SBG-D1V) (Sold ...

User Manual (ENGLISH)
Page 5
Contents 053 Using the Menu 053 Using the MENU button 054 Using the CAPTURE MENU 054 Picture Wizard 055 File Format 055 JPEG Size 055 JPEG Quality 056 Colour Space 056 Set RAW Button 056 Liveview 057 User Registration 057 Interval Shooting 057 Extended Bracket 058 Multi Exposure 059 Memory of Top LCD 069 Flash in Focus 062 EV Steps 062 Metering Time 062 AE-L with AF Locked 062 Program Line 063 Auto EVC 063 Fine Tune when AWB 063 WB when using flash 063 WB Adjustable Range 064 Colour Temp. Unit 064 Noise Reduction 064 High Noise ...
Contents 053 Using the Menu 053 Using the MENU button 054 Using the CAPTURE MENU 054 Picture Wizard 055 File Format 055 JPEG Size 055 JPEG Quality 056 Colour Space 056 Set RAW Button 056 Liveview 057 User Registration 057 Interval Shooting 057 Extended Bracket 058 Multi Exposure 059 Memory of Top LCD 069 Flash in Focus 062 EV Steps 062 Metering Time 062 AE-L with AF Locked 062 Program Line 063 Auto EVC 063 Fine Tune when AWB 063 WB when using flash 063 WB Adjustable Range 064 Colour Temp. Unit 064 Noise Reduction 064 High Noise ...

User Manual (ENGLISH)
Page 6
tance 104 Calculating Shooting Distance from Aperture Value 105 Using an External Flash (Sold Separately) 105 About the LCD Panel Display for SEF-36PZF 106 Using P-TTL Auto Mode 106 Using High-Speed Flash Sync Mode 107 Using in Wireless Mode 107 Red-Eye Reduction 108 Using the external flash sync terminal 110 Playing Back Still Pictures 110 Rotating Images 111 Displaying Multiple Images 111 Selecting the Number of Automatic Correction in Flash 104 Calculating Aperture Value from Shooting Dis- Contents Using Advanced Shooting Modes 080 Using the best ...
tance 104 Calculating Shooting Distance from Aperture Value 105 Using an External Flash (Sold Separately) 105 About the LCD Panel Display for SEF-36PZF 106 Using P-TTL Auto Mode 106 Using High-Speed Flash Sync Mode 107 Using in Wireless Mode 107 Red-Eye Reduction 108 Using the external flash sync terminal 110 Playing Back Still Pictures 110 Rotating Images 111 Displaying Multiple Images 111 Selecting the Number of Automatic Correction in Flash 104 Calculating Aperture Value from Shooting Dis- Contents Using Advanced Shooting Modes 080 Using the best ...
User Manual (ENGLISH)
Page 7
.../Vista 127 Setting up the USB Driver for MAC 127 Using the USB Driver for MAC 128 Samsung Master 128 Downloading images 130 Image viewer 131 Image edit 132 Movie edit 133 Using the Samsung RAW Converter 2.0 133 Developing the RAW files 134 Correcting the exposure 135 Handling the JPEG/TIFF...
.../Vista 127 Setting up the USB Driver for MAC 127 Using the USB Driver for MAC 128 Samsung Master 128 Downloading images 130 Image viewer 131 Image edit 132 Movie edit 133 Using the Samsung RAW Converter 2.0 133 Developing the RAW files 134 Correcting the exposure 135 Handling the JPEG/TIFF...

User Manual (ENGLISH)
Page 8
... format size for a full-frame 35mm camera, divide the focal length of the 35 mm camera by 1.5. Feature ● The 14.60 effective Megapixel of SAMSUNG digital camera sensor. (High dynamic range.) ● Built-in Optical Image Stabilization (OIS) minimizes or prevents digital images from becoming blurred due to compare.) 007...
... format size for a full-frame 35mm camera, divide the focal length of the 35 mm camera by 1.5. Feature ● The 14.60 effective Megapixel of SAMSUNG digital camera sensor. (High dynamic range.) ● Built-in Optical Image Stabilization (OIS) minimizes or prevents digital images from becoming blurred due to compare.) 007...

User Manual (ENGLISH)
Page 9
This "Note" symbol indicates information that failure to the user or the hardware. ( ) This icon indicates the rear dial. 008 Understanding illustrated icons used in physical harm to take or avoid a specific action could result in this user guide Please read this basic information thoroughly before you start using the product. ◄ ( ) This icon indicates the program mode dial. and (◄►) icons indicate the direction buttons or (►) icons indicates the each direction button. ( ) This icon indicates the front dial. This "Warning" symbol advises users that...
This "Note" symbol indicates information that failure to the user or the hardware. ( ) This icon indicates the rear dial. 008 Understanding illustrated icons used in physical harm to take or avoid a specific action could result in this user guide Please read this basic information thoroughly before you start using the product. ◄ ( ) This icon indicates the program mode dial. and (◄►) icons indicate the direction buttons or (►) icons indicates the each direction button. ( ) This icon indicates the front dial. This "Warning" symbol advises users that...
User Manual (ENGLISH)
Page 10
...) mode, Av (Aperture-Priority AE) mode, and so on the LCD monitor. 009 Starting Basic Shooting (Auto mode) This chapter gives a quick guidelines for your SAMSUNG digital camera. 8. How to Make a Photo Print Explains how to take a picture using the flash. 6. Using the Flash This chapter explains how to make...
...) mode, Av (Aperture-Priority AE) mode, and so on the LCD monitor. 009 Starting Basic Shooting (Auto mode) This chapter gives a quick guidelines for your SAMSUNG digital camera. 8. How to Make a Photo Print Explains how to take a picture using the flash. 6. Using the Flash This chapter explains how to make...

User Manual (ENGLISH)
Page 12
Before Starting to Take a Picture Explains camera characteristics, accessories and the names of various parts. 012 Checking the Contents of the Package 012 What are included in the package 013 Names of Working Parts 013 Front & Top 014 Rear 015 Quick reference guide 016 Charging and Inserting the Battery 016 Charging the Battery 017 Inserting the Battery 018 Battery Level Indicator 018 Approximate Playback Time (Fully charged battery) 019 Inserting the Memory Card 020 Precautions When Using the Memory Card 021 Turning the Camera On and Off 021 Using the Vertical ...
Before Starting to Take a Picture Explains camera characteristics, accessories and the names of various parts. 012 Checking the Contents of the Package 012 What are included in the package 013 Names of Working Parts 013 Front & Top 014 Rear 015 Quick reference guide 016 Charging and Inserting the Battery 016 Charging the Battery 017 Inserting the Battery 018 Battery Level Indicator 018 Approximate Playback Time (Fully charged battery) 019 Inserting the Memory Card 020 Precautions When Using the Memory Card 021 Turning the Camera On and Off 021 Using the Vertical ...

User Manual (ENGLISH)
Page 13
... (SLB-1674) Charger (SBC-L6) AC cord 012 User's Manual (AD68-01904A)/ Quick Guide (AD68-02661A) To buy the optional equipment, contact your nearest Samsung dealer or Samsung service centre. What are included in the package Hot shoe cover (Installed on camera) Eyecup (Installed on camera) Viewfinder cap Body mount...
... (SLB-1674) Charger (SBC-L6) AC cord 012 User's Manual (AD68-01904A)/ Quick Guide (AD68-02661A) To buy the optional equipment, contact your nearest Samsung dealer or Samsung service centre. What are included in the package Hot shoe cover (Installed on camera) Eyecup (Installed on camera) Viewfinder cap Body mount...
User Manual (ENGLISH)
Page 14
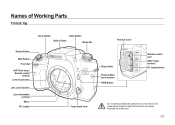
Failure to follow this instruction may cause the product to adjust the aperture lever or the mirror in the camera body. Names of Working Parts Front & Top Shutter Button Main Switch Front dial Self-Timer lamp / Remote control receiver Lens mount index Lens unlock button Lens information contacts Mirror AF coupler Green Button Flash Button Built-in Flash Mode dial Focus mode lever Terminal Cover Strap holder External flash sync terminal RAW Button Remote control port USB / Video terminal DC input terminal Do not attempt to malfunction. 013
Failure to follow this instruction may cause the product to adjust the aperture lever or the mirror in the camera body. Names of Working Parts Front & Top Shutter Button Main Switch Front dial Self-Timer lamp / Remote control receiver Lens mount index Lens unlock button Lens information contacts Mirror AF coupler Green Button Flash Button Built-in Flash Mode dial Focus mode lever Terminal Cover Strap holder External flash sync terminal RAW Button Remote control port USB / Video terminal DC input terminal Do not attempt to malfunction. 013

User Manual (ENGLISH)
Page 15
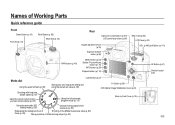
Names of Working Parts Rear Self-Timer lamp / Remote control receiver Hot shoe Diopter adjustment lever Metering mode lever Exposure bracket button Exposure Compensation / LCD panel lamp button Rear e-dial LCD Panel AE-L/Lock Button Strap Holder Memory Card Slot Memory Card Cover Viewfinder MENU button Delete / Picture Wizard INFO button Playback button LCD Monitor 014 Focus point selection dial AF Button OK Button Direction button Card access lamp Card cover lock OIS (Optical Image Stabilization) lever Fn Button
Names of Working Parts Rear Self-Timer lamp / Remote control receiver Hot shoe Diopter adjustment lever Metering mode lever Exposure bracket button Exposure Compensation / LCD panel lamp button Rear e-dial LCD Panel AE-L/Lock Button Strap Holder Memory Card Slot Memory Card Cover Viewfinder MENU button Delete / Picture Wizard INFO button Playback button LCD Monitor 014 Focus point selection dial AF Button OK Button Direction button Card access lamp Card cover lock OIS (Optical Image Stabilization) lever Fn Button
User Manual (ENGLISH)
Page 16
Names of Working Parts Quick reference guide Front Green Button (p. 66) Front dial (p. 53) Flash Button (p. 99) Mode dial (p. 33) Rear Exposure Compensation (p.47)/ LCD panel lamp button (p.69) Diopter adjustment lever (p.35) Exposure bracket button (p.90) Rear e-dial (p.53) LCD Panel (p.32) AE-L (p.48)/Lock Button (p.119) RAW button (p. 49) MENU button (p.53) Delete / Picture Wizard button (p.116) INFO button (p.28) Playback button (p.110) AF Button (p.61) Direction button (p.8) Mode dial Using the external flash (p. 88) LCD Monitor (p.27) Saving your own exposure setting ...
Names of Working Parts Quick reference guide Front Green Button (p. 66) Front dial (p. 53) Flash Button (p. 99) Mode dial (p. 33) Rear Exposure Compensation (p.47)/ LCD panel lamp button (p.69) Diopter adjustment lever (p.35) Exposure bracket button (p.90) Rear e-dial (p.53) LCD Panel (p.32) AE-L (p.48)/Lock Button (p.119) RAW button (p. 49) MENU button (p.53) Delete / Picture Wizard button (p.116) INFO button (p.28) Playback button (p.110) AF Button (p.61) Direction button (p.8) Mode dial Using the external flash (p. 88) LCD Monitor (p.27) Saving your own exposure setting ...
User Manual (ENGLISH)
Page 17
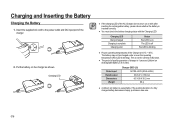
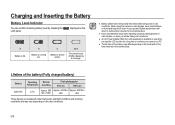
Put the battery on or blink after inserting the rechargeable battery, please check whether the battery is inserted correctly. ● You must check the battery charging status with the Charging LED. This is not the camera malfunction. ● The period of quality guarantee of charger is 1 year and Lithium ion rechargeable battery is blinking ● Proper operating temperatures of the AC Charger does not turn on the charger as shown. Charging LED ● If the charging LED of the Charger are 0°C ~ 40°C. Charging LED Being Charged Charging is complete Charging error ...
Put the battery on or blink after inserting the rechargeable battery, please check whether the battery is inserted correctly. ● You must check the battery charging status with the Charging LED. This is not the camera malfunction. ● The period of quality guarantee of charger is 1 year and Lithium ion rechargeable battery is blinking ● Proper operating temperatures of the AC Charger does not turn on the charger as shown. Charging LED ● If the charging LED of the Charger are 0°C ~ 40°C. Charging LED Being Charged Charging is complete Charging error ...

User Manual (ENGLISH)
Page 18
Rotate the Battery cover unlock lever as shown in the [SETUP MENU]. ● Insert batteries correctly. Battery lock lever 017 Problems caused by the Samsung warranty. ● Do not open the cover. 2. Close the Battery cover and rotate the battery cover lock lever as shown on . ● Remove the batteries ...
Rotate the Battery cover unlock lever as shown in the [SETUP MENU]. ● Insert batteries correctly. Battery lock lever 017 Problems caused by the Samsung warranty. ● Do not open the cover. 2. Close the Battery cover and rotate the battery cover lock lever as shown on . ● Remove the batteries ...
User Manual (ENGLISH)
Page 19
... to use while you use 23°C Approx. 500 Approx. 430 Min./ Approx. 400 Min./ Min./1,000 860 800 These figures are measured under Samsung's standard conditions and shooting conditions and may differ depending on the user's methods. 018
... to use while you use 23°C Approx. 500 Approx. 430 Min./ Approx. 400 Min./ Min./1,000 860 800 These figures are measured under Samsung's standard conditions and shooting conditions and may differ depending on the user's methods. 018
User Manual (ENGLISH)
Page 20
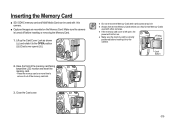
Lift up the Card Cover Lock as shown (①) and rotate it to remove it into the camera. Have the front of the memory card slot. ● Do not remove the Memory Card while card access lamp is lit. ● Always format new Memory Cards before use. Close the Card cover. 019 Press the memory card one more time to the OPEN position (②) (Card cover opens (③)). 2. Also format Memory Cards used with other cameras. ● If the memory card cover is left open, the power will not turn on the Memory Card. Make sure the camera is turned off before inserting it out of ...
Lift up the Card Cover Lock as shown (①) and rotate it to remove it into the camera. Have the front of the memory card slot. ● Do not remove the Memory Card while card access lamp is lit. ● Always format new Memory Cards before use. Close the Card cover. 019 Press the memory card one more time to the OPEN position (②) (Card cover opens (③)). 2. Also format Memory Cards used with other cameras. ● If the memory card cover is left open, the power will not turn on the Memory Card. Make sure the camera is turned off before inserting it out of ...
User Manual (ENGLISH)
Page 21
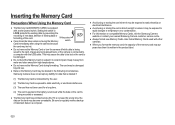
.... ● For information on the Memory Card may be damaged beyond use. ● Data on compatible Memory Cards, visit the Samsung Camera website or contact your nearest Samsung Camera customer service centre. ● Always format new Memory Cards. Also format Memory Cards used with other cameras. ● When ...is removed while the data on the card may cause the data to be lost or the card to be deleted in the following circumstances. Samsung Camera does not accept any liability for a long time. (4) The card is ejected or the battery is equipped with the USB cable. This...
.... ● For information on the Memory Card may be damaged beyond use. ● Data on compatible Memory Cards, visit the Samsung Camera website or contact your nearest Samsung Camera customer service centre. ● Always format new Memory Cards. Also format Memory Cards used with other cameras. ● When ...is removed while the data on the card may cause the data to be lost or the card to be deleted in the following circumstances. Samsung Camera does not accept any liability for a long time. (4) The card is ejected or the battery is equipped with the USB cable. This...
User Manual (ENGLISH)
Page 22
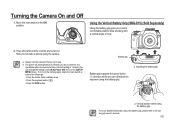
Move the main switch to the battery grip owner's manual. 021 The LCD panel and the monitor are turned on the camera again, rotate the main switch or refer to the followings. - To turn off when not in use. ● The power will automatically turn on . Press the shutter button halfway down. - Press the INFO button. Now you can still adjust the exposure using the battery grip. ▲ Vertical position when using the camera. ● Always turn the camera off when you do not perform any operations within a set period of time. (Default setting is 1 minute) You can change the setting on ...
Move the main switch to the battery grip owner's manual. 021 The LCD panel and the monitor are turned on the camera again, rotate the main switch or refer to the followings. - To turn off when not in use. ● The power will automatically turn on . Press the shutter button halfway down. - Press the INFO button. Now you can still adjust the exposure using the battery grip. ▲ Vertical position when using the camera. ● Always turn the camera off when you do not perform any operations within a set period of time. (Default setting is 1 minute) You can change the setting on ...